1.rsync服务基本介绍
1.1 Rsync服务器
- Rsync是一款开源的、快速的、多功能的、可实现全量及增量的本地或远程数据同步备份的优秀工具。并且可以不进行改变原有数据的属性信息,实现数据的备份迁移特性。
- Rsync软件适用于unix/linux/windows等多种操作系统平台。
- Rsync是一个快速和非常通用的文件复制工具。它能本地复制,远程复制,或者远程守护进程方式复制。它提供了大量的参数来控制其行为的各个方面,并且允许非常灵活的方式来实现文件的传输复制。它以其delta-transfer算法闻名。
- rsync监听端口:873
- rsync运行模式:C/S
1.2 Rsync的备份方式
-
全量备份
所有数据全部传送
把原来的文件和新的文件一起统一传送
全量复制,效率低 -
增量备份
在传输数据之前通过一些算法通过你有的数据和我有的数据进行对比,把不一样的数据通过网络传输
增量复制,效率较高
1.3 Rsync的作用
- 可以在不同主机之间镜像同步整个目录树
- 支持本地复制,增量备份、保持连接和权限,或者与其他SSH,rsync主机同步
- 采用优化的同步算法,传输前执行压缩,因此非常适用于异地备份、镜像服务器等应用

1.4 rsync源服务器的关系
- rsync同步源:指备份操作的远程服务器,也成为备份源

2.Rsync命令集锦
- rsync命令使用方法
rsync命令 属于 1v4命令
2.1 本地备份命令
- cp命令使用:
[root@nfs01 backup]# cp /etc/hosts /tmp/
[root@nfs01 backup]# ll /tmp/hosts
-rw-r--r-- 1 root root 312 Jul  5 22:55 /tmp/hosts
- rsync命令使用:
[root@nfs01 backup]# rsync /etc/hosts /tmp/host_rsync
[root@nfs01 backup]# ll /tmp/host_rsync
-rw-r--r-- 1 root root 312 Jul  5 22:55 /tmp/host_rsync
2.2 远程备份命令
- scp使用:
[root@nfs01 backup]#scp -rp /etc/hosts 172.16.1.41:/backup
root@172.16.1.41's password:
hosts        100%  312    17.0KB/s   00:00
- rsyn命令使用:
[root@backup mnt]# rsync -avP /etc/hosts 172.16.1.31:/mnt
root@172.16.1.31's password:
sending incremental file list
hosts
         424 100%    0.00kB/s    0:00:00 (xfer#1, to-check=0/1)

sent 497 bytes  received 31 bytes  211 .20 bytes/sec
total size is 424  speedup is 0.80
2.3 代替删除命令
- rm命令使用:
[root@backup mnt]# rm -f *
- rsync命令使用:
[root@backup mnt]# rsync -avP --delete /null/ /mnt/
sending incremental file list
./
deleting 04.txt
deleting 03.txt
deleting 02.txt
deleting 01.txt

sent 29 bytes  received 15 bytes  88.00 bytes/sec
total size is 0  speedup is 0.00
2.4 rsync备份目录情况
rsync -rp /oldboy/ 172.16.1.41:/backup 有斜线
#在备份目录后面有 斜线 /oldboy/:只将目录下面的内容进行备份传输
rsync -rp /oldboy 172.16.1.41:/backup  无斜线
#在备份目录后面没有斜线/oldboy:会将目录本身以及下面的内容进行传输备份
2.5 rsync备份数据
- 本地备份数据
Local:  rsync [OPTION...] SRC... [DEST]

src:要备份的数据信息
dest:备份到什么路径中

[root@backup backup]# rsync /backup/cheak.txt /root/
- 远程备份数据
rsync拉操作--源下行同步

拉:Pull: rsync [OPTION...] [USER@]HOST:SRC... [DEST]

 [USER@]	以什么用户身份拉取数据(默认以当前用户)
注意:需要对端也要有相同的用户(对端用户密码)
hosts		指定远程主机IP地址或者主机名称
SRC			要拉取的数据信息
dest		保存到本地的路径信息

[root@backup mnt]# rsync -avP 172.16.1.31:/mnt /mnt

rsync推操作--客户端上行同步

推:Push: rsync [OPTION...] SRC... [USER@]HOST:DEST

SRC		本地要进行远程传输备份的数据
[USER@]	以什么用户身份拉取数据(默认以当前用户)
hosts		指定远程主机IP地址或者主机名称
dest			保存到远程的路径信息

[root@backup mnt]# rsync -avP /mnt 172.16.1.31:/mnt

2.6 rcync的常用命令选项以及服务的启动和关闭
- 启动rsync服务:
rsync --daemon
- 关闭rsync服务:
kill $(cat /var/run/rsyncd.pid)
- 同步本地文件系统数据:rsync [选项] 原始位置 目标位置
rsync [选项] 原始位置 目标位置

例如:
rsync /etc/fstab /opt		 '//同步本机的fstab文件到opt目录'
rsync -rl /boot/grub /opt	'//同步本机的grub目录到opt目录'
##如果想要在/opt目录下也创建一个boot目录,那么命令需要为:rsync -R rl /boot/grub /opt

常用选项:

-a #归档模式传输, 递归并保留对象属性,等于-tropgDl
-A #保留ACL属性信息
-v #详细模式输出, 打印速率, 文件数量等。即显示同步过程的详细(verbose)信息
-z #传输时进行压缩以提高效率
-r #递归传输目录及子目录,即目录下得所有目录都同样传输。主要是针对目录,单独传一个文件不需要加-r,但是传输的是目录必须加-r选项
-t #保持文件时间信息
-o #保持文件属主信息
-p #保持文件权限
-g #保持文件属组信息
-l #保留软连接
-H #保留硬连接文件
-P #显示同步的过程及传输时的进度等信息
-D #保持设备文件信息
-L #保留软连接指向的目标文件
-e #使用的信道协议,指定替代 rsh 的 shell 程序
--exclude=PATTERN #指定排除不需要传输的文件模式
--exclude-from=file #文件名所在的目录文件
--bwlimit=100 #限速传输
--partial #断点续传
--delete #删除"目标"中"源"没有的文件,让目标目录和源目录数据保持一致
--checksum #根据对象的校验和来决定是否跳过文件
--progress #在同步的过程中可以看到同步的过程状态,比如统计要同步的文件数量、同步的文件传输速度等等

注意:路径的格式可以是本地路径,也可以是使用user@host:path或user@host::path的远程路径,如果主机和path路径之间使用单个
冒号隔开,表示使用的是远程shell通信方式,而使用双冒号隔开的则表示的是连接rsync daemon
2.7 /etc/rsync.conf配置文件详解
[root@localhost ~]# vim /etc/rsyncd.conf

motd file = /etc/rsyncd.motd    #设置服务器信息提示文件,在该文件中编写提示信息

transfer logging = yes    #开启rsync数据传输日志功能

log file = /var/log/rsyncd.log    #设置日志文件名,可通过log format参数设置日志格式

pid file = /var/run/rsyncd.log    #设置rsync进程号保存文件名称

lock file = /var/run/rsync.lock    #设置锁文件名称

port = 873    #设置服务器监听的端口号,默认是873

address = 192.168.0.100    #设置本服务器所监听网卡接口的ip地址

uid = nobody    #设置进行数据传输时所使用的帐户名或ID号,默认使用nobody

gid = nobody    #设置进行数据传输时所使用的组名或GID号,默认使用nobody

use chroot = no
#若为yes, rsync会首先进行chroot设置,将根映射在下面的path参数路径下,对客户端而言,系统的根就是path参数指定的路径。
但这样做需要root权限,并且在同步符号连接资料时只会同步名称,不会同步内容。

read only = yes    #是否允许客户端上传数据,yes表示不允许

max connections =10    #设置并发连接数,0表示无限制

[common]    #自定义模块名,rsync通过模块定义同步的目录,可定义多个

comment = web content    #定义注释说明字串

path = /common    #同步目录的真是路径通过path指定

ignore errors    #忽略一些IO错误

#exclude = test/    #exclude指定common目录下某个目录可以不同步数据

auth users = tom, jerry    #设置允许连接服务器的账户,此账户可以是系统中不存在的用户

secrets file = /etc/rysncd.secrets    #密码验证文件名,该文件权限要求为只读,建议为600,仅在设置auth users后有效

hosts allow = 192.168.0.0/255.255.255.0   #设置哪些主机可以同步数据,多ip和网段之间使用空格分隔

hosts deny=*    #除了hosts allow定义的主机外,拒绝其他所有

list = false    #客户端请求显示模块列表时,本模块名称是否显示,默认为true
3.Rsync项目实验
3.1 实验环境及拓扑图
- 使用VMware软件
| 主机名 | IP地址 | 安装服务 |
|---|---|---|
| source | 192.168.140.20 | rsync,httpd |
| client | 192.168.140.21 | rsync,in0tify-tools |

3.2 守护进程部署
- linux系统安装部署服务流程
1)	下载安装软件
2)	编写配置文件
3)	搭建服务环境
4)	启动服务程序
5)	测试服务功能
3.3 实现步骤
3.3.1 下载安装软件
yum -y install rsync //在服务器和客户机上均需安装
3.3.2 编写rsync配置文件
- 配置rsync源服务器
[root@source ~]# vi /etc/rsyncd.conf

uid = nobody
gid = nobody
use chroot = yes
max connections = 200
pid file = /var/run/rsyncd.pid
log file = /var/log/rsyncd.log
# exclude = lost+found/
# transfer logging = yes
# timeout = 900
# ignore nonreadable = yes
dont compress   = *.gz *.tgz *.zip *.z *.Z *.rpm *.deb *.bz2
hosts allow = 192.168.140.0/24
address = 192.168.140.20
port 873
[wwwroot]
path = /www
comment = web site page
read only = yes
auth users = lisi
secrets file = /etc/user.db		//注意文件的后缀名必须是.db,不可更改

[root@source ~]# vi /etc/user.db		//设置用户名及密码
lisi:abc123
[root@source ~]# chmod 600 /etc/user.db		//给该文件添加只读权限
[root@source ~]# rsync --daemon		//以守护进程模式启动服务
[root@source ~]# netstat -anptu | grep 873
tcp        0      0 192.168.140.20:873      0.0.0.0:*               LISTEN      54807/rsync
3.3.3 搭建服务环境
- 在rsync服务器上添加目录并创建文件
[root@source ~]# mkdir /www
[root@source ~]# cd /www
[root@source www]# touch a b c
[root@source www]# ls -lh
总用量 0
-rw-r--r--. 1 root root 0 1月   3 18:32 a
-rw-r--r--. 1 root root 0 1月   3 18:32 b
-rw-r--r--. 1 root root 0 1月   3 18:32 c
3.3.4 测试服务功能
- 在客户机上验证环境,同步数据(拷贝文件)
首先,关闭防火墙

[root@client ~]# iptables -F
[root@client ~]# setenforce 0
同步数据,格式1:把140.20的源下的wwwroot模块共享到客户机的/bak目录下

[root@client ~]# mkdir /bak
[root@client ~]# rsync -avz lisi@192.168.140.20::wwwroot /bak	//拷贝服务器上的文件到bak目录下
Password:
receiving incremental file list
./
a
b
c

sent 117 bytes  received 227 bytes  27.52 bytes/sec
total size is 0  speedup is 0.00

[root@client ~]# cd /bak
[root@client bak]# ll
总用量 0
-rw-r--r--. 1 root root 0 1月   3 18:32 a
-rw-r--r--. 1 root root 0 1月   3 18:32 b
-rw-r--r--. 1 root root 0 1月   3 18:32 c

格式2,与上面语句功能一样,只是语句结构不同

[root@client ~]# mkdir /bak2
[root@client ~]# rsync -avz rsync://lisi@192.168.140.20/wwwroot /bak2
Password:
receiving incremental file list
./
a
b
c

sent 117 bytes  received 227 bytes  98.29 bytes/sec
total size is 0  speedup is 0.00

[root@client ~]# cd /bak2
[root@client bak2]# ll
总用量 0
-rw-r--r--. 1 root root 0 1月   3 18:32 a
-rw-r--r--. 1 root root 0 1月   3 18:32 b
-rw-r--r--. 1 root root 0 1月   3 18:32 c

免交互,创建免密同步且客户机同步的目录多余文件删除

[root@client ~]# vi /etc/server.pass		//创建密码文件
abc123
[root@client ~]# chmod 600 /etc/server.pass		//必须给密码文件只读权限
[root@client ~]# cd /bak3
[root@client ~]# rsync -avz --password-file=/etc/server.pass rsync://lisi@192.168.140.20/wwwroot /bak3
receiving incremental file list
./
a
b
c

sent 117 bytes  received 227 bytes  688.00 bytes/sec
total size is 0  speedup is 0.00

[root@client ~]# cd /bak3
[root@client bak3]# ll
总用量 0
-rw-r--r--. 1 root root 0 1月   3 18:32 a
-rw-r--r--. 1 root root 0 1月   3 18:32 b
-rw-r--r--. 1 root root 0 1月   3 18:32 c

4.Rsync配合inotify工具实现触发式传输同步
4.1 rsync实现同步的优劣
- rsync的缺点
执行备份的时间固定,延迟明细,实时性差; 当同步源长期不变化时,密集的定期任务是不必要的
- rysnc的优点
一旦同步源出现变化,立即启用备份; 只要同步源不变化,则不执行备份
4.2 Inotify的介绍
- Inotify是一个Linux内核机制,它可以监控文件系统的操作,比如读取、写入、创建等。
- Inotify反应灵敏,用法非常简单,并且比cron任务的繁忙轮询高效
- 从版本 2.6.13 开始提供;
- 可以监控文件系统的变化情况,并作出通知响应;
- 辅助软件:inotify-tools
4.3 如何实现实时同步
4.3.1 安装httpd环境
在服务器和客户机上均需要安装

mkdir -p /var/www/html
yum -y install httpd
在rsync源服务器上启动httpd服务,并创建网页

[root@source ~]# systemctl start httpd.service
[root@source ~]# cd /var/www/html
[root@source html]# vi index.html
This is web1
[root@source html]# cd
[root@source ~]# curl http://localhost
This is web1
4.3.2 客户机添加通知软件
- 复制在根目录下即可

4.3.3 解压并编译安装
[root@client ~]# tar zxvf inotify-tools-3.14.tar.gz
[root@client ~]# cd inotify-tools-3.14/
[root@client inotify-tools-3.14]# ./configure && make && make  install
4.3.4 启动监控功能
[root@client ~]# inotifywait -mrq -e modify,create,delete,move /var/www/html
//启动监控功能,对该文件目录进行监控
4.3.5 在客户机上验证
- 另开一个客户机窗口测试
[root@client ~]# cd /var/www/html/
[root@client html]# touch aa.html
[root@client html]# touch ab.html
[root@client html]# ll
总用量 0
-rw-r--r--. 1 root root 0 1月   3 19:39 aa.html
-rw-r--r--. 1 root root 0 1月   3 19:39 ab.html
[root@client html]# vi aa.html
server for aa
[root@client html]# vi ab.html
server for ab
- 查看原窗口


4.3.6 给共享目录777的权限
注意:两边的同步目录均需给777权限,以服务器为例

[root@source ~]# chmod 777 /var/www/html
[root@source ~]# cd /var/www/
[root@source www]# ll
总用量 0
drwxr-xr-x. 2 root root  6 8月   4 2017 cgi-bin
drwxrwxrwx. 2 root root 24 1月   3 19:25 html
4.3.7 修改源服务器配置并重启服务
[root@source ~]# vi /etc/rsyncd.conf
...
path = /var/www/html
read only = no		//关闭只读权限,确保客户机有可读写共享模块的权限
[root@source ~]# pkill rsync	//关闭服务(kill cat /var/run/rsyncd.pid)
[root@source ~]# rsync --daemon
[root@source ~]# netstat -anptu | grep 873
tcp        0      0 192.168.140.20:873      0.0.0.0:*               LISTEN      56532/rsync
4.3.8 在客户机上编写并启动脚本
[root@client ~]# vi /opt/inotify.sh
#!/bin/bash
INOTIFY_CMD="inotifywait -mrq -e modify,create,delete,move /var/www/html"
RSYNC_CMD="rsync -avz --delete --password-file=/etc/server.pass /var/www/html/ [email protected]::wwwroot"
$INOTIFY_CMD | while read DIRECTORY EVENT FILE
do
        if [ $(pgrep rsync | wc -l) -le 0 ]
        then $RSYNC_CMD
        fi
done
- 客户机上启动脚本,并创建验证文件
[root@client ~]# sh /opt/inotify.sh
[root@client ~]# cd /var/www/html
[root@client html]# vi cx.html
server cx

补充
当出现以下报错时
rsync error: some files/attrs were not transferred (see previous errors) (code 23) at main.c(1052) [sender=3.0.9]

原因是有文件没有写的权限,导致备份数据库权限不够,两种解决办法:

1、将服务端rsyncd.conf配置文件的uid和gid分别修改成root,重载下,/etc/rc.d/init.d/xinetd reload,再次执行同步,同步成功
2、将需要同步的文件夹及下属文件赋予777权限(chmod -R 777 xxx),再次执行同步,同步成功

注意:如果使用第一种办法,那么在执行完同步后,为了安全,记得将uid和gid修改回来,或修改成nobody
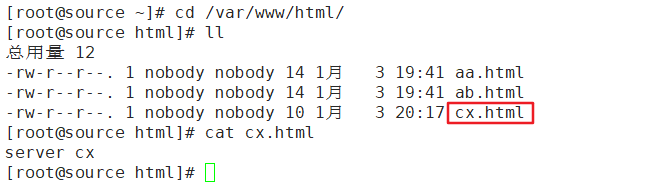
4.3.9 在服务器上验证
[root@source ~]# cd /var/www/html/
[root@source html]# ll
总用量 12
-rw-r--r--. 1 nobody nobody 14 1月   3 19:41 aa.html
-rw-r--r--. 1 nobody nobody 14 1月   3 19:41 ab.html
-rw-r--r--. 1 nobody nobody 10 1月   3 20:17 cx.html
[root@source html]# cat cx.html
server cx
[root@source html]# curl http://localhost/cx.html
server cx
4.4 修改内核文件
- 查看并修改监控内核配置文件
[root@client ~]# cat /proc/sys/fs/inotify/max_queued_events		'//监控队列大小'
16384
[root@client ~]# cat /proc/sys/fs/inotify/max_user_instances	'//最多监控实例数'
128
[root@client ~]# cat /proc/sys/fs/inotify/max_user_watches		'//每个实例最多监控文件数'
8192
[root@client ~]# vi /etc/sysctl.conf
...//末尾添加以下配置
fs.inotify.max_queued_events = 32768
fs.inotify.max_user_instances = 1024
fs.inotify.max_user_watches = 1048576

[root@client ~]# sysctl -p		'使内核文件,生效'
fs.inotify.max_queued_events = 32768
fs.inotify.max_user_instances = 1024
fs.inotify.max_user_watches = 1048576
- 验证结果
[root@client ~]# cat /proc/sys/fs/inotify/max_queued_events
32768
[root@client ~]# cat /proc/sys/fs/inotify/max_user_instances
1024
[root@client ~]# cat /proc/sys/fs/inotify/max_user_watches
1048576