文章目录
简介
- Haproxy是目前流行得一种群集调度工具,同类群集调度工具有很多,如LVS和Nginx。相比较而言,LVS性能最好,但搭建相对复杂,Nginx的upstream模块支持群集功能,但是对群集节点的健康检查功能不强,性能没有Haproxy好。
- Haproxy官方网站是 http://haproxy.1wt.eu/
1.常见的Web集群调度器
- 目前常见的Web集群调度器分为软件和硬件;
- 软件通常使用开源的LVS、Haproxy、Nginx;
- 硬件一般使用比较多的是F5也有很多人使用国内的些产品,如梭子鱼、绿盟等。

2.Haproxy应用分析
LVS在企业应用中抗负载能力很强,但存在不足
- LVS不支持正则处理,不能实现动静分离;
- 对于大型网站,LVS的实施配置复杂,维护成本相对较高
Haproxy是一款可提供高可用性、负载均衡、及基于TCP和HTTP应用的代理的软件
- 适用于负载大的Web站点;
- 运行在硬件上可支持数以万计的并发连接的连接请求。
3.Haproxy调度算法原理
Haproxy支持多种调度算法,最常用的有三种·:
RR (Round Robin),LC(Least Connections),SH(Source Hashing)
3.1 RR调度算法的介绍
- RR算法是最简单最常用的一种算法,即轮询调度
- 理解举例:有三个节点A、B、C
第一个用户访问会被指派到节点A
第二个用户访问会被指派到节点B
第三个用户访问会被指派到节点C
第四个用户访问继续指派到节点A,轮询分配访问请求实现负载均衡效果
3.2 LC调度算法的介绍
-
最小连接数算法,根据后端的节点连接数大小动态分配前端请求
-
理解举例:有三个节点A、B、C,各节点的连接数分别为A:4、B:5、C:6
(1)第一个用户连接请求,会被指派到A上,连接数变为A:5、B:5、C:6
(2)第二个用户请求会继续分配到A上,连接数变为A:6、B:5、C:6,再有新的请求会分配给B,每次将新的请求指派给连接数最小的客户端
(3)由于实际情况下A、B、C的连接数会动态释放,很难会出现一样连接数的情况 -
此算法相比较rr算法有很大改进,是目前用到比较多的一种算法
3.3 SH调度算法的介绍
- 基于来源访问调度算法,用于一些有Session会话记录在服务器端的场景,可以基于来源的IP、Cookie等做集群调度。
- 理解举例:
(1)有三个节点A、B、C,第一个用户第一次访问被指派到了A,第二个用户第一次访问被指派到了B;
(2)当第一个用户第二次访问时会被继续指派到A,第二个用户第二次访问时依旧会被指派到B,只要负载均衡调度器不重启,第一个用户访问都会被指派到A,第二个用户访问都会被指派到B,实现集群的调度; - 此调度算法好处是实现会话保持,但某些IP访问量非常大时会引起负载不均衡,部分节点访问量超大,影响业务使用
4.Haproxy安装与启动
在负载均衡器上安装Haproxy
- 安装步骤:安装基础软件包,编译安装haproxy,要注意操作系统版本,是32位系统还是64位
建立Haproxy的配置文件
- 创建配置文件目录/etc/haproxy
- 将源码包提供的配置文件样例haproxy.cfg复制到配置文件目录中
4.1 Haproxy配置文件详解
Haproxy配置文件通常分为三个部分
- global:为全局配置
- defaults:为默认配置
- listen:为应用组件配置
global配置参数
- log127.0.0.1 lcal0:配置日志记录,local0为日志设备,默认存放到系统日志
- log127.0.0.1 loca1 notice:notice为日志级别,通常有24个级别
- maxconn4096:最大连接数
- uid 99:用户uid
- gid 99:用户gid
defaults配置项配置默认参数,一般会被应用组件继承
- log global:定义日志为global配置中的日志定义
- mode http:模式为http
- option httplog:采用http日志格式记录日志
- retries 3:检查节点服务器失败连续达到三次则认为节点不可用
- maxconn2000:最大连接数
- contimeout5000:连接超时时间
- clitimeout50000:客户端超时时间
- srvtimeout50000:服务器超时时间
listen配置项目一般为配置应用模块参数
- listen appli4- backup 0.0.0.0:10004:定义一个appli4- backup的应用
- option httpchk /index.html检查服务器的index.html文件
- option persist:强制将请求发送到已经down掉的服务器
- balance roundrobin:负载均衡调度算法使用轮询算法
- server inst1 192.168.114.56:80 check inter 2000 fall 3:定义在线节点
- server inst2 192.168 114.56:81 check inter 2000 fall 3 backup:定义备份节点
4.2 日志的级别
- 0(EMERG,紧急)
- 1(ALERT,警告)
- 2(CRIT,严重)
- 3(ERR,错误)
- 4(WARNING,提醒)
- 5(NOTICE,注意)
- 6(INFO,信息)
- 7(DEBUG,调试)
5.Haproxy群集配置
5.1 项目环境
(1)Haproxy服务器一台
- IP地址:192.168.70.10
(2)nginx服务器两台
- IP地址:192.168.70.11 (web1)
- IP地址:192.168.70.12(web2)
(3)NFS共享服务器一台
- IP地址:192.168.70.13
(4)客户机一台,用于测试验证
- IP地址:192.168.70.14
注意:需确保相同网段之间能互相通信
5.2 实验目的
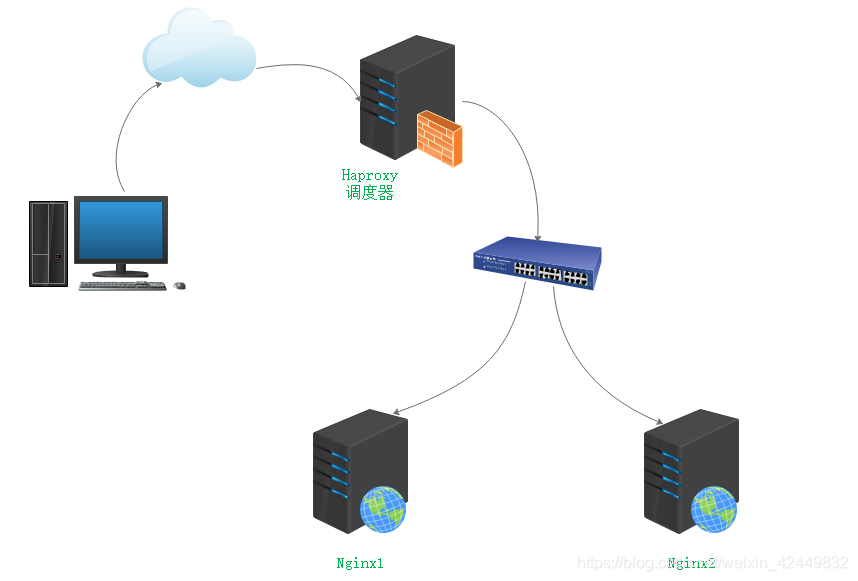
- 客户机访问haproxy服务器地址 192.168.70.10 ,能够轮询地访问到nginx两台主机的网页;测试其是否满足高性能,高可用的群集特征;
- 搭建出nfs网络文件存储服务。
5.3 Nginx的安装与启动
在两台网站服务器上安装Nginx,并启动服务
- 使用源码编译的方式进行安装
- 关闭 Firewall防火墙
- 安装基础软件包
- 增加系统用户账号 nginx
- 编译安装 Nginx并启动
在两台Nginx上配置测试网站,测试网页的内容应该不同,以便进行测试
5.4 项目步骤
5.4.1 配置NFS存储服务器
[root@nfs ~]# rpm -qa | grep rpcbind	//默认虚拟机已安装rpcbind模块
rpcbind-0.2.0-42.el7.x86_64
[root@nfs ~]# yum -y install nfs-utils	//确认是否安装nfs-utils软件包
已加载插件:fastestmirror, langpacks
base                                                     | 3.6 kB     00:00
Loading mirror speeds from cached hostfile
 * base:
软件包 1:nfs-utils-1.3.0-0.48.el7.x86_64 已安装并且是最新版本
无须任何处理
[root@nfs ~]# mkdir /opt/web1
[root@nfs ~]# mkdir /opt/web2
[root@nfs ~]# echo "<h1>this is server1.</h1>" > /opt/web1/index.html
[root@nfs ~]# echo "<h1>this is server2.</h1>" > /opt/web2/index.html
[root@nfs ~]# vi /etc/exports
/opt/web1 192.168.70.11/32 (ro)
/opt/web2 192.168.70.12/32 (ro)
[root@nfs ~]# systemctl restart nfs
[root@nfs ~]# systemctl restart rpcbind
[root@nfs ~]# showmount -e
Export list for nfs:
/opt/web2 (everyone)
/opt/web1 (everyone)
5.4.2 配置nginx服务器
导入软件包

- 在两台nginx服务器上进行的相同配置如下
[root@web ~]# useradd -M -s /sbin/nologin nginx
[root@web ~]# tar zxvf nginx-1.12.2.tar.gz
[root@web ~]# cd nginx-1.12.2/
[root@web nginx-1.12.2]# ./configure --prefix=/usr/local/nginx --user=nginx --group=nginx
[root@web nginx-1.12.2]# make && make install
[root@web nginx-1.12.2]# cd
[root@web ~]# ln -s /usr/local/nginx/sbin/nginx /usr/local/bin/
[root@web ~]# cd /usr/local/nginx/html/
[root@web html]# ls -lh
总用量 8.0K
-rw-r--r--. 1 root root 537 12月 11 00:05 50x.html
-rw-r--r--. 1 root root 612 12月 11 00:05 index.html
- 在web1上的配置
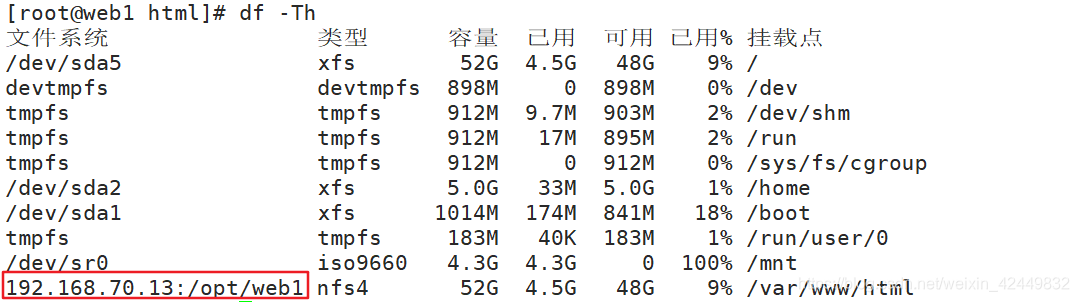
[root@web1 html]# mount 192.168.70.13:/opt/web1 /usr/local/nginx/html/
[root@web1 html]# df -Th
[root@web1 html]# cd
[root@web1 ~]# nginx
[root@web1 ~]# curl http://localhost
<h1>this is server1.</h1>
- 在web2上的配置
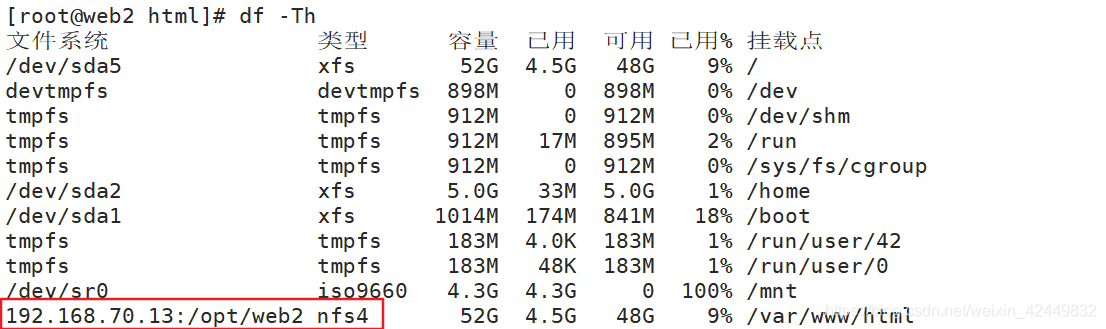
[root@web2 html]# mount 192.168.70.13:/opt/web2 /usr/local/nginx/html/
[root@web2 html]# df -Th
[root@web2 html]# cd
[root@web2 ~]# nginx
[root@web2 ~]# curl http://localhost
<h1>this is server2.</h1>
5.4.3 配置haproxy调度器
导入软件包

[root@haproxy ~]# yum -y install gcc gcc-c++ make pcre-devel bzip2-devel
[root@haproxy ~]# tar zxvf haproxy-1.4.24.tar.gz
[root@haproxy ~]# mkdir /etc/haproxy
[root@haproxy ~]# cd haproxy-1.4.24/
[root@haproxy haproxy-1.4.24]# make TARGET=linux26
[root@haproxy haproxy-1.4.24]# make install
[root@haproxy haproxy-1.4.24]# cp examples/haproxy.cfg /etc/haproxy
[root@haproxy haproxy-1.4.24]# vi /etc/haproxy/haproxy.cfg
# this config needs haproxy-1.1.28 or haproxy-1.2.1

global
        log 127.0.0.1   local0			//日志输出配置
        log 127.0.0.1   local1 notice	//notice为日志级别
        #log loghost    local0 info
        maxconn 4096
        chroot /usr/share/haproxy
        uid 99	//用户uid
        gid 99	//用户gid
        daemon
        #debug
        #quiet

defaults
        log     global	//定义日志为global配置中的日志定义
        mode    http	//模式为http
        option  httplog	//采用http日志格式记录日志
        option  dontlognull
        retries 3		//检查节点服务器失败次数,连续达到三次失败,则节点不可用
        #redispatch		//请求继续发个DOWN的节点
        maxconn 10240	//最大连接数
        contimeout      5000	//连接超时时间
        clitimeout      50000	//客户端超时时间
        srvtimeout      50000	//服务器超时时间

listen webcluster 0.0.0.0:80
        option httpchk GET /index.html	//检查服务器的文件
        balance roundrobin
        server web1 192.168.70.11:80 check inter 2000 fall 3
        server web2 192.168.70.12:80 check inter 2000 fall 3
[root@haproxy haproxy-1.4.24]# cp examples/haproxy.init /etc/init.d/haproxy
[root@haproxy haproxy-1.4.24]# vi /etc/init.d/haproxy
#!/bin/sh
#
# chkconfig: 35 85 15	//将"-"改为35
...
[root@haproxy haproxy-1.4.24]# chmod 755 /etc/init.d/haproxy
[root@haproxy haproxy-1.4.24]# chkconfig --add haproxy
[root@haproxy haproxy-1.4.24]# chkconfig --list

注:该输出结果只显示 SysV 服务,并不包含
原生 systemd 服务。SysV 配置数据
可能被原生 systemd 配置覆盖。

      要列出 systemd 服务,请执行 'systemctl list-unit-files'。
      查看在具体 target 启用的服务请执行
      'systemctl list-dependencies [target]'。

haproxy        	0:关	1:关	2:关	3:开	4:关	5:开	6:关
netconsole     	0:关	1:关	2:关	3:关	4:关	5:关	6:关
network        	0:关	1:关	2:开	3:开	4:开	5:开	6:关
[root@haproxy haproxy-1.4.24]# cd
[root@haproxy ~]# ln -s /usr/local/sbin/haproxy /usr/sbin/
[root@haproxy ~]# systemctl enable haproxy
[root@haproxy ~]# systemctl start haproxy
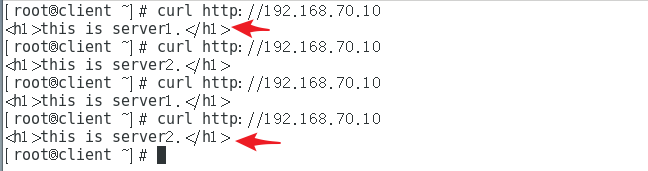
5.5 测试Web群集
- 在客户机上验证
注意:若在启动haproxy服务时,出现 Cannot chroot(/usr/share/haproxy) 失败,只需要写入以下命令即可
mkdir -p /usr/share/haproxy
5.6 日志定义
- 配置日志记录,添加脚本
[root@haproxy ~]# vi /etc/haproxy/haproxy.cfg
# this config needs haproxy-1.1.28 or haproxy-1.2.1

global
        log /dev/log    local0 info
        log /dev/log    local0 notice
...
[root@haproxy ~]# systemctl restart haproxy
[root@haproxy ~]# touch /etc/rsyslog.d/haproxy.conf
[root@haproxy ~]# vi /etc/rsyslog.d/haproxy.conf
if ($programname == 'haproxy' and $syslogseverity-text == 'info')
then -/var/log/haproxy/haproxy-info.log
&~	//当程序名匹配到haproxy 和 日志级别是info时,输出到/var/log/haproxy/haproxy-info.log里
if ($programname == 'haproxy' and $syslogseverity-text == 'notice')
then -/var/log/haproxy/haproxy-notice.log
&~	//当程序名匹配到haproxy 和 日志级别是notice时,输出到/var/log/haproxy/haproxy-notice.log里
[root@haproxy ~]# systemctl restart rsyslog		//重启系统日志
[root@haproxy ~]# systemctl restart haproxy		//重启服务才能有日志文件
[root@haproxy ~]# cat /var/log/haproxy/haproxy-info.log		//查看haproxy调度信息
[root@haproxy ~]# cat /var/log/haproxy/haproxy-notice.log	//查看haproxy启动信息


6.Haproxy 参数优化
- 随着企业网站负载增加, haproxy参数优化相当重要
1)maxconn:最大连接数,根据应用实际情况进行调整,推荐使用10 240
2)daemon:守护进程模式, Haproxy可以使用非守护进程模式启动,建议使用守护进程模式启动
3)nbproc:负载均衡的并发进程数,建议与当前服务器CPU核数相等或为其2倍
4)retries:重试次数,主要用于对集群节点的检查,如果节点多,且并发量大,设置为2次或3次
5)option http-server-close:主动关闭http请求选项,建议在生产环境中使用此选项
6)timeout http-keep-alive:长连接超时时间,设置长连接超时时间,可以设置为10s
7)timeout http-request:http请求超时时间,建议将此时间设置为5~10s,增加http连接释放速度
8)timeout client:客户端超时时间,如果访问量过大,节点响应慢,可以将此时间设置短一些,建议设置为1min左右就可以了