前言
在上一篇博客中基于滴滴DroidAssist插件实现了无痕埋点,这样用户的操作路径就通过了接口上传到了服务器,然后后台制作图表,产品经理进而分析和优化产品后续的体验,也可以为产品的运营提供数据支撑。但是现在我们上传的View路径都是这样的MainActivity/LinearLayout[0]/LinearLayout[7]/TextView[2],这些路径别人是看不懂的,所以就需要给这些路径设置别名,通过查看路径的别名就知道用户点击的是什么控件了。
实现步骤
- 在屏幕上添加一个小圆点,滑动小圆点获取当前屏幕坐标P
- 递归遍历DecorView下所有子view
- 获取该View下所有可触摸视图(包含自己),遍历获取位置、宽高判断P坐标是否在View上
- 如果P坐标在这个View内,则表示我们选中了这个View,然后给这个View设置前景色
- 根据选取的View获取路径
实现效果

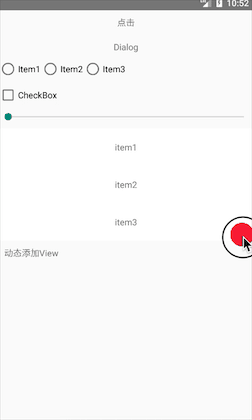
在屏幕上添加一个小圆点View很简单,可以通过WindowManager添加View到屏幕上,然后设置OnTouchListener监听事件,移动小圆点。小圆点中心点的位置就是我们获取的坐标,接下来根据坐标选取对应的View,具体代码如下:
public class ViewUtil {


    //根据坐标获取相对应的子控件
    public static View getViewAtActivity(Activity activity, int x, int y) {


        View root = activity.getWindow().getDecorView();
        return findViewByXY(root, x, y);
    }
    public static View getViewAtViewGroup(View view, int x, int y) {


        return findViewByXY(view, x, y);
    }

    private static View findViewByXY(View view, int x, int y) {


        View targetView = null;
        if (view instanceof ViewGroup) {


            ViewGroup v = (ViewGroup) view;
            for (int i = 0; i < v.getChildCount(); i++) {


                targetView = getTouchTarget(v.getChildAt(i), x, y);
                if (targetView != null) {


                    break;
                } else {


                    findViewByXY(v.getChildAt(i), x, y);
                }
            }
        } else {


            targetView = getTouchTarget(view, x, y);
        }
        return targetView;
    }

  	//获取View下所有可触摸视图
    private static View getTouchTarget(View view, int x, int y) {


        View targetView = null;
        ArrayList<View> touchableViews = view.getTouchables();
        for (View child : touchableViews) {


            if (isTouchPointInView(child, x, y)) {


                targetView = child;
            }
        }
        return targetView;
    }

  	//判断坐标点是否在View上
    private static boolean isTouchPointInView(View view, int x, int y) {


        int[] location = new int[2];
        view.getLocationOnScreen(location);
        int left = location[0];
        int top = location[1];
        int right = left + view.getMeasuredWidth();
        int bottom = top + view.getMeasuredHeight();
        if (view.isClickable() && y >= top && y <= bottom && x >= left
                && x <= right) {


            return true;
        }
        return false;
    }
}
获取到了View,我们就可以根据View一层层向上遍历,获取到View的名字和index然后拼接起来,直到遍历到视图的最顶端,具体代码如下:
public static String parsePath(View view) {


        String path = "";
        //循环获取ViewPath
        do {


            String simpleName = view.getClass().getSimpleName();
            ViewParent parent = view.getParent();
            if (parent instanceof ViewGroup) {


                int index = ((ViewGroup) parent).indexOfChild(view);
                path = String.format(Locale.CHINA, "%s[%d]/%s", simpleName, index, path);
                view = (ViewGroup) parent;
            }

        } while (view.getParent() instanceof View);

        //替换掉页面相同路径,分两种情况
        path = path
          //当页面设置fitsSystemWindows=true时
          .replaceFirst("LinearLayout\\[0]/FrameLayout\\[1]/FitWindowsLinearLayout\\[0]/ContentFrameLayout\\[1]","")
          //当页面设置fitsSystemWindows=false时
                .replaceFirst("LinearLayout\\[0]/FrameLayout\\[1]","");
        path = path.substring(0, path.lastIndexOf('/'));
        path = path.substring(1);
        return path;
    }
筛选View、解析路径我们都已经做完了,现在已经到了最后的阶段那就是设置别名了。我们把解析的路径传到一个页面,填入别名对接服务器接口就搞定了,这样收集的用户点击的路径在后台就知道是什么意思了。