
内核对设备树的处理(四)__device_node转换为platform_device
https://blog.csdn.net/huanting_123/article/details/90342535
前言:以前写驱动程序时候,一般把驱动程序分成两部分platform_device跟platform_driver这两部分,
- platform_device:描述硬件使用的资源;
在前面文章介绍过设备树dts文件最终在linux内核中会转化成platform_device:
dts -> dtb -> device_node -> platform_device
本文章主要解决下面三个问题:
- linux内核如何把device_node转换成platfrom_device?
答:内核函数of_platform_default_populate_init, 遍历device_node树, 生成platform_device
- 哪些设备树节点可以转换为platform_device。
答:
1、 该节点必须含有compatible属性
2、 根节点的子节点(节点必须含有compatible属性)
3、 含有特殊compatible属性的节点的子节点(子节点必须含有compatible属性):
这些特殊的compatilbe属性为: "simple-bus","simple-mfd","isa","arm,amba-bus "
根节点是例外的,生成platfrom_device时,即使有compatible属性也不会处理。
HY:1.含有compatible属性的根节点的子节点;
2.含有compatible属性的根节点的子节点且compatible为: "simple-bus","simple-mfd","isa","arm,amba-bus "设备的所有子节点
(确实必须含有compatible属性)

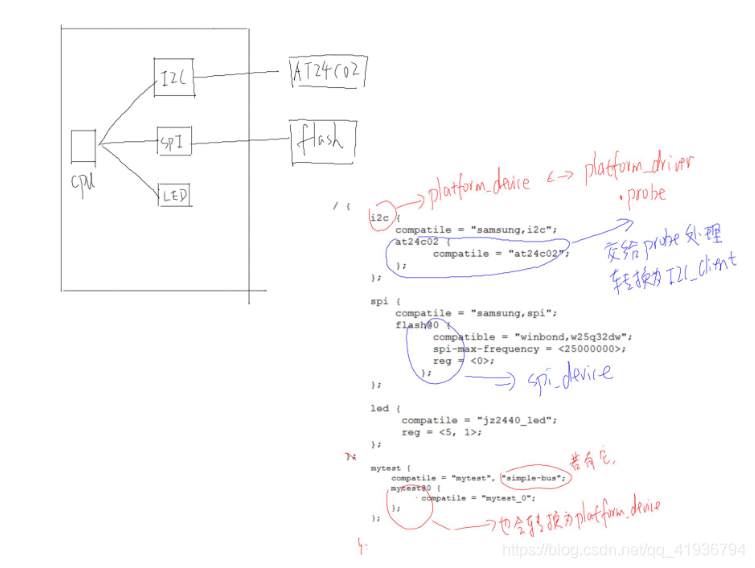
- cpu可以访问很多外设,spi控制器 I2c控制器,led

如何在设备树中描述这些硬件?
答:
1、比如以下的节点:
/mytest会被转换为platform_device,
因为它兼容"simple-bus", 它的子节点/mytest/mytest@0 也会被转换为platform_device
2、 /i2c节点一般表示i2c控制器, 它会被转换为platform_device, 在内核中有对应的platform_driver;
/i2c/at24c02节点不会被转换为platform_device, 它被如何处理完全由父节点的platform_driver决定, 一般是被创建为一个i2c_client。
3、类似的也有/spi节点, 它一般也是用来表示SPI控制器, 它会被转换为platform_device, 在内核中有对应的platform_driver;
/spi/flash@0节点不会被转换为platform_device, 它被如何处理完全由父节点的platform_driver决定, 一般是被创建为一个spi_device。
     / {
          mytest {
              compatile = "mytest", "simple-bus";
              mytest@0 {
                    compatile = "mytest_0";
              };
          };

          i2c {
              compatile = "samsung,i2c";
              at24c02 {
                    compatile = "at24c02";
              };
          };

          spi {
              compatile = "samsung,spi";
              flash@0 {
                    compatible = "winbond,w25q32dw";
                    spi-max-frequency = <25000000>;
                    reg = <0>;
                  };
          };
      };
下面通过源程序对问题进行分析:
首先看下platform_device结构体:
 struct platform_device {
	const char	*name;
	int		id;
	bool		id_auto;
	struct device	dev;     ----------------------2
	u32		num_resources;
	struct resource	*resource; ---------------------1

	const struct platform_device_id	*id_entry;
	char *driver_override; /* Driver name to force a match */

	/* MFD cell pointer */
	struct mfd_cell *mfd_cell;

	/* arch specific additions */
	struct pdev_archdata	archdata;
1、resource是一个指针,指向动态分配的数组,num_resources表示动态分配数组的下标,这也就意味着platform_device中可以会有n(n>=0)项资源,这些资源来自设备树中reg属性(表示所占用的内存空间)、中断属性(表示所占用的中断号)对于resource(资源)有三种类别:内存资源、IO资源、中断资源,这三种资源都可以在设备树中指定,这些资源可以从device_node结构体转化得到。
2、在设备树中还会有其他的属性譬如 : spi-max-frequency = <25000000>;
它并不对应什么资源,那么这些属性保存在哪里呢?
在platform_device结构体里面有个struct device dev; 在dev中有个of_node(指向device_node结构体),所以我们以后想要得到某个属性时可以从platform_device->dev->of_node里面读取属性值,
 struct device {
        .........
        struct device_node	*of_node; /* associated device tree node */
        .........
};- 事实上,如果从C语言的开始函数start_kernel进行追溯,是找不到platform device这一部分转换的源头的,事实上,这个转换过程的函数是of_platform_default_populate_init(),它被调用的方式是这样一个声明:
arch_initcall_sync(of_platform_default_populate_init);在linux内核源码中,同系列的调用声明还有:
#define pure_initcall(fn)       __define_initcall(fn, 0)
#define core_initcall(fn)       __define_initcall(fn, 1)
#define core_initcall_sync(fn)      __define_initcall(fn, 1s)
#define postcore_initcall(fn)       __define_initcall(fn, 2)
#define postcore_initcall_sync(fn)  __define_initcall(fn, 2s)
#define arch_initcall(fn)       __define_initcall(fn, 3)
#define arch_initcall_sync(fn)      __define_initcall(fn, 3s)
#define subsys_initcall(fn)     __define_initcall(fn, 4)
#define subsys_initcall_sync(fn)    __define_initcall(fn, 4s)
#define fs_initcall(fn)         __define_initcall(fn, 5)
#define fs_initcall_sync(fn)        __define_initcall(fn, 5s)
#define rootfs_initcall(fn)     __define_initcall(fn, rootfs)
#define device_initcall(fn)     __define_initcall(fn, 6)
#define device_initcall_sync(fn)    __define_initcall(fn, 6s)
#define late_initcall(fn)       __define_initcall(fn, 7)
#define late_initcall_sync(fn)      __define_initcall(fn, 7s)
这些宏最终都是调用__define_initcall(fn, n),这个数字代表系统启动时被调用的优先级,数字越小,优先级越低,用这一系列宏声明一个新的函数就是将这个函数指针放入内存中一个指定的段内。
 #define __define_initcall(fn, id) \
static initcall_t __initcall_##fn##id __used \
__attribute__((__section__(".initcall" #id ".init"))) = fn;
编译内核,section属性的变量(.initcalln.init)会被集中放在一起,放在linux-4.19-rc3/arch/arm/kernel/vmlinux.lds文件中,linux内核启动时会从何里面取出section属性(.initcalln.init,n代表优先级)会依次调用这些段中的函数。
 start_kernel     // init/main.c
    rest_init();
        pid = kernel_thread(kernel_init, NULL, CLONE_FS);
                    kernel_init
                        kernel_init_freeable();
                            do_basic_setup();
                                do_initcalls();
                                    for (level = 0; level < ARRAY_SIZE(initcall_levels) - 1; level++)
                                        do_initcall_level(level);  // 比如 do_initcall_level(3)
                                                                               for (fn = initcall_levels[3]; fn < initcall_levels[3+1]; fn++)
                                                                                    do_one_initcall(initcall_from_entry(fn));  // 就是调用"arch_initcall_sync(fn)"中定义的fn函数
2. of_platform_default_populate_init()做什么事情:-----device_node 转化为platform_device
 static int __init of_platform_default_populate_init(void)
{
	struct device_node *node;

	if (!of_have_populated_dt())
		return -ENODEV;

	/*
	 * Handle certain compatibles explicitly, since we don't want to create
	 * platform_devices for every node in /reserved-memory with a
	 * "compatible",
	 */
	for_each_matching_node(node, reserved_mem_matches)  //处理一些保留的节点
		of_platform_device_create(node, NULL, NULL);

	node = of_find_node_by_path("/firmware");    //处理/firmware下面的子节点
	if (node) {
		of_platform_populate(node, NULL, NULL, NULL);
		of_node_put(node);
	}

	/* Populate everything else.  处理所有的信息 */
	of_platform_default_populate(NULL, NULL, NULL); --------1

	return 0;
}
1、
 int of_platform_default_populate(struct device_node *root,
				 const struct of_dev_auxdata *lookup,
				 struct device *parent)
{
	return of_platform_populate(root, of_default_bus_match_table, lookup,
				    parent);  --------1.1
}
1.1、
- 参考of_default_bus_match_table变量的定义:
 const struct of_device_id of_default_bus_match_table[] = {
	{ .compatible = "simple-bus", },
	{ .compatible = "simple-mfd", },
	{ .compatible = "isa", },
#ifdef CONFIG_ARM_AMBA
	{ .compatible = "arm,amba-bus", },
#endif /* CONFIG_ARM_AMBA */
	{} /* Empty terminated list */
};
如果节点的属性值为 "simple-bus","simple-mfd","isa","arm,amba-bus "之一的话,那么它子节点就可以转化成platform_device。
- of_platform_populate函数定义如下所示:
 /**
 * of_platform_populate() - Populate platform_devices from device tree data
 * @root: parent of the first level to probe or NULL for the root of the tree
 * @matches: match table, NULL to use the default
 * @lookup: auxdata table for matching id and platform_data with device nodes
 * @parent: parent to hook devices from, NULL for toplevel
 *
 * Similar to of_platform_bus_probe(), this function walks the device tree
 * and creates devices from nodes.  It differs in that it follows the modern
 * convention of requiring all device nodes to have a 'compatible' property,
 * and it is suitable for creating devices which are children of the root
 * node (of_platform_bus_probe will only create children of the root which
 * are selected by the @matches argument).
 *
 * New board support should be using this function instead of
 * of_platform_bus_probe().
 *
 * Returns 0 on success, < 0 on failure.
 */
int of_platform_populate(struct device_node *root,
			const struct of_device_id *matches,
			const struct of_dev_auxdata *lookup,
			struct device *parent)
{
	struct device_node *child;
	int rc = 0;

	root = root ? of_node_get(root) : of_find_node_by_path("/"); //得到根节点
	if (!root)
		return -EINVAL;

	pr_debug("%s()\n", __func__);
	pr_debug(" starting at: %pOF\n", root);

	for_each_child_of_node(root, child) {   //遍历所有的子节点

		/* 每一个子节点都会调用of_platform_bus_create函数,根据节点创建对应的
		 * 总线节点
		 */
		rc = of_platform_bus_create(child, matches, lookup, parent, true);-----1.1.1
		if (rc) {
			of_node_put(child);
			break;
		}
	}
	of_node_set_flag(root, OF_POPULATED_BUS);

	of_node_put(root);
	return rc;
}
1.1.1、of_platform_bus_create函数定义
 /**
 * of_platform_bus_create() - Create a device for a node and its children.
 * @bus: device node of the bus to instantiate
 * @matches: match table for bus nodes
 * @lookup: auxdata table for matching id and platform_data with device nodes
 * @parent: parent for new device, or NULL for top level.
 * @strict: require compatible property
 *
 * Creates a platform_device for the provided device_node, and optionally
 * recursively create devices for all the child nodes.
 */
static int of_platform_bus_create(struct device_node *bus,
				  const struct of_device_id *matches,
				  const struct of_dev_auxdata *lookup,
				  struct device *parent, bool strict)
{
	const struct of_dev_auxdata *auxdata;
	struct device_node *child;
	struct platform_device *dev;
	const char *bus_id = NULL;
	void *platform_data = NULL;
	int rc = 0;

	/* Make sure it has a compatible property */
	if (strict && (!of_get_property(bus, "compatible", NULL))) {
		pr_debug("%s() - skipping %pOF, no compatible prop\n",
			 __func__, bus);
		return 0;  //如果节点没有compatible属性的话,返回0
	}

	/* Skip nodes for which we don't want to create devices */
	if (unlikely(of_match_node(of_skipped_node_table, bus))) {
		pr_debug("%s() - skipping %pOF node\n", __func__, bus);
		return 0;
	}

	if (of_node_check_flag(bus, OF_POPULATED_BUS)) {
		pr_debug("%s() - skipping %pOF, already populated\n",
			__func__, bus);
		return 0;
	}

	auxdata = of_dev_lookup(lookup, bus);
	if (auxdata) {
		bus_id = auxdata->name;
		platform_data = auxdata->platform_data;
	}

	if (of_device_is_compatible(bus, "arm,primecell")) {
		/*
		 * Don't return an error here to keep compatibility with older
		 * device tree files.
		 */
		of_amba_device_create(bus, bus_id, platform_data, parent);
		return 0;
	}

	/* 根据节点创建出对应的platform_device */
	dev = of_platform_device_create_pdata(bus, bus_id, platform_data, parent);
----1.1.1.1
	/* 如果bus节点属性不含 "simple-bus","simple-mfd","isa","arm,amba-bus "之一的话,
     * 返回0(不处理子节点)
	*/
	if (!dev || !of_match_node(matches, bus))
		return 0;

	for_each_child_of_node(bus, child) {
		pr_debug("   create child: %pOF\n", child);

		/* 该函数是个递归调用函数,当节点属性含有 "simple-bus","simple-mfd","isa","arm,amba-bus "
		 * 之一的话,任然把子节点当作对应的总线来对待,
		 */
		rc = of_platform_bus_create(child, matches, lookup, &dev->dev, strict);
		if (rc) {
			of_node_put(child);
			break;
		}
	}
	of_node_set_flag(bus, OF_POPULATED_BUS);
	return rc;
}
1.1.1.1、of_platform_device_create_pdata函数定义:
 /**
 * of_platform_device_create_pdata - Alloc, initialize and register an of_device
 * @np: pointer to node to create device for
 * @bus_id: name to assign device
 * @platform_data: pointer to populate platform_data pointer with
 * @parent: Linux device model parent device.
 *
 * Returns pointer to created platform device, or NULL if a device was not
 * registered.  Unavailable devices will not get registered.
 */
static struct platform_device *of_platform_device_create_pdata(
					struct device_node *np,
					const char *bus_id,
					void *platform_data,
					struct device *parent)
{
	struct platform_device *dev;

	if (!of_device_is_available(np) ||
	    of_node_test_and_set_flag(np, OF_POPULATED))
		return NULL;

	/* 会从device_node中根据中断属性、IO属性构造出resource */
	dev = of_device_alloc(np, bus_id, parent);
	if (!dev)
		goto err_clear_flag;

	dev->dev.coherent_dma_mask = DMA_BIT_MASK(32);
	if (!dev->dev.dma_mask)
		dev->dev.dma_mask = &dev->dev.coherent_dma_mask;
	dev->dev.bus = &platform_bus_type;
	dev->dev.platform_data = platform_data;
	of_msi_configure(&dev->dev, dev->dev.of_node);

	if (of_device_add(dev) != 0) {
		platform_device_put(dev);
		goto err_clear_flag;
	}

	return dev;

err_clear_flag:
	of_node_clear_flag(np, OF_POPULATED);
	return NULL;
}
对于i2c节点里面的子节点应该交给总线来处理,对于i2c节点它是根目录下面的第一级子节点,它会有对应的platform_device,在linux内核中它也会找到对应的platform_device,找到之后对应的.probe函数就会被调用,
 s3c24xx_i2c_probe(struct platform_device *pdev)
    i2c_add_numbered_adapter(&i2c->adap); //注册一个adapter(i2c总线控制器)
        __i2c_add_numbered_adapter(adap);
            i2c_register_adapter(adap);
                /* create pre-declared device nodes */
                of_i2c_register_devices(adap);  //
                    /* 遍历总线下面每一个可用的子节点 */
                    for_each_available_child_of_node(bus, node)
                    {
                        /* 创建、注册i2c_client结构体 *
                        client = of_i2c_register_device(adap, node);
                    }
------------------------------------------------------------------------------------------------
设备树的深入分析
https://blog.csdn.net/qq_41936794/article/details/105901606
内核head.s对dtb的简单处理
bootloader启动内核时,会设置r0,r1,r2三个寄存器,r0一般设置为0,r1一般设置为machine_id(在使用设备树时改参数没有被使用),r2一般设置ATAGS或DTB的起始地址,比如我们SMDK2410,SMDK2440,JZ2440都对应有一个machine_desc结构体,该结构体包含有nr和init初始化函数,当bootloader传递的machine_id给内核时,内核会根据这个machine_id和machine_desc结构体中的nr比对,如果一致的化则调用init初始化函数初始化单板,现在我们有了设备树,machine_id的设置就由设备树来完成,下面来简要介绍下head.s的启动流程
1.
mrc	p15, 0, r9, c0, c0		@ get processor id
bl	__lookup_processor_type		@ r5=procinfo r9=cpuid
mrc p15, 0, r9, c0, c0用来获取处理器ID,__lookup_processor_type用来查找处理器类型,看看内核是否支持这个CPU,如果支持的话就调用这款CPU对应的初始化函数
2.
/*
	 * r1 = machine no, r2 = atags or dtb,
	 * r8 = phys_offset, r9 = cpuid, r10 = procinfo
	 */
	bl	__vet_atags
#ifdef CONFIG_SMP_ON_UP
	bl	__fixup_smp
r1里面存放的是机器ID,r2里面要么是atags,要么是dtb首地址,__vet_atags用来判断atags或者dtb是否有效,根据头部信息判断
3
__create_page_tables
创建页表, 即创建虚拟地址和物理地址的映射关系
4
__enable_mmu
使能MMU, 以后就要使用虚拟地址了
5.
__mmap_switched
__enable_mmu 后会调用该函数,将r0保存到processor_id,r1保存到machine_arch_type,把bootloader传入的r2参数, 保存到变量__atags_pointer中,调用C函数start_kernel
设备树中对平台信息的处理
/ {
	model = "SMDK24440";
	compatible = "samsung,smdk2440";

	#address-cells = <1>;
	#size-cells = <1>;

	memory {  /* /memory */
		device_type = "memory";
		reg =  <0x30000000 0x4000000 0 4096>;
	};
在前面我们说过,uboot会通过ATAGS传给内核一个机器ID,内核会根据这个机器ID找到machine_desc,调用machine_desc的init函数,现在我们引入设备树后在根节点中的model和compatible,也就是说在dts中会声明想要什么样的machine_desc,根据根节点的compatible属性,内核依据这些字符串(“samsung,smdk2440”)找到machine_desc,compatible属性后面跟着的字符串可以有多个(从头到尾依次匹配),看到下面March_smdk2440.c代码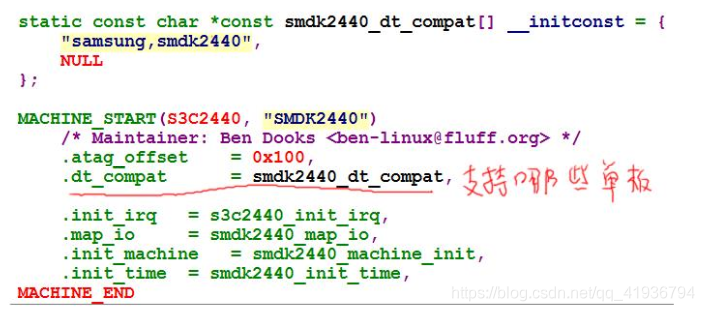
在内核源码中MACHINE_START定义一个结构体,里面有各项成员和初始化函数,smdk2440_dt_compt表明可以支持哪些单板,里面含有的字符串和我们设备树的根节点compatible属性的value匹对,一致则调用初始化单板函数,当有多个machine_desc跟dts吻合,应该选择第一个匹配到的machine_desc
设备树运行时配置信息的处理
对于配置信息的处理其实就是把设备树的节点信息提取出来赋给内核中的某个变量而已,下面我来分析几点重要的节点
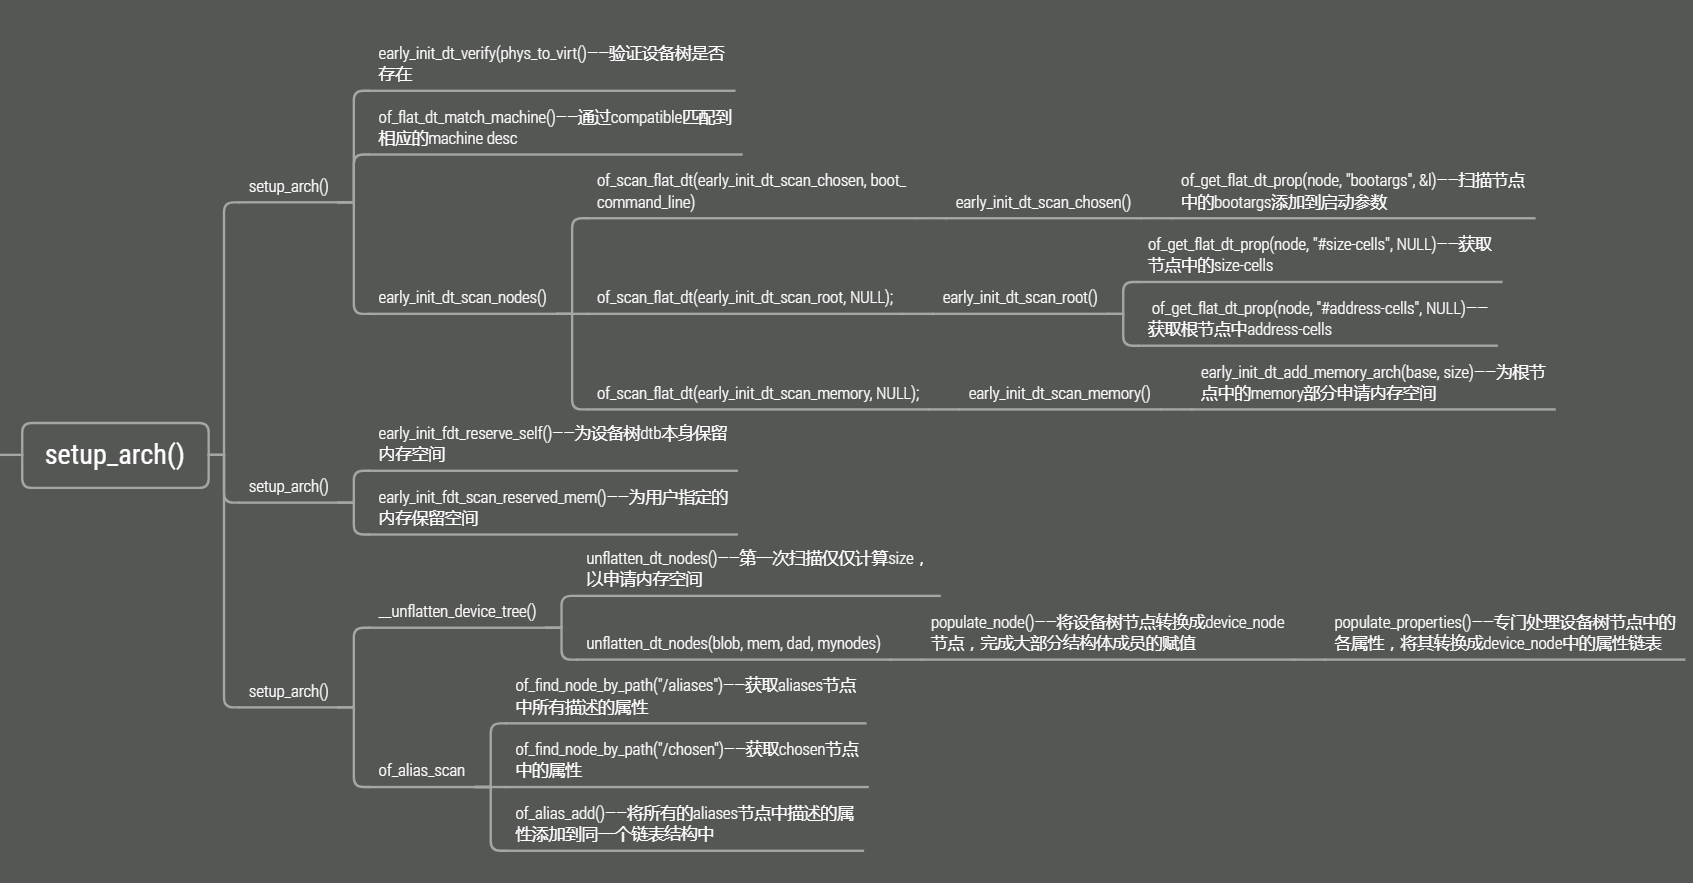
start_kernel // init/main.c
    setup_arch(&command_line);  // arch/arm/kernel/setup.c
        mdesc = setup_machine_fdt(__atags_pointer);  // arch/arm/kernel/devtree.c 使用dtb文件来设置机器,选择出最合适的machine_desc结构体
                    early_init_dt_scan_nodes();      // drivers/of/ftd.c 接着调用早期初始化设备树扫描节点
                        /* Retrieve various information from the /chosen node */
                        of_scan_flat_dt(early_init_dt_scan_chosen, boot_command_line);

                        /* Initialize {size,address}-cells info */
                        of_scan_flat_dt(early_init_dt_scan_root, NULL);

                        /* Setup memory, calling early_init_dt_add_memory_arch */
                        of_scan_flat_dt(early_init_dt_scan_memory, NULL);
上面就是设备树运行时配置信息处理的大致流程,最终将chosen节点的信息保存到boot_command_line中,确定根节点的这2个属性的值: #address-cells, #size-cells,存入全局变量: dt_root_addr_cells, dt_root_size_cells,解析/memory中的reg属性, 提取出"base, size", 最终调用memblock_add(base, size)设置内存
dtb转换为device_node
对于每个节点都用一个struct device_node类型的结构体来描述,其定义如下所示
struct device_node {
	const char *name; // 来自节点中的name属性, 如果没有该属性, 则设为"NULL"
	const char *type; // 来自节点中的device_type属性, 如果没有该属性, 则设为"NULL"
	phandle phandle;
	const char *full_name; // 节点的名字, node-name[@unit-address]
	struct fwnode_handle fwnode;
	struct	property *properties; // 节点的属性,该结构体成员有属性的名字,value的长度,value,指向下一个属性的指针
	struct	property *deadprops;	/* removed properties */
	struct	device_node *parent; // 节点的父亲
	struct	device_node *child;// 节点的孩子(子节点)
	struct	device_node *sibling;// 节点的兄弟(同级节点)
#if defined(CONFIG_OF_KOBJ)
	struct	kobject kobj;
#endif
	unsigned long _flags;
	void	*data;
#if defined(CONFIG_SPARC)
	const char *path_component_name;
	unsigned int unique_id;
	struct of_irq_controller *irq_trans;
#endif
};
我们把dtb文件放在内存的某个地方就可以使用,为什么内核运行中不会去覆盖使用dtb占用的那块内存,在前面讲个设备树格式的时候我们说过在dts文件中可以用memreserve指定一个块保留下来的内存,内核不会占用它,即使我们没有指定这块内存,系统也会把DTB所占区域保留下来,即调用:memblock_reserve,函数调用过程如下
start_kernel // init/main.c
    setup_arch(&command_line);  // arch/arm/kernel/setup.c
        arm_memblock_init(mdesc);   // arch/arm/kernel/setup.c
            early_init_fdt_reserve_self();
                    /* Reserve the dtb region */
                    // 把DTB所占区域保留下来, 即调用: memblock_reserve
                    early_init_dt_reserve_memory_arch(__pa(initial_boot_params),
                                      fdt_totalsize(initial_boot_params),
                                      0);
            early_init_fdt_scan_reserved_mem();  // 根据dtb中的memreserve信息, 调用memblock_reserve
             unflatten_device_tree();    // arch/arm/kernel/setup.c
                 /*initial_boot_params存放dtb文件的起始地址,该函数会去遍历整个dtb文件,构造出对应的device_node结构体并生成对应的树状结构,
                 该树的根节点保存在of_root变量中,可以通过of_root遍历整颗设备树*/
                __unflatten_device_tree(initial_boot_params, NULL, &of_root,early_init_dt_alloc_memory_arch, false);
                /* 计算设备树的大小 */
                size = unflatten_dt_nodes(blob, NULL, dad, NULL);

                /* 分配设备树大小的内存空间 */
                mem = dt_alloc(size + 4, __alignof__(struct device_node));

                /* 设置设备树的节点,放入内存空间 */
                unflatten_dt_nodes(blob, mem, dad, mynodes);
                    populate_node//构造每一个device_node
                        np = unflatten_dt_alloc(mem, sizeof(struct device_node) + allocl,
                                    __alignof__(struct device_node));//分配一个节点的内存空间

                        np->full_name = fn = ((char *)np) + sizeof(*np);//设置节点名字

                        populate_properties//处理设备树中的属性
                                pp = unflatten_dt_alloc(mem, sizeof(struct property),
                                            __alignof__(struct property));//分配属性的内存大小

                                /*设置属性*/
                                pp->name   = (char *)pname;
                                pp->length = sz;
                                pp->value  = (__be32 *)val;
如下图所示是其对应关系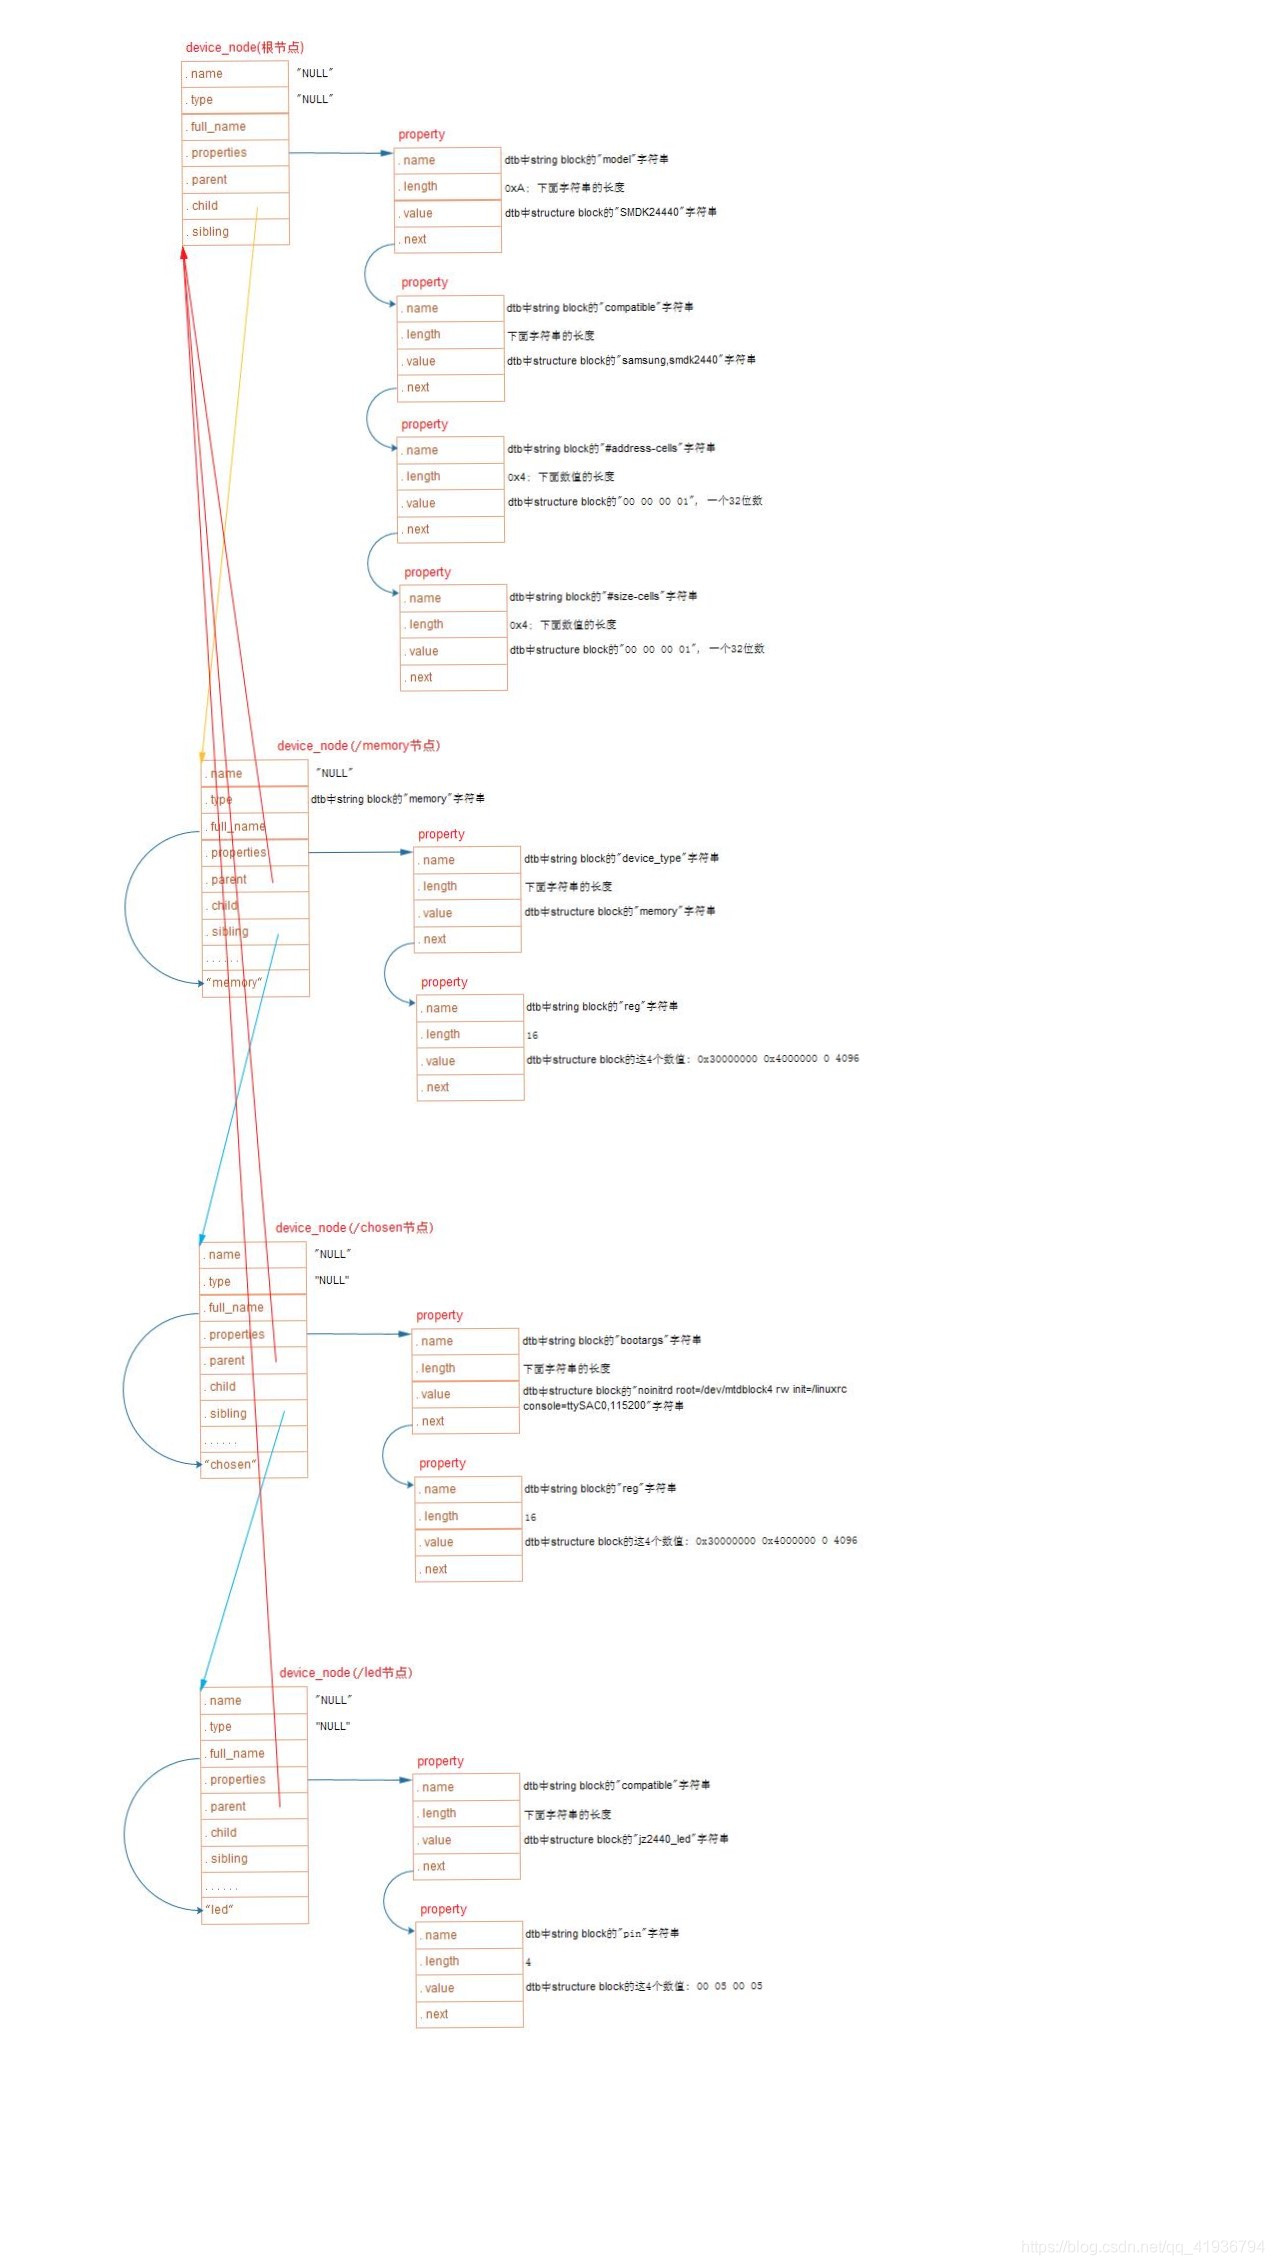
device_node转化为platform_device过程
含有compatible属性的节点才能被转换为platform_device,而对于i2c, spi等总线节点下的子节点,应该交给对应的总线驱动程序来处理,它们不应该被转换为platform_device,下图所示,系统会根据i2c, spi根节点的compatile属性去跟驱动程序配对,如果配对成功则在probe函数处理其子节点,将其I2C子节点转化成一个I2C_Client,将SPI子节点转化为一个SPI_Client,比如以下的节点,/mytest会被转换为platform_device,因为它兼容"simple-bus", 它的子节点/mytest/mytest@0 也会被转换为platform_device,所以如果I2C,SPI想要转化为platform_device可以在其跟节点属性中加入特殊的属性,这些特殊的compatilbe属性为: “simple-bus”,“simple-mfd”,“isa”,“arm,amba-bus”
下面我们看看platform_device结构体是怎么定义的
struct platform_device {
	const char	*name;
	int		id;
	bool		id_auto;
	struct device	dev;
	u32		num_resources;
	struct resource	*resource;
	const struct platform_device_id	*id_entry;
	char *driver_override; /* Driver name to force a match */
	/* MFD cell pointer */
	struct mfd_cell *mfd_cell;
	/* arch specific additions */
	struct pdev_archdata	archdata;
};
resource是一个指针,指向一个动态生成的数组,这个数组存有设备资源,数组的项目由num_resources表示,这些资源可以从device_node转换得到,这是由于dev里面含有一个of_node,该of_node指向设备树中的节点,所以根据of_node可以获取设备的资源到resource,也就是说platform_device.dev.of_node指向device_node,可以通过它获得其他属性资源
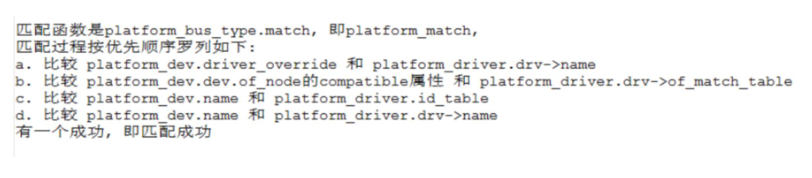
总线设备匹配过程
在根文件系统中查看设备树
/sys/firmware/fdt存放有原始dtb文件,如下图查看该文件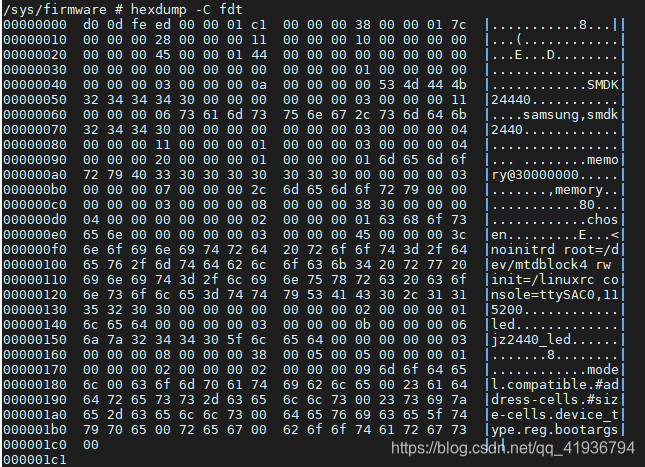
/sys/firmware/devicetree以目录结构程现的dtb文件, 根节点对应base目录, 每一个节点对应一个目录, 每一个属性对应一个文件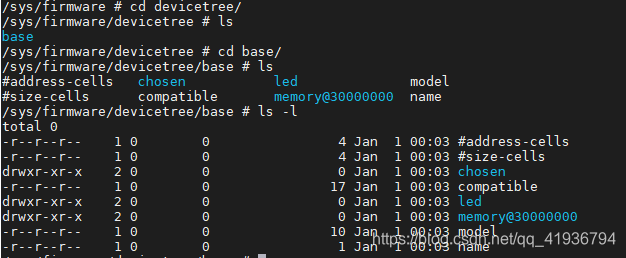
系统中所有的platform_device,有来自设备树的,也有来有.c文件中注册的,对于来自设备树的platform_device,可以进入 /sys/devices/platform/<设备名>/of_node 查看它的设备树属性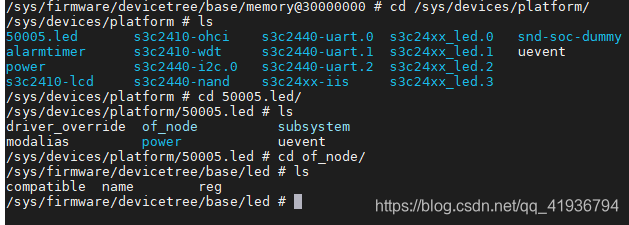
----------------------------------------------------------------------------------
linux设备驱动程序-设备树(1)-dtb转换成device_node
https://www.cnblogs.com/downey-blog/p/10485596.html
本设备树解析基于arm平台
从start_kernel开始
linux最底层的初始化部分在HEAD.s中,这是汇编代码,我们暂且不作过多讨论,在head.s完成部分初始化之后,就开始调用C语言函数,而被调用的第一个C语言函数就是start_kernel,start kernel原型是这样的:
asmlinkage __visible void __init start_kernel(void)
{
...
setup_arch(&command_line);
...
}
而对于设备树的处理,基本上就在setup_arch()这个函数中。
在这篇文章中,我们分析的方法就是持续地跟踪linux源代码,但是鉴于linux源代码的复杂性,只将程序中相关性较强的部分贴出来进行分析,因为如果去深究细节部分,那只会自讨苦吃。
博主为整个函数调用流程画了一张思维导图,结合思维导图阅读更加清晰,点此下载,博主也将其贴在了文章最后,需要下载查看,网页上查看可能不清晰。
setup_arch
可以看到,在start_kernel()中调用了setup_arch(&command_line);
void __init setup_arch(char **cmdline_p)
{
    const struct machine_desc *mdesc;
    mdesc = setup_machine_fdt(__atags_pointer);
    ...
    arm_memblock_init(mdesc);
    ...
    unflatten_device_tree();
    ...
}
这三个被调用的函数就是主要的设备树处理函数,setup_machine_fdt()函数根据传入的设备树dtb的首地址完成一些初始化操作。
arm_memblock_init()函数主要是内存相关,为设备树保留相应的内存空间,保证设备树dtb本身存在于内存中而不被覆盖。用户可以在设备树中设置保留内存,这一部分同时作了保留指定内存的工作。
unflatten_device_tree()从命名可以看出,这个函数就是对设备树具体的解析,事实上在这个函数中所做的工作就是将设备树各节点转换成相应的struct device_node结构体。
下面我们再来通过代码跟踪仔细分析,先从setup_machine_fdt()开始。
setup_machine_fdt(__atags_pointer)
__atags_pointer这个全局变量存储的就是r2的寄存器值,是设备树在内存中的起始地址,将设备树起始地址传递给setup_machine_fdt,对设备树进行解析。接着跟踪setup_machine_fdt()函数:
const struct machine_desc * __init setup_machine_fdt(unsigned int dt_phys)
{
    const struct machine_desc *mdesc, *mdesc_best = NULL;
    if (!dt_phys || !early_init_dt_verify(phys_to_virt(dt_phys)))           ——————part 1
	    return NULL;

    mdesc = of_flat_dt_match_machine(mdesc_best, arch_get_next_mach);       ——————part 2

    early_init_dt_scan_nodes();                                             ——————part 3
    ...
}
第一部分先将设备树在内存中的物理地址转换为虚拟地址,然后再检查该地址上是否有设备树的魔数(magic),魔数就是一串用于识别的字节码,如果没有或者魔数不匹配,表明该地址没有设备树文件,函数返回,否则验证成功,将设备树地址赋值给全局变量initial_boot_params。
第二部分of_flat_dt_match_machine(mdesc_best, arch_get_next_mach),逐一读取设备树根目录下的compatible属性。
将compatible中的属性一一与内核中支持的硬件单板相对比,匹配成功后返回相应的machine_desc结构体指针。
machine_desc结构体中描述了单板相关的一些硬件信息,这里不过多描述。
主要的的行为就是根据这个compatible属性选取相应的硬件单板描述信息,一般compatible属性名就是"厂商,芯片型号"。
第三部分就是扫描设备树中的各节点,主要分析这部分代码。
void __init early_init_dt_scan_nodes(void)
{
    of_scan_flat_dt(early_init_dt_scan_chosen, boot_command_line);
    of_scan_flat_dt(early_init_dt_scan_root, NULL);
    of_scan_flat_dt(early_init_dt_scan_memory, NULL);
}
出人意料的是,这个函数中只有一个函数的三个调用,直觉告诉我这三个函数调用并不简单。
首先of_scan_flat_dt()这个函数接收两个参数,一个是函数指针,一个为boot_command_line,boot_command_line是一个静态数组,存放着启动参数,而of_scan_flat_dt()函数的作用就是扫描设备树中的节点,然后对各节点分别调用传入的回调函数。
在上述代码中,传入的参数分别为early_init_dt_scan_chosen,early_init_dt_scan_root,early_init_dt_scan_memory这三个函数,从名称可以猜测,这三个函数分别是处理chosen节点、root节点中除子节点外的属性信息、memory节点。
int __init early_init_dt_scan_chosen(unsigned long node, const char *uname,int depth, void *data){
    ...
    p = of_get_flat_dt_prop(node, "bootargs", &l);
    if (p != NULL && l > 0)
	    strlcpy(data, p, min((int)l, COMMAND_LINE_SIZE));
    ...
}
经过代码分析,第一个被传入的函数参数作用是获取bootargs,然后将bootargs放入boot_command_line中,作为启动参数,而并非处理整个chosen节点。
接下来再看第二个函数调用:
int __init early_init_dt_scan_root(unsigned long node, const char *uname,int depth, void *data)
{
    dt_root_size_cells = OF_ROOT_NODE_SIZE_CELLS_DEFAULT;
    dt_root_addr_cells = OF_ROOT_NODE_ADDR_CELLS_DEFAULT;

    prop = of_get_flat_dt_prop(node, "#size-cells", NULL);
    if (prop)
        dt_root_size_cells = be32_to_cpup(prop);
    prop = of_get_flat_dt_prop(node, "#address-cells", NULL);
    if (prop)
        dt_root_addr_cells = be32_to_cpup(prop);
    ...
}
通过进一步代码分析,第二个函数执行是为了将root节点中的#size-cells和#address-cells属性提取出来,并非获取root节点中所有的属性,放到全局变量dt_root_size_cells和dt_root_addr_cells中。
size-cells和address-cells表示对一个属性(通常是reg属性)的地址需要多少个四字节描述,而地址的长度需要多少个四字节描述,数据长度基本单位为4。
#size-cells = 1
#address-cells = 1
reg = <0x12345678 0x100 0x22 0x4>
在上述示例中,size-cells为1表示数据大小为一个4字节描述,address-cells为1表示地址由一个四字节描述。
而reg属性由四个四字节组成,所以存在两组地址描述,第一组是起始地址为0x12345678,长度为0x100,第二组起始地址为0x22,长度为0x4,因为在<>中,所有数据都是默认为32位。
接下来看第三个函数调用:
int __init early_init_dt_scan_memory(unsigned long node, const char *uname,int depth, void *data){
...
if (!IS_ENABLED(CONFIG_PPC32) || depth != 1 || strcmp(uname, "memory@0") != 0)
return 0;
reg = of_get_flat_dt_prop(node, "reg", &l);
endp = reg + (l / sizeof(__be32));
while ((endp - reg) >= (dt_root_addr_cells + dt_root_size_cells)) {
base = dt_mem_next_cell(dt_root_addr_cells, ®);
size = dt_mem_next_cell(dt_root_size_cells, ®);
early_init_dt_add_memory_arch(base, size);
}
}
函数先判断节点的unit name是memory@0,如果不是,则返回。然后将所有memory相关的reg属性取出来,根据address-cell和size-cell的值进行解析,然后调用early_init_dt_add_memory_arch()来申请相应的内存空间。
到这里,setup_machine_fdt()函数对于设备树的第一次扫描解析就完成了,主要是获取了一些设备树提供的总览信息。
*** 接下来继续回到setup_arch()函数中,继续向下跟踪代码。 ***
arm_memblock_init
void __init arm_memblock_init(const struct machine_desc *mdesc)
{
    ...
    early_init_fdt_reserve_self();
    early_init_fdt_scan_reserved_mem();
    ...
}
arm_memblock_init()对于设备树的初始化而言,主要做了两件事:
- 调用early_init_fdt_reserve_self,根据设备树的大小为设备树分配空间,设备树的totalsize在dtb头部中有指明,因此当系统启动之后,设备树就一直存在在系统中。
- 扫描设备树节点中的"reserved-memory"节点,为其分配保留空间。
memblock_init对于设备树的部分解析就完成了,主要是为设备树指定保留内存空间。
接下来继续回到setup_arch()函数中,继续向下跟踪代码。
unflatten_device_tree
这一部分就进入了设备树的解析部分:
void __init unflatten_device_tree(void)
{
    __unflatten_device_tree(initial_boot_params, NULL, &of_root,early_init_dt_alloc_memory_arch, false);  —————— part1

    of_alias_scan(early_init_dt_alloc_memory_arch);                  —————— part2
    ...
}
of_alias_scan
为了讲解的方便,我们先来看part2,从名字来看,这个函数的作用是解析根目录下的alias,跟踪代码:
void of_alias_scan(void * (*dt_alloc)(u64 size, u64 align)){
    of_aliases = of_find_node_by_path("/aliases");
    of_chosen = of_find_node_by_path("/chosen");
    if (of_chosen) {
        if (of_property_read_string(of_chosen, "stdout-path", &name))
            of_property_read_string(of_chosen, "linux,stdout-path",
                        &name);
        if (IS_ENABLED(CONFIG_PPC) && !name)
            of_property_read_string(of_aliases, "stdout", &name);
        if (name)
            of_stdout = of_find_node_opts_by_path(name, &of_stdout_options);
    }
    for_each_property_of_node(of_aliases, pp) {
        ...
        ap = dt_alloc(sizeof(*ap) + len + 1, __alignof__(*ap));
        if (!ap)
            continue;
        memset(ap, 0, sizeof(*ap) + len + 1);
        ap->alias = start;
        of_alias_add(ap, np, id, start, len);
        ...
    }
}
从上文贴出的程序来看,of_alias_scan()函数先是处理设备树chosen节点中的"stdout-path"或者"stdout"属性(两者最多存在其一),然后将stdout指定的path赋值给全局变量of_stdout_options,并将返回的全局struct
device_node类型数据赋值给of_stdout,指定系统启动时的log输出。
接下来为aliases节点申请内存空间,如果一个节点中同时没有name/phandle/linux,phandle,则被定义为特殊节点,对于这些特殊节点将不会申请内存空间。
然后,使用of_alias_add()函数将所有的aliases内容放置在同一个链表中。
of_chosen和of_aliases都是struct device_node型的全局数据。
__unflatten_device_tree
我们再来看最主要的设备树解析函数:
void *__unflatten_device_tree(const void *blob,struct device_node *dad,struct device_node **mynodes,void *(*dt_alloc)(u64 size, u64 align),bool detached){
    int size;
    ...
    size = unflatten_dt_nodes(blob, NULL, dad, NULL);
    ...
    mem = dt_alloc(size + 4, __alignof__(struct device_node));
    ...
    unflatten_dt_nodes(blob, mem, dad, mynodes);
}
主要的解析函数为unflatten_dt_nodes(),在__unflatten_device_tree()函数中,unflatten_dt_nodes()被调用两次,第一次是扫描得出设备树转换成device node需要的空间,然后系统申请内存空间,第二次就进行真正的解析工作,我们继续看unflatten_dt_nodes()函数:
值得注意的是,在第二次调用unflatten_dt_nodes()时传入的参数为unflatten_dt_nodes(blob, mem, dad, mynodes);
第一个参数是设备树存放首地址,第二个参数是申请的内存空间,第三个参数为父节点,初始值为NULL,第四个参数为mynodes,初始值为of_node.
static int unflatten_dt_nodes(const void *blob,void *mem,struct device_node *dad,struct device_node **nodepp)
{
    ...
    for (offset = 0;offset >= 0 && depth >= initial_depth;offset = fdt_next_node(blob, offset, &depth)) {
        populate_node(blob, offset, &mem,nps[depth],fpsizes[depth],&nps[depth+1], dryrun);
        ...
     }
}
这个函数中主要的作用就是从根节点开始,对子节点依次调用populate_node(),从函数命名上来看,这个函数就是填充节点,为节点分配内存。
我们继续往下追踪:
static unsigned int populate_node(const void *blob,int offset,void **mem,
			  struct device_node *dad,unsigned int fpsize,struct device_node **pnp,bool dryrun){
    struct device_node *np;
    ...
    np = unflatten_dt_alloc(mem, sizeof(struct device_node) + allocl,__alignof__(struct device_node));
    of_node_init(np);
    np->full_name = fn = ((char *)np) + sizeof(*np);
    if (dad != NULL) {
		np->parent = dad;
		np->sibling = dad->child;
		dad->child = np;
	}
    ...
    populate_properties(blob, offset, mem, np, pathp, dryrun);
    np->name = of_get_property(np, "name", NULL);
	np->type = of_get_property(np, "device_type", NULL);
    if (!np->name)
		np->name = "<NULL>";
	if (!np->type)
		np->type = "<NULL>";
    ...
}
通过跟踪populate_node()函数,可以看出,首先为当前节点申请内存空间,使用of_node_init()函数对node进行初始化,of_node_init()函数也较为简单:
static inline void of_node_init(struct device_node *node)
{
    kobject_init(&node->kobj, &of_node_ktype);
    node->fwnode.ops = &of_fwnode_ops;
}
设置kobj,接着设置node的fwnode.ops。
然后再设置一些参数,需要特别注意的是:对于一个struct device_node结构体,申请的内存空间是sizeof(struct device_node)+allocl,这个allocl是节点的unit_name长度(类似于chosen、memory这类子节点描述开头时的名字,并非.name成员)。
然后通过np->full_name = fn = ((char )np) + sizeof(np);将device_node的full_name指向结构体结尾处,即将一个节点的unit name放置在一个struct device_node的结尾处。
同时,设置其parent和sibling节点。
接着,调用populate_properties()函数,从命名上来看,这个函数的作用是为节点的各个属性分配空间。
紧接着,设置device_node节点的name和type属性,name由设备树中.name属性而来,type则由设备树中.device_type而来。
一个设备树中节点转换成一个struct device_node结构的过程渐渐就清晰起来,现在我们接着看看populate_properties()这个函数,看看属性是怎么解析的:
static void populate_properties(const void *blob,int offset,void **mem,struct device_node *np,const char *nodename,bool dryrun){
    ...
    for (cur = fdt_first_property_offset(blob, offset);
     cur >= 0;
     cur = fdt_next_property_offset(blob, cur))
     {
         fdt_getprop_by_offset(blob, cur, &pname, &sz);
         unflatten_dt_alloc(mem, sizeof(struct property),__alignof__(struct property));
         if (!strcmp(pname, "phandle") ||  !strcmp(pname, "linux,phandle")) {
		 if (!np->phandle)
			np->phandle = be32_to_cpup(val);

        pp->name   = (char *)pname;
        pp->length = sz;
        pp->value  = (__be32 *)val;
        *pprev     = pp;
        pprev      = &pp->next;
        ...
	}
    }
}
从属性转换部分的程序可以看出,对于大部分的属性,都是直接填充一个struct property属性,而对于,"phandle"属性和"linux,phandle"属性,直接填充struct device_node 的phandle字段,不放在属性链表中。
struct property结构体是这样的:
struct property {
    char	*name;
    int	length;
    void	*value;
    struct property *next;
    ...
};
在设备树中,对于属性的描述是key = value,这个结构体中的name和value分别对应key和value,而length表示value的长度,next指针指向下一个struct property结构体。
struct device_node的生成
程序跟踪到这里,设备树由dtb二进制文件经过解析为每个节点生成一个struct device_node结构体的过程基本上就清晰了,我们再进行一下总结,首先看看struct device_node结构:
struct device_node {
    const char *name;
    const char *type;
    phandle phandle;
    const char *full_name;
    ...
    struct	property *properties;
    struct	property *deadprops;	/* removed properties */
    struct	device_node *parent;
    struct	device_node *child;
    struct	device_node *sibling;
    struct	kobject kobj;
    unsigned long _flags;
    void	*data;
    ...
};
- .name属性:设备节点中的name属性转换而来。
- .type属性:由设备节点中的device_type转换而来。
- .phandle属性:有设备节点中的"phandle"和"linux,phandle"属性转换而来,特殊的还可能由"ibm,phandle"属性转换而来。
- full_name:这个指针指向整个结构体的结尾位置,在结尾位置存储着这个结构体对应设备树节点的unit_name,意味着一个struct device_node结构体占内存空间为sizeof(struct device_node)+strlen(unit_name)+字节对齐。
- .properties这是一个设备树节点的属性链表,属性可能有很多种,比如:"interrupts","timer","hwmods"等等。
- .parent,.child,.sibling:与当前属性链表节点相关节点,所以相关链表节点构成整个device_node的属性节点。
- .kobj:用于在/sys目录下生成相应用户文件。
这就是设备树子节点到struct device_node的转换,为了能更直观地看出设备树节点到struct device_node的转换过程,博主特意制作了一张脑图:
设备树处理之——device_node转换成platform_device
以下讨论基于linux4.14,arm平台
platform device
设备树的产生就是为了替代driver中过多的platform_device部分的静态定义,将硬件资源抽象出来,由系统统一解析,这样就可以避免各驱动中对硬件资源大量的重复定义,这样一来,几乎可以肯定的是,设备树中的节点最终目标是转换成platform device结构,在驱动开发时就只需要添加相应的platform driver部分进行匹配即可。
在上一节中讲到设备树dtb文件中的各个节点转换成device_node的过程,每个设备树子节点都将转换成一个对应的device_node节点,那么:
是不是每个由设备树节点转换而来的device_node结构体都将转换成对应的?
首先,对于所有的device_node,如果要转换成platform_device,必须满足以下条件:
-
一般情况下,只对设备树中根的子节点进行转换,也就是子节点的子节点并不处理。但是存在一种特殊情况,就是当某个根子节点的compatible属性为"simple-bus"、"simple-mfd"、"isa"、"arm,amba-bus"时,当前节点中的子节点将会被转换成platform_device节点。
-
节点中必须有compatible属性。
如果是device_node转换成platform device,这个转换过程又是怎么样的呢?
在老版本的内核中,platform_device部分是静态定义的,其实最主要的部分就是resources部分,这一部分描述了当前驱动需要的硬件资源,一般是IO,中断等资源。
在设备树中,这一类资源通常通过reg属性来描述,中断则通过interrupts来描述,所以,设备树中的reg和interrupts资源将会被转换成platform_device内的struct resources资源。
那么,设备树中其他属性是怎么转换的呢?答案是:不需要转换,在platform_device中有一个成员struct device dev,这个dev中又有一个指针成员struct device_node *of_node,linux的做法就是将这个of_node指针直接指向由设备树转换而来的device_node结构。
例如,有这么一个struct platform_device* of_test.我们可以直接通过of_test->dev.of_node来访问设备树中的信息.
设备树节点到device_node的转换参考一篇博客:设备树dtb到device_node的转换.
大体流程讲完了,接下来从源代码中进行求证。
platform_device转换的开始
事实上,如果从C语言的开始函数start_kernel进行追溯,是找不到platform device这一部分转换的源头的,事实上,这个转换过程的函数是of_platform_default_populate_init(),它被调用的方式是这样一个声明:
arch_initcall_sync(of_platform_default_populate_init);
在linux中,同系列的调用声明还有:
#define pure_initcall(fn)		__define_initcall(fn, 0)
#define core_initcall(fn)		__define_initcall(fn, 1)
#define core_initcall_sync(fn)		__define_initcall(fn, 1s)
#define postcore_initcall(fn)		__define_initcall(fn, 2)
#define postcore_initcall_sync(fn)	__define_initcall(fn, 2s)
#define arch_initcall(fn)		__define_initcall(fn, 3)
#define arch_initcall_sync(fn)		__define_initcall(fn, 3s)
#define subsys_initcall(fn)		__define_initcall(fn, 4)
#define subsys_initcall_sync(fn)	__define_initcall(fn, 4s)
#define fs_initcall(fn)			__define_initcall(fn, 5)
#define fs_initcall_sync(fn)		__define_initcall(fn, 5s)
#define rootfs_initcall(fn)		__define_initcall(fn, rootfs)
#define device_initcall(fn)		__define_initcall(fn, 6)
#define device_initcall_sync(fn)	__define_initcall(fn, 6s)
#define late_initcall(fn)		__define_initcall(fn, 7)
#define late_initcall_sync(fn)		__define_initcall(fn, 7s)
这些宏最终都是调用__define_initcall(fn, n),这个数字代表系统启动时被调用的优先级,数字越小,优先级越低,用这一系列宏声明一个新的函数就是将这个函数指针放入内存中一个指定的段内。
#define __define_initcall(fn, id) \
static initcall_t __initcall_##fn##id __used \
__attribute__((__section__(".initcall" #id ".init"))) = fn;
即放入到".initcalln.init"中,n代表优先级,当系统启动时,会依次调用这些段中的函数。
(详细了解linux的initcall机制可以参考我的另一篇博客:linux的initcall机制)
下面我们就进入到of_platform_default_populate_init()中,查看它的执行过程:
static int __init of_platform_default_populate_init(void)
{
    ...
    of_platform_default_populate(NULL, NULL, NULL);
    ...
}
在函数of_platform_default_populate_init()中,调用了of_platform_default_populate(NULL, NULL, NULL);,传入三个空指针:
const struct of_device_id of_default_bus_match_table[] = {
    { .compatible = "simple-bus", },
    { .compatible = "simple-mfd", },
    { .compatible = "isa", },
    #ifdef CONFIG_ARM_AMBA
        { .compatible = "arm,amba-bus", },
    #endif /* CONFIG_ARM_AMBA */
        {} /* Empty terminated list */
};

int of_platform_default_populate(struct device_node *root,const struct of_dev_auxdata *lookup,struct device *parent)
{
    return of_platform_populate(root, of_default_bus_match_table, lookup,
                    parent);
}
of_platform_default_populate()调用了of_platform_populate()。
需要注意的是,在调用of_platform_populate()时传入了参数of_default_bus_match_table[],这个table是一个静态数组,这个静态数组中定义了一系列的compatible属性:"simple-bus"、"simple-mfd"、"isa"、"arm,amba-bus"。
按照我们上文中的描述,当某个根节点下的一级子节点的compatible属性为这些属性其中之一时,它的一级子节点也将由device_node转换成platform_device.
到底是不是这样呢?接着往下看:
int of_platform_populate(struct device_node *root,const struct of_device_id *matches,const struct of_dev_auxdata *lookup,struct device *parent){
    root = root ? of_node_get(root) : of_find_node_by_path("/");

    for_each_child_of_node(root, child) {
        rc = of_platform_bus_create(child, matches, lookup, parent, true);
        if (rc) {
            of_node_put(child);
            break;
        }
    }
    ...
}
首先,从设备树中获取根节点的device_node结构体,然后对每个根目录下的一级子节点调用of_platform_bus_create(),从命名上来看,这部分解析的目的是建立各个bus的platform_device结构,需要注意的是对于of_platform_bus_create(child, matches, lookup, parent, true),matchs参数是上文中提到的compatible静态数组,而lookup和parent依旧为NULL。
接着跟踪代码:
static int of_platform_bus_create(struct device_node *bus,const struct of_device_id *matches,const struct of_dev_auxdata *lookup,struct device *parent, bool strict)
{
    dev = of_platform_device_create_pdata(bus, bus_id, platform_data, parent);

    if (!dev || !of_match_node(matches, bus))
	    return 0;

    for_each_child_of_node(bus, child) {
        pr_debug("   create child: %pOF\n", child);
        rc = of_platform_bus_create(child, matches, lookup, &dev->dev, strict);
        if (rc) {
            of_node_put(child);
            break;
        }
    }
    ...
}
对于节点的转换,是由of_platform_device_create_pdata(bus, bus_id, platform_data, parent)函数来实现的。
紧接着,在第二行的函数调用中,判断of_match_node(matches,bus)函数的返回值,这个matchs就是compatible的静态数组,这个函数的作用就是判断当前节点的compatible属性是否包含上文中compatible静态数组中的元素,如果不包含,函数返回。
如果当前compatible属性中包含静态数组中的元素,即当前节点的compatible属性有"simple-bus"、"simple-mfd"、"isa"、"arm,amba-bus"其中一项,递归地对当前节点调用of_platform_bus_create(),即将符合条件的子节点转换为platform_device结构。
关于节点转换的细节部分我们接着跟踪of_platform_device_create_pdata(bus, bus_id, platform_data, parent)函数,此时的参数platform_data为NULL。
static struct platform_device *of_platform_device_create_pdata(struct device_node *np,const char *bus_id,void *platform_data,struct device *parent)
{
    struct platform_device *dev;
    dev = of_device_alloc(np, bus_id, parent);
    dev->dev.bus = &platform_bus_type;
    dev->dev.platform_data = platform_data;


    if (of_device_add(dev) != 0) {
	    platform_device_put(dev);
	    goto err_clear_flag;
    }
}
struct platform_device终于现出了真身,在这个函数调用中,显示申请并初始化一个platform_device结构体,将传入的device_node链接到成员:dev.fo_node中
赋值bus成员和platform_data成员,platform_data成员为NULL。
再使用of_device_add()将当前生成的platform_device添加到系统中。
对于of_platform_device_create_pdata()函数中的实现,我们需要逐一讲解其中的函数实现:
of_device_alloc()
struct platform_device *of_device_alloc(struct device_node *np,const char *bus_id,struct device *parent)
{
    //统计reg属性的数量
    while (of_address_to_resource(np, num_reg, &temp_res) == 0)
	    num_reg++;
    //统计中断irq属性的数量
    num_irq = of_irq_count(np);
    //根据num_irq和num_reg的数量申请相应的struct resource内存空间。
    if (num_irq || num_reg) {
        res = kzalloc(sizeof(*res) * (num_irq + num_reg), GFP_KERNEL);
        if (!res) {
            platform_device_put(dev);
            return NULL;
        }
        //设置platform_device中的num_resources成员
        dev->num_resources = num_reg + num_irq;
        //设置platform_device中的resource成员
        dev->resource = res;

        //将device_node中的reg属性转换成platform_device中的struct resource成员。
        for (i = 0; i < num_reg; i++, res++) {
            rc = of_address_to_resource(np, i, res);
            WARN_ON(rc);
        }
        //将device_node中的irq属性转换成platform_device中的struct resource成员。
        if (of_irq_to_resource_table(np, res, num_irq) != num_irq)
            pr_debug("not all legacy IRQ resources mapped for %s\n",
                np->name);
    }
    //将platform_device的dev.of_node成员指针指向device_node。
    dev->dev.of_node = of_node_get(np);
    //将platform_device的dev.fwnode成员指针指向device_node的fwnode成员。
    dev->dev.fwnode = &np->fwnode;
    //设备parent为platform_bus
    dev->dev.parent = parent ? : &platform_bus;

}
首先,函数先统计设备树中reg属性和中断irq属性的个数,然后分别为它们申请内存空间,链入到platform_device中的struct resources成员中。除了设备树中"reg"和"interrupt"属性之外,还有可选的"reg-names"和"interrupt-names"这些io中断资源相关的设备树节点属性也在这里被转换。
将相应的设备树节点生成的device_node节点链入到platform_device的dev.of_node中。
of_device_add
int of_device_add(struct platform_device *ofdev){
    ...
    return device_add(&ofdev->dev);
}
将当前platform_device中的struct device成员注册到系统device中,并为其在用户空间创建相应的访问节点。
总结
总的来说,将device_node转换为platform_device的过程还是比较简单的。
整个转换过程的函数调用关系是这样的:
                            of_platform_default_populate_init()
                                        |
                            of_platform_default_populate();
                                        |
                            of_platform_populate();
                                        |
                            of_platform_bus_create()
                _____________________|_________________
                |                                      |
        of_platform_device_create_pdata()       of_platform_bus_create()
        _________________|____________________
       |                                      |
 of_device_alloc()                        of_device_add()
好了,关于linux设备树中device_node到platform_device的转换过程的讨论就到此为止啦,如果朋友们对于这个有什么疑问或者发现有文章中有什么错误,欢迎留言。