常用控件使用
目录
3、定义好参数和参数值以后我们需要引用到请求中,格式如下:${定义的参数名称}
八、添加事务控制器,将同一操作步骤涉及的请求剪切到同一个事务中
1、把mysql驱动放在jmeter4.0\lib\ext这个目录
2、添加JDBC Connection Configuration
一、参数化:以搜索为例,对搜索条件参数化
1、添加csv Data set config
步骤:“添加”->”配置元件” ->”CSV Data Set Config”


2、设置csv Data set config
步骤:
- 填写Filename,数据文件存放路径
- 填写File encoding,一般填写UTF-8
- 填写Variable Names,填写参数名,用逗号分隔
- 填写Delimiter,默认是英文逗号
说明:
- Filename:文件名,指保存信息的文件目录,可以相对或者绝对路径(比如:D:\test.txt)
- File encoding:csv文件编码,可以不填
- Variable Names:参数名,多个参数用“,”分开。参数使用格式${OA_VendingMachineNum}和${Name}
- Delimiter:csv文件中的分隔符(用”\t”代替tab键)(一般情况下,分隔符为英文逗号)

我在文件中定义的参数

3、定义好参数和参数值以后我们需要引用到请求中,格式如下:${定义的参数名称}

二、正则表达式提取器

Token:”(.+?)”


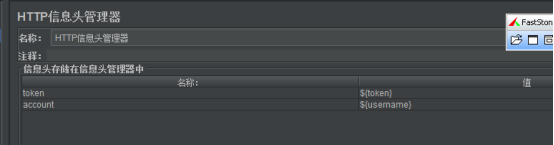
三、信息头加token
四、处理Base64加密参数
import sun.misc.BASE64Decoder;
String data = new sun.misc.BASE64Encoder().encode(("..."+"${password}"+"...").getBytes());
vars.put("base64password", data);
// ${password}:要加密的字符串参数,base64password:加密后的字符串保存在${base64password}参数中
加密网站:http://www.jsons.cn/

五、处理SHA256加密参数
import org.apache.commons.codec.binary.Base64;
import org.apache.commons.codec.digest.DigestUtils;
//对appName、time 和token 拼接后进行摘要计算
String appName = "D-KGRY";
String token = "${token}";
String time = vars.get("time");
String str = appName + time + token;
String strSha256 = DigestUtils.sha256Hex(str);
vars.put("signsha256", strSha256);

六、导出Excel文件
import java.io.*;
byte[] result = prev.getResponseData();
String file_name = "D:\\MyData\\ex_mokg\\Desktop\\DMP项目测试\\测试数据\\数据资产_移动画像_200304.xlsx";
File file = new File(file_name);
FileOutputStream out = new FileOutputStream(file);
out.write(result);
out.close();

七、多个线程组时设置全局变量
1、获取token

2、利用token设置全局变量

3、调用全局变量

八、添加事务控制器,将同一操作步骤涉及的请求剪切到同一个事务中
步骤:“添加”->”逻辑控制器” ->”事务控制器”


九、添加仅一次控制器
在压测过程中,某个接口只需要请求一次时添加,比如登录接口。

十、添加集合点,同步定时器

Number of Simulated Users to Groupby:每次释放的线程数量。如果设置为0,等于设置为线程租中的线程数量。
Timeout in milliseconds:指定人数多少秒没集合到算超时。

十一、添加固定定时器,模拟新老用户的操作时间差距

十二、设置数据库测试
1、把mysql驱动放在jmeter4.0\lib\ext这个目录

2、添加JDBC Connection Configuration


3、添加JDBC Request请求

4、添加BeanShell断言
String response = "";
String Str = "5";
String state = vars.getObject("name").get(0).get("state").toString();response=prev.getResponseDataAsString(); // 通过变量name和state获取数据库请求响应结果的state字段信息
if(response=="")
{
Failure = true;
FailureMessage = "系统无响应,获取不到响应数据!";
// 对比数据库内容和响应内容,私用euqals方法判断是否一致
}else if(!state.equals(Str))
{
Failure = true; // 把断言失败置为真
// String Msg = " (0-等待,2-运行,3-失败,4-失败禁用、杀掉、取消,5-成功)\n";
String Msg = "\n";
String Msg1 = "目前状态为:";
if (state.equals("0")) {
FailureMessage = Msg1 + state + "-等待" + Msg;
} else if (state.equals("2")) {
FailureMessage = Msg1 + state + "-运行" + Msg;
} else if (state.equals("3")) {
FailureMessage = Msg1 + state + "-失败" + Msg;
} else if (!state.equals("4")) {
FailureMessage = Msg1 + state + "-失败禁用、杀掉、取消" + Msg;
} else {
FailureMessage = Msg1 + state + "-其他" + Msg;
}
}
else
{
String stratdate = vars.getObject("name").get(0).get("date_latest_send").toString();
String enddate = vars.getObject("name").get(0).get("u_date").toString();
String sdate = ${sdate};
int i = stratdate.compareTo(sdate);
if (i < 0) {
// 把断言失败置为真
Failure = true;
String Msg = "开始时间小于定义的时间,请确认作业是否重跑过";
FailureMessage = Msg + " (运行开始日期:" + stratdate + ",运行完成日期:" + enddate + ")\n";
}
}

5、添加断言结果
