oAuth2.0
简介
什么是OAuth
oAuth 协议为用户资源的授权提供了一个安全的、开放而又简易的标准。与以往的授权方式不同之处是 oAuth 的授权不会使第三方触及到用户的帐号信息(如用户名与密码),即第三方无需使用用户的用户名与密码就可以申请获得该用户资源的授权,因此 oAuth 是安全的。
什么是Spring Security
Spring Security 是一个安全框架,前身是 Acegi Security,能够为 Spring 企业应用系统提供声明式的安全访问控制。Spring Security 基于 Servlet 过滤器、IoC 和 AOP,为 Web 请求和方法调用提供身份确认和授权处理,避免了代码耦合,减少了大量重复代码工作。
令牌刷新机制
Access Token
Access Token 是客户端访问资源服务器的令牌。拥有这个令牌代表着得到用户的授权。然而,这个授权应该是 临时 的,有一定有效期。这是因为,Access Token 在使用的过程中 可能会泄露。给 Access Token 限定一个 较短的有效期 可以降低因 Access Token 泄露而带来的风险。
然而引入了有效期之后,客户端使用起来就不那么方便了。每当 Access Token 过期,客户端就必须重新向用户索要授权。这样用户可能每隔几天,甚至每天都需要进行授权操作。这是一件非常影响用户体验的事情。希望有一种方法,可以避免这种情况。
于是 oAuth2.0 引入了 Refresh Token 机制
Refresh Token
Refresh Token 的作用是用来刷新 Access Token。认证服务器提供一个刷新接口,例如:
http://www.funtl.com/refresh?refresh_token=&client_id=
传入 refresh_token 和 client_id,认证服务器验证通过后,返回一个新的 Access Token。为了安全,oAuth2.0 引入了两个措施:
- oAuth2.0 要求,Refresh Token 一定是保存在客户端的服务器上 ,而绝不能存放在狭义的客户端(例如 App、PC 端软件)上。调用
refresh接口的时候,一定是从服务器到服务器的访问。 - oAuth2.0 引入了
client_secret机制。即每一个client_id都对应一个client_secret。这个client_secret会在客户端申请client_id时,随client_id一起分配给客户端。客户端必须把client_secret妥善保管在服务器上,决不能泄露。刷新 Access Token 时,需要验证这个client_secret。
以上就是 Refresh Token 机制。Refresh Token 的有效期非常长,会在用户授权时,随 Access Token 一起重定向到回调 URL,传递给客户端。
客户端授权模式
概述
客户端必须得到用户的授权(authorization grant),才能获得令牌(access token)。oAuth 2.0 定义了四种授权方式。
- implicit:简化模式,不推荐使用
- authorization code:授权码模式
- resource owner password credentials:密码模式
- client credentials:客户端模式
简化模式
简化模式适用于纯静态页面应用。所谓纯静态页面应用,也就是应用没有在服务器上执行代码的权限(通常是把代码托管在别人的服务器上),只有前端 JS 代码的控制权。
这种场景下,应用是没有持久化存储的能力的。因此,按照 oAuth2.0 的规定,这种应用是拿不到 Refresh Token 的。其整个授权流程如下:
该模式下,access_token容易泄露不可刷新
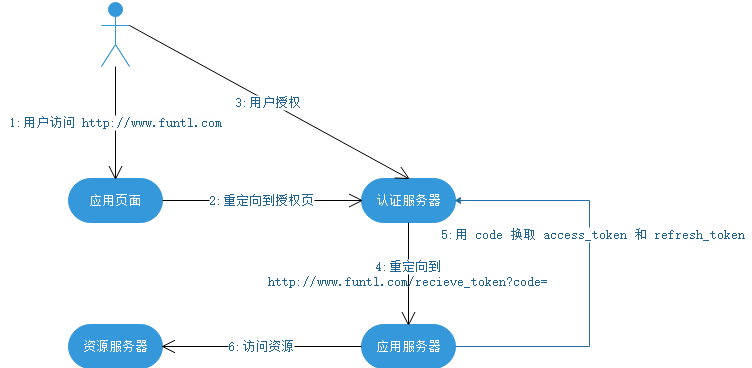
授权码模式
授权码模式适用于有自己的服务器的应用,它是一个一次性的临时凭证,用来换取 access_token 和 refresh_token。
需要传入 code、client_id 以及 client_secret。验证通过后,返回 access_token 和 refresh_token。一旦换取成功,code 立即作废,不能再使用第二次。流程图如下:

这个 code 的作用是保护 token 的安全性。上一节说到,简单模式下,token 是不安全的。这是因为在第 4 步当中直接把 token 返回给应用。而这一步容易被拦截、窃听。引入了 code 之后,即使攻击者能够窃取到 code,但是由于他无法获得应用保存在服务器的 client_secret,因此也无法通过 code 换取 token。而第 5 步,为什么不容易被拦截、窃听呢?这是因为,首先,这是一个从服务器到服务器的访问,黑客比较难捕捉到;其次,这个请求通常要求是 https 的实现。即使能窃听到数据包也无法解析出内容。
有了这个 code,token 的安全性大大提高。因此,oAuth2.0 鼓励使用这种方式进行授权,而简单模式则是在不得已情况下才会使用。
密码模式
密码模式中,用户向客户端提供自己的用户名和密码。客户端使用这些信息,向 “服务商提供商” 索要授权。在这种模式中,用户必须把自己的密码给客户端,但是客户端不得储存密码。这通常用在用户对客户端高度信任的情况下,比如客户端是操作系统的一部分。
一个典型的例子是同一个企业内部的不同产品要使用本企业的 oAuth2.0 体系。在有些情况下,产品希望能够定制化授权页面。由于是同个企业,不需要向用户展示“xxx将获取以下权限”等字样并询问用户的授权意向,而只需进行用户的身份认证即可。这个时候,由具体的产品团队开发定制化的授权界面,接收用户输入账号密码,并直接传递给鉴权服务器进行授权即可
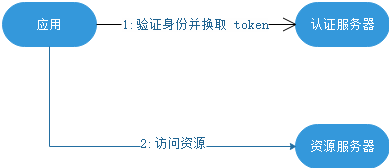
客户端模式
如果信任关系再进一步,或者调用者是一个后端的模块,没有用户界面的时候,可以使用客户端模式。鉴权服务器直接对客户端进行身份验证,验证通过后,返回 token。
环境
环境介绍
oAuth2.0的服务提供方涵盖两个服务,即授权服务和资源服务,使用Spring Security oAuth2.0的时候你可以选择把它们在同一个应用程序中实现,也可以选择建立使用同一个授权服务的多个资源服务.
授权服务
授权服务应包含对接入端以及登录用户的合法性进行验证并颁布token等功能,对令牌的请求端点有Spring MVC控制器进行实现,下面是配置一个认证服务器必须要实现的endpoints:
- AuthenticationEndpoint:服务于认证请求.默认URL:
/oauth/authorize. - TokenEndpoint:服务于访问令牌的请求.默认URL:
/oauth/token
资源服务
资源服务应包含对资源的保护功能,对非法的请求进行拦截,对请求中token进行解析鉴权等,下面的过滤器用于实现oAuth2.0资源服务:
- oAuth2AuthenticationProcessingFilter用来对请求给出的身份令牌解析鉴权
环境搭建
父工程
创建父工程并加入以下依赖
        <dependency>
            <groupId>org.springframework.cloud</groupId>
            <artifactId>spring-cloud-dependencies</artifactId>
            <version>Greenwich.RELEASE</version>
            <type>pom</type>
            <scope>import</scope>
        </dependency>

        <dependency>
            <groupId>javax.servlet</groupId>
            <artifactId>javax.servlet-api</artifactId>
            <scope>provided</scope>
        </dependency>

        <dependency>
            <groupId>mysql</groupId>
            <artifactId>mysql-connector-java</artifactId>
        </dependency>

        <dependency>
            <groupId>org.springframework.security</groupId>
            <artifactId>spring-security-jwt</artifactId>
            <version>1.0.10.RELEASE</version>
        </dependency>

        <dependency>
            <groupId>org.springframework.security.oauth.boot</groupId>
            <artifactId>spring-security-oauth2-autoconfigure</artifactId>
            <version>2.1.2.RELEASE</version>
        </dependency>
创建UAA授权服务
创建distributed_security_uaa作为授权服务工程,依赖如下:
<?xml version="1.0" encoding="UTF-8"?>
<project xmlns="http://maven.apache.org/POM/4.0.0"
         xmlns:xsi="http://www.w3.org/2001/XMLSchema-instance"
         xsi:schemaLocation="http://maven.apache.org/POM/4.0.0 http://maven.apache.org/xsd/maven-4.0.0.xsd">
    <parent>
        <artifactId>distribute_security</artifactId>
        <groupId>com.cehcloud.cehc</groupId>
        <version>0.0.1-SNAPSHOT</version>
    </parent>
    <modelVersion>4.0.0</modelVersion>

    <artifactId>distribute_security_uaa</artifactId>

    <dependencies>
        <!--<dependency>
            <groupId>org.springframework.cloud</groupId>
            <artifactId>spring-cloud-starter-netflix-hystrix</artifactId>
            <version>2.2.1.RELEASE</version>
        </dependency>

        <dependency>
            <groupId>org.springframework.cloud</groupId>
            <artifactId>spring-cloud-starter-netflix-ribbon</artifactId>
            <version>2.2.1.RELEASE</version>
        </dependency>-->

        <dependency>
            <groupId>org.springframework.cloud</groupId>
            <artifactId>spring-cloud-starter-openfeign</artifactId>
            <version>2.2.1.RELEASE</version>
        </dependency>

        <dependency>
            <groupId>com.netflix.hystrix</groupId>
            <artifactId>hystrix-javanica</artifactId>
            <version>1.5.18</version>
        </dependency>

        <!--<dependency>
            <groupId>org.springframework.cloud</groupId>
            <artifactId>spring-cloud-starter-netflix-eureka-client</artifactId>
            <version>2.1.1.RELEASE</version>
        </dependency>-->
    </dependencies>

</project>
创建启动类
@SpringBootApplication
@EnableDiscoveryClient
@EnableHystrix
@EnableFeignClients(basePackages = {

    "com.cehcloud.cehc.distribute"})
public class DistributeApplication {


    public static void main(String[] args) {


        SpringApplication.run(DistributeApplication.class, args);
    }
}
配置文件
在resources下创建application.yml
spring:
  application:
    name: uaa-service
  main:
    allow-bean-definition-overriding: true
  freemarker:
    enabled: true
    suffix: .html
    request-context-attribute: rc
    content-type: text/html
    charset: UTF-8
  mvc:
    throw-exception-if-no-handler-found: true

  datasource:
    url: jdbc:mysql://localhost:3306/user_db
    username: root
    password: root
    driver-class-name: com.mysql.cj.jdbc.Driver
    type: com.alibaba.druid.pool.DruidDataSource

server:
  port: 53201
  servlet:
    context-path: /uaa

feign:
  hystrix:
    enabled: true
  compression:
    request:
      enabled: true
      mime-types[0]: text/html
      mime-types[1]: application/xml
      mime-types[2]: application/json
      min-request-size: 2048
    response:
      enabled: true
创建Order资源服务
同上
授权服务器配置
EnableAuthenticationServer
可以在@EnableAuthenticationServer注解并继承AuthenticationServerConfigAdapter来配置oAuth2.0授权服务器.
在config包下创建AuthenticationServer:
/**
 * @author Lenovo
 * @date 2020/8/21 14:18
 */
@Configuration
@EnableAuthorizationServer
public class AuthorizationServer extends AuthorizationServerConfigurerAdapter {


}
AuthorizationServerConfigurerAdapter要求配置以下几个类,这几个类是由Spring创建的独立的配置对象,它们会被传入AuthorizationServerConfigurer中进行配置.
package com.cehcloud.cehc.distribute_order.config;

import org.springframework.context.annotation.Configuration;
import org.springframework.security.oauth2.config.annotation.configurers.ClientDetailsServiceConfigurer;
import org.springframework.security.oauth2.config.annotation.web.configuration.AuthorizationServerConfigurerAdapter;
import org.springframework.security.oauth2.config.annotation.web.configuration.EnableAuthorizationServer;
import org.springframework.security.oauth2.config.annotation.web.configurers.AuthorizationServerEndpointsConfigurer;
import org.springframework.security.oauth2.config.annotation.web.configurers.AuthorizationServerSecurityConfigurer;

/**
 * @author Lenovo
 * @date 2020/8/21 14:18
 */
@Configuration
@EnableAuthorizationServer
public class AuthorizationServer extends AuthorizationServerConfigurerAdapter {


    public AuthorizationServer() {


    }

    @Override
    public void configure(AuthorizationServerSecurityConfigurer security) throws Exception {


    }

    @Override
    public void configure(ClientDetailsServiceConfigurer clients) throws Exception {


    }

    @Override
    public void configure(AuthorizationServerEndpointsConfigurer endpoints) throws Exception {


    }
}
ClientDetailsServiceConfigurer用来配置客户端详情服务,客户端信息在这里进行初始化,能够把客户端详情信息写死在这里或者通过数据库来存储调取详情信息;AuthorizationServerEndpointsConfigurer用来配置令牌的访问端点和令牌服务;AuthorizationServerSecurityConfigurer用来配置令牌端点的安全约束;
配置客户端详情信息
ClientDetailsServiceConfigurer能够使用内存或者jdbc来实现客户端详情服务,ClientDetailsService负责查找ClientDetails,而ClientDetails有几个重要的属性:
- clientid:用来标识客户的id
- secret:客户端安全码,如果有的话
- scope:用来限制客户端的访问范围,如果为空,那么客户端有全部的访问范围
- authorizedGrantTyoes:此客户端可以使用授权类型,默认为空
- authorities:此客户端可以使用的权限
客户端详情能够在应用程序运行的时候进行更新,可以通过访问底层的存储服务或者通过自己实现ClientRegistrationService接口来进行管理.
暂时使用内存方式存储客户端详情信息:
    /**
     * 配置客户端详细信息服务
     * @param clients
     * @throws Exception
     */
    @Override
    public void configure(ClientDetailsServiceConfigurer clients) throws Exception {


        clients.inMemory()
                .withClient("c1")
                .secret(new BCryptPasswordEncoder().encode("secret"))
                .resourceIds("res1")
                .authorizedGrantTypes("authorization_code", "password", "client_credentials", "implicit", "refresh_token")
                .scopes("all")
                .autoApprove(false)
                .redirectUris("http://www.baidu.com");
    }
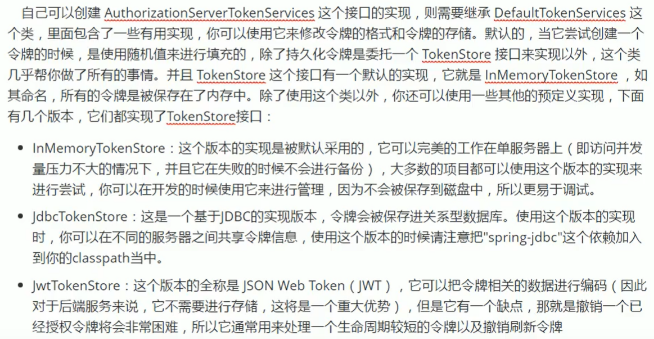
管理令牌
AuthorizationServerTokenService接口定义了一些操作可以使用户对令牌进行一些必要的管理,令牌可以被用来加载身份信息,里面包含了这个令牌的相关权限.
定义TokenConfig,在config包下定义TokenConfig,我们暂时使用内存存储,生成一个令牌
/**
 * @author Lenovo
 * @date 2020/8/21 14:55
 */
@Configuration
public class TokenConfig {


    @Bean
    public TokenStore tokenStore() {


        return new InMemoryTokenStore();
    }
}
在AuthorizationServer中定义AuthorizationServerTokenService
    @Autowired
    private TokenStore tokenStore;

    @Autowired
    private ClientDetailsService clientDetailsService;

    @Bean
    public AuthorizationServerTokenServices tokenServices() {


        DefaultTokenServices services = new DefaultTokenServices();
        // 客户端信息服务
        services.setClientDetailsService(clientDetailsService);
        // 时候产生刷新令牌
        services.setSupportRefreshToken(true);
        // 令牌存储策略
        services.setTokenStore(tokenStore);
        services.setAccessTokenValiditySeconds(7200);
        services.setRefreshTokenValiditySeconds(259200);
        return services;
    }
配置授权端点的URL
authorizationServerEndpointsConfigurer这个配置对象有一个叫做pathMapping()的方法来配置端点URL链接,它有两个参数:
- 第一个参数:String类型的,这个端点URL的默认链接
- 第二个参数:String类型的,你要进行替代的URL链接
以上参数都将以"/"字符开始的字符串,框架的默认url链接如下表可以作为pathMapping()方法的第一个参数
/oauth/authorize:授权端点/oauth/token:令牌端点/oauth/confirm_access:用户确认授权提交端点/oauth/error:授权服务错误信息端点/oauth/check_token:用于资源访问的令牌解析端点/oauth/token_key:提供公有密钥的端点,如果使用的JWT令牌的话
需要注意的是授权端点这个URL应该被Spring Security保护起来只供授权用户访问
在AuthorizationServer配置令牌访问端点
    @Autowired
    private AuthorizationCodeServices authorizationCodeServices;

    @Autowired
    private AuthenticationManager authenticationManager;

	/**
     * 令牌访问端点
     * @param endpoints
     * @throws Exception
     */
   	@Override
   	public void configure(AuthorizationServerEndpointsConfigurer endpoints) throws Exception {


        endpoints
                .authenticationManager(authenticationManager) // 密码模式需要
                .authorizationCodeServices(authorizationCodeServices) // 授权模式需要
                .tokenServices(tokenServices()) // 令牌管理服务
                .allowedTokenEndpointRequestMethods(HttpMethod.POST);
    }
令牌端点的安全约束
AuthorizationServerSecurityConfigurer用来配置令牌端点的安全约束,在AuthorizationServer中配置如下:
    /**
     * 令牌安全策略
     * @param security
     * @throws Exception
     */
    @Override
    public void configure(AuthorizationServerSecurityConfigurer security) throws Exception {


        security
                // /oauth/token_key公开
                .tokenKeyAccess("permitAll()")
                // /oauth/check_token公开
                .checkTokenAccess("permitAll()")
                // 表单认证,申请令牌
                .allowFormAuthenticationForClients();
    }
授权服务配置总结授权服务配置分成三大块:
既然要完成认证,首先要知道客户端的信息从哪里取,因此要对客户端详情配置
既然要颁发token,就必须定义token的相关endpoints,以及token如何存取,以及客户支持哪些类型的token
既然暴露除了一些endpoints,那对这些endpoints可以定义一些安全上的约束
JWT令牌
JWT介绍
JSON Web Token 是一个开放的行业标准,它定义了一种简洁的、自包含的协议格式,用于在通信双方传递json对象,传递的信息经过数字签名可以被验证和信任,JWT可以使用HMAC算法或使用RSA的公钥/私钥签名.
JWT令牌结构
JWT令牌由三部分组成,每部分中间使用(.)分隔,比如xxxx.yyyyy.xxxxx
-
Header
头部包含令牌的类型及使用的哈希算法
{
	"alg" : "HS256",
	"typ" : "JWT"
}
将上面的内容使用Base64Url编码,得到一个字符串就是JWT令牌的第一部分
-
Payload
第二部分是负载,内容也是一个json对象,它是存放有效信息的地方,它可以存放jwt提供的现成字段,比如iss、exp、sub
将第二部分使用Base64Url编码,得到一个字符串就是JWT令牌的第二部分
-
Signature
第三部分是签名,此部分用于防止jwt内容被篡改
配置JWT令牌服务
在uaa模块中配置jwt令牌服务,即可实现jwt格式的令牌
TokenConfig
package com.cehcloud.cehc.distribute_uaa.config;

import org.springframework.context.annotation.Bean;
import org.springframework.context.annotation.Configuration;
import org.springframework.security.oauth2.provider.token.TokenStore;
import org.springframework.security.oauth2.provider.token.store.InMemoryTokenStore;
import org.springframework.security.oauth2.provider.token.store.JwtAccessTokenConverter;
import org.springframework.security.oauth2.provider.token.store.JwtTokenStore;

/**
 * @author Lenovo
 * @date 2020/8/21 14:55
 */
@Configuration
public class TokenConfig {


    private String SINGING_KEY = "uaa123";

    @Bean
    public TokenStore tokenStore() {


        return new JwtTokenStore(accessTokenConverter());
    }

    @Bean
    public JwtAccessTokenConverter accessTokenConverter() {


        JwtAccessTokenConverter converter = new JwtAccessTokenConverter();
        converter.setSigningKey(SINGING_KEY);
        return converter;
    }
}
定义JWT令牌服务
	@Autowired
    private JwtAccessTokenConverter accessTokenConverter;

	@Bean
    public AuthorizationServerTokenServices tokenServices() {


        DefaultTokenServices services = new DefaultTokenServices();
        // 客户端信息服务
        services.setClientDetailsService(clientDetailsService);
        // 时候产生刷新令牌
        services.setSupportRefreshToken(true);
        // 令牌存储策略
        services.setTokenStore(tokenStore);

        TokenEnhancerChain tokenEnhancerChain = new TokenEnhancerChain();
        tokenEnhancerChain.setTokenEnhancers(Arrays.asList(accessTokenConverter));
        services.setTokenEnhancer(tokenEnhancerChain);

        services.setAccessTokenValiditySeconds(7200);
        services.setRefreshTokenValiditySeconds(259200);
        return services;
    }