环境要求
安装 Anaconda3
Pytorch:1.5.1
Cuda:10.1
Python:3.7
具体的环境配置,可以参考之前的文章
数据集
数据集的介绍和下载见这个网站
代码参考
文中未提及来源的代码均来自这个博主
一、生成voc格式的数据集
import os
import json
import codecs

class_name_dic = {


  "0": "背景",
  "1": "边异常",
  "2": "角异常",
  "3": "白色点瑕疵",
  "4": "浅色块瑕疵",
  "5": "深色点块瑕疵",
  "6": "光圈瑕疵"
 }
rawImgDir='D:/Tianchi/tile_round1_train_20201231/train_imgs/'
rawLabelDir='D:/Tianchi/tile_round1_train_20201231/train_annos.json'
anno_dir='./voc/Annotations/'
if not os.path.exists(anno_dir):
    os.makedirs(anno_dir)
with open(rawLabelDir) as f:
    annos=json.load(f)

#
image_ann={

    }
for i in range(len(annos)):
    anno=annos[i]
    name = anno['name']
    if name not in image_ann:
        image_ann[name]=[]
    image_ann[name].append(i)
#
for name in image_ann.keys():
    indexs=image_ann[name]
    height, width = annos[indexs[0]]["image_height"], annos[indexs[0]]["image_width"]
    #
    with codecs.open(anno_dir + name[:-4] + '.xml', 'w', 'utf-8') as xml:
        xml.write('<annotation>\n')
        xml.write('\t<filename>' + name + '</filename>\n')
        xml.write('\t<size>\n')
        xml.write('\t\t<width>' + str(width) + '</width>\n')
        xml.write('\t\t<height>' + str(height) + '</height>\n')
        xml.write('\t\t<depth>' + str(3) + '</depth>\n')
        xml.write('\t</size>\n')
        cnt = 0
        for inx in indexs:
            obj = annos[inx]
            assert name == obj['name']
            bbox = obj['bbox']
            category = obj['category']
            xmin, ymin, xmax, ymax = bbox
            class_name = class_name_dic[str(category)]
            #
            xml.write('\t<object>\n')
            xml.write('\t\t<name>' + class_name + '</name>\n')
            xml.write('\t\t<bndbox>\n')
            xml.write('\t\t\t<xmin>' + str(int(xmin)) + '</xmin>\n')
            xml.write('\t\t\t<ymin>' + str(int(ymin)) + '</ymin>\n')
            xml.write('\t\t\t<xmax>' + str(int(xmax)) + '</xmax>\n')
            xml.write('\t\t\t<ymax>' + str(int(ymax)) + '</ymax>\n')
            xml.write('\t\t</bndbox>\n')
            xml.write('\t</object>\n')
            cnt += 1
        assert cnt > 0
        xml.write('</annotation>')
二、自动绘制瑕疵点
# -*- coding: utf-8 -*-
import json
import cv2
from tqdm import tqdm
import os
import xml.etree.ElementTree as ET
#
def get(root, name):
    vars = root.findall(name)
    return vars
def get_and_check(root, name, length):
    vars = root.findall(name)
    if len(vars) == 0:
        raise NotImplementedError('Can not find %s in %s.'%(name, root.tag))
    if length > 0 and len(vars) != length:
        raise NotImplementedError('The size of %s is supposed to be %d, but is %d.'%(name, length, len(vars)))
    if length == 1:
        vars = vars[0]
    return vars
def deal_xml(xml_f):
    tree = ET.parse(xml_f)
    root = tree.getroot()
    object_list=[]
    # 处理每个标注的检测框
    for obj in get(root, 'object'):
        # 取出检测框类别名称
        category = get_and_check(obj, 'name', 1).text
        # 更新类别ID字典
        bndbox = get_and_check(obj, 'bndbox', 1)
        xmin = int(get_and_check(bndbox, 'xmin', 1).text) - 1
        ymin = int(get_and_check(bndbox, 'ymin', 1).text) - 1
        xmax = int(get_and_check(bndbox, 'xmax', 1).text)
        ymax = int(get_and_check(bndbox, 'ymax', 1).text)
        assert (xmax > xmin)
        assert (ymax > ymin)
        o_width = abs(xmax - xmin)
        o_height = abs(ymax - ymin)
        obj_info=[xmin,ymin,xmax,ymax,category]
        object_list.append(obj_info)
    return object_list
#
def draw_voc():
    ann_dir = './voc/annotations' #voc格式的数据集存放路径
    image_dir = './voc/JPEGImages' #原始图片的存放路径
    save_path = './voc/val_with_bbox/'  # 绘制完之后的的图片存放路径
    if not os.path.exists(save_path): os.makedirs(save_path)

    for ann_name in tqdm(os.listdir(ann_dir)):
        ann_path=os.path.join(ann_dir,ann_name)
        object_list=deal_xml(ann_path)
        img = cv2.imread(os.path.join(image_dir , ann_name[:-4]+'.jpg'))
        for obj in object_list:
            x1 = obj[0]
            y1 = obj[1]
            x2 = obj[2]
            y2 = obj[3]
            img = cv2.rectangle(img, (x1,y1), (x2,y2), (255,0,0), 8)
        cv2.imwrite(os.path.join(save_path , ann_name[:-4]+'.jpg'),img)
def draw_coco():

    ann_path = 'coco/annotations/instances_val2017.json' # annotation json
    img_path = 'coco/val2017/'
    save_path = 'coco/val2017_with_bbox/' # the path of saveing image with annotated bboxes
    #
    if not os.path.exists(save_path):os.makedirs(save_path)
    with open(ann_path,'r') as f:
        ann = json.load(f)
    #
    # for ann_img in tqdm(ann['images']):
    #     img = cv2.imread(img_path + ann_img['file_name'])
    #     img_id = ann_img['id']
    #     for ann_ann in ann['annotations']:
    #         if ann_ann['image_id'] == img_id:
    #             x1 = ann_ann['bbox'][0]
    #             y1 = ann_ann['bbox'][1]
    #             x2 = ann_ann['bbox'][0] + ann_ann['bbox'][2]
    #             y2 = ann_ann['bbox'][1] + ann_ann['bbox'][3]
    #             img = cv2.rectangle(img, (x1,y1), (x2,y2), (255,0,0), 8)
    #     cv2.imwrite(save_path + ann_img['file_name'], img)
    # #
    aug_anns = ann
    print("The augmentation image number: %d" % len(aug_anns['images']))
    print("The augmentation annotation number: %d" % len(aug_anns['annotations']))
    print("")
    class_freq_dict = {

    }

    # init class_fre_dict
    for cls in aug_anns['categories']:
        class_freq_dict[cls['id']] = 0

    # count the instance number of each class
    for ann in aug_anns['annotations']:
        class_freq_dict[ann['category_id']] += 1

    # print out class frequency
    print("The instance number of each class:")
    for cls_id in list(class_freq_dict.keys()):
        for cat in aug_anns['categories']:
            if cat['id'] == cls_id:
                print(cat['name'], ': ', class_freq_dict[cls_id])

#
if __name__=="__main__":
    draw_voc()
绘制瑕疵点之后的图像如下图所示
可以看出瑕疵点较小,因此对瓷砖图片进行切图处理。
三、 对瓷砖进行切图处理
为了提高识别的精度,对瓷砖图片进行切图处理,参照这篇文章的代码对图片进行切图处理。
实现代码如下
import os
import random
#手动建立
os.makedirs('D:/Tianchi/voc/JPEGImages/', exist_ok=True)
os.makedirs('D:/Tianchi/voc/Annotations/', exist_ok=True)
window_s = 1333
for idx, each_item in enumerate(image_meta):
    print(each_item)
    bbox = each_item['bbox']
    img = cv2.imread(img_paths + each_item['name'])
    # h, w = img.shape[:2]
    h = img.shape[0]
    w = img.shape[1]
    # each_img_meta[each_item['name']].append(bbox)
    center_x, center_y = int(bbox[0] + (bbox[2] - bbox[0]) /
                             2), int((bbox[3] - bbox[1]) / 2 + bbox[1])
    x, y, r, b = center_x - window_s // 2, center_y - window_s // 2, center_x + window_s // 2, center_y + window_s // 2
    x = x - random.randint(50, 100)
    y = y - random.randint(50, 100)
    x = max(0, x)
    y = max(0, y)
    r = min(r, w)
    b = min(b, h)
    boxes = each_img_meta[each_item['name']]
    annotations = []
    for e_box in boxes:
        if x < e_box[0] < r and y < e_box[1] < b and x < e_box[
                2] < r and y < e_box[3] < b:
            e_box1 = [int(i) for i in e_box]
            e_box1[0] = math.floor(e_box1[0] - x)
            e_box1[1] = math.floor(e_box1[1] - y)
            e_box1[2] = math.ceil(e_box1[2] - x)
            e_box1[3] = math.ceil(e_box1[3] - y)
            annotations.append(e_box1)
            each_img_meta[each_item['name']].remove(e_box)
    print('process id:', idx, "|", annotations)
    if annotations:
        slice_img = img[y:b, x:r]

        create_tree(each_item['name'], window_s, window_s)

        for anno in annotations:
            create_object(annotation, anno[0], anno[1], anno[2], anno[3],
                          anno[4])
        tree = ET.ElementTree(annotation)

        slice_name = each_item['name'][:-4] + '_' + str(x) + '_' + str(
            y) + '.jpg'
        xml_name = each_item['name'][:-4] + '_' + str(x) + '_' + str(
            y) + '.xml'
        cv2.imwrite('D:/Tianchi/yolov5_material/yolov5-master/voc/JPEGImages/' + slice_name,
                    slice_img)
        tree.write('D:/Tianchi/yolov5_material/yolov5-master/voc/Annotations/' + xml_name)
    else:
        continue
    if x < 0 or y < 0 or r > w or b > h:
        print(idx)
        print(each_item['name'])
切完之后的图片如下图所示
四、将voc格式的数据集转换为yolo(.txt)格式的数据集
yolov5模型进行目标检测,必须使用yolo格式的数据
因此利用下面的程序创建yolo格式的数据
'''
标注文件转换xml转txt(vol to yolo)转完后需添加labels文件,即数字序号对应的标签名。

'''

import xml.etree.ElementTree as ET
import pickle
import os
from os import listdir, getcwd
from os.path import join

classes = ['边异常', '角异常', '白色点瑕疵', '浅色块瑕疵', '深色点块瑕疵','光圈瑕疵']

def convert(size, box):
    dw = 1./(size[0])
    dh = 1./(size[1])
    x = (box[0] + box[1])/2.0 - 1
    y = (box[2] + box[3])/2.0 - 1
    w = box[1] - box[0]
    h = box[3] - box[2]
    x = x*dw
    w = w*dw
    y = y*dh
    h = h*dh
    if x >= 1:
        x = 0.99
    if y >= 1:
        y = 0.99
    if w>=1:
        w=0.99
    if h>=1:
        h=0.99
    return (x,y,w,h)

def convert_annotation(rootpath,xmlname):
    xmlpath = rootpath + '/Annotations'
    xmlfile = os.path.join(xmlpath,xmlname)
    with open(xmlfile, "r", encoding='UTF-8') as in_file:
      txtname = xmlname[:-4]+'.txt'
      print(txtname)
      txtpath = rootpath + '/worktxt'
      if not os.path.exists(txtpath):
        os.makedirs(txtpath)
      txtfile = os.path.join(txtpath,txtname)
      with open(txtfile, "w+" ,encoding='UTF-8') as out_file:
        tree=ET.parse(in_file)
        root = tree.getroot()
        size = root.find('size')
        w = int(size.find('width').text)
        h = int(size.find('height').text)
        out_file.truncate()
        for obj in root.iter('object'):
            #difficult = obj.find('difficult').text
            cls = obj.find('name').text
            #if cls not in classes or int(difficult)==1:
                #continue
            if cls not in classes:
                continue
            cls_id = classes.index(cls)
            xmlbox = obj.find('bndbox')
            b = (float(xmlbox.find('xmin').text), float(xmlbox.find('xmax').text), float(xmlbox.find('ymin').text), float(xmlbox.find('ymax').text))
            bb = convert((w,h), b)
            out_file.write(str(cls_id) + " " + " ".join([str(a) for a in bb]) + '\n')


if __name__ == "__main__":
    rootpath='./voc'
    xmlpath=rootpath+'/Annotations'
    list=os.listdir(xmlpath)
    for i in range(0,len(list)) :
        path = os.path.join(xmlpath,list[i])
        if ('.xml' in path)or('.XML' in path):
            convert_annotation(rootpath,list[i])
            print('done', i)
        else:
            print('not xml file',i)
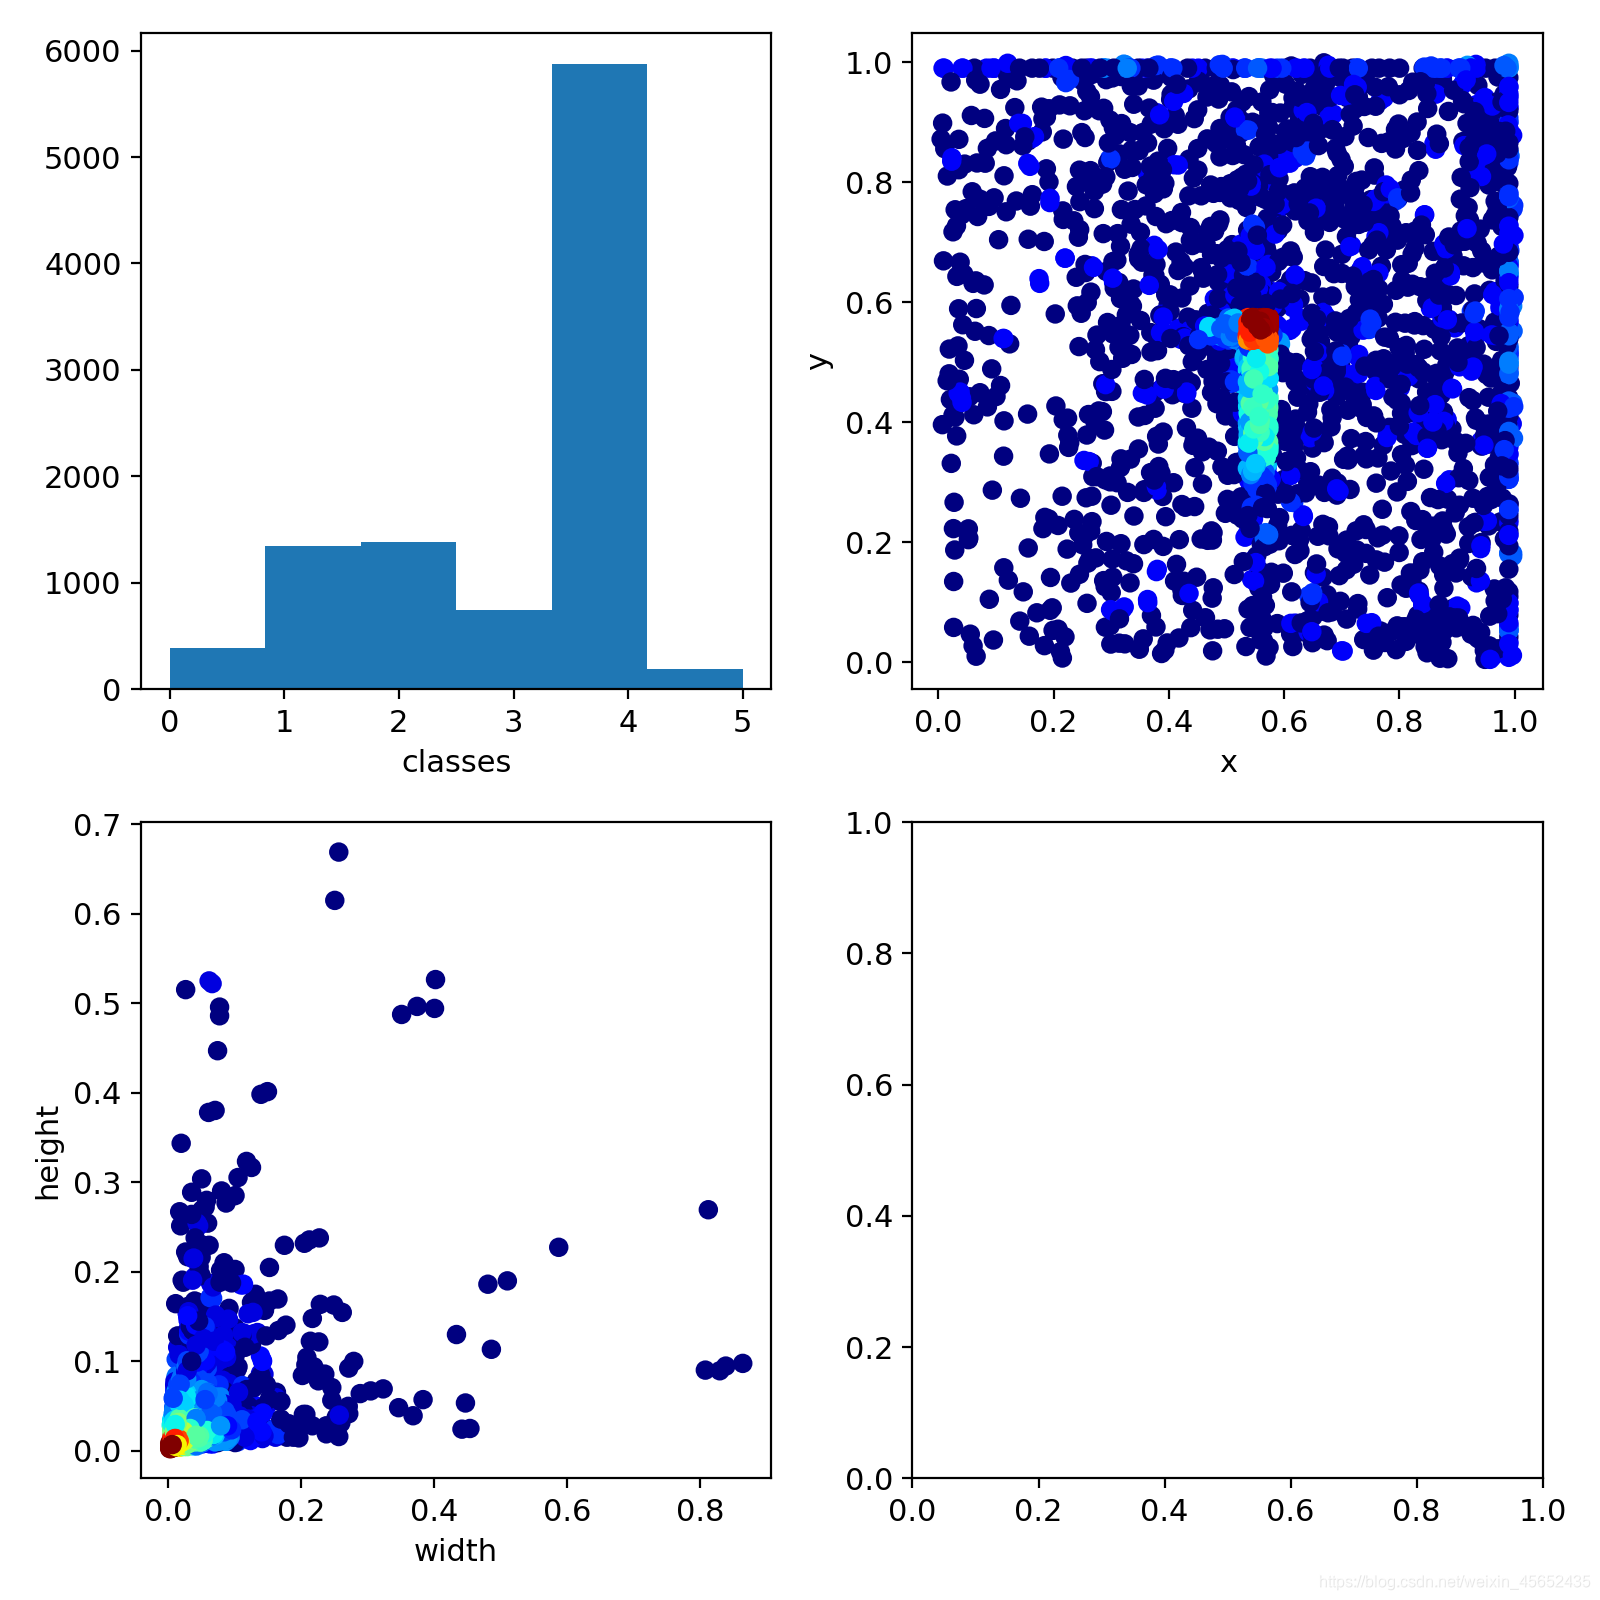
生成的yolo格式数据如下图所示,最前面的数字 4 为瑕疵点类别编号,后面的数据为瑕疵点的位置
五、将Yolo格式数据自动划分成训练集(train2017),测试集(val2017)
import os
import shutil
import random
ratio=0.1
img_dir='./voc/JPEGImages' #图片路径
label_dir='./voc/worktxt'#生成的yolo格式的数据存放路径
train_img_dir='.//coco/images/train2017'#训练集图片的存放路径
val_img_dir='./coco/images/val2017'
train_label_dir='./coco/labels/train2017'#训练集yolo格式数据的存放路径
val_label_dir='./coco/labels/val2017'
if not os.path.exists(train_img_dir):
    os.makedirs(train_img_dir)
if not os.path.exists(val_img_dir):
    os.makedirs(val_img_dir)
if not os.path.exists(train_label_dir):
    os.makedirs(train_label_dir)
if not os.path.exists(val_label_dir):
    os.makedirs(val_label_dir)
names=os.listdir(img_dir)
val_names=random.sample(names,int(len(names)*ratio))

cnt_1=0
cnt_2=0
for name in names:
    if name in val_names:
        #cnt_1+=1
        #if cnt_1>100:
            #break
        shutil.copy(os.path.join(img_dir,name),os.path.join(val_img_dir,name))
        shutil.copy(os.path.join(label_dir, name[:-4]+'.txt'), os.path.join(val_label_dir, name[:-4]+'.txt'))
    else:
        #cnt_2+=1
        #if cnt_2>1000:
            #break
        shutil.copy(os.path.join(img_dir, name), os.path.join(train_img_dir, name))
        shutil.copy(os.path.join(label_dir, name[:-4] + '.txt'), os.path.join(train_label_dir, name[:-4] + '.txt'))
程序生成的数据集存放方式如下图所示
五、Yolov5模型的训练
模型环境的建立和模型训练流程可以参照之前的文章
模型训练之前需要更改coco128.yaml 和 yolov5s.yaml中的nc(识别对象的类别数目)和 names
进入Yolov5的环境,切换到相应的目录,对模型进行训练
(之前的文章有详细步骤)
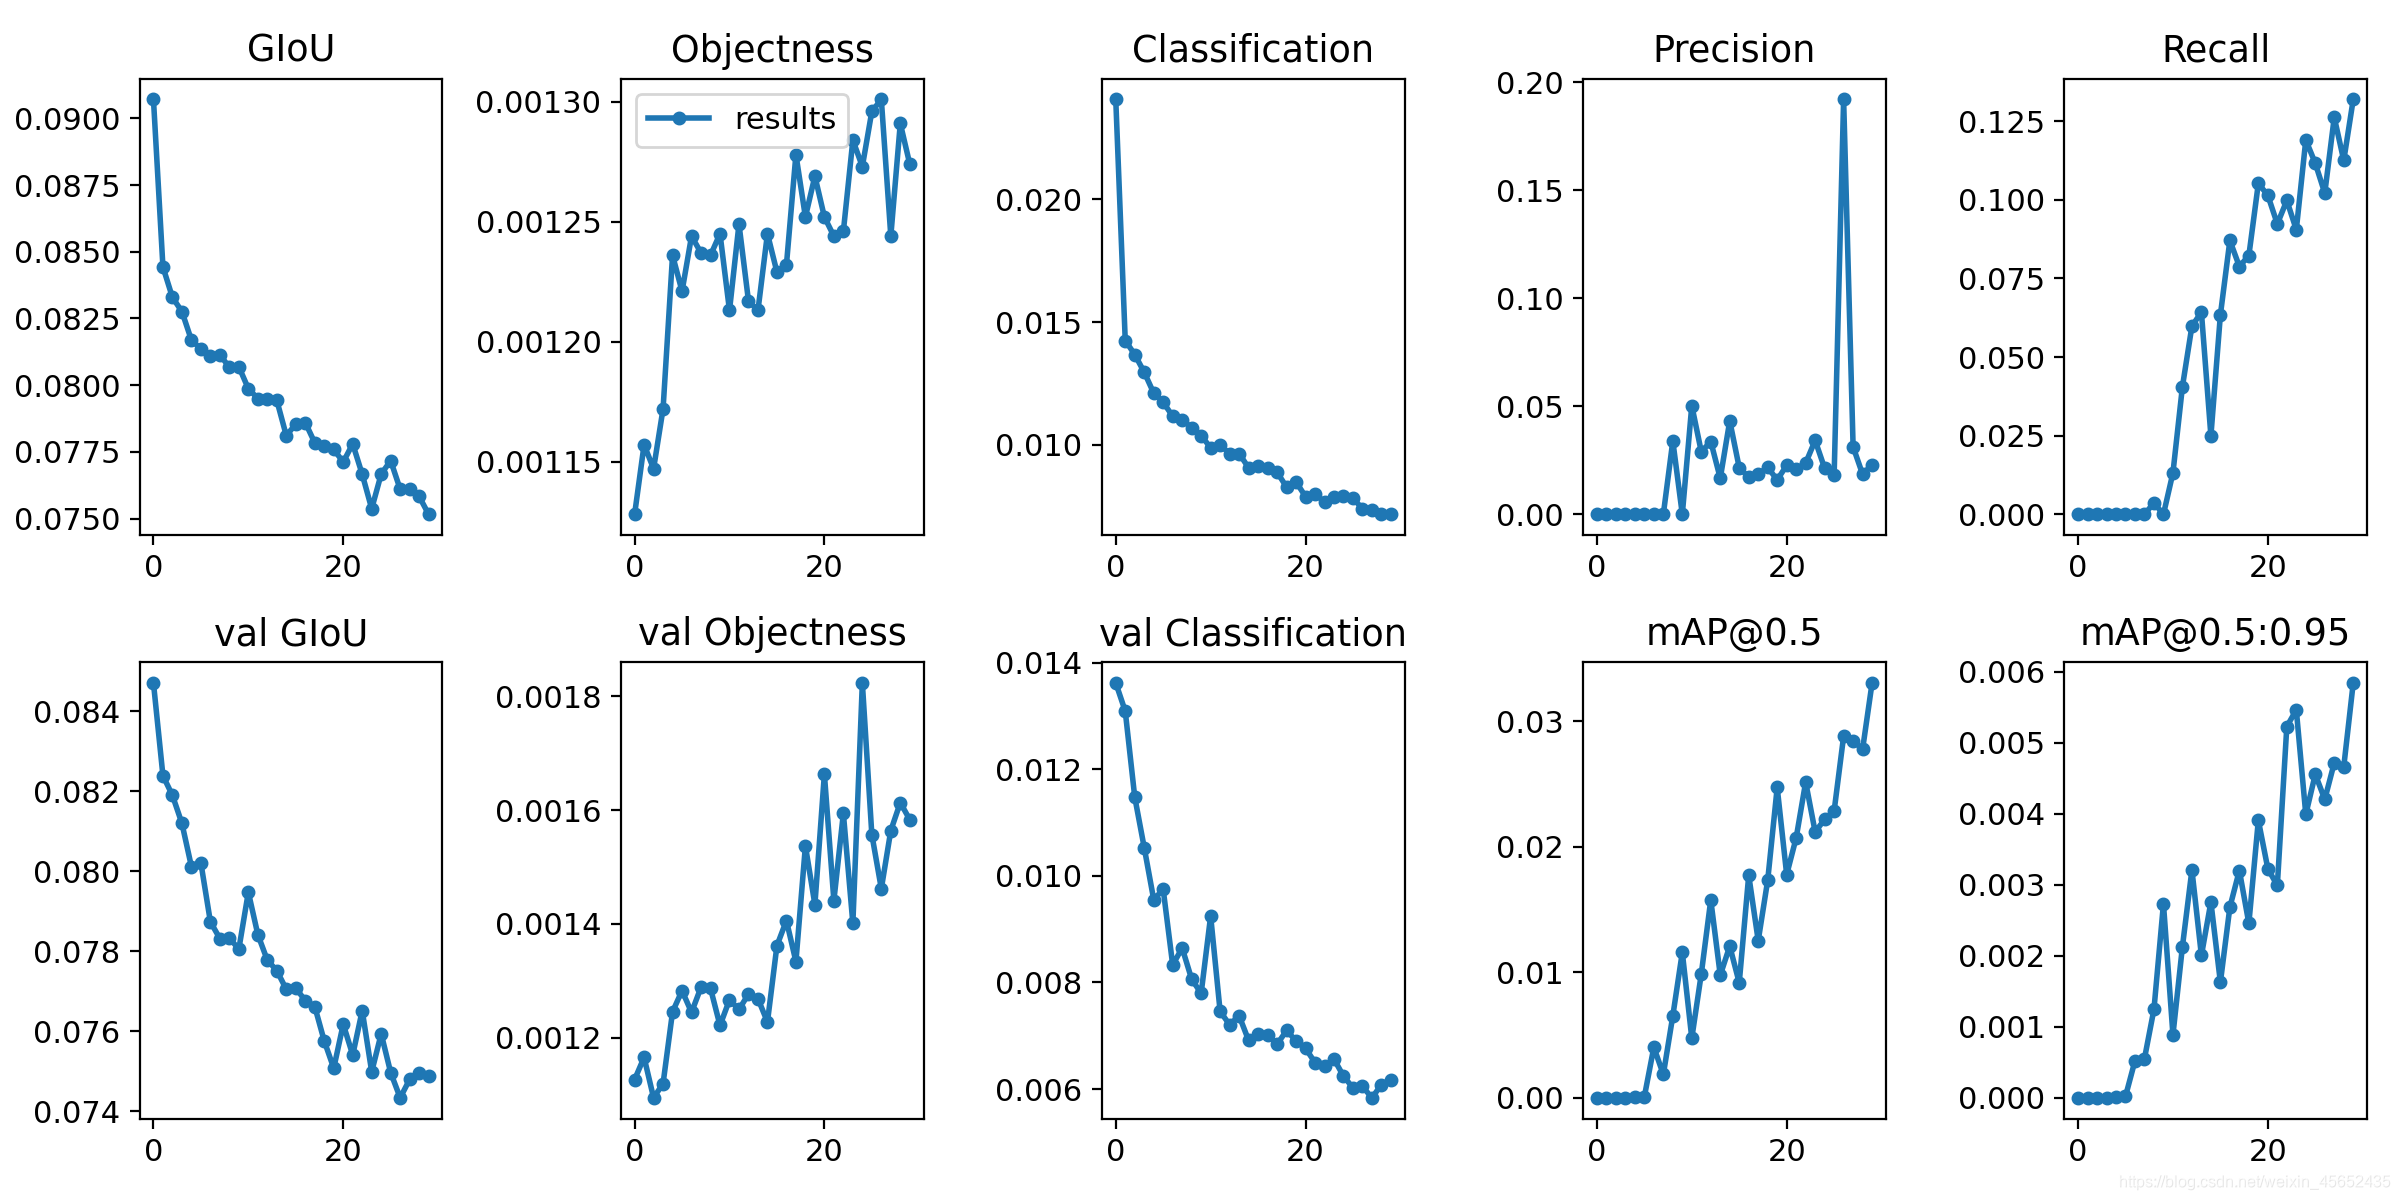
python train.py --img 640 --data data/coco128.yaml --cfg models/yolov5s.yaml --weights weights/yolov5s.pt --batch-size 16 --epochs 30
训练的结果如下图所示
六、对需要检测的图片进行预测,生成 json 文件
import argparse
import torch.backends.cudnn as cudnn

from utils import google_utils
from utils.datasets import *
from utils.utils import *
import json
submit_result=[]

def infer_one_slice(im0,cur_x,cur_y):
    img = letterbox(im0, new_shape=opt.slice_size)[0]
    # Convert
    img = img[:, :, ::-1].transpose(2, 0, 1)  # BGR to RGB, to 3x416x416
    img = np.ascontiguousarray(img)

    img = torch.from_numpy(img).to(device)
    #img =  img.float()  # uint8 to fp16/32
    img = img.half() if half else img.float()  # uint8 to fp16/32
    img /= 255.0
    if img.ndimension() == 3:
        img = img.unsqueeze(0)

    # Inference
    pred = model(img, augment=False)[0]

    # Apply NMS
    pred = non_max_suppression(pred, opt.conf_thres, opt.iou_thres)

    boxes = []
    max_score=0
    for i, det in enumerate(pred):  # detections per image
        # save_path = 'draw/' + image_id + '.jpg'
        if det is not None and len(det):
            # Rescale boxes from img_size to im0 size
            det[:, :4] = scale_coords(img.shape[2:], det[:, :4], im0.shape).round()

            # Write results
            for *xyxy, conf, cls in det:
                boxes.append([int(xyxy[0]+cur_x), int(xyxy[1]+cur_y), int(xyxy[2]+cur_x), int(xyxy[3]+cur_y),int(cls.item())+1,conf.item()])
                if conf.item()>max_score:
                    max_score=conf.item()
    #
    #print(max_score)
    if max_score>0.3:
        return boxes
    else:
        return []

def slice_im(image_path, sliceHeight=640, sliceWidth=640,overlap=0.01):
    #
    result_pre=[]
    image0 = cv2.imread(image_path, 1)  # color
    win_h, win_w = image0.shape[:2]
    #
    n_ims = 0
    dx = int((1. - overlap) * sliceWidth)
    dy = int((1. - overlap) * sliceHeight)

    for y0 in range(0, image0.shape[0], dy):
        for x0 in range(0, image0.shape[1], dx):
            n_ims += 1
            #
            #这一步确保了不会出现比要切的图像小的图,其实是通过调整最后的overlop来实现的
            #举例:h=6000,w=8192.若使用640来切图,overlop:0.2*640=128,间隔就为512.所以小图的左上角坐标的纵坐标y0依次为:
            #:0,512,1024,....,5120,接下来并非为5632,因为5632+640>6000,所以y0=6000-640
            if y0 + sliceHeight > image0.shape[0]:
                y = image0.shape[0] - sliceHeight
            else:
                y = y0
            if x0 + sliceWidth > image0.shape[1]:
                x = image0.shape[1] - sliceWidth
            else:
                x = x0
            #
            # extract image
            window_c = image0[y:y + sliceHeight, x:x + sliceWidth]
            #cv2.imwrite(outpath, window_c)
            #------对切出来的一副图像进行预测------
            slice_bbox=infer_one_slice(window_c,x,y)#返回的是这一个slice的目标集合
            if slice_bbox!=[]:
                result_pre+=slice_bbox
    return result_pre

if __name__ == '__main__':
    parser = argparse.ArgumentParser()
    parser.add_argument('--weights', type=str, default='weights/best.pt', help='model.pt path')
    parser.add_argument('--source', type=str, default='D:/Tianchi/yolo/test', help='source')  # file/folder, 0 for webcam
    parser.add_argument('--output', type=str, default='inference/output', help='output folder')  # output folder
    parser.add_argument('--slice_size', type=int, default=640, help='inference size (pixels)')
    parser.add_argument('--conf-thres', type=float, default=0.05, help='object confidence threshold')
    parser.add_argument('--iou-thres', type=float, default=0.5, help='IOU threshold for NMS')
    parser.add_argument('--device', default='', help='cuda device, i.e. 0 or 0,1,2,3 or cpu')
    parser.add_argument('--view-img', action='store_true', help='display results')
    parser.add_argument('--save-txt', action='store_true', help='save results to *.txt')
    parser.add_argument('--classes', nargs='+', type=int, help='filter by class')
    parser.add_argument('--agnostic-nms', action='store_true', help='class-agnostic NMS')
    parser.add_argument('--augment', action='store_true', help='augmented inference')
    opt = parser.parse_args()
    print(opt)
    # Initialize
    device = torch_utils.select_device(opt.device)
    half = device.type != 'cpu'  # half precision only supported on CUDA

    # Load model
    google_utils.attempt_download(opt.weights)
    model = torch.load(opt.weights, map_location=device)['model'].float().eval()  # load FP32 model
    #imgsz = check_img_size(imgsz, s=model.stride.max())  # check img_size
    if half:
        model.half()  # to FP16
    #
    for per_img_name in tqdm(os.listdir(opt.source)):
        image_path = os.path.join(opt.source, per_img_name)
        #
        image_result_pre = slice_im(image_path, sliceHeight=opt.slice_size, sliceWidth=opt.slice_size)
        # print(image_result_pre)
        '''
        image_result_pre:如果切图之间存在ovelap,可以经过一个NMS
        '''
        if image_result_pre != [[]]:
            for per_pre in image_result_pre:
                submit_result.append(
                    {

    'name': per_img_name, 'category': per_pre[4], 'bbox': per_pre[:4], 'score': per_pre[5]})
    #
    print(submit_result)
    if not os.path.exists('results/'):os.makedirs('results/')
    with open('results/resut_post.json', 'w') as fp:
        json.dump(submit_result, fp, indent=4, ensure_ascii=False)
部分检测结果如下
  {


        "name": "198_23_t20201119103451643_CAM3.jpg",
        "category": 1,
        "bbox": [
            1266,
            1124,
            1358,
            1200
        ],
        "score": 0.05110248923301697
    },
    {


        "name": "198_23_t20201119103451643_CAM3.jpg",
        "category": 6,
        "bbox": [
            3227,
            1074,
            3341,
            1173
        ],
        "score": 0.3168776035308838
    }