springboot项目整合quartz动态创建,停止,删除定时任务
二、编写自定义job1 和 job2类,实现job接口重写execute方法
springboot整合最新swagger3.0 api doc框架
三、编写SwaggerProperties类用来读取配置文件中swagger的配置项
springboot项目整合quartz动态创建,停止,删除定时任务
一、添加quartz依赖
      <dependency>
            <groupId>org.springframework.boot</groupId>
            <artifactId>spring-boot-starter-quartz</artifactId>
        </dependency>
二、编写自定义job1 和 job2类,实现job接口重写execute方法
package com.sf.gis.boot.rcboot.task;

import lombok.extern.slf4j.Slf4j;
import org.quartz.DisallowConcurrentExecution;
import org.quartz.Job;
import org.quartz.JobExecutionContext;
import org.quartz.JobExecutionException;

import java.time.LocalDateTime;
import java.time.format.DateTimeFormatter;
import java.time.format.FormatStyle;

/**
 * @author 80004819
 * @ClassName:
 * @Description:
 * @date 2020年10月15日 10:59:17
 */

/**
 * 添加@DisallowConcurrentExecution
 * //Job中的任务有可能并发执行,例如任务的执行时间过长,而每次触发的时间间隔太短,则会导致任务会被并发执行。如果是并发执行,就需要一个数据库锁去避免一个数据被多次处理。
 */
@DisallowConcurrentExecution
@Slf4j
public class TestJob1 implements Job {
    @Override
    public void execute(JobExecutionContext jobExecutionContext) throws JobExecutionException {
        log.info("JOB1定时任务开始执行,当前时间:{}", LocalDateTime.now().format(DateTimeFormatter.ofPattern("yyyy-MM-dd HH:mm:ss")));
        log.info("name is :{}", jobExecutionContext.getMergedJobDataMap().getString("name"));
        log.info("age is :{}", jobExecutionContext.getMergedJobDataMap().getInt("age"));
        log.info("phoneNumber is :{}", jobExecutionContext.getMergedJobDataMap().getString("phoneNumber"));
    }
}
package com.sf.gis.boot.rcboot.task;

import lombok.extern.slf4j.Slf4j;
import org.quartz.DisallowConcurrentExecution;
import org.quartz.Job;
import org.quartz.JobExecutionContext;
import org.quartz.JobExecutionException;

import java.time.LocalDateTime;
import java.time.format.DateTimeFormatter;

/**
 * @author 80004819
 * @ClassName:
 * @Description:
 * @date 2020年10月15日 11:49:33
 */
@DisallowConcurrentExecution
@Slf4j
public class TestJob2 implements Job {
    @Override
    public void execute(JobExecutionContext jobExecutionContext) throws JobExecutionException {
        log.info("JOB2定时任务开始执行,当前时间:{}", LocalDateTime.now().format(DateTimeFormatter.ofPattern("yyyy-MM-dd HH:mm:ss")));
        log.info("name is :{}", jobExecutionContext.getMergedJobDataMap().getString("name"));
        log.info("age is :{}", jobExecutionContext.getMergedJobDataMap().getInt("age"));
        log.info("phoneNumber is :{}", jobExecutionContext.getMergedJobDataMap().getString("phoneNumber"));
    }
}
三、编写定时任务测试controller
package com.sf.gis.boot.rcboot.controller;
import cn.hutool.core.date.DateUnit;
import cn.hutool.core.date.DateUtil;
import cn.hutool.core.util.StrUtil;
import com.sf.gis.boot.rcboot.shiro.ShiroConfig;
import com.sf.gis.boot.rcboot.task.TestJob1;
import com.sf.gis.boot.rcboot.util.JsonResponse;
import io.swagger.annotations.Api;
import io.swagger.annotations.ApiOperation;
import lombok.extern.slf4j.Slf4j;
import org.checkerframework.checker.units.qual.C;
import org.quartz.*;
import org.springframework.beans.factory.annotation.Autowired;
import org.springframework.web.bind.annotation.*;
import springfox.documentation.spring.web.json.Json;
import java.io.IOException;
import java.util.Date;
/**
* @author 80004819
* @ClassName:
* @Description:
* @date 2020年10月15日 11:07:45
*/
@RestController
@RequestMapping("/scheduler")
@Api(tags = "定时任务controller")
@Slf4j
public class SchedulerJobController {
@Autowired
private Scheduler scheduler;
private static final String JOB1 = "JOB1";
private static final String JOB2 = "JOB2";
@GetMapping("/createJob")
@ApiOperation("创建定时任务")
public JsonResponse createJob(@RequestParam("job_key") String job_key) {
try {
//定时任务在在当前时间10秒后执行
Date start = new Date(System.currentTimeMillis() + 10000);
Date end = new Date(System.currentTimeMillis() + 30000);
//写死的方式
// JobDetail jobDetail = JobBuilder.newJob(TestJob1.class)
// .usingJobData("name", "dzx")
// .usingJobData("age", "26")
// .withIdentity(job_key)
// .build();
//利用反射动态创建job的方式
String clazzStr = StrUtil.equalsIgnoreCase(JOB1, job_key) ? "com.sf.gis.boot.rcboot.task.TestJob1" : "com.sf.gis.boot.rcboot.task.TestJob2";
JobDetail jobDetail = JobBuilder.newJob(((Job) Class.forName(clazzStr).newInstance()).getClass())
.usingJobData("name", "dzx")
.usingJobData("age", "26")
.usingJobData("phoneNumber", "17823234521")
.withIdentity(job_key)
.build();
//简单触发器
Trigger trigger = TriggerBuilder.newTrigger().usingJobData("phoneNumber", "13865412236")
.withIdentity(job_key).startAt(start)
.endAt(end)
.withSchedule(SimpleScheduleBuilder.simpleSchedule()
//3秒执行一次
.withIntervalInSeconds(3)
//一直重复执行
.repeatForever())
.build();
//cron表达式触发器
CronTrigger cronTrigger = TriggerBuilder.newTrigger()
/**给当前JobDetail添加参数,K V形式,链式调用,可以传入多个参数,在Job实现类中,可以通过jobExecutionContext.getTrigger().getJobDataMap().get("orderNo")获取值*/
.usingJobData("phoneNumer", "13865412236")
/**添加认证信息,有3种重写的方法,我这里是其中一种,可以查看源码看其余2种*/
.withIdentity(job_key)
/**立即生效*/
// .startNow()
/**开始执行时间*/
.startAt(start)
/**结束执行时间,不写永久执行*/
.endAt(end)
/**添加执行规则,SimpleTrigger、CronTrigger的区别主要就在这里,我这里是demo,写了个每2分钟执行一次*/
.withSchedule(CronScheduleBuilder.cronSchedule("0/2 * * * * ?"))
.build();
//将任务和触发器添加到调度器中
scheduler.scheduleJob(jobDetail, cronTrigger);
if (!scheduler.isShutdown()) {
//启动定时任务
scheduler.start();
}
return JsonResponse.ok(JsonResponse.STATUS_SUCCESS, true);
} catch (Exception e) {
log.error("创建定时任务失败", e);
return JsonResponse.ok(JsonResponse.STATUS_FAILED, false);
}
}
@GetMapping("/shutDown")
@ApiOperation("停止定时任务")
public JsonResponse shutdown(@RequestParam("job_key") String job_key) {
try {
scheduler.pauseJob(JobKey.jobKey(job_key));
scheduler.pauseTrigger(TriggerKey.triggerKey(job_key));
return JsonResponse.ok(JsonResponse.STATUS_SUCCESS, true);
} catch (SchedulerException e) {
log.error("停止定时任务失败", e);
return JsonResponse.ok(JsonResponse.STATUS_FAILED, false);
}
}
@PostMapping("/resume")
@ApiOperation(value = "恢复定时任务", notes = "恢复")
public Object resume(@RequestParam("job_key") String job_key) {
try {
//恢复Trigger
scheduler.resumeTrigger(TriggerKey.triggerKey(job_key));
return JsonResponse.ok(JsonResponse.STATUS_SUCCESS, true);
} catch (Exception e) {
log.error("恢复定时任务失败", e);
return JsonResponse.ok(JsonResponse.STATUS_FAILED, false);
}
}
@PostMapping("/del")
@ApiOperation(value = "删除定时任务", notes = "删除")
public Object del(@RequestParam("job_key") String job_key) {
try {
//恢复Trigger
scheduler.pauseTrigger(TriggerKey.triggerKey(job_key));
//移除触发器
scheduler.unscheduleJob(TriggerKey.triggerKey(job_key));
//删除Job
scheduler.deleteJob(JobKey.jobKey(job_key));
return JsonResponse.ok(JsonResponse.STATUS_SUCCESS, true);
} catch (Exception e) {
log.error("删除定时任务失败", e);
return JsonResponse.ok(JsonResponse.STATUS_FAILED, false);
}
}
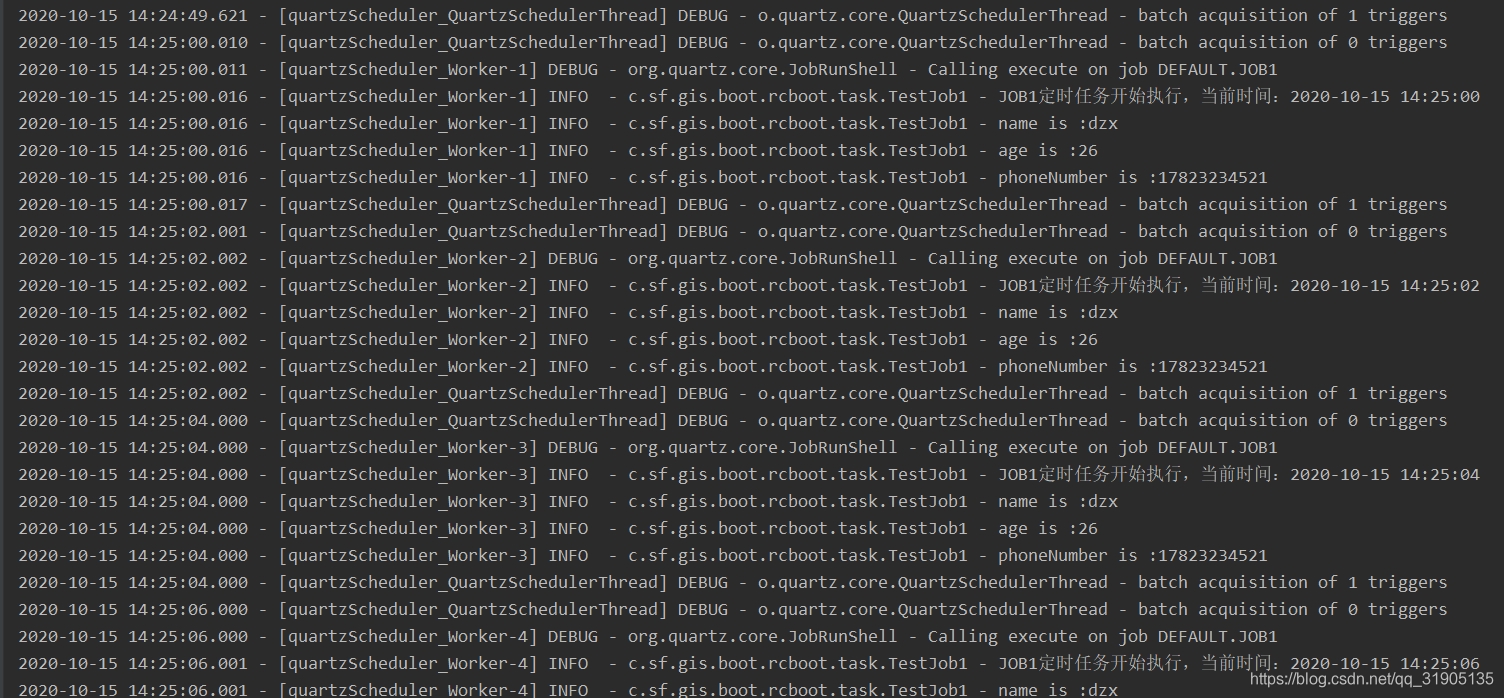
}调用创建定时任务接口,可看到控制台如下输出,说明定时任务创建并成功执行:
springboot整合最新swagger3.0 api doc框架
一、添加swagger3.0依赖
  <dependency>
            <groupId>io.springfox</groupId>
            <artifactId>springfox-boot-starter</artifactId>
            <version>3.0.0</version>
        </dependency>


     <dependency>
            <groupId>org.apache.commons</groupId>
            <artifactId>commons-lang3</artifactId>
            <version>3.10</version>
        </dependency>
二、添加配置项
# ===== 自定义swagger配置 ===== #
swagger:
  enable: true
  application-name: ${spring.application.name}
  application-version: 1.0
  application-description: springfox swagger 3.0整合Demo
  try-host: http://localhost:${server.port}
三、编写SwaggerProperties类用来读取配置文件中swagger的配置项
package com.sf.gis.boot.rcboot.config;

import lombok.Data;
import org.springframework.boot.context.properties.ConfigurationProperties;
import org.springframework.stereotype.Component;

/**
 * @author 80004819
 * @ClassName:
 * @Description:
 * @date 2020年10月15日 13:54:07
 */
@Component
@ConfigurationProperties("swagger")
@Data
public class SwaggerProperties {
    /**
     * 是否开启swagger,生产环境一般关闭,所以这里定义一个变量
     */
    private Boolean enable;

    /**
     * 项目应用名
     */
    private String applicationName;

    /**
     * 项目版本信息
     */
    private String applicationVersion;

    /**
     * 项目描述信息
     */
    private String applicationDescription;

    /**
     * 接口调试地址
     */
    private String tryHost;
}
四、编写SwaggerConfiguration 类
package com.sf.gis.boot.rcboot.config;

import io.swagger.models.auth.In;
import org.apache.commons.lang3.reflect.FieldUtils;
import org.springframework.boot.SpringBootVersion;
import org.springframework.context.annotation.Bean;
import org.springframework.context.annotation.Configuration;
import org.springframework.util.ReflectionUtils;
import org.springframework.web.servlet.config.annotation.InterceptorRegistration;
import org.springframework.web.servlet.config.annotation.InterceptorRegistry;
import org.springframework.web.servlet.config.annotation.WebMvcConfigurer;
import springfox.documentation.builders.ApiInfoBuilder;
import springfox.documentation.builders.PathSelectors;
import springfox.documentation.builders.RequestHandlerSelectors;
import springfox.documentation.oas.annotations.EnableOpenApi;
import springfox.documentation.service.*;
import springfox.documentation.spi.DocumentationType;
import springfox.documentation.spi.service.contexts.SecurityContext;
import springfox.documentation.spring.web.plugins.Docket;

import java.lang.reflect.Field;
import java.util.*;

/**
 * @author 80004819
 * @ClassName:
 * @Description:
 * @date 2020年10月15日 13:55:03
 */
@EnableOpenApi
@Configuration
public class SwaggerConfiguration implements WebMvcConfigurer {

    private final SwaggerProperties swaggerProperties;

    public SwaggerConfiguration(SwaggerProperties swaggerProperties) {
        this.swaggerProperties = swaggerProperties;
    }

    @Bean
    public Docket createRestApi() {
        return new Docket(DocumentationType.OAS_30).pathMapping("/")

                // 定义是否开启swagger,false为关闭,可以通过变量控制
                .enable(swaggerProperties.getEnable())

                // 将api的元信息设置为包含在json ResourceListing响应中。
                .apiInfo(apiInfo())

                // 接口调试地址
                .host(swaggerProperties.getTryHost())

                // 选择哪些接口作为swagger的doc发布
                .select()
                //所有的controller接口
                .apis(RequestHandlerSelectors.any())
                // 选择指定的包
                // .apis(RequestHandlerSelectors.basePackage("com.sf.gis.boot.rcboot.controller"))
                .paths(PathSelectors.any())
                .build()

                // 支持的通讯协议集合
                .protocols(newHashSet("https", "http"))

                // 授权信息设置,必要的header token等认证信息
                .securitySchemes(securitySchemes())

                // 授权信息全局应用
                .securityContexts(securityContexts());
    }

    /**
     * API 页面上半部分展示信息
     */
    private ApiInfo apiInfo() {
        return new ApiInfoBuilder().title(swaggerProperties.getApplicationName() + " Api Doc")
                .description(swaggerProperties.getApplicationDescription())
                .contact(new Contact("lighter", null, "[email protected]"))
                .version("Application Version: " + swaggerProperties.getApplicationVersion() + ", Spring Boot Version: " + SpringBootVersion.getVersion())
                .build();
    }


    /**
     * 设置授权信息
     */
    private List<SecurityScheme> securitySchemes() {
        ApiKey apiKey = new ApiKey("BASE_TOKEN", "token", In.HEADER.toValue());
        return Collections.singletonList(apiKey);
    }

    /**
     * 授权信息全局应用
     */
    private List<SecurityContext> securityContexts() {
        return Collections.singletonList(
                SecurityContext.builder()
                        .securityReferences(Collections.singletonList(new SecurityReference("BASE_TOKEN", new AuthorizationScope[]{new AuthorizationScope("global", "")})))
                        .build()
        );
    }

    @SafeVarargs
    private final <T> Set<T> newHashSet(T... ts) {
        if (ts.length > 0) {
            return new LinkedHashSet<>(Arrays.asList(ts));
        }
        return null;
    }

    /**
     * 通用拦截器排除swagger设置,所有拦截器都会自动加swagger相关的资源排除信息
     */
    @SuppressWarnings("unchecked")
    @Override
    public void addInterceptors(InterceptorRegistry registry) {
        try {
            Field registrationsField = FieldUtils.getField(InterceptorRegistry.class, "registrations", true);
            List<InterceptorRegistration> registrations = (List<InterceptorRegistration>) ReflectionUtils.getField(registrationsField, registry);
            if (registrations != null) {
                for (InterceptorRegistration interceptorRegistration : registrations) {
                    interceptorRegistration
                            .excludePathPatterns("/swagger**/**")
                            .excludePathPatterns("/webjars/**")
                            .excludePathPatterns("/v3/**")
                            .excludePathPatterns("/doc.html");
                }
            }
        } catch (Exception e) {
            e.printStackTrace();
        }
    }
}
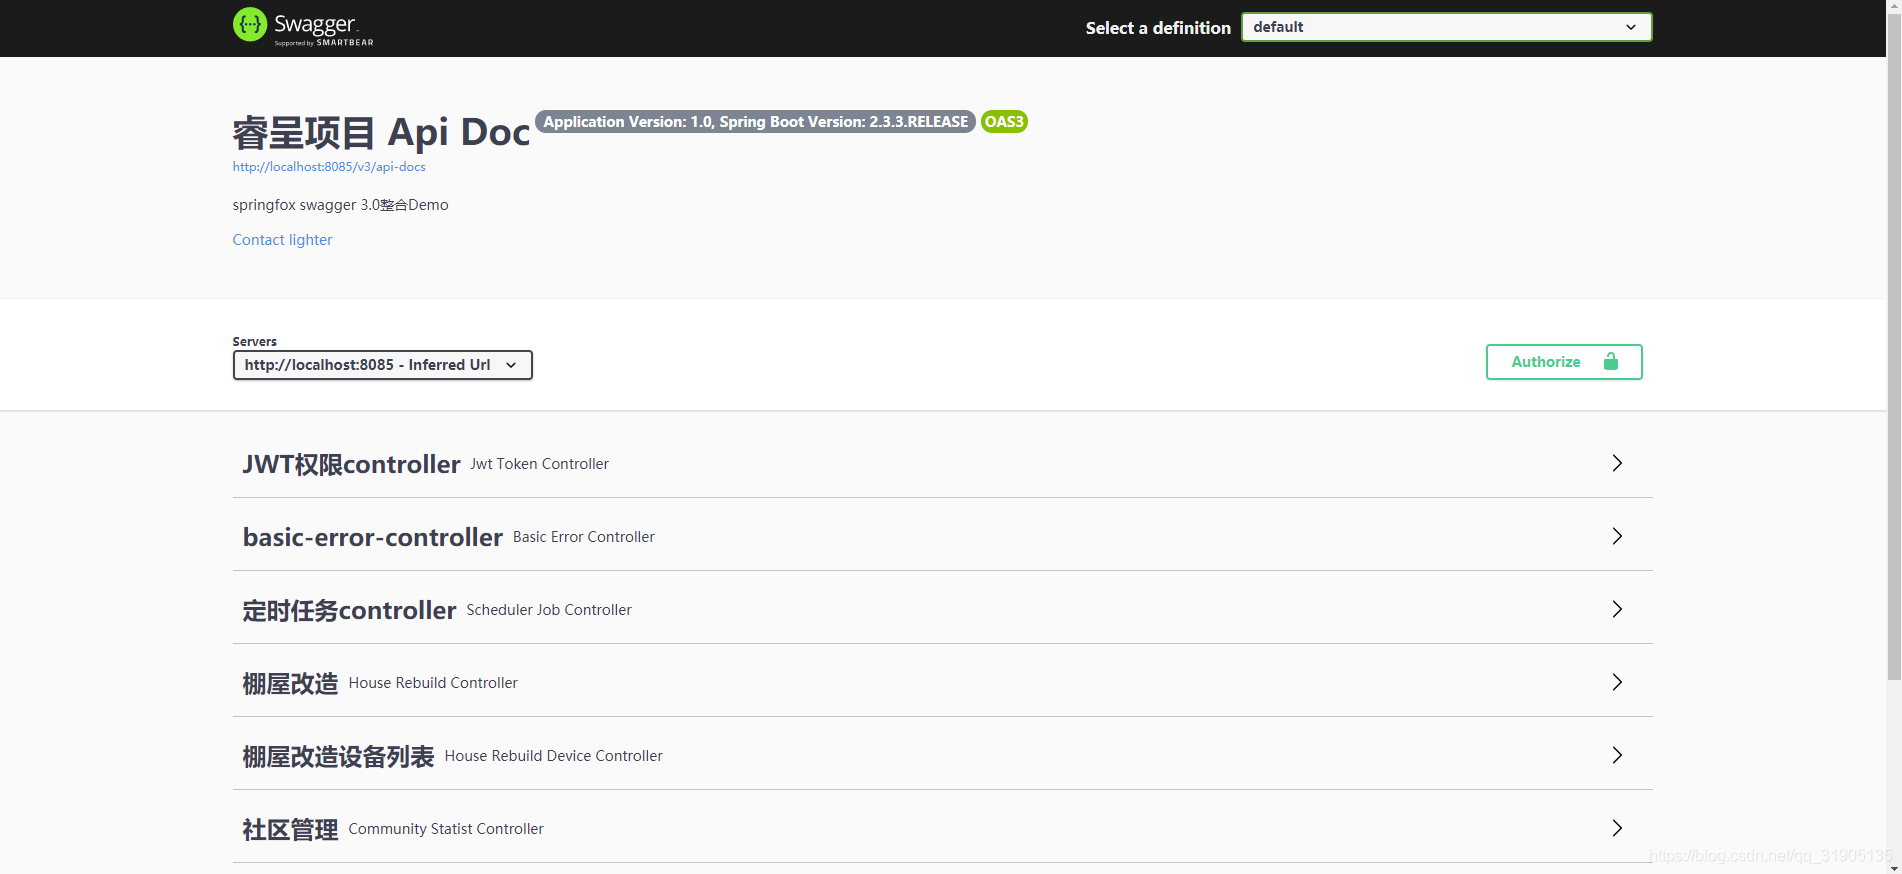
最后访问http://localhost:8085/swagger-ui/index.html ,注意这里已经不是swagger2的http://localhost:8085/swagger-ui.html
访问路径了。
看到如下界面: