https://blog.csdn.net/liang19890820/article/details/50974059
简述
衍伸前面的章节,我们对QTableView实现了数据显示、自定义排序、显示复选框、进度条等功能的实现,本节主要针对自定义按钮进行讲解,这节过后,也希望大家对自定义有更深入的了解,在以后的功能开发过程中,相信无论遇到什么样式形式,我们都可以很好地实现。
| 版权声明:一去、二三里,未经博主允许不得转载。
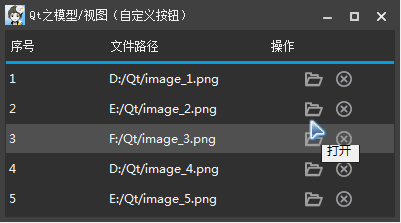
效果
QStyledItemDelegate
源码
.h
包含显示按钮需要用到的智能指针,按钮的宽度、高度、按钮之间的间距、鼠标的坐标等。
class TableViewDelegate: public QStyledItemDelegate
{
    Q_OBJECT

public:
    explicit TableViewDelegate(QWidget *parent = 0); ~TableViewDelegate(); void paint(QPainter *painter, const QStyleOptionViewItem &option, const QModelIndex &index) const; bool editorEvent(QEvent* event, QAbstractItemModel* model, const QStyleOptionViewItem& option, const QModelIndex& index); signals: void open(const QModelIndex &index); void deleteData(const QModelIndex &index); private: QPoint m_mousePoint; // 鼠标位置 QScopedPointer<QPushButton> m_pOpenButton; QScopedPointer<QPushButton> m_pDeleteButton; QStringList m_list; int m_nSpacing; // 按钮之间的间距 int m_nWidth; // 按钮宽度 int m_nHeight; // 按钮高度 int m_nType; // 按钮状态-1:划过 2:按下 };
.cpp
主要设置按钮样式,实现鼠标划过、按下,响应鼠标事件等操作。
TableViewDelegate::TableViewDelegate(QWidget *parent)
    : QStyledItemDelegate(parent),
      m_pOpenButton(new QPushButton()),
      m_pDeleteButton(new QPushButton()),
      m_nSpacing(5),
      m_nWidth(25),
      m_nHeight(20) { // 设置按钮正常、划过、按下样式 m_pOpenButton->setStyleSheet("QPushButton {border: none; background-color: transparent; image:url(:/Images/open);} \ QPushButton:hover {image:url(:/Images/openHover);} \ QPushButton:pressed {image:url(:/Images/openPressed);}"); m_pDeleteButton->setStyleSheet("QPushButton {border: none; background-color: transparent; image:url(:/Images/delete);} \ QPushButton:hover {image:url(:/Images/deleteHover);} \ QPushButton:pressed {image:url(:/Images/deletePressed);}"); m_list << QStringLiteral("打开") << QStringLiteral("删除"); } TableViewDelegate::~TableViewDelegate() { } // 绘制按钮 void TableViewDelegate::paint(QPainter *painter, const QStyleOptionViewItem &option, const QModelIndex &index) const { QStyleOptionViewItem viewOption(option); initStyleOption(&viewOption, index); if (option.state.testFlag(QStyle::State_HasFocus)) viewOption.state = viewOption.state ^ QStyle::State_HasFocus; QStyledItemDelegate::paint(painter, viewOption, index); if (index.column() == FILE_OPERATE_COLUMN) { // 计算按钮显示区域 int nCount = m_list.count(); int nHalf = (option.rect.width() - m_nWidth * nCount - m_nSpacing * (nCount - 1)) / 2; int nTop = (option.rect.height() - m_nHeight) / 2; for (int i = 0; i < nCount; ++i) { // 绘制按钮 QStyleOptionButton button; button.rect = QRect(option.rect.left() + nHalf + m_nWidth * i + m_nSpacing * i, option.rect.top() + nTop, m_nWidth, m_nHeight); button.state |= QStyle::State_Enabled; //button.iconSize = QSize(16, 16); //button.icon = QIcon(QString(":/Images/%1").arg(m_list.at(i))); if (button.rect.contains(m_mousePoint)) { if (m_nType == 0) { button.state |= QStyle::State_MouseOver; //button.icon = QIcon(QString(":/Images/%1Hover").arg(m_list.at(i))); } else if (m_nType == 1) { button.state |= QStyle::State_Sunken; //button.icon = QIcon(QString(":/Images/%1Pressed").arg(m_list.at(i))); } } QWidget *pWidget = (i == 0) ? m_pOpenButton.data() : m_pDeleteButton.data(); QApplication::style()->drawControl(QStyle::CE_PushButton, &button, painter, pWidget); } } } // 响应按钮事件 - 划过、按下 bool TableViewDelegate::editorEvent(QEvent* event, QAbstractItemModel* model, const QStyleOptionViewItem& option, const QModelIndex& index) { if (index.column() != FILE_OPERATE_COLUMN) return false; m_nType = -1; bool bRepaint = false; QMouseEvent *pEvent = static_cast<QMouseEvent *> (event); m_mousePoint = pEvent->pos(); int nCount = m_list.count(); int nHalf = (option.rect.width() - m_nWidth * nCount - m_nSpacing * (nCount - 1)) / 2; int nTop = (option.rect.height() - m_nHeight) / 2; // 还原鼠标样式 QApplication::restoreOverrideCursor(); for (int i = 0; i < nCount; ++i) { QStyleOptionButton button; button.rect = QRect(option.rect.left() + nHalf + m_nWidth * i + m_nSpacing * i, option.rect.top() + nTop, m_nWidth, m_nHeight); // 鼠标位于按钮之上 if (!button.rect.contains(m_mousePoint)) continue; bRepaint = true; switch (event->type()) { // 鼠标滑过 case QEvent::MouseMove: { // 设置鼠标样式为手型 QApplication::setOverrideCursor(Qt::PointingHandCursor); m_nType = 0; QToolTip::showText(pEvent->globalPos(), m_list.at(i)); break; } // 鼠标按下 case QEvent::MouseButtonPress: { m_nType = 1; break; } // 鼠标释放 case QEvent::MouseButtonRelease: { if (i == 0) { emit open(index); } else { emit deleteData(index); } break; } default: break; } } return bRepaint; }
衍伸
通过上面的实现,我们可以自定义按钮的样式、文本、显示区域、等,我们也可以通过QStyleOptionButton的icon和iconSize来设置按钮的图标与图标大小,通过响应按钮来实现我们自己的事件。