一、原理图
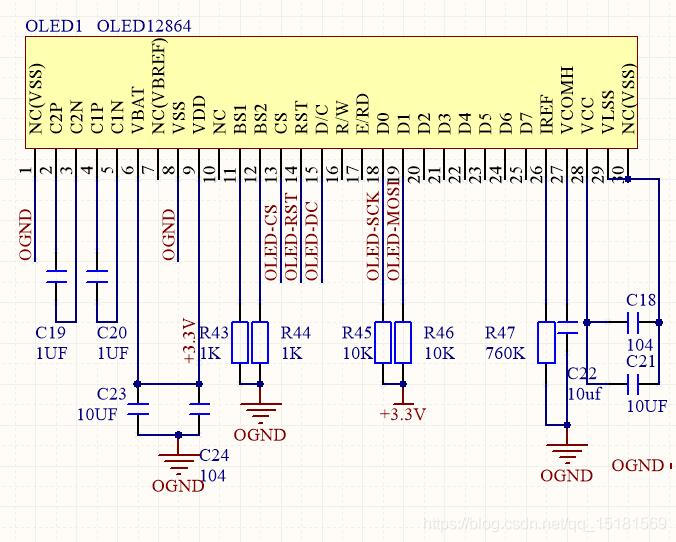
芯片引脚连接

二、驱动程序
spi.c
#include "spi.h"

void SPI1_Init(void)
{


 	GPIO_InitTypeDef GPIO_InitStructure;
    SPI_InitTypeDef  SPI_InitStructure;

	RCC_APB2PeriphClockCmd(	RCC_APB2Periph_GPIOA, ENABLE );//PORTA时钟使能
	RCC_APB2PeriphClockCmd(	RCC_APB2Periph_SPI1,  ENABLE );//SPI1时钟使能

	GPIO_InitStructure.GPIO_Pin = GPIO_Pin_5 | GPIO_Pin_7;
	GPIO_InitStructure.GPIO_Mode = GPIO_Mode_AF_PP;
	GPIO_InitStructure.GPIO_Speed = GPIO_Speed_50MHz;
	GPIO_Init(GPIOA, &GPIO_InitStructure);//初始化GPIOA

 	GPIO_SetBits(GPIOA,GPIO_Pin_5|GPIO_Pin_7);  //PB13/14/15上拉

	SPI_InitStructure.SPI_Direction = SPI_Direction_1Line_Tx;  //设置SPI单向或者双向的数据模式:SPI设置为双线双向全双工
	SPI_InitStructure.SPI_Mode = SPI_Mode_Master;		//设置SPI工作模式:设置为主SPI
	SPI_InitStructure.SPI_DataSize = SPI_DataSize_8b;		//设置SPI的数据大小:SPI发送接收8位帧结构
	SPI_InitStructure.SPI_CPOL = SPI_CPOL_High;		//串行同步时钟的空闲状态为高电平
	SPI_InitStructure.SPI_CPHA = SPI_CPHA_2Edge;	//串行同步时钟的第二个跳变沿(上升或下降)数据被采样
	SPI_InitStructure.SPI_NSS = SPI_NSS_Soft;		//NSS信号由硬件(NSS管脚)还是软件(使用SSI位)管理:内部NSS信号有SSI位控制
	SPI_InitStructure.SPI_BaudRatePrescaler = SPI_BaudRatePrescaler_256;		//定义波特率预分频的值:波特率预分频值为256
	SPI_InitStructure.SPI_FirstBit = SPI_FirstBit_MSB;	//指定数据传输从MSB位还是LSB位开始:数据传输从MSB位开始
	SPI_InitStructure.SPI_CRCPolynomial = 7;	//CRC值计算的多项式
	SPI_Init(SPI1, &SPI_InitStructure);  //根据SPI_InitStruct中指定的参数初始化外设SPIx寄存器

	SPI_Cmd(SPI1, ENABLE); //使能SPI外设

	SPI1_ReadWriteByte(0xff);//启动传输


}
//SPI 速度设置函数
//SpeedSet:
//SPI_BaudRatePrescaler_2   2分频
//SPI_BaudRatePrescaler_8   8分频
//SPI_BaudRatePrescaler_16  16分频
//SPI_BaudRatePrescaler_256 256分频

void SPI1_SetSpeed(u8 SPI_BaudRatePrescaler)
{


  assert_param(IS_SPI_BAUDRATE_PRESCALER(SPI_BaudRatePrescaler));
	SPI1->CR1&=0XFFC7;
	SPI1->CR1|=SPI_BaudRatePrescaler;	//设置SPI1速度
	SPI_Cmd(SPI1,ENABLE);

}

//SPIx 读写一个字节
//TxData:要写入的字节
//返回值:读取到的字节
u8 SPI1_ReadWriteByte(u8 TxData)
{


	u8 retry=0;
	while (SPI_I2S_GetFlagStatus(SPI1, SPI_I2S_FLAG_TXE) == RESET) //检查指定的SPI标志位设置与否:发送缓存空标志位
		{


		retry++;
		if(retry>200)return 0;
		}
	SPI_I2S_SendData(SPI1, TxData); //通过外设SPIx发送一个数据
	retry=0;

	while (SPI_I2S_GetFlagStatus(SPI1, SPI_I2S_FLAG_RXNE) == RESET) //检查指定的SPI标志位设置与否:接受缓存非空标志位
		{


		retry++;
		if(retry>200)return 0;
		}
	return SPI_I2S_ReceiveData(SPI1); //返回通过SPIx最近接收的数据
}
oled.c
#include "oled.h"
#include "stdlib.h"
#include "oledfont.h"
#include "delay.h"
#include "stdio.h"
#include "spi.h"
//OLED的显存
//存放格式如下.
//[0]0 1 2 3 ... 127
//[1]0 1 2 3 ... 127
//[2]0 1 2 3 ... 127
//[3]0 1 2 3 ... 127
//[4]0 1 2 3 ... 127
//[5]0 1 2 3 ... 127
//[6]0 1 2 3 ... 127
//[7]0 1 2 3 ... 127

//向SSD1106写入一个字节。
//dat:要写入的数据/命令
//cmd:数据/命令标志 0,表示命令;1,表示数据;
void OLED_WR_Byte(u8 dat,u8 cmd)
{


	if(cmd)
	  OLED_DC_Set();
	else
	  OLED_DC_Clr();
	OLED_CS_Clr();
	SPI1_ReadWriteByte(dat);
	OLED_CS_Set();
	OLED_DC_Set();
}

void OLED_Set_Pos(unsigned char x, unsigned char y)
{


	OLED_WR_Byte(0xb0+y,OLED_CMD);
	OLED_WR_Byte(((x&0xf0)>>4)|0x10,OLED_CMD);
	OLED_WR_Byte((x&0x0f)|0x01,OLED_CMD);
}
//开启OLED显示
void OLED_Display_On(void)
{


	OLED_WR_Byte(0X8D,OLED_CMD);  //SET DCDC命令
	OLED_WR_Byte(0X14,OLED_CMD);  //DCDC ON
	OLED_WR_Byte(0XAF,OLED_CMD);  //DISPLAY ON
}
//关闭OLED显示
void OLED_Display_Off(void)
{


	OLED_WR_Byte(0X8D,OLED_CMD);  //SET DCDC命令
	OLED_WR_Byte(0X10,OLED_CMD);  //DCDC OFF
	OLED_WR_Byte(0XAE,OLED_CMD);  //DISPLAY OFF
}
//清屏函数,清完屏,整个屏幕是黑色的!和没点亮一样!!!
void OLED_Clear(void)
{


	u8 i,n;
	for(i=0;i<8;i++)
	{


		OLED_WR_Byte (0xb0+i,OLED_CMD);    //设置页地址(0~7)
		OLED_WR_Byte (0x00,OLED_CMD);      //设置显示位置—列低地址
		OLED_WR_Byte (0x10,OLED_CMD);      //设置显示位置—列高地址
		for(n=0;n<128;n++)OLED_WR_Byte(0,OLED_DATA);
	} //更新显示
}


//在指定位置显示一个字符,包括部分字符
//x:0~127
//y:0~63
//mode:0,反白显示;1,正常显示
//size:选择字体 16/12
void OLED_ShowChar(u8 x,u8 y,u8 chr)
{


	unsigned char c=0,i=0;
	c=chr-' ';//得到偏移后的值
	if(x>Max_Column-1){

    x=0;y=y+2;}
	if(SIZE ==16)
	{


		OLED_Set_Pos(x,y);
		for(i=0;i<8;i++)
		OLED_WR_Byte(F8X16[c*16+i],OLED_DATA);
		OLED_Set_Pos(x,y+1);
		for(i=0;i<8;i++)
		OLED_WR_Byte(F8X16[c*16+i+8],OLED_DATA);
	}
}
//m^n函数
u32 oled_pow(u8 m,u8 n)
{


	u32 result=1;
	while(n--)result*=m;
	return result;
}
//显示2个数字
//x,y :起点坐标
//len :数字的位数
//size:字体大小
//mode:模式	0,填充模式;1,叠加模式
//num:数值(0~4294967295);
void OLED_ShowNum(u8 x,u8 y,u32 num,u8 len,u8 size)
{


	u8 t,temp;
	u8 enshow=0;
	for(t=0;t<len;t++)
	{


		temp=(num/oled_pow(10,len-t-1))%10;
		if(enshow==0&&t<(len-1))
		{


			if(temp==0)
			{


				OLED_ShowChar(x+(size/2)*t,y,' ');
				continue;
			}else enshow=1;

		}
	 	OLED_ShowChar(x+(size/2)*t,y,temp+'0');
	}
}
//显示一个字符号串
void OLED_ShowString(u8 x,u8 y,u8 *chr)
{


	unsigned char j=0;
	while (chr[j]!='\0')
	{


		OLED_ShowChar(x,y,chr[j]);
		x+=8;
		if(x>120)
		{


			x=0;
			y+=2;
		}
		j++;
	}
}
/***********功能描述:显示显示BMP图片128×64起始点坐标(x,y),x的范围0~127,y为页的范围0~7*****************/
void oled_draw_picture(unsigned char x0,unsigned char y0,unsigned char x1,unsigned char y1,unsigned char BMP[])
{


	unsigned int j=0;
	unsigned char x,y;

	if(y1%8==0) y=y1/8;
	else y=y1/8+1;
	for(y=y0;y<y1;y++)
	{


		OLED_Set_Pos(x0,y);
		for(x=x0;x<x1;x++)
		{


			OLED_WR_Byte(BMP[j++],OLED_DATA);
		}
	}
}
void oled_gpio_init()
{


	GPIO_InitTypeDef  GPIO_InitStructure;

	RCC_APB2PeriphClockCmd(RCC_APB2Periph_GPIOA|RCC_APB2Periph_AFIO, ENABLE);

	GPIO_PinRemapConfig(GPIO_Remap_SWJ_JTAGDisable, ENABLE);

	GPIO_InitStructure.GPIO_Pin = GPIO_Pin_4|GPIO_Pin_6|GPIO_Pin_8;
	GPIO_InitStructure.GPIO_Mode = GPIO_Mode_Out_PP;
	GPIO_InitStructure.GPIO_Speed = GPIO_Speed_50MHz;
	GPIO_Init(GPIOA, &GPIO_InitStructure);
	GPIO_SetBits(GPIOA,GPIO_Pin_4|GPIO_Pin_6|GPIO_Pin_8);


}


//初始化SSD1306
void oled_init(void)
{


	oled_gpio_init();
	SPI1_Init();

//	OLED_RST_Set();//复位使用系统复位,所有此处不需要再复位
//	delay_ms(5);
//	OLED_RST_Clr();
//	delay_ms(5);
//	OLED_RST_Set();

	OLED_WR_Byte(0xAE,OLED_CMD);//--turn off oled panel
	OLED_WR_Byte(0x00,OLED_CMD);//---set low column address
	OLED_WR_Byte(0x10,OLED_CMD);//---set high column address
	OLED_WR_Byte(0x40,OLED_CMD);//--set start line address  Set Mapping RAM Display Start Line (0x00~0x3F)
	OLED_WR_Byte(0x81,OLED_CMD);//--set contrast control register
	OLED_WR_Byte(0xCF,OLED_CMD); // Set SEG Output Current Brightness
	OLED_WR_Byte(0xA0,OLED_CMD);//--Set SEG/Column Mapping     0xa0左右反置 0xa1正常
	OLED_WR_Byte(0xC0,OLED_CMD);//Set COM/Row Scan Direction   0xc0上下反置 0xc8正常
	OLED_WR_Byte(0xA6,OLED_CMD);//--set normal display
	OLED_WR_Byte(0xA8,OLED_CMD);//--set multiplex ratio(1 to 64)
	OLED_WR_Byte(0x3f,OLED_CMD);//--1/64 duty
	OLED_WR_Byte(0xD3,OLED_CMD);//-set display offset	Shift Mapping RAM Counter (0x00~0x3F)
	OLED_WR_Byte(0x00,OLED_CMD);//-not offset
	OLED_WR_Byte(0xd5,OLED_CMD);//--set display clock divide ratio/oscillator frequency
	OLED_WR_Byte(0x80,OLED_CMD);//--set divide ratio, Set Clock as 100 Frames/Sec
	OLED_WR_Byte(0xD9,OLED_CMD);//--set pre-charge period
	OLED_WR_Byte(0xF1,OLED_CMD);//Set Pre-Charge as 15 Clocks & Discharge as 1 Clock
	OLED_WR_Byte(0xDA,OLED_CMD);//--set com pins hardware configuration
	OLED_WR_Byte(0x12,OLED_CMD);
	OLED_WR_Byte(0xDB,OLED_CMD);//--set vcomh
	OLED_WR_Byte(0x40,OLED_CMD);//Set VCOM Deselect Level
	OLED_WR_Byte(0x20,OLED_CMD);//-Set Page Addressing Mode (0x00/0x01/0x02)
	OLED_WR_Byte(0x02,OLED_CMD);//
	OLED_WR_Byte(0x8D,OLED_CMD);//--set Charge Pump enable/disable
	OLED_WR_Byte(0x14,OLED_CMD);//--set(0x10) disable
	OLED_WR_Byte(0xA4,OLED_CMD);// Disable Entire Display On (0xa4/0xa5)
	OLED_WR_Byte(0xA6,OLED_CMD);// Disable Inverse Display On (0xa6/a7)
	OLED_WR_Byte(0xAF,OLED_CMD);//--turn on oled panel

	OLED_WR_Byte(0xAF,OLED_CMD); /*display ON*/
	OLED_Clear();
	OLED_Set_Pos(0,0);
	SPI1_SetSpeed(SPI_BaudRatePrescaler_2);
}
main.c
#include "sys.h"
#include "delay.h"
#include "usart.h"
#include "oled.h"
#include "tm1804.h"
int main(void)
{


	delay_init();	    //延时函数初始化
	oled_init();
	tm1804_init();
	OLED_ShowString(0,0,"xupengxisxveryx1");
	OLED_ShowString(0,2,"xupeng is very");
	OLED_ShowString(0,4,"xupeng is very");
	OLED_ShowString(0,6,"xupeng is very");

	while(1)
	{


		set_tm1804_data(0xcc,0x00);
		delay_ms(1000);
		set_tm1804_data(0x00,0x00);
		delay_ms(1000);
	}
}
三、完整工程下载
完整工程下载点击此链接