1. 选择器 API
querySelector 方法获取满足第一个条件的 DOM 元素querySelectorAll 方法获取满足条件的所有 DOM 元素- 支持
复杂选择器的查找方式
<script type="text/javascript">
window.onload = function() {
var container = document.querySelector('#container')
console.log(container);
var lis = document.querySelector('.item')
console.log(lis);
alert(document.querySelector('#container ul>li.item:nth-child(3)').innerHTML)
var items = document.querySelectorAll('.item')
console.log('items:',items);
}
</script>
<body>
<div id="container">
<ul>
<li class="item">1</li>
<li class="item">2</li>
<li class="item">3</li>
<li class="item">4</li>
<li class="item">5</li>
</ul>
</div>
</body>
2. 历史对象 API
- History 对象
包含用户(在浏览器窗口中)访问过的 URL,能够让一个页面具有历史状态
- History 对象是 window 对象的一部分,可通过
window.history 属性对其进行访问
- 通过
pushState 方法添加历史状态
- 当调用历史对象的
前进后退方法时触发 window 对象的 popstate 事件,可以在事件中获取历史状态的数据
| 属性方法 |
描述 |
| length |
返回浏览器历史列表中的 URL 数量 |
| back() |
加载 history 列表中的前一个 URL |
| forward() |
加载 history 列表中的下一个 URL |
| go() |
加载 history 列表中的某个具体页面 |
history.pushState('历史状态的数据','标题',url)
功能描述
- 点击左侧的列表项,右侧区域显示对应的内容
- 点击后退箭头,能
回退历史浏览记录
注意点
- Ajax 执行数据请求的时候,是没有历史记录的
- 现在需要作出历史记录

<!DOCTYPE html>
<html lang="en" dir="ltr">
<head>
<meta charset="utf-8">
<title>历史对象API</title>
<style media="screen">
html,body{
height: 100%}
*{
margin: 0;padding: 0;}
.container{
display: flex;
height: 100%;
}
.left {
width: 200px;
height: 100%;
border: 1px solid #ccc;
padding: 10px;
}
.right{
flex:1;
height: 100%;
border: 1px solid #ccc;
}
</style>
<script src="https://cdn.bootcdn.net/ajax/libs/jquery/3.5.1/jquery.min.js" charset="utf-8"></script>
<script type="text/javascript">
var datas = []
$(function(){
$.getJSON('study.json',function(response){
var strLi = ''
for (var i = 0; i < response.length; i++) {
var title = response[i].title
strLi += `<li οnclick="showContent(${
i})">${
title}</li>`
}
$('.titles').html(strLi)
datas = response
})
})
function showContent(index) {
$('.right').html(datas[index].content)
window.history.pushState(datas[index].content,'','?title='+ datas[index].title)
}
window.addEventListenter('popstate',function(e){
$('.right').html(e.state)
})
</script>
</head>
<body>
<div class="container">
<div class="left">
<ul class="titles"></ul>
</div>
<div class="right"></div>
</div>
</body>
</html>
3. 新增 Web 存储 API
3.1 Web 存储 API 类型
localStorage 存储sessionStorage 存储离线缓存其他
3.2 本地存储 localStorage
- localStorage 采用
键值配对保存数据,用于持久化的本地存储
- localStorage 的
容量大小约为 5M
浏览器的支持不一致,建议加上兼容性语法- 保存的数据值类型为
string,JSON对象需要进行类型转换
JSON.stringify()JSON.parse()
本地数据未加密,且持久存在,安全性差
3.2.1 localStorage 属性方法
| 属性方法 |
描述 |
| length |
存储数据对象的个数 |
| key(index) |
获取 index 对应的键 |
| setItem(key, value) |
键值存储的方法 |
| getItem(key) |
获取存储数据的方法 |
| removeItem(key) |
删除指定数据的方法 |
| clear() |
清除所有存储数据的方法 |
3.2.2 localStorage 存储数据
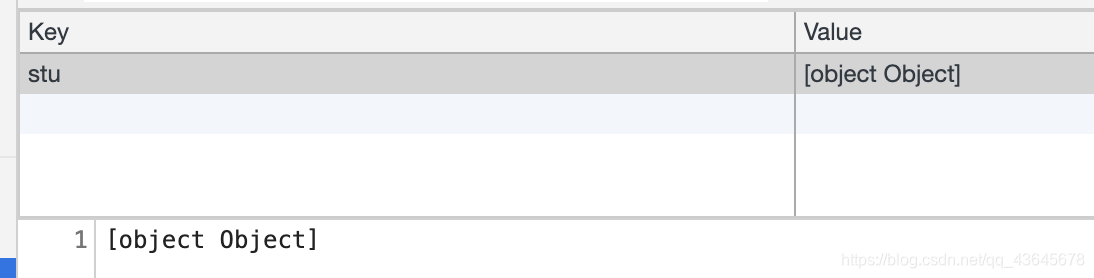
localStorage.setItem('stuName','tom')
alert(localStorage.getItem('stuName'))

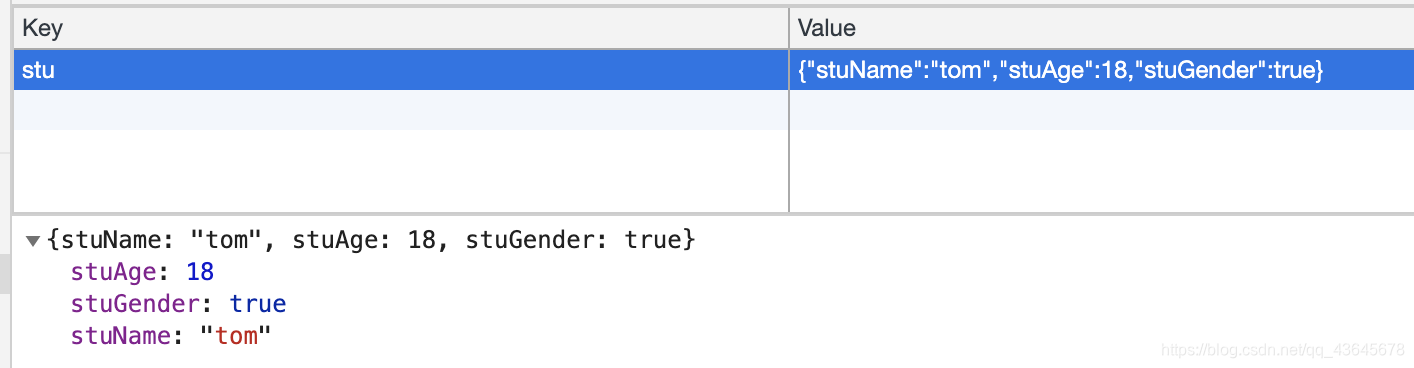
本地存储对象
- 保存对象前,需要做
字符串转换
- 读取对象数据前,需要再转换成
JSON格式
var stu = {
"stuName": "tom", "stuAge": 18, "stuGender": true }
localStorage.setItem('stu',stu)
if (localStorage) {
localStorage.setItem('stu', JSON.stringify(stu))
alert(JSON.parse(localStorage.getItem('stu')).stuName)
}else{
alert('您的浏览器不支持本地存储,请升级!')
}
3.2.3 localStorage 存储登陆验证
<script type="text/javascript">
function login(){
var userName = document.querySelector('#txtName').value
var userPwd = document.querySelector('#txtPwd').value
if (userName == 'admin' && userPwd == '888') {
alert('欢迎登陆!')
localStorage.setItem('userName',userName)
location.href = 'index.html'
}
}
</script>
<body>
<form class="" action="index.html" method="post">
<input type="text" name="" value="" id="txtName" placeholder="请输入用户名">
<input type="password" name="" value="" id="txtPwd" placeholder="请输入密码">
<input type="button" name="" value="登陆" onclick="login()">
</form>
</body>
<script type="text/javascript">
if(localStorage.getItem('userName') == null) {
alert('本页面需要登陆才能访问! 请先登录! ')
location.href = 'login.html'
}
function exit() {
localStorage.removeItem('userName')
location.href = 'login.html'
}
</script>
</head>
<body>
<h1>欢迎访问首页</h1>
<input type="button" name="" value="安全退出" onclick="exit()">
</body>
3.2.4 localStorage 记住密码练习
<script>
window.onload = function(){
var userInfo = localStorage.getItem('userInfo')
if(userInfo){
document.querySelector('[type="text"]').value = JSON.parse(userInfo).userName
document.querySelector('[type="password"]').value = JSON.parse(userInfo).userPwd
}
}
function login(){
var userName = document.querySelector('[type="text"]').value
var userPwd = document.querySelector('[type="password"]').value
var isSave = document.querySelector('[type="checkbox"]').checked
if(userName == 'admin' && userPwd == '888'){
alert('登录成功!')
if(isSave){
localStorage.setItem('userInfo',
JSON.stringify({
"userName":userName,"userPwd":userPwd}))
}else{
localStorage.removeItem('userInfo')
}
}else{
alert('登录失败!')
}
}
</script>
<body>
<form action="">
<input type="text" placeholder="请输入用户名">
<input type="password" placeholder="请输入密码">
<input type="button" value="登陆验证" onclick=“login()”>
<input type="checkbox">记住密码
</form>
</body>
3.3 会话存储 sessionStorage
- sessionStorage 与 localStorage 语法类似,只是
生命周期限于会话期内,会话结束后自动销毁
- sessionStorage 主要用于
在多页面间共享数据
3.3.1 sessionStorage 模拟购物车
<script type="text/javascript">
var productInfos = []
function buy() {
var products = document.querySelector('#products')
var productName = products.options[products.selectedIndex].text
var productId = products.options[products.selectedIndex].value
productInfos.push({
"pName":productName,"pId":productId})
sessionStorage['productInfos'] = JSON.stringify(productInfos)
}
function goPay() {
location.href = 'pay.html'
}
</script>
<body>
<select class="" name="" id="products">
<option value="IPhoneX001">IPhoneX</option>
<option value="HUAWEI00A">华为P40Pro</option>
<option value="Sansum00I">三星</option>
</select>
<input type="button" name="" value="放入购物车" onclick="buy()">
<input type="button" name="" value="去支付" onclick="goPay()">
</body>
<script type="text/javascript">
window.onload = function() {
if (sessionStorage['productInfos']) {
var productInfos = JSON.parse(sessionStorage['productInfos'])
var strHtml = ''
for (var i = 0; i < productInfos.length; i++) {
var pName = productInfos[i].pName
var pId = productInfos[i].pId
strHtml += `<li>${
pName}-${
pId}</li>`
}
document.querySelector('ul').innerHTML = strHtml
}
}
</script>
</head>
<body>
<h3>当前购物车的商品清单:</h3>
<ul></ul>
</body>
3.4 离线存储
- 离线应用程序原理是
建立一个URL列表清单
- 当应用和服务器建立联系时,浏览器将在本地缓存列表清单中的资源文件
- 当离线时,浏览器将调用缓存来支撑Web应用
- 离线缓存机制的关键是
Cache Manifest 文件
3.4.1 离线缓存的配置文件
CACHE MANIFEST
# version 0.0.0

CACHE:
# 需要缓存的资源文件
css/style.css
Image/head.jpg

NETWORK:
# 在线访问的资源文件
Index.jsp
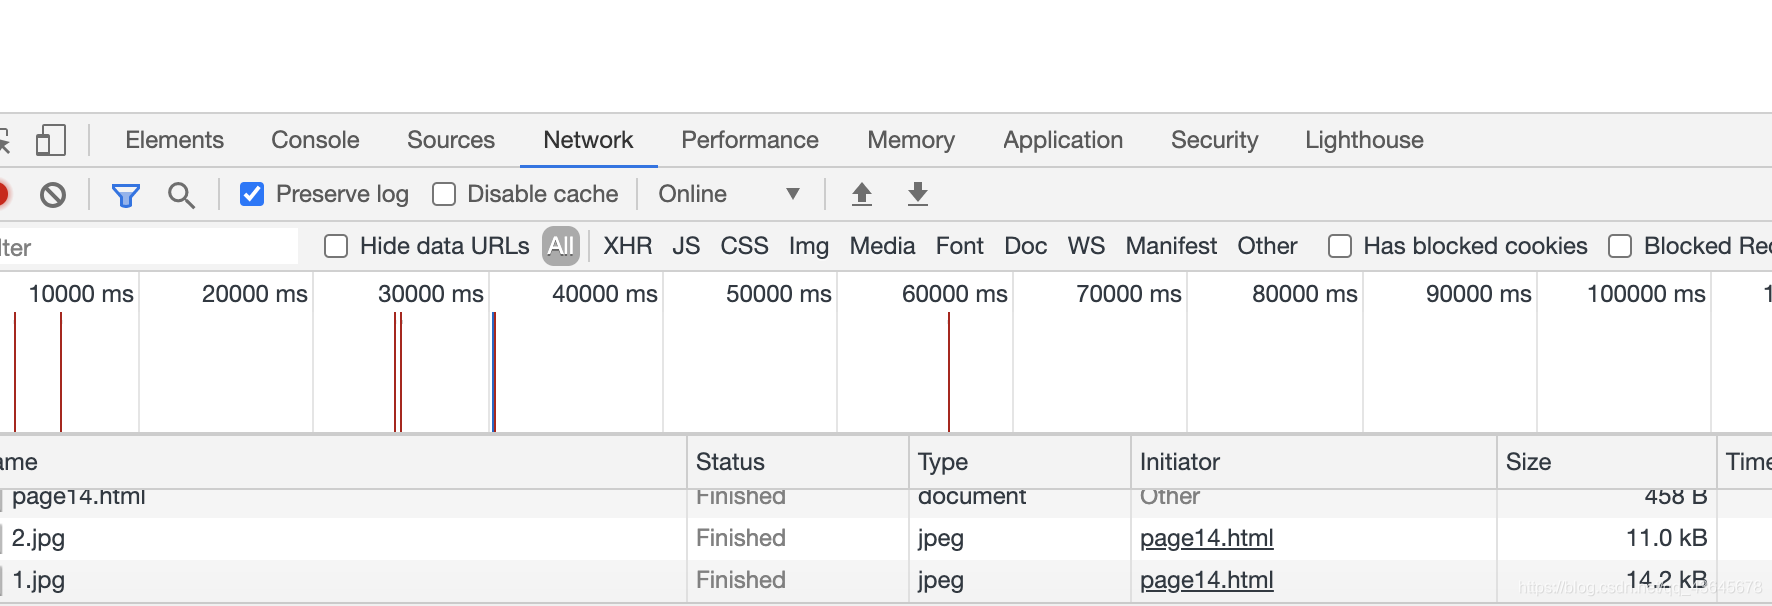
3.4.2 离线缓存模拟断网情况
- 当断网时,页面只能显示img2,只有联网时,页面才会显示img1
index.html
<!DOCTYPE html>
<html lang="en" manifest="myCache.manifest">
<head>
<meta charset="UTF-8">
<meta name="viewport" content="width=device-width, initial-scale=1.0">
<title>离线缓存</title>
</head>
<body>
<img src="images/2.jpg" alt="">
<img src="images/1.jpg" alt="">
</body>
</html>
CACHE MANIFEST
#version  0.0.0

CACHE:
#需要缓存的资源文件
images/2.jpg

NETWORK:
#在线访问的资源文件
images/1.jpg
3.4.3 离线缓存查看方法
检查/Network
4. 新增地理定位 API
- 地理位置(Geolocation)是 HTML5 的重要特性之一
- 提供了
确定用户位置的功能,借助这个特性能够开发基于位置信息的应用
- 使得开发人员不用借助其他软件就能轻松实现
位置查找,地图应用,导航等功能,具有划时代的意义
4.1 常见定位技术
4.2 定位的语法
- Geolocation 是 navigator 对象的属性
- getCurrentPosition 方法实现
数据定位
latitude (纬度)longitude (经度)
window.navigator.geolocation.getCurrentPosition(success,error,null)
success(position): 成功的回调函数
error(errorcode): 失败的回调函数
4.3 定位 success 函数的参数
| 参数 |
功能 |
coords.latitude |
纬度 |
coords.longitude |
经度 |
coords.altitude |
海拔 |
coords.accuracy |
位置精确度 |
coords.altitudeAccuracy |
海拔精确度 |
coords.heading |
朝向 |
coords.speed |
速度 |
4.4 百度地图 API 功能
5. 新增文件操作 API
5.1 文件操作 API
- HTML5 提供一个
页面层调用的API文件,通过调用这个API文件中的对象、方法和接口,可以方便的访问文件的属性或内容
- 通过
file 表单元素,访问和操纵本地文件
- 通过
FileReader 对象读取文件
5.2 文件对象
- 文件对象包含的
基本属性
NamelastModifieddate(上一次修改文件的时间)
- 文件对象
继承了Blob接口,可以使用接口提供的属性
<script>
function showFileInfo(inputFiles){
var files = inputFiles.files
for(var i = 0 ; i < files.length ; i++){
console.log('文件名:',files[i].name)
console.log('文件类型:',files[i].type)
console.log('文件大小:',files[i].size)
console.log('文件最后修改时间:',files[i].lastModifiedDate)
}
}
</script>
<body>
<form action="">
<input type="file" name="" id="" multiple onchange="showFileInfo(this)">
</form>
</body>
<style>
*{
margin:0;padding:0;}
[type="button"]{
background-color: #00f;
color:#eee;
padding:10px;
}
[type="file"]{
display:none;
}
ul{
list-style: none;}
li{
width: 300px;
height: 80px;
border:1px solid #ccc;
}
</style>
<script>
function selectFile(){
document.querySelector('[type="file"]').click()
}
function showFileInfo(){
var files = document.querySelector('[type="file"]').files
var strHTML = ''
for(var i = 0 ; i < files.length ; i++){
strHTML += `<li>
<h3>${
files[i].name}</h3>
<p>
<span>${
new Date(files[i].lastModifiedDate).toLocaleString()}</span>
<span>${
(files[i].size/1024).toFixed(2)}KB</span>
</p>
</li>`
}
document.querySelector('#files').innerHTML = strHTML
}
</script>
<body>
<form action="">
<input type="button" value="选择文件" onclick="selectFile()">
<input type="file" multiple onchange="showFileInfo()">
</form>
<ul id="files"></ul>
</body>
5.3 文件读取对象的方法
文件读取对象常用方法
readAsDataURL:读取图片文件readAsText:读取文本文件
var reader = new FileReader();
reader.onload = function(e){
}
reader.readAsDataURL(file);
<script>
function loadFile(inputFile){
var fileReader = new FileReader()
fileReader.onload = function(e){
document.querySelector('textarea').value = e.target.result
document.querySelector('img').src = e.target.result
}
fileReader.readAsText(inputFile.files[0])
fileReader.readAsDataURL(inputFile.files[0])
}
</script>
<body>
<h3>发表旅行感想</h3>
<form action="">
<textarea name="" id="" cols="30" rows="10"></textarea>
<input type="file" name="" id="" multiple onchange="loadFile(this)">
</form>
<img src="" alt="">
</body>
<style>
    div {


        width: 200px;
        text-align: center;
    }

    [type="file"] {


        display: none;
    }

    img {


        width: 150px;
        height: 150px;
        border: 1px solid #ccc;
        border-radius: 50%;
    }

    span {


        font-size: 20px;
    }
</style>
<script>
    window.onload = function () {


        var inputFile = document.querySelector('[type="file"]')
        document.querySelector('img').onclick = function () {


            inputFile.click()
        }
    }
    function loadFile(inputFile) {


        var fileReader = new FileReader()
        var reg = /^image/gi
        var flag = reg.test(inputFile.files[0].type)
        if (inputFile.files[0].size < Math.pow(1024,2) && flag) {


            fileReader.onload = function (e) {


                document.querySelector('img').src = e.target.result
            }
            fileReader.readAsDataURL(inputFile.files[0])
        } else {


            alert("图片上传失败!")
        }
    }
</script>
<body>
    <div>
        <img src="images/0.jpg" alt=""><br>
        <span>user</span>
        <input type="file" name="" id="" onchange="loadFile(this)">
    </div>
</body>
5.4 文件读取对象的事件
| 事件名 |
描述 |
| onloadstart |
当读取数据开始时触发 |
| onprogress |
当正在读取数据时触发 |
| onerror |
当读取数据失败时触发 |
| onload |
当数据读取成功时触发 |
| onloadend |
当数据读取结束时触发,不论是否成功 |
-
执行顺序
Loadstart -> onprogress -> onload -> onloadend
-
事件的参数
- 获取的
数据:e.target.result
错误码:e.target.error.code常见错误信息:
NOT_FOUND_ERR:查不到文件ENCODING_ERR:文件容量太大NOT_READABLE_ERR:权限不足
6. 新增拖曳 API
6.1 拖曳操作API
- 默认对
图片和文字可以拖曳
- HTML5 提供了对元素的
拖曳操作(Drag/Drop),需要添加属性 draggable 才可以
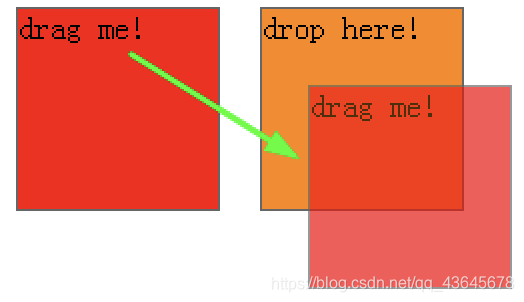
6.2 拖曳事件类型
dragenter
dragleave
dragover
drop
6.4 drop 事件的用法
- 通过 drop 事件对象的 dataTransfer 属性实现
拖放功能
- dataTranfer 属性的主要用法
| 格式参数 |
描述 |
text/plain |
文本格式 |
text/html |
HTML页面格式 |
<style>
div {
width: 300px;
height: 200px;
background-color: #ff0;
}
.selected {
border: 2px solid #f00;
}
.unselected {
border: 2px solid #ccc;
}
</style>
<script>
window.onload = function () {
var div = document.querySelector('div')
div.ondragenter = function () {
this.className = 'selected'
}
div.ondragleave = function (e) {
this.className = 'unselected'
}
div.ondragover = function (e) {
e.preventDefault()
}
div.ondrop = function (e) {
if (e.dataTransfer.files.length > 0) {
alert('您拖拉进入的是文件!')
} else {
console.log(e.dataTransfer.getData('text/html'))
var content = e.dataTransfer.getData('text/plain')
var reg = /^http/gi
if (reg.test(content)) {
var img = document.createElement('img')
img.src = content
div.appendChild(img)
} else {
document.querySelector('div').innerHTML += content
}
}
}
}
</script>
<body>
<h1>测试标题文字</h1>
<img src="images/1.jpg" alt="">
<div draggable="true"></div>
</body>
7. 总结