学习linux内核是很多程序员的梦想,内核错误往往会导致系统宕机,很难保留出错时的现场,对于开发linux内核和驱动调试,一般需要双机调试环境,KGDB是在内核2.6.26版本中正式支持的,可以方便调试内核和驱动。
前期准备
1.vmware虚拟机,安装centos6操作系统(内核版本2.6.32),对于学习低版本内核更合适
2.安装开发工具链 sudo yum groupinstall "Development Tools"
3.安装ncurses:sudo yum install ncurses-devel 因为make menuconfig依赖ncurses
编译内核
解压linux内核代码,进入源码目录,执行:make menuconfig
Kernel Hacking -->
      (1)选中Compile the kernel with frame pointers
      (2)去掉Write protect kernel read-only data structures(否则不能用软件断点)
清理以前的编译痕迹(如果需要)
make mrproper
make clean编译内核:
make -j4 bzImage 编译会生成bzImage文件,对应于/boot目录下的vmlinuz文件,是压缩过的内核文件。启动加载时将该文件解压缩到内存中之后才能执行操作系统。
编译内核模块:
make -j4 modules
内核在运行过程中,除需要内核文件之外,还需要加载一些外围模块(例如驱动程序)等才能运行。
安装内核及模块
安装内核模块:make modules_install
安装上一步中编译的内核模块,一般都会安装到/lib/modules目录下。
安装内核:make install
[root@localhost linux-2.6.32.27]# make install
sh /root/build/linux-2.6.32.27/arch/x86/boot/install.sh 2.6.32.27 arch/x86/boot/bzImage \
                System.map "/boot"
ERROR: modinfo: could not find module xt_CHECKSUM
ERROR: modinfo: could not find module nf_defrag_ipv6
ERROR: modinfo: could not find module vmware_balloon
ERROR: modinfo: could not find module vmwgfx
这些错误可以忽略。
生成initrd.img
mkinitrd /boot/initrd-2.6.32.27.img 2.6.32.27
启动新的内核
重启系统,选择我们刚刚编译的内核启动项,重启后,我们发现:
[root@localhost ~]# uname -a
Linux localhost.localdomain 2.6.32.27 #1 SMP Fri Mar 12 17:47:47 CST 2021 i686 i686 i386 GNU/Linux
内核已经更新
配置双机调试
做虚拟机快照,基于快照创建一台新机器,用于目标机。
目标添加串行端口(先删除打印机设备)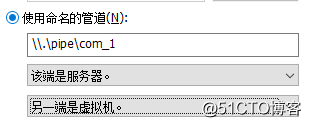
开发机也添加串口(先删除打印机设备)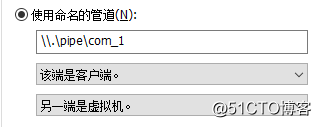
修改grub文件
启动目标机,修改grub文件

[root@localhost ~]# cat /etc/grub.conf
# grub.conf generated by anaconda
#
# Note that you do not have to rerun grub after making changes to this file
# NOTICE:  You have a /boot partition.  This means that
#          all kernel and initrd paths are relative to /boot/, eg.
#          root (hd0,0)
#          kernel /vmlinuz-version ro root=/dev/mapper/VolGroup-lv_root
#          initrd /initrd-[generic-]version.img
#boot=/dev/sda
default=1
timeout=5
splashimage=(hd0,0)/grub/splash.xpm.gz
hiddenmenu
title CentOS (2.6.32.27)
        root (hd0,0)
        kernel /vmlinuz-2.6.32.27 ro root=/dev/mapper/VolGroup-lv_root rd_NO_LUKS LANG=en_US.UTF-8 rd_NO_MD rd_LVM_LV=VolGroup/lv_swap SYSFONT=latarcyrheb-sun16 crashkernel=128M rd_LVM_LV=VolGroup/lv_root  KEYBOARDTYPE=pc KEYTABLE=us rd_NO_DM rhgb quiet kgdboc=ttyS0,115200 kgdbwait
        initrd /initramfs-2.6.32.27.img
title CentOS 6 (2.6.32-754.el6.i686)
        root (hd0,0)
        kernel /vmlinuz-2.6.32-754.el6.i686 ro root=/dev/mapper/VolGroup-lv_root rd_NO_LUKS LANG=en_US.UTF-8 rd_NO_MD rd_LVM_LV=VolGroup/lv_swap SYSFONT=latarcyrheb-sun16 crashkernel=128M rd_LVM_LV=VolGroup/lv_root  KEYBOARDTYPE=pc KEYTABLE=us rd_NO_DM rhgb quiet
        initrd /initramfs-2.6.32-754.el6.i686.img
kgdboc=ttyS0,115200: 使用ttyS0,波特率115200
kgdbwait: 使 kernel 在启动过程中等待 gdb 的连接。然后重启target,系统就会暂停在kgdbwait处,等待host端的gdb连接。
修改完grub文件后,重启系统,系统将停留在:
启动开发机进行调试,进入内核编译目录,运行gdb ./vmlinux
(gdb) set remotebaud 115200
(gdb) target remote /dev/ttyS0
Remote debugging using /dev/ttyS0
kgdb_breakpoint (new_kgdb_io_ops=0xc0a0b7d8) at kernel/kgdb.c:1721
1721 wmb(); /* Sync point after breakpoint */
(gdb) c  (继续运行)
如果目标机进入系统后,再想回到调试模式:在目标机执行:echo g > /proc/sysrq-trigger