本文的 demo 源码地址,欢迎自取star:https://github.com/DavidChen93/vue-practical-directives
自定义指令简介
在 Vue2.0 中除了默认内置的指令(v-model 和 v-show)以外,也支持注册自定义指令。虽然代码复用和抽象的主要形式是组件,但是有时候仍然需要对顶层的 dom 元素进行操作,此时自定义指令就派上用场了。
注意:v-model 和 v-show 的实现方式和自定义指令不一样,前者在模板编译(compile)时就已经进行处理。
钩子函数
在 Vue2.x 中为每个自定义指令对象提供如下几个钩子函数 (均为可选):
- bind:只调用一次,指令第一次绑定到元素时调用。在这里可以进行一次性的初始化设置。
- inserted:被绑定元素插入父节点时调用 (仅保证父节点存在,但不一定已被插入文档中)。
- update:所在组件的 VNode 更新时调用,但是可能发生在其子 VNode 更新之前。指令的值可能发生了改变,也可能没有。但是你可以通过比较更新前后的值来忽略不必要的模板更新 (详细的钩子函数参数见下)。
- componentUpdated:指令所在组件的 VNode 及其子 VNode 全部更新后调用。
- unbind:只调用一次,指令与元素解绑时调用。
钩子函数参数
指令钩子函数会被传入以下参数:
- el:指令所绑定的元素,可以用来直接操作 DOM。
- binding:一个对象,包含以下 property:
- name:指令名,不包括 v- 前缀。
- value:指令的绑定值,例如:v-my-directive=“1 + 1” 中,绑定值为 2。
- oldValue:指令绑定的前一个值,仅在 update 和 componentUpdated 钩子中可用。无论值是否改变都可用。
- expression:字符串形式的指令表达式。例如 v-my-directive=“1 + 1” 中,表达式为 “1 + 1”。
- arg:传给指令的参数,可选。例如 v-my-directive:foo 中,参数为 “foo”。
- modifiers:一个包含修饰符的对象。例如:v-my-directive.foo.bar 中,修饰符对象为 { foo: true, bar: true }。
- vnode:Vue 编译生成的虚拟节点。移步 VNode API 来了解更多详情。
- oldVnode:上一个虚拟节点,仅在 update 和 componentUpdated 钩子中可用。
除了 el 之外,其它参数都应该是只读的,切勿进行修改。如果需要在钩子之间共享数据,建议通过元素的 dataset 来进行。
注册指令
Vue2.x 自定义指令有全局注册和局部注册两种方式。
- 全局注册:通过 Vue.directive( name, [definition] ) 方式注册
- 局部注册:在组件选项配置对象中,使用 directives 选项进行注册
本文使用插件的方式全局注册自定义指令,在 directives 文件夹下新建 index.js 文件。
import debounce from "./debounce";

const directives = {


  debounce,
};

function install(Vue) {


  for (const [key, value] of Object.entries(directives)) {


    Vue.directive(key, value);
  }
}

export default {


  install,
};
在入口文件 main.js 中使用 Vue.use()方法使用插件。
import Vue from "vue";
import directives from "./directives";

Vue.use(directives);
下面总结分享一些特定场景下经常用到的自定义指令。
防抖指令 v-debounce
场景描述:部分按钮或者敏感操作短时间内被多次点击,就会向后台重复发起多条请求,导致数据错乱,比如新增按钮、支付按钮等。故需要短时间多次点击按钮,只触发一次事件回调,即常见的防抖。
实现方案:监听 dom 元素的 click 事件,在捕获阶段进行防抖判断,如果短时间内多次点击则阻止冒泡。
// directives/debounce.js
const debounce = {


  inserted(el, {

     value, arg }) {


    const delay = +arg || 1000;
    let timer;
    el.addEventListener("click", () => {


      if (timer) {


        clearTimeout(timer);
      }
      timer = setTimeout(() => {


        value();
      }, delay);
    });
  },
};

export default debounce;
示例:
<template>
  <div>
    <button v-debounce:1000="handleTriggerClick" @click="handleClick">
      点击
    </button>
    <div>我点击了{

   { clickCount }}次</div>
    <div>我触发了{

   { triggerCount }}次</div>
  </div>
</template>

<script>
export default {
  name: "Debounce",

  data() {
    return {
      clickCount: 0,
      triggerCount: 0,
    };
  },

  methods: {
    handleClick() {
      this.clickCount++;
    },
    handleTriggerClick() {
      this.triggerCount++;
    },
  },
};
</script>
效果:

加载指令 v-loading
场景描述:在异步请求或提交数据的过程中,为阻止用户进行操作,通常使用全屏加载遮罩层的方式进行阻拦,但比如请求分页列表数据时,用户体验就非常差。故可以在异步请求时,只对需要阻止用户操作的元素添加 loading 遮罩层。
实现方案:通过 createdElement 方法创建遮罩层,在插入和更新钩子函数中判断当前状态值,加载中就添加遮罩层,未加载中则移除遮罩层,在移除时先判断遮罩层是否挂载过。
// directives/loading.js
function createMask() {


  const ele = document.createElement("div");
  ele.style.position = "absolute";
  ele.style.top = 0;
  ele.style.right = 0;
  ele.style.bottom = 0;
  ele.style.left = 0;
  ele.style.zIndex = 9999;
  ele.style.display = "flex";
  ele.style.justifyContent = "center";
  ele.style.alignItems = "center";
  ele.style.backgroundColor = "rgba(0, 0, 0, 0.3)";
  ele.innerHTML = "加载中...";
  return ele;
}

const mask = createMask();
let mountedFlag = false;

function checkLoading(node, isLoading) {


  if (node) {


    if (isLoading) {


      node.style.position = "relative";
      node.appendChild(mask);
      mountedFlag = true;
    } else if (mountedFlag) {


      node.removeChild(mask);
      mountedFlag = false;
    }
  }
}

const loading = {


  inserted(el, {

     value }) {


    checkLoading(el, value);
  },
  update(el, {

     value }) {


    checkLoading(el, value);
  },
};

export default loading;
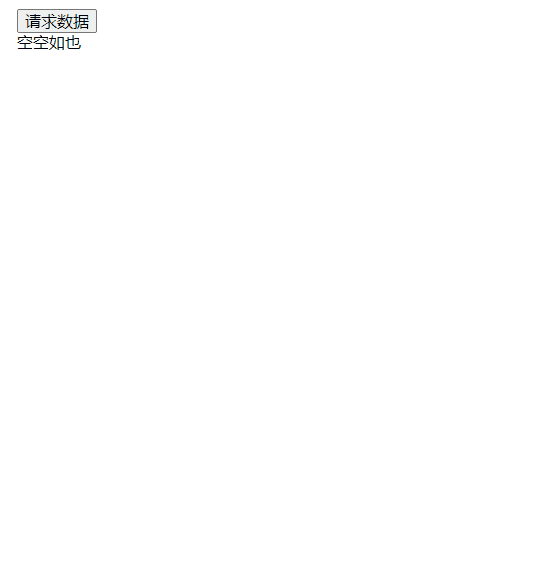
示例:
<template>
  <div>
    <button @click="fetchData">请求数据</button>
    <div v-loading="loading" class="wrapper">{

   { text }}</div>
  </div>
</template>

<script>
export default {
  name: "Loading",

  data() {
    return {
      text: "空空如也",
      loading: false,
    };
  },

  methods: {
    fetchData() {
      // 模拟异步请求
      this.loading = true;
      setTimeout(() => {
        this.text = "嘿嘿,我有数据了";
        this.loading = false;
      }, 3000);
    },
  },
};
</script>

<style>
.wrapper {
  height: 500px;
  width: 500px;
}
</style>
效果图:
粘黏指令 v-sticky
场景描述:当元素高度过大时,需要内部元素能够吸顶,但是目前部分浏览器尚不支持 css3 的 sticky 定位属性,所以需要实现兼容大部分浏览器的 sticky 定位
实现方案:
- 如果浏览器原生支持 sticky 属性,则直接使用该属性。
- 否则使用 relative 定位和 fixed 定位结合模拟实现:
- 先获取最近一个出现滚动的祖先,利用 scrollHeight > clientHeight 的方式进行判断
- 获取元素距离视口的高度
- 当父元素的滚动条高度大于吸顶高度减去元素高度时,利用fixed进行定位,否则重置定位
// directives/sticky.js
// 获取最近的“滚动祖先”
function getLatestScrollEle(el) {


  if (el.parentNode === null) {


    return el;
  } else if (hasScroll(el.parentNode)) {


    return el.parentNode;
  } else {


    return getLatestScrollEle(el.parentNode);
  }
}

function hasScroll(el) {


  return el.scrollHeight - el.clientHeight > 1;
}

function getScroll(target) {


  let ret = target.pageYOffset;
  if (typeof ret !== "number") {


    ret = target.scrollTop;
  }
  return ret;
}

const sticky = {


  inserted(el, binding) {


    const params = binding.value || {

    };
    const zIndex = params.zIndex || 1000;
    const elStyle = el.style;

    elStyle.position = "sticky";
    if (elStyle.position === "sticky") {


      elStyle.top = params.top || 0;
      elStyle.zIndex = zIndex;
    } else {


      const rect = el.getBoundingClientRect();
      const elHeight = rect.height;
      const elWidth = rect.width;

      const parentElm = getLatestScrollEle(el);
      const stickyTop = params.top || parentElm.getBoundingClientRect().top;

      let stickyed = false;

      const sticky = () => {


        if (stickyed) {


          return;
        }

        if (!elStyle.height) {


          elStyle.height = `${

      el.offsetHeight}px`;
        }

        elStyle.position = "fixed";
        elStyle.width = `${

      elWidth}px`;
        elStyle.top = `${

      stickyTop}px`;
        elStyle.zIndex = zIndex;
        stickyed = true;
      };

      const reset = () => {


        elStyle.position = "";
        elStyle.top = "";
        elStyle.zIndex = "";
        stickyed = false;
      };

      const check = () => {


        const scrollTop = getScroll(parentElm);
        if (scrollTop > stickyTop - elHeight) {


          sticky();
        } else {


          reset();
        }
      };

      parentElm.addEventListener("scroll", check);
    }
  },
};

export default sticky;
示例:
<template>
  <div style="height: 100px; overflow: auto;">
    <dl>
      <dt>A</dt>
      <dd>Andrew W.K.</dd>
      <dd>Arcade Fire</dd>
      <dd>At The Drive-In</dd>
      <dd>Aziz Ansari</dd>
    </dl>
    <dl>
      <dt v-sticky style="background-color: red;">C</dt>
      <dd>Chromeo</dd>
      <dd>Common</dd>
      <dd>Converge</dd>
      <dd>Crystal Castles</dd>
      <dd>Cursive</dd>
    </dl>
    <dl>
      <dt>E</dt>
      <dd>Explosions In The Sky</dd>
    </dl>
    <dl>
      <dt>T</dt>
      <dd>Ted Leo & The Pharmacists</dd>
      <dd>T-Pain</dd>
      <dd>Thrice</dd>
      <dd>TV On The Radio</dd>
      <dd>Two Gallants</dd>
    </dl>
  </div>
</template>

<script>
export default {
  name: "Sticky",
};
</script>
效果图:

波纹指令 v-wave
场景描述:当鼠标点击页面或者指定元素区域时,从鼠标点击处出现向外扩散波纹。
实现方案:
- 监听点击事件,记录鼠标点击坐标
- 使用 createElement 方法创建动画节点,通过绝对定位设置波纹起始为鼠标点击处
- 在更新和销毁钩子函数内移除监听器
// deirectives/wave/index.js
import "./wave.css";

const context = "@@waveContext";

function handleClick(el, binding) {


  const {

     value } = binding;
  const handle = (e) => {


    const customOpts = Object.assign({

    }, value);
    const opts = Object.assign(
      {


        ele: el, // 波纹作用元素
        type: "hit", // hit 点击位置扩散 center中心点扩展
        color: "rgba(0, 0, 0, 0.15)", // 波纹颜色
      },
      customOpts
    );
    const target = opts.ele;
    if (target) {


      target.style.position = "relative";
      target.style.overflow = "hidden";
      const rect = target.getBoundingClientRect();
      let ripple = target.querySelector(".wave-ripple");
      if (!ripple) {


        ripple = document.createElement("span");
        ripple.className = "wave-ripple";
        ripple.style.height = ripple.style.width =
          Math.max(rect.width, rect.height) + "px";
        target.appendChild(ripple);
      } else {


        ripple.className = "wave-ripple";
      }
      switch (opts.type) {


        case "center":
          ripple.style.top = rect.height / 2 - ripple.offsetHeight / 2 + "px";
          ripple.style.left = rect.width / 2 - ripple.offsetWidth / 2 + "px";
          break;
        default:
          ripple.style.top =
            (e.pageY -
              rect.top -
              ripple.offsetHeight / 2 -
              document.documentElement.scrollTop || document.body.scrollTop) +
            "px";
          ripple.style.left =
            (e.pageX -
              rect.left -
              ripple.offsetWidth / 2 -
              document.documentElement.scrollLeft || document.body.scrollLeft) +
            "px";
      }
      ripple.style.backgroundColor = opts.color;
      ripple.className = "wave-ripple z-active";
      return false;
    }
  };

  if (!el[context]) {


    el[context] = {


      removeHandle: handle,
    };
  } else {


    el[context].removeHandle = handle;
  }

  return handle;
}

const wave = {


  bind(el, binding) {


    el.addEventListener("click", handleClick(el, binding), false);
  },
  update(el, binding) {


    el.removeEventListener("click", el[context].removeHandle, false);
    el.addEventListener("click", handleClick(el, binding), false);
  },
  unbind(el) {


    el.removeEventListener("click", el[context].removeHandle, false);
    el[context] = null;
    delete el[context];
  },
};

export default wave;
/* deirectives/wave/wave.css */
.wave-ripple {


  position: absolute;
  border-radius: 100%;
  background-color: rgba(0, 0, 0, 0.15);
  background-clip: padding-box;
  pointer-events: none;
  -webkit-user-select: none;
  -moz-user-select: none;
  -ms-user-select: none;
  user-select: none;
  -webkit-transform: scale(0);
  -ms-transform: scale(0);
  transform: scale(0);
  opacity: 1;
}

.wave-ripple.z-active {


  opacity: 0;
  -webkit-transform: scale(2);
  -ms-transform: scale(2);
  transform: scale(2);
  -webkit-transition: opacity 1.2s ease-out, -webkit-transform 0.6s ease-out;
  transition: opacity 1.2s ease-out, -webkit-transform 0.6s ease-out;
  transition: opacity 1.2s ease-out, transform 0.6s ease-out;
  transition: opacity 1.2s ease-out, transform 0.6s ease-out,
    -webkit-transform 0.6s ease-out;
}
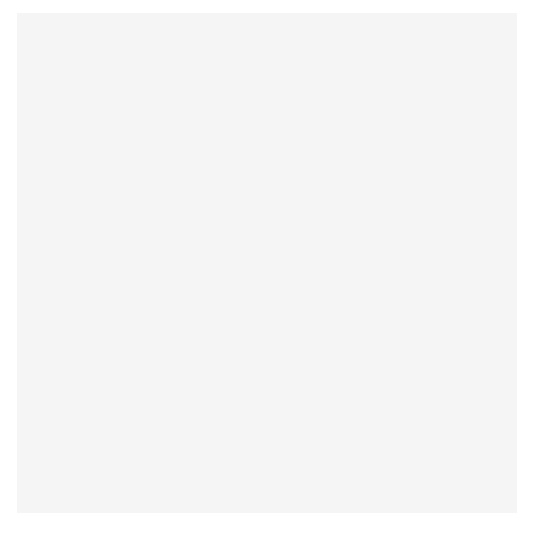
示例:
<template>
  <div class="wrapper" v-wave></div>
</template>

<script>
export default {
  name: "Permission",
};
</script>

<styl>
.wrapper {
  width: 500px;
  height: 500px;
  background-color: #f5f5f5;
}
</styl>
效果图:
权限执行 v-permission
场景描述:很多时候我们需要根据用户的角色权限对某些功能或者操作进行限制,虽然可以使用 v-if 或者 v-show 暴力的隐藏或者展示,但随着角色量增加以及系统功能的增加,表达式会变得越来越复杂且冗余,此时就可以通用 permission 指令优化
实现方案:
- 获取当前用户的角色列表
- 判断元素允许的角色是否在当前用户的角色列表中,如果在则展示元素,否则移除元素
// directives/permission.js
import store from "@/store";

function getUserRoles() {


  // 此处实现用户权限获取的逻辑,一般放在vuex中
  return store.getters.userRoles;
}

function checkPermission(value) {


  // 获取用户角色权限列表
  const roles = getUserRoles();

  // 指令值为数组,表示那些角色有权限,形如:['administrator', 'author', 'visitor']
  if (value && value instanceof Array && value.length > 0) {


    // 判断用户是否拥有该角色
    return roles.some((role) => {


      return value.includes(role);
    });
  }
  return false;
}

const permission = {


  inserted(el, binding) {


    const hasPermission = checkPermission(binding.value);
    // 无权限则移除元素
    if (!hasPermission) {


      el.parentNode && el.parentNode.removeChild(el);
    }
  },
};

export default permission;
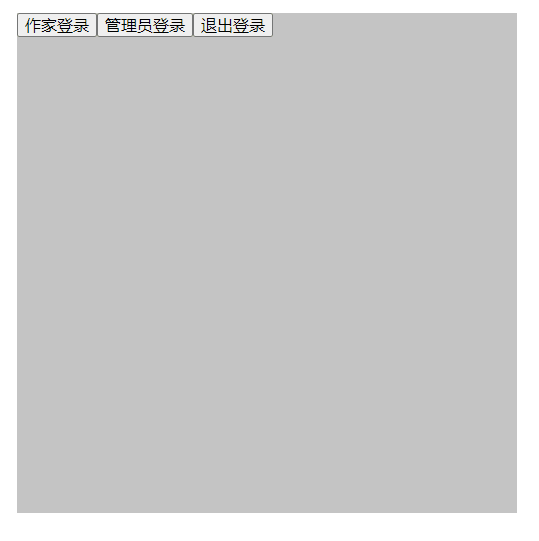
示例:
<template>
  <div class="wrapper">
    <div>
      <button @click="login('author')">作家登录</button>
      <button @click="login('administrator')">管理员登录</button>
      <button @click="login()">退出登录</button>
    </div>
    <div v-if="reloadFlag">
      <button v-permission="['author']" @click="handleSubmit">提交</button>
      <button v-permission="['author']" @click="handleEdit">编辑</button>
      <button v-permission="['administrator']" @click="handleDelete">
        删除
      </button>
    </div>
  </div>
</template>

<script>
export default {
  name: "Permission",

  data() {
    return {
      reloadFlag: false, // 模拟登录页面重载
    };
  },

  methods: {
    handleSubmit() {
      alert("提交");
    },
    handleEdit() {
      alert("编辑");
    },
    handleDelete() {
      alert("删除");
    },
    login(role) {
      this.reloadFlag = false;
      if (role) {
        this.$store.commit("UPDATE_USER_ROLES", [role]);
      } else {
        this.$store.commit("UPDATE_USER_ROLES", []);
      }
      this.$nextTick(() => {
        this.reloadFlag = true;
      });
    },
  },
};
</script>

<styl>
.wrapper {
  width: 500px;
  height: 500px;
  background-color: #c5c5c5;
}
</styl>
效果图:
可拖拽指令 v-draggable
场景描述:令页面元素可以拖拽至任意地方。常见场景是对话框 Dialog 可任意移动。
实现方案:
- 监听元素的 mousedown 事件,记录当前元素至可视区的距离
- 通过事件代理在文档 document 下监听鼠标移动事件,计算移动距离
- 利用绝对定位设置新的坐标
- 当元素移出页面时,移除所有事件回调函数
// directives/draggable.js
const dragable = {


  bind(el) {


    el.style.cssText += ";cursor:move;";
    el.style.cssText += ";left:0px;top:0px;";

    // 兼容获取dom元素样式属性
    const getStyle = (function () {


      if (window.document.currentStyle) {


        return (dom, attr) => dom.currentStyle[attr];
      } else {


        return (dom, attr) => getComputedStyle(dom, false)[attr];
      }
    })();

    el.onmousedown = (e) => {


      // 鼠标按下,计算当前元素距离可视区的距离
      const disX = e.clientX - el.offsetLeft;
      const disY = e.clientY - el.offsetTop;

      // 获取到的值带px 正则匹配替换
      let styL = getStyle(el, "left");
      let styT = getStyle(el, "top");

      if (styL.includes("%")) {


        styL = +document.body.clientWidth * (+styL.replace(/\%/g, "") / 100);
        styT = +document.body.clientHeight * (+styT.replace(/\%/g, "") / 100);
      } else {


        styL = +styL.replace(/\px/g, "");
        styT = +styT.replace(/\px/g, "");
      }

      document.onmousemove = function (e) {


        // 通过事件委托,计算移动的距离
        let left = e.clientX - disX;
        let top = e.clientY - disY;

        // 移动当前元素
        el.style.cssText += `;position: absolute;left:${

      left}px;top:${

      top}px;`;
      };

      document.onmouseup = function (e) {


        document.onmousemove = null;
        document.onmouseup = null;
      };
    };

    // 拖拽还原
    // el.onmouseup = () => {


    //   el.style.cssText += `;position: relative;top: 0;left: 0;`;
    // };
  },
  unbind(el) {


    el.onmousedown = null;
  },
};

export default dragable;
示例:
<template>
  <div class="wrapper" v-draggable></div>
</template>

<script>
export default {
  name: "Draggable",
};
</script>
效果图:

总结
自定义指令的特点在于可以直接对真实dom元素进行操作,不过Vue推崇数据驱动,过多的操作dom反而有违初衷,实际上上面的自定义指令都可以通过组件的方式进行封装,从而实现复用。
本文的 demo 源码地址,欢迎自取star:https://github.com/DavidChen93/vue-practical-directives