简介
本文将介绍如何编写一个提供给后台接口并使用脚本在前端页面调用。
使用maven下载XWiki提供的模板项目
保证你的maven已经安装,然后执行命令
mvn archetype:generate \
  -DarchetypeArtifactId=xwiki-commons-component-archetype \
  -DarchetypeGroupId=org.xwiki.commons \
  -DarchetypeVersion=10.11.3
下载成功之后会询问项目的自定义预设信息

当你输入’Y’确认了以后就会在本地生成项目了
模板项目里边的文件列表如下
pom.xml
src/main/java/com/fxp/HelloWorld.java
src/main/java/com/fxp/internal/DefaultHelloWorld.java
src/main/java/com/fxp/internal/HelloWorldScriptService.java
src/main/resources/META-INF/components.txt
src/test/java/com/fxp/HelloWorldTest.java
介绍几个比较重要的文件
- components.txt:用于实例的注入,你编写的bean都要在此文件中声明才能注入到应用上下文中。
- HelloWorldScriptService.java:用于把你的bean暴露给前端页面的脚本,脚本可以通过services对象找到你的bean。
如何写一个bean并且暴露给前端页面
第一步:编写你的bean
package com.fxp.internal;

import com.fxp.HelloWorld;
import org.xwiki.component.annotation.Component;
import javax.inject.Singleton;

/**
 * Implementation of a <tt>HelloWorld</tt> component.
 */
@Component
@Singleton
public class DefaultHelloWorld implements HelloWorld
{


    @Override
    public String sayHello()
    {


        return "hello I come from custom jar!!";
    }
}
第二步:在components.txt中声明你的bean
com.fxp.internal.DefaultHelloWorld
com.fxp.script.HelloWorldScriptService
第三步:注入到ScriptService的bean中,通过该bean的方法暴露出去。
package com.fxp.script;

import org.xwiki.component.annotation.Component;
import org.xwiki.script.service.ScriptService;

import com.fxp.HelloWorld;

import javax.inject.Inject;
import javax.inject.Named;
import javax.inject.Singleton;

/**
 * Make the HelloWorld API available to scripting.
 */
@Component
@Named("hello")
@Singleton
public class HelloWorldScriptService implements ScriptService
{


    @Inject
    private HelloWorld helloWorld;

    public String greet()
    {


        return this.helloWorld.sayHello();
    }
}
把项目打成jar包并且导入到XWiki中
在项目目录下使用mvn install命令生成jar包,如果成功可以在打印信息的最后看到生成的jar包目录,如下

再把jar包复制到XWiki应用的lib目录下
#我是用docker部署的,所以要用docker cp命令
docker cp C:\Users\Administrator\.m2\repository\com\fxp\test-component\1.0-SNAPSHOT\test-component-1.0-SNAPSHOT.jar 747f836b8a05:/usr/local/tomcat/webapps/ROOT/WEB-INF/lib
重启XWiki项目

到此,jar包部署完成,下一步测试一下我们的jar包。
在前端使用脚本访问你的接口
我们编写的ScriptService的bean方法可以在前端脚本中使用services对象引用到,在XWiki编辑框中输入如下脚本(hello就是我们使用@Named(“hello”)声明的对bean名称)

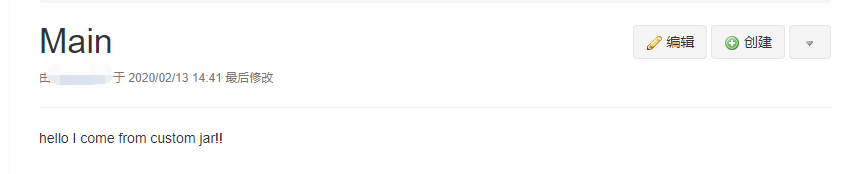
点击保存并查看,效果如下
总结
到此,从后端API到前端脚本的流程都打通了。
扫描二维码关注公众号,回复:
12904530 查看本文章
