补充:
这一节的验证码识别是通过第三方平台——超级鹰;超级鹰方面的操作可以看我之前记录的这篇博客:超级鹰平台的使用
1. 12306模拟登录编码流程:
- 使用selenium打开登陆页面
- 对当前selenium打开的这张页面进行截图
- 对当前图片局部区域(验证码图片)进行裁剪
- 好处:将验证码图片和模拟登录进行一一对应
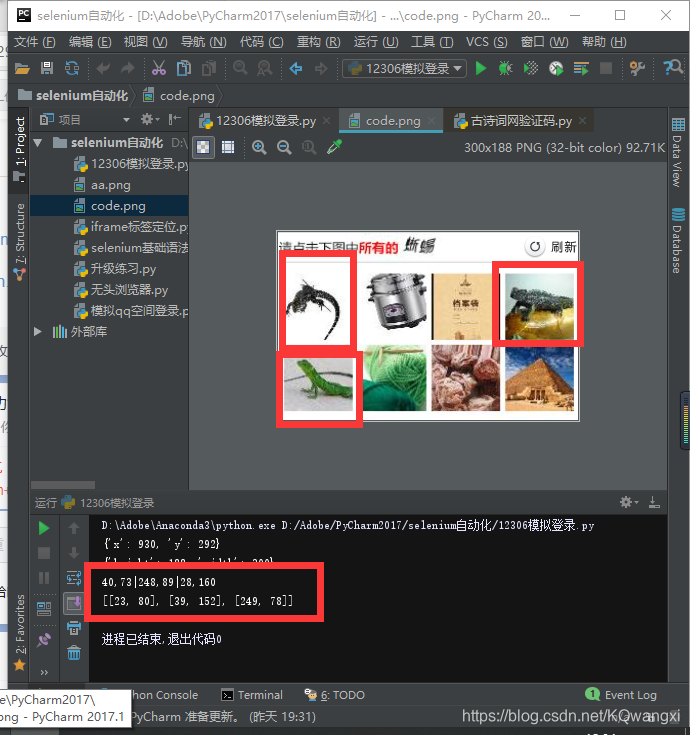
- 使用超级鹰识别验证码图片(返回值为:坐标)
- 输入用户名,密码
- 点击登录按钮
- 会跳出一个页面显示需要滑块验证
2. 写代码实验的过程中遇到的问题:
2.1 12306识别到是selenium会拒绝访问
反正就是不让你验证通过,所以查找了一些反反爬的博客看,找到了解决办法:
option = ChromeOptions()
option.add_experimental_option('excludeSwitches', ['enable-automation'])
# 如何实现让selenium规避被检测的风险
bro = webdriver.Chrome(options=option)
#使用selenium打开登陆页面
bro.get('https://kyfw.12306.cn/otn/resources/login.html')
script = 'Object.defineProperty(navigator,"webdriver",{get:()=>undefined,});'
重要就是option的赋值和后面那个script。
只要出现了这句话的提醒就表示它已经认出你是个爬虫了。

2.2 关于滑动验证
网上说为了防机器手段需要中间来回划一下啥的,我试了很多函数,最后成功的是用drag_and_drop_by_offset()函数再加上time.sleep()语句:
#滑块验证
span = bro.find_element_by_xpath('//*[@id="nc_1_n1z"]')
time.sleep(1)
action=ActionChains(bro)
time.sleep(2)
action.click_and_hold(span)
action.drag_and_drop_by_offset(span,300,0).perform()
time.sleep(5)
参考来源:selenium滑动验证码
2.3 最大化窗口
涉及到验证码截图和滑块验证需要水平移动多少的尺寸问题的确定,建议大家最大化窗口尝试。
代码里面也加上这句:
#把窗口最大化方便截图
bro.maximize_window()
这样截图截出来就恰到好处
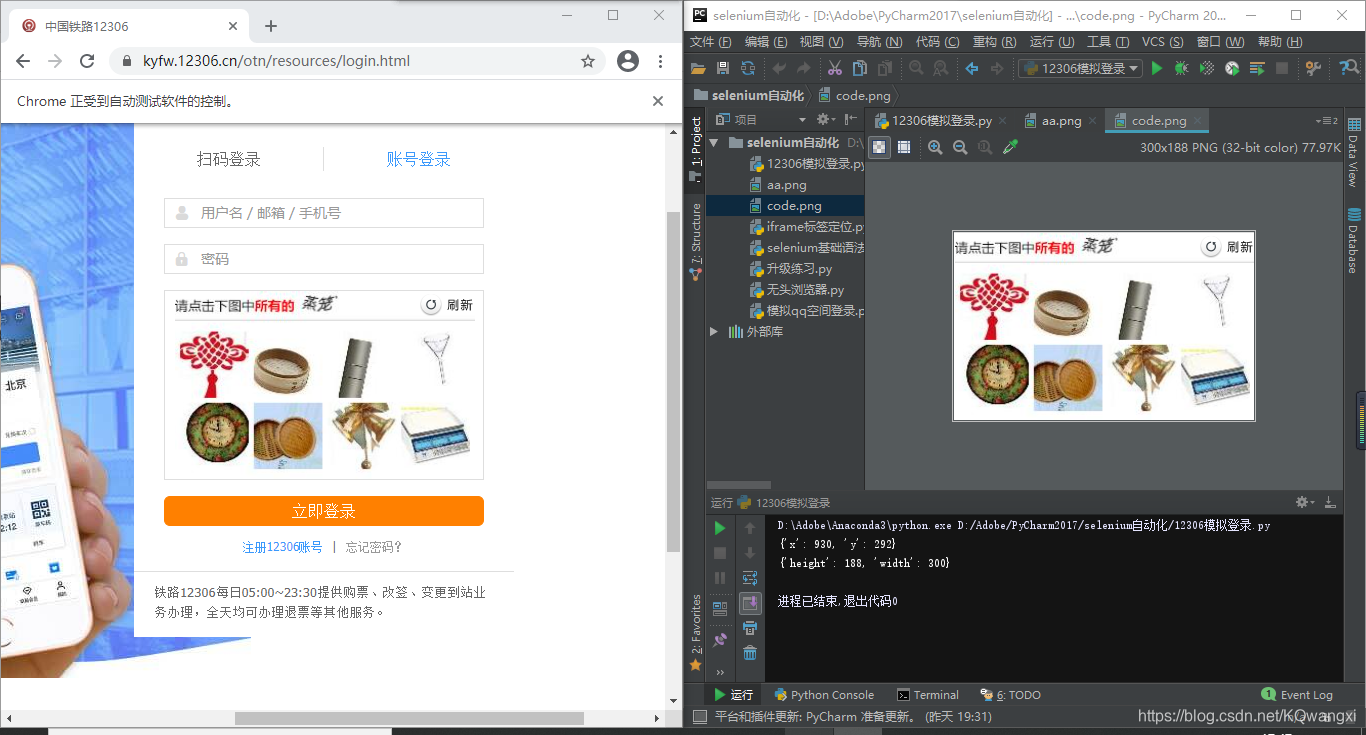
还有就是验证码识别的时候会有需要点击多个图片的结果,具体操作就是将返回的坐标值进行分割然后相应的动作链重复点击动作(详情见下文完整代码):
3.完整代码:
#!/usr/bin/env python
# coding:utf-8
from selenium import webdriver
import time
import requests
from urllib import request
from selenium.webdriver import ChromeOptions
from selenium.webdriver.common.action_chains import ActionChains
from PIL import  Image
import json
from lxml import  etree
from hashlib import md5

#封装识别验证码图片的函数
class Chaojiying_Client(object):

    def __init__(self, username, password, soft_id):
        self.username = username
        password =  password.encode('utf8')
        self.password = md5(password).hexdigest()
        self.soft_id = soft_id
        self.base_params = {


            'user': self.username,
            'pass2': self.password,
            'softid': self.soft_id,
        }
        self.headers = {


            'Connection': 'Keep-Alive',
            'User-Agent': 'Mozilla/4.0 (compatible; MSIE 8.0; Windows NT 5.1; Trident/4.0)',
        }

    def PostPic(self, im, codetype):
        """
        im: 图片字节
        codetype: 题目类型 参考 http://www.chaojiying.com/price.html
        """
        params = {


            'codetype': codetype,
        }
        params.update(self.base_params)
        files = {

    'userfile': ('ccc.jpg', im)}
        r = requests.post('http://upload.chaojiying.net/Upload/Processing.php', data=params, files=files, headers=self.headers)
        return r.json()

    def ReportError(self, im_id):
        """
        im_id:报错题目的图片ID
        """
        params = {


            'id': im_id,
        }
        params.update(self.base_params)
        r = requests.post('http://upload.chaojiying.net/Upload/ReportError.php', data=params, headers=self.headers)
        return r.json()

# 实现规避检测
# 防止12306禁止selenium
option = ChromeOptions()
option.add_experimental_option('excludeSwitches', ['enable-automation'])
# 如何实现让selenium规避被检测的风险
bro = webdriver.Chrome(options=option)
#使用selenium打开登陆页面
bro.get('https://kyfw.12306.cn/otn/resources/login.html')
script = 'Object.defineProperty(navigator,"webdriver",{get:()=>undefined,});'
bro.execute_script(script)
#把窗口最大化方便截图
bro.maximize_window()

#谷歌关于验证码的显示位置自己试的时候出现了错位的情况,所以多写了两个跳转刷新的操作
a_tag=bro.find_element_by_xpath('/html/body/div[2]/div[2]/ul/li[2]/a')
a_tag.click()
time.sleep(1)
a_tag=bro.find_element_by_xpath('/html/body/div[2]/div[2]/ul/li[1]/a')
a_tag.click()
time.sleep(1)
a_tag=bro.find_element_by_xpath('/html/body/div[2]/div[2]/ul/li[2]/a')
a_tag.click()

time.sleep(3)
#对当前selenium打开的这张页面进行截图
bro.save_screenshot('aa.png')
#对当前图片局部区域进行裁剪
#确定验证码图片对应的坐标
#先定位到当前验证码对应的img标签
code_img_ele = bro.find_element_by_xpath('//*[@id="J-loginImg"]')
#验证码图片长度
location=code_img_ele.location
print(location)
#宽度
size = code_img_ele.size
print(size)
#左下角和右下角坐标
img_range=(
    int(location['x']),
    int(location['y']),
    int(location['x']+size['width']),
    int(location['y']+size['height']),
)
#至此验证码图片区域就确定下来了
i=Image.open('./aa.png')
code_img_name ='code.png'
#crop根据指定区域进行图片裁剪
time.sleep(3)
frame = i.crop(img_range)
frame.save(code_img_name)

#使用超级鹰识别验证码图片
chaojiying = Chaojiying_Client('账户', '密码', '软件ID')  # 用户中心>>软件ID 生成一个替换 96001
im = open('code.png', 'rb').read()  # 本地图片文件路径 来替换 a.jpg 有时WIN系统须要//
codeType=9004
print(chaojiying.PostPic(im,codeType)['pic_str'])
result=chaojiying.PostPic(im,codeType)['pic_str']
#根据返回的坐标设计动作链的点击
#先处理返回的坐标,因为坐标很有可能有多组
all_list=[]
if '|' in result:
    list_1=result.split('|')
    count_1=len(list_1)
    for i in range(count_1):
        xy_list =[]
        x=int(list_1[i].split(',')[0])
        y = int(list_1[i].split(',')[1])
        xy_list.append(x)
        xy_list.append(y)
        all_list.append(xy_list)
        pass
else:
    xy_list = []
    x = int(result.split(',')[0])
    y = int(result.split(',')[1])
    xy_list.append(x)
    xy_list.append(y)
    all_list.append(xy_list)
    pass
print(all_list)
#对列表进行遍历,使用动作链对每一个列表元素对应的x,y指定的位置进行点击操作
for l in all_list:
    x=l[0]
    y=l[1]
    #将参照物对应到原先的验证码图片处
    ActionChains(bro).move_to_element_with_offset(code_img_ele,x,y).click().perform()
    time.sleep(5)

bro.find_element_by_xpath('//*[@id="J-userName"]').send_keys("账户")
time.sleep(2)
bro.find_element_by_xpath('//*[@id="J-password"]').send_keys("密码")
time.sleep(2)
bro.find_element_by_xpath('//*[@id="J-login"]').click()
time.sleep(5)

#滑块验证
span = bro.find_element_by_xpath('//*[@id="nc_1_n1z"]')
time.sleep(1)
action=ActionChains(bro)
time.sleep(2)
action.click_and_hold(span)
action.drag_and_drop_by_offset(span,300,0).perform()
time.sleep(5)
输出结果:

扫描二维码关注公众号,回复:
12926806 查看本文章
