ServletContext
web容器在启动的时候,它会为每个web程序都创建一个对应的ServletContext对象,它代表了当前的web应用。
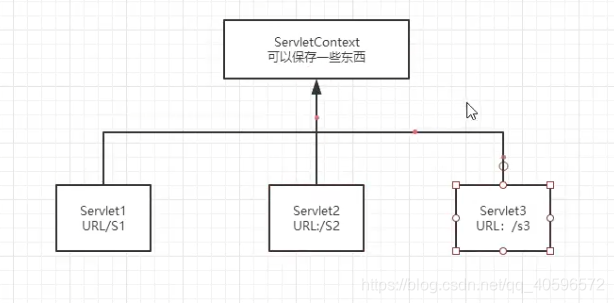
ServletContext是处于Servlet之上的对象。
1. 实现共享数据:
先通过S1将共享数据存储在ServletContext中,
public class Servlet1 extends HttpServlet {


    @Override
    protected void doGet(HttpServletRequest req, HttpServletResponse resp) throws ServletException, IOException {


        ServletContext context = getServletContext();
        context.setAttribute("message","Hello Servlet");

        resp.setContentType("text/html");
        resp.setCharacterEncoding("utf-8");
        resp.getWriter().println("添加到context成功");
    }
}
然后在S2中可以将共享数据从ServletContext中取出来
public class Servlet2 extends HttpServlet {


    @Override
    protected void doGet(HttpServletRequest req, HttpServletResponse resp) throws ServletException, IOException {


        ServletContext context = getServletContext();
        String val = (String)context.getAttribute("message");

        resp.setContentType("text/html");
        resp.setCharacterEncoding("utf-8");
        resp.getWriter().println(val);
    }
}
他们的配置为:
      <servlet>
        <servlet-name>s1</servlet-name>
        <servlet-class>Servlet1</servlet-class>
      </servlet>
      <servlet>
        <servlet-name>s2</servlet-name>
        <servlet-class>Servlet2</servlet-class>
      </servlet>
  <servlet-mapping>
    <servlet-name>s1</servlet-name>
    <url-pattern>/s1</url-pattern>
  </servlet-mapping>
  <servlet-mapping>
    <servlet-name>s2</servlet-name>
    <url-pattern>/s2</url-pattern>
  </servlet-mapping>
最后先访问/s1再访问/s2就可以得到存入的消息。
2. 获取初始化参数
首先可以在web.xml中配置一些初始化参数,然后同过ServletContext的getInitParameter()方法可以获得初始化参数的值
<context-param>
        <param-name>url</param-name>
        <param-value>http://www.baidu.com</param-value>
</context-param>
public class Servlet3 extends HttpServlet {


    @Override
    protected void doGet(HttpServletRequest req, HttpServletResponse resp) throws ServletException, IOException {


        ServletContext context = getServletContext();
        String s = context.getInitParameter("url");
        System.out.println(s);
    }
}
3. 实现请求转发
先说一下请求转发与请求重定向的区别:
看图:
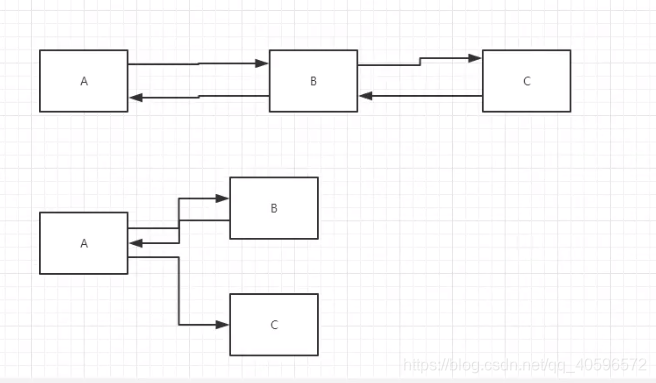
转发:A请求B,B发现A需要的资源在C,所以B将请求转发到C,C处理之后返回给B,B再返回给A。这个过程A与B分别发送了一次请求。
重定向:A请求B,B发现A的资源在C,所以就告诉A你要得资源在C,之后A向C再发送请求。这个过程A发送了两次请求。(所以A的请求URL地址会发生变化)
通过ServletContext实现请求转发:
public class Servlet3 extends HttpServlet {


    @Override
    protected void doGet(HttpServletRequest req, HttpServletResponse resp) throws ServletException, IOException {


        ServletContext context = getServletContext();
        context.getRequestDispatcher("/s2").forward(req,resp);
    }
}
通过getRequestDispatcher()获得请求的转发路径,再通过forward()方法调用转发。
4. 读取资源文件
Properties
- 在java目录下新建properties
- 在resources目录下新建properties
发现:都被打包到了同一个路径下:classes,我们俗称这个路径为classpath。
首先需要一个文件流:
username=root
password=510781
然后通过ServletContext读取资源文件:
public class Servlet4 extends HttpServlet {


    @Override
    protected void doGet(HttpServletRequest req, HttpServletResponse resp) throws ServletException, IOException {


        ServletContext context = getServletContext();
        InputStream in = context.getResourceAsStream("/WEB-INF/classes/db.properties");
        Properties prop = new Properties();
        prop.load(in);
        String user = prop.getProperty("username");
        String pwd = prop.getProperty("password");
        resp.setCharacterEncoding("utf-8");
        resp.setContentType("text/html");
        resp.getWriter().println(user+":"+pwd);
    }
}
在上面的代码中,要注意使用ServletContext的getResourceAsStream()方法可以加载资源文件。
其中的路径需要注意,对于WEB服务器(Tomcat)来讲,路径中开头的"/"代表的是当前项目的根据经:
[外链图片转存失败,源站可能有防盗链机制,建议将图片保存下来直接上传(img-I4dvu9jq-1616852250176)(ServletContext/image-20210327213238051.png)]
ServletContext`的getResourceAsStream()方法可以加载资源文件。
其中的路径需要注意,对于WEB服务器(Tomcat)来讲,路径中开头的"/"代表的是当前项目的根据经:

也就是其中的S1-1.0-.....这个路径。然后后面的路径都是按照项目根据经来算的。所以,一定要确保在部署打包之后的项目对应路径下含有资源文件,而不是源代码中资源文件的位置。