首先确保引入了netty的jar包(4.1.20版的netty),我是通过IDEA内部的Maven下的,因为这样可以将jar包直接放入项目的lib目录中,简单方便。还没下载的朋友可以看看:
一、打开Project Structure,并点击Modules模块:
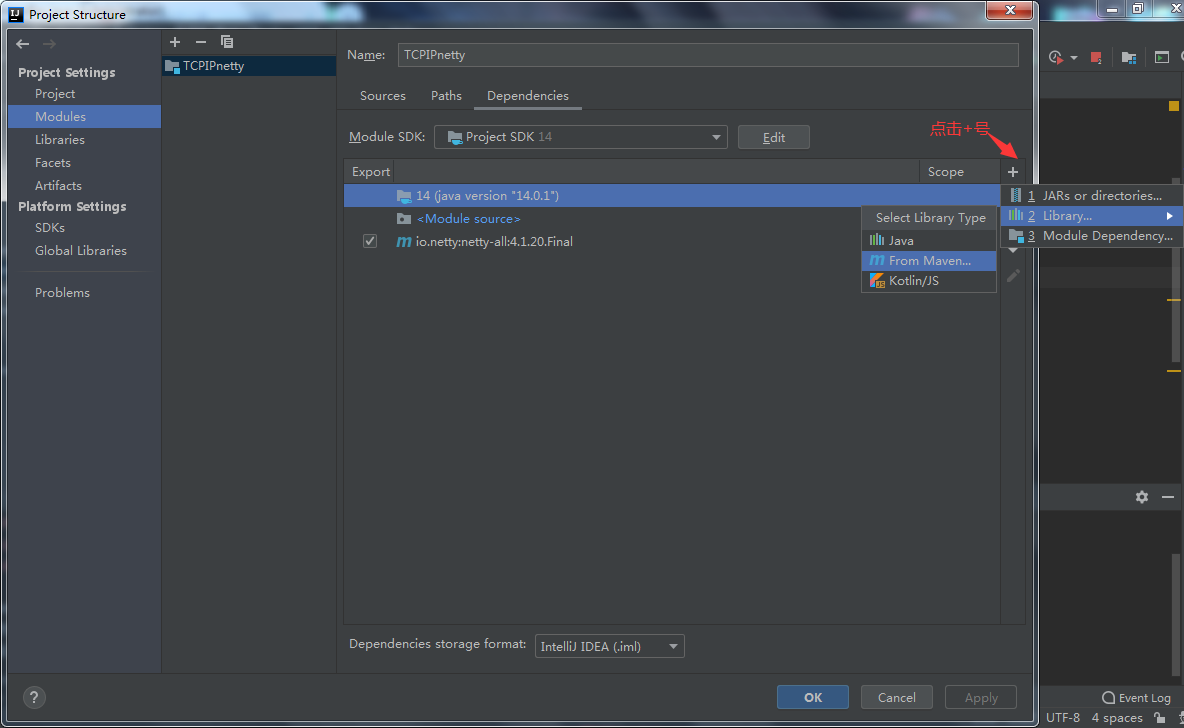
二、输入io.netty:netty-all后点击搜索按钮,记得要保证IDEA连网,并且要耐心等一会儿,毕竟它不会一下就显示搜索结果,然后选择4.1.20版本的下载,初次下载比较慢。

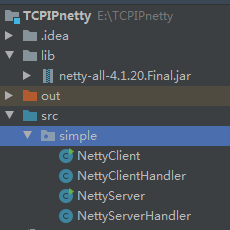
附上IDEA中可运行工程的结构:
话不多说,开始撸代码!因为代码中已经有了必要的注释,因此不再作其它解释了。
NettyServer.java
package simple;

import io.netty.bootstrap.ServerBootstrap;
import io.netty.channel.ChannelFuture;
import io.netty.channel.ChannelInitializer;
import io.netty.channel.ChannelOption;
import io.netty.channel.EventLoopGroup;
import io.netty.channel.nio.NioEventLoopGroup;
import io.netty.channel.socket.SocketChannel;
import io.netty.channel.socket.nio.NioServerSocketChannel;

public class NettyServer {
    public static void main(String[] args) throws InterruptedException {
        //创建两个线程组:BossGroup:处理连接请求和WorkerGroup:真正与客户端业务处理,两个都是无限循环
        EventLoopGroup BossGroup = new NioEventLoopGroup();
        EventLoopGroup WorkerGroup = new NioEventLoopGroup();

        try {
            //创建服务器端的启动对象,配置参数
            ServerBootstrap bootstrap = new ServerBootstrap();
            //使用链式编程来进行设置
            bootstrap.group(BossGroup, WorkerGroup)//设置两个线程组
                    .channel(NioServerSocketChannel.class)//使用NIOSocketChannel作为服务器的通道实现
                    .option(ChannelOption.SO_BACKLOG, 128)//设置线程队列得到连接个数
                    .childOption(ChannelOption.SO_KEEPALIVE, true)//设置保持活动连接状态
                    .childHandler(new ChannelInitializer<SocketChannel>() {//创建一个通道初始化对象(匿名对象)
                        //给pipline设置处理器
                        @Override
                        protected void initChannel(SocketChannel socketChannel) throws Exception {
                            socketChannel.pipeline().addLast(new NettyServerHandler());
                        }
                    });//给我们EventGroup对应的管道设置处理器

            System.out.println("服务器is ready!");

            //绑定一个端口并同步,生成了一个ChannelFuture对象
            //启动服务器(并绑定端口)
            ChannelFuture channelFuture = bootstrap.bind(6668).sync();

            //对关闭通道进行监听
            channelFuture.channel().closeFuture().sync();
        }finally {
            BossGroup.shutdownGracefully();
            WorkerGroup.shutdownGracefully();
        }
    }
}
NettyServerHandler.java
package simple;

import io.netty.buffer.ByteBuf;
import io.netty.buffer.Unpooled;
import io.netty.channel.ChannelHandlerContext;
import io.netty.channel.ChannelInboundHandlerAdapter;
import io.netty.util.CharsetUtil;

import java.nio.charset.Charset;

//我们自定义一个handler需要继续netty规定好的某个HandlerAdapter(规范)
//这时我们制定的一个handler,才能称为一个handler

public class NettyServerHandler extends ChannelInboundHandlerAdapter {
    //这里我们可以读取客户端发送的消息
    /*
    1.ChannelHandlerContext ctx:上下文对象,含有管道pipline,通道channel,地址
    2.Object msg默认是客户端发送的消息,默认Object
     */
    @Override
    public void channelRead(ChannelHandlerContext ctx, Object msg) throws Exception {
        System.out.println("server ctx=" +ctx);
        //将msg转成byteBuf
        ByteBuf byteBuf = (ByteBuf) msg;
        System.out.println("客户端发送消息是" + byteBuf.toString(CharsetUtil.UTF_8));
        System.out.println("客户端地址是:"+ ctx.channel().remoteAddress());
    }

    //数据读取完毕
    @Override
    public void channelReadComplete(ChannelHandlerContext ctx) throws Exception {
        //writeAndFlush是write方法+Flush方法,将数据写入到缓存并刷新
        //一般来讲我们对发送的数据进行编码
        ctx.writeAndFlush(Unpooled.copiedBuffer("Hello客户端", CharsetUtil.UTF_8));
    }

    //处理异常,一般是需要关闭通道
    @Override
    public void exceptionCaught(ChannelHandlerContext ctx, Throwable cause) throws Exception {
        ctx.close();
    }
}
---------------------------------------------------------分割线:以上是服务端,接下来写客户端---------------------------------------------------
NettyClient.java
package simple;

import io.netty.bootstrap.Bootstrap;
import io.netty.channel.ChannelFuture;
import io.netty.channel.ChannelInitializer;
import io.netty.channel.EventLoopGroup;
import io.netty.channel.nio.NioEventLoopGroup;
import io.netty.channel.socket.SocketChannel;
import io.netty.channel.socket.nio.NioSocketChannel;

public class NettyClient {
    public static void main(String[] args) throws InterruptedException {
        EventLoopGroup group = new NioEventLoopGroup();
        try{
        //创建客户端启动对象,注意客户端使用的不是ServerBootStrap而是BootStrap
        Bootstrap bootstrap = new Bootstrap();
        //设置相关参数
        bootstrap
                .group(group)//设置线程组
                .channel(NioSocketChannel.class)//设置客户端通道的实现类
                .handler(new ChannelInitializer<SocketChannel>() {
                    @Override
                    protected void initChannel(SocketChannel socketChannel) throws Exception {
                        socketChannel.pipeline().addLast(new NettyClientHandler());
                    }
                });
        System.out.println("客户端OK");
        //启动客户端去连接服务器端
        //关于channel要分析,要分析netty的异步模型
        ChannelFuture channelfulture = bootstrap.connect("127.0.0.1", 6668).sync();
        channelfulture.channel().closeFuture().sync();
    }finally {
        group.shutdownGracefully();
        }
        }
}
NettyClientHandler.java
package simple;

import io.netty.buffer.ByteBuf;
import io.netty.buffer.Unpooled;
import io.netty.channel.ChannelHandlerContext;
import io.netty.channel.ChannelInboundHandlerAdapter;
import io.netty.util.CharsetUtil;

public class NettyClientHandler extends ChannelInboundHandlerAdapter {
    @Override
    //当通道就绪就会触发该方法
    public void channelActive(ChannelHandlerContext ctx) throws Exception {
        System.out.println("clinet" + ctx);
        ctx.writeAndFlush(Unpooled.copiedBuffer("Hello,Server",CharsetUtil.UTF_8));
    }

    //当通道有读取事件时会触发
    @Override
    public void channelRead(ChannelHandlerContext ctx, Object msg) throws Exception {
        ByteBuf byteBuf = (ByteBuf) msg;
        System.out.println("服务器回复的消息:" + byteBuf.toString(CharsetUtil.UTF_8));
        System.out.println("服务器的地址:" + ctx.channel().remoteAddress());
    }

    @Override
    public void exceptionCaught(ChannelHandlerContext ctx, Throwable cause) throws Exception {
        cause.printStackTrace();
        ctx.close();
    }
}
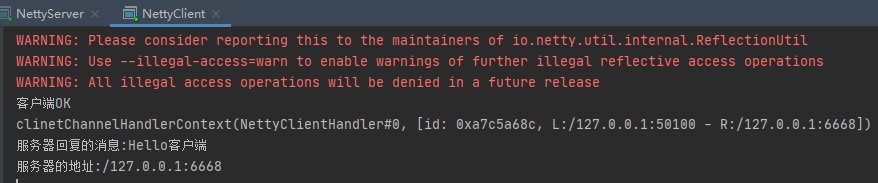
OK,接着先运行服务端,再运行客户端,就可以看到控制台输出信息。
服务端输出:

客户端输出:
欧拉,到此为止结束。认可此篇的朋友,懂我的意思吧?麻烦三连┗|`O′|┛ ~,点赞、关注、收藏~