1.String类型
部分图片转自刘昱江老师的笔记 @闪耀太阳


1.1.Hash类型
说明:可以用散列类型保存对象和属性值
例子:User对象{id:2,name:小明,age:19}

1.2. List类型
说明:Redis中的List集合是双端循环列表,分别可以从左右两个方向插入数据.
List集合可以当做队列使用,也可以当做栈使用
队列:存入数据的方向和获取数据的方向相反
栈:存入数据的方向和获取数据的方向相同

1.3.Redis事务命令
说明:redis中操作可以添加事务的支持.一项任务可以由多个redis命令完成,如果有一个命令失败导致入库失败时.需要实现事务回滚.

2.Redis 安装配置
2.1.什么是Redis
Redis 是一个开源(BSD许可)的,内存中的数据结构存储系统,它可以用作数据库、缓存和消息中间件。 它支持多种类型的数据结构,如 字符串(strings), 散列(hashes), 列表(lists), 集合(sets), 有序集合(sorted sets) 与范围查询, bitmaps, hyperloglogs 和 地理空间(geospatial) 索引半径查询。 Redis 内置了 复制(replication),LUA脚本(Lua scripting), LRU驱动事件(LRU eviction),事务(transactions) 和不同级别的 磁盘持久化(persistence), 并通过 Redis哨兵(Sentinel)和自动 分区(Cluster)提供高可用性(high availability)。
速度: 读: 11.2万/秒 写:8.6万/秒 50万/秒
2.2.上传Redis
1).上传redis
2).解压redis服务
[root@localhost src]# tar -xvf redis-5.0.4.tar.gz
3).移动文件/修改文件名称

2.3.安装Redis
说明:在Redis根目录中执行如下命令
1).make

2). make install

2.4.修改redis配置文件
修改redis根目录下的redis.conf文件
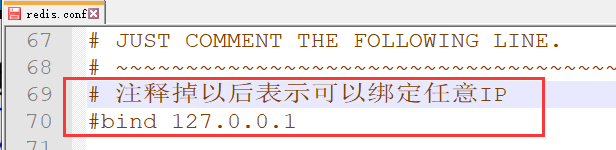
1).去除IP绑定

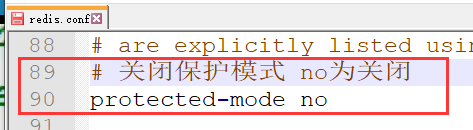
2).修改保护模式

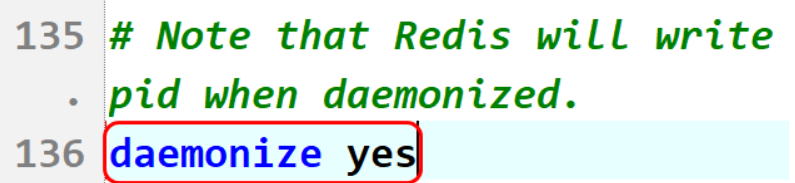
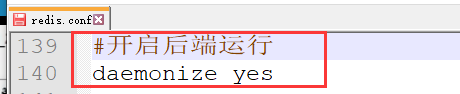
3).开启后台启动
2.5.Redis服务器命令
说明: Redis服务在运行时,必须依赖于配置文件 redis.conf. 操作redis时最好在根目录中操作
1).启动redis
redis-server redis.conf

2).进入redis客户端
redis-cli -p 6379 (或者redis-cli 默认端口是6379)
ctrl + c 退出客户端

3).关闭redis服务器
(或者 redis-cli -p 6379 shutdown)

补充说明: 如果操作的端口号是默认端口6379 则可以省略不写.
导入依赖
		<!-- jedis -->
		<dependency>
			<groupId>redis.clients</groupId>
			<artifactId>jedis</artifactId>
			<version>${jedis.version}</version>
		</dependency>

		<!--添加spring-datajar包  -->
		<dependency>
			<groupId>org.springframework.data</groupId>
			<artifactId>spring-data-redis</artifactId>
			<version>1.4.1.RELEASE</version>
		</dependency>
测试java代码:
package com.jt.test;

import org.junit.Test;
import redis.clients.jedis.Jedis;

public class TestRedis {


    //连接一个服务:ip地址:端口
    @Test
    public void testSetGet() throws InterruptedException {


        Jedis jedis = new Jedis("192.168.126.129",6379);
        jedis.flushAll(); //测试的时候用:清空redis缓存 (线上不可用!!)
        //1 存取redis
        jedis.set("key1","天天向上");
        String value = jedis.get("key1");
        System.out.println(value);

        //2 判断key是否存在?
        if(jedis.exists("key1")){


            jedis.set("key1","好好学习天天向上!");
        }else {


            jedis.set("key1","不学习就天天开心吧!");
        }

        //3 为key添加超时时间
        jedis.expire("key1",10);
        Thread.sleep(2000);
        System.out.println("剩余存活时间:" + jedis.ttl("key1"));

        //4 撤销剩余超时时间
        jedis.persist("key1");
        System.out.println("撤销成功!");

    }

}
3.Redis的内存优化策略
- volatile-lru 在设定超时时间的数据中采用LRU算法
- allkeys-lru 所有的数据采用LRU算法删除
- volatile-lfu 设定了超时时间的数据采用LFU算法删除
- allkeys-lfu 所有数据采用LFU算法删除
- volatile-random 设定了超时时间的数据采用随机算法
- allkeys-random 所有数据的随机算法
- volatile-ttl 设定了超时时间之后采用TTL算法
- noeviction 不做任何操作,只是返回报错信息.
4.关于Redis常见问题
4.1什么是缓存穿透
说明: 用户高并发环境下访问数据库和缓存中都不存在的数据称之为缓存穿透现象.

解决方案:
1). 禁用IP 限制IP访问
2). 限流 每秒最多访问3次
3). 布隆过滤器
布隆过滤器
布隆过滤器(Bloom Filter)是1970年由布隆提出的。它实际上是一个很长的二进制向量和一系列随机映射函数。布隆过滤器可以用于检索一个元素是否在一个集合中。它的优点是空间效率和查询时间都比一般的算法要好的多,缺点是有一定的误识别率和删除困难。
原理:

布隆过滤器优化:
问题:如何解决hash碰撞问题
知识点: 由于hash碰撞问题,可能由多个key有相同的位置,所以得出结论,布隆过滤器认为数据存在,那么数据可能存在.如果布隆过滤器认为数据不存在,则数据一定不在.
如何降低hash碰撞的几率:
答:
1.扩容二进制向量位数.
2.增加hash函数的个数
当位数增加/函数适当增加,则可以有效的降低hash碰撞的几率. 默认值 0.03

4.3 什么是缓存击穿
说明: 某个(一个)热点数据在缓存中突然失效. 导致大量的用户直接访问数据库.导致并发压力过高造成异常.

解决方案:
1.尽可能将热点数据的超时时间 设定的长一点
2.设定多级缓存 超时时间采用随机算法.

4.3 什么是缓存雪崩
说明: 在缓存服务器中,由于大量的缓存数据失效,导致用户访问的命中率过低.导致直接访问数据库.
问题分析:
- fluashAll命令可能导致缓存雪崩.
- 设定超时时间时,应该采用随机算法
- 采用多级缓存可以有效防止.

5.redis分片机制
5.1 Redis性能优化
说明: 单台redis内存容量是有限的.但是如果有海量的数据要求实现缓存存储,则应该使用多个Redis节点.

5.2 Redis分片机制定义

5.3 Redis分片机制配置
5.3.1 配置规划
说明: 准备3台redis服务器 分别为 6379/6380/6381
5.3.2 准备3个配置文件

修改各自端口号 改为6380 6381

5.3.3启动redis服务器

5.3.4 检查redis启动状态

5.3.5 Redis分片入门案例

5.4 Redis分片机制配置
说明:根据redis节点个数.拼接字符串,修改
文件,内容如下:
# 配置redis分片机制
redis.nodes=192.168.126.129:6379,192.168.126.129:6380,192.168.126.129:6381
5.5 编辑RedisConfig配置类
@Configuration  //标识我是一个配置类   一般与@Bean注解联用
@PropertySource("classpath:/properties/redis.properties")
public class RedisConfig {


    @Value("${redis.nodes}")
    private String nodes;   //node,node,node

    @Bean
    public ShardedJedis shardedJedis(){


        List<JedisShardInfo> shards = new ArrayList<>();
        String[] nodeArray = nodes.split(",");
        for( String node :nodeArray){

      //node=host:port
            String host = node.split(":")[0];
            int port = Integer.parseInt(node.split(":")[1]);
            JedisShardInfo info = new JedisShardInfo(host,port);
            shards.add(info);
        }
        return new ShardedJedis(shards);
    }
    }
5.6 修改CacheAOP中的注入

6.redis集群配置
创建文件夹

文件夹里新建文件夹
将redis.conf文件复制到cluster目录的7000文件夹下

进入7000目录下的redis.conf并进行编辑

此处复制一下7000下面的全路径

粘贴到此处来


此处测试需要所以改为no


此时一个redis配置完毕,复制到其他目录下
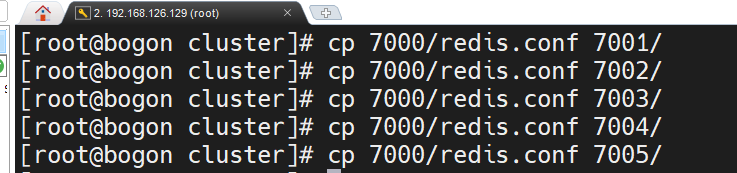
修改其他配置文件

该指令为批量查找和替换
%s/7000/7001/g
全部更改完毕后执行:

键入如下并保存
#!/bin/sh
redis-server 7000/redis.conf &
redis-server 7001/redis.conf &
redis-server 7002/redis.conf &
redis-server 7003/redis.conf &
redis-server 7004/redis.conf &
redis-server 7005/redis.conf &

执行脚本
sh start.sh

输入
ps -ef | grep redis 进行查询

执行集群搭建指令:
redis-cli --cluster create --cluster-replicas 1 192.168.126.129:7000 192.168.126.129:7001 192.168.126.129:7002 192.168.126.129:7003 192.168.126.129:7004 192.168.126.129:7005
配置成功后出现如下图状态(如果失败则需重启stop.sh start.sh)

7.集群搭建入门案例
 @Test
    public void testCluster(){


        Set<HostAndPort> nodes = new HashSet<>();
        nodes.add(new HostAndPort("192.168.126.129", 7000));
        nodes.add(new HostAndPort("192.168.126.129", 7001));
        nodes.add(new HostAndPort("192.168.126.129", 7002));
        nodes.add(new HostAndPort("192.168.126.129", 7003));
        nodes.add(new HostAndPort("192.168.126.129", 7004));
        nodes.add(new HostAndPort("192.168.126.129", 7005));
        JedisPoolConfig poolConfig = new JedisPoolConfig();
        poolConfig.setMaxTotal(1000);
        poolConfig.setMaxIdle(40);
        poolConfig.setMinIdle(20);
        JedisCluster jedisCluster = new JedisCluster(nodes,poolConfig);
        jedisCluster.set("jedisCluster", "redis集群搭建");
        System.out.println(jedisCluster.get("jedisCluster"));
    }
8.扩展问题:
1).redis集群中一共可以存储16384个数据?
不对: redis中存储多少数据完全由内存决定
hash(key1)=3000
hash(key2)=3000
2).redis集群中最多可以有多少个redis主机? 16384台主机 一台主机管理一个槽位.
9.SpringBoot整合Redis集群
9.1.编辑pro配置文件
#配置redis集群
redis.nodes=192.168.126.129:7000,192.168.126.129:7001,192.168.126.129:7002,192.168.126.129:7003,192.168.126.129:7004,192.168.126.129:7005
9.2.编辑配置类
@Configuration  //标识我是一个配置类   一般与@Bean注解联用
@PropertySource("classpath:/properties/redis.properties")
public class RedisConfig {


    @Value("${redis.nodes}")
    private String nodes;   //node,node,node

    @Bean
    public JedisCluster jedisCluster(){


        Set<HostAndPort> nodesSet = new HashSet<>();
        String[] nodeArray = nodes.split(",");
        for (String node : nodeArray){

      //host:port
            String host = node.split(":")[0];
            int port = Integer.parseInt(node.split(":")[1]);
            HostAndPort hostAndPort = new HostAndPort(host, port);
            nodesSet.add(hostAndPort);
        }
        JedisPoolConfig config = new JedisPoolConfig();
        config.setMaxTotal(1000);
        config.setMaxIdle(60);
        config.setMinIdle(20);
        return new JedisCluster(nodesSet,config);
    }
}
设置aop切面代码:
	private JedisCluster jedis;          //注入集群对象

    @Around("@annotation(cacheFind)")
    public Object around(ProceedingJoinPoint joinPoint,CacheFind cacheFind) throws NoSuchMethodException {


        //Jedis jedis = sentinelPool.getResource();
        Object result = null;
        //1.获取key的前缀
        String key = cacheFind.key();
        //2.获取方法参数
        String argString = Arrays.toString(joinPoint.getArgs());
        key = key + "::" + argString;
        try {


            //3.判断缓存中是否有数据
            if(jedis.exists(key)){


                String json = jedis.get(key);
                //5.获取返回值类型
                MethodSignature methodSignature = (MethodSignature) joinPoint.getSignature();
                result = ObjectMapperUtil.toObject(json,methodSignature.getReturnType());
                System.out.println("AOP查询redis缓存");
            }else{


                //表示缓存中没有数据,执行目标方法
                result = joinPoint.proceed();
                String json = ObjectMapperUtil.toJSON(result);
                //4.判断数据中是否有超时时间
                if(cacheFind.seconds()>0){


                    jedis.setex(key,cacheFind.seconds(),json);
                }else{


                    jedis.set(key,json);
                }
                System.out.println("AOP执行数据库调用!!!!!");
            }
        } catch (Throwable throwable) {


            throwable.printStackTrace();
            throw new RuntimeException(throwable);
        }

        //jedis.close();  //还池操作
        return result;
    }