Python 官方网站:
网方网页版Shell地址:
当前最新版本 3.9.2,下载地址:
https://www.python.org/downloads/release/python-392/
但是最新版本在Windows7上用不了,官方告示:Note that Python 3.9+ cannot be used on Windows 7 or earlier.

Python3.8.8下载及安装
国内下载网站推荐: down.chinaz.com,站内搜 "python 64位" (或32位) , 版本3.9.2 / 3.8.8都有。
我还用windows7,只能下载 3.8.8 版本,32位还是64位看自己的系统来选。安装如下:

注:若要修改默认安装路径,请选择“Customize installation”
安装完成后,有两种使用方式: 控制台窗口和Shell窗口:
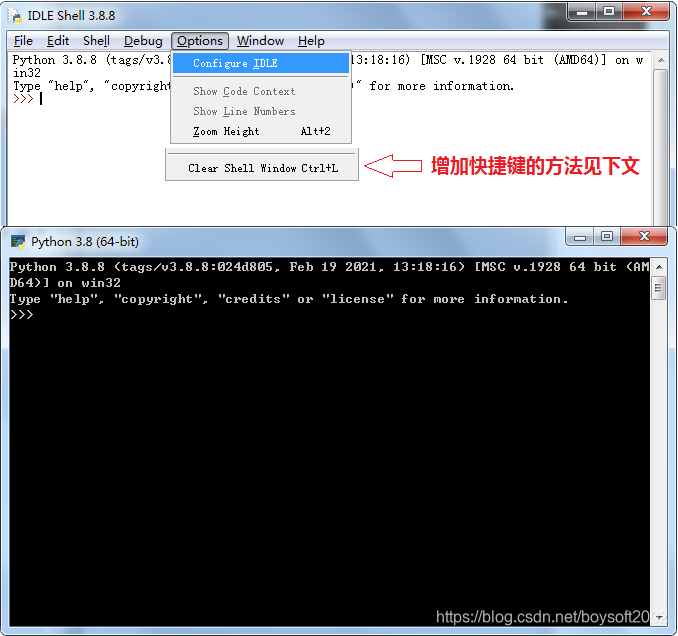
Shell 窗口增加清屏快捷键的方法:
1. 把以下源代码复制粘贴到记事本,另存为 “ClearWindow.py” (注意大写字母和双引号),存放到路径 Lib\idlelib\ 。
2. 再把以下代码第16到21行的内容添加到源码第14行提到的 .def 文件最末处(也在 idlelib下),并存盘退出。
3. 路径和文件建议用 everything 软件搜索;退出后重新打开IDLE Shell,就能用快捷键 Ctrl+L 清屏了。
"""

Clear Window Extension
Version: 0.2

Author: Roger D. Serwy
        [email protected]

Date: 2009-06-14

It provides "Clear Shell Window" under "Options"
with ability to undo.

Add these lines to config-extensions.def

[ClearWindow]
enable=1
enable_editor=0
enable_shell=1
[ClearWindow_cfgBindings]
clear-window=<Control-Key-l>


"""

class ClearWindow:

    menudefs = [
        ('options', [None,
               ('Clear Shell Window', '<<clear-window>>'),
       ]),]

    def __init__(self, editwin):
        self.editwin = editwin
        self.text = self.editwin.text
        self.text.bind("<<clear-window>>", self.clear_window2)

        self.text.bind("<<undo>>", self.undo_event)  # add="+" doesn't work

    def undo_event(self, event):
        text = self.text

        text.mark_set("iomark2", "iomark")
        text.mark_set("insert2", "insert")
        self.editwin.undo.undo_event(event)

        # fix iomark and insert
        text.mark_set("iomark", "iomark2")
        text.mark_set("insert", "insert2")
        text.mark_unset("iomark2")
        text.mark_unset("insert2")


    def clear_window2(self, event): # Alternative method
        # work around the ModifiedUndoDelegator
        text = self.text
        text.undo_block_start()
        text.mark_set("iomark2", "iomark")
        text.mark_set("iomark", 1.0)
        text.delete(1.0, "iomark2 linestart")
        text.mark_set("iomark", "iomark2")
        text.mark_unset("iomark2")
        text.undo_block_stop()
        if self.text.compare('insert', '<', 'iomark'):
            self.text.mark_set('insert', 'end-1c')
        self.editwin.set_line_and_column()

    def clear_window(self, event):
        # remove undo delegator
        undo = self.editwin.undo
        self.editwin.per.removefilter(undo)

        # clear the window, but preserve current command
        self.text.delete(1.0, "iomark linestart")
        if self.text.compare('insert', '<', 'iomark'):
            self.text.mark_set('insert', 'end-1c')
        self.editwin.set_line_and_column()

        # restore undo delegator
        self.editwin.per.insertfilter(undo)
控制台清屏方法:
以下两行代码就能清屏,第二行一定要弄个变量比如用a=,否则清屏后第一行会有返回值0显示。
>>> import os
>>> a=os.system('cls')
读/写Excel 2010 xlsx文件的Python库
openpyxl 3.0.7 下载及安装
A Python library to read/write Excel 2010 xlsx/xlsm files
官方网站: https://pypi.org/project/openpyxl/
下载并解压到安装路径下,打开cmd.exe窗口并进到openpyxl-3.0.7文件夹
运行DOS命令: python setup.py install
安装结束后显示:

打开Python,在提示符<<< 后键入 import openpyxl 回车,没有报错“ModuleNotFoundError: No module named 'openpyxl'” 即安装成功。
以下内容来源于网络:
openpyxl官方手册
https://openpyxl.readthedocs.io/en/stable/
创建excel文件 Create a workbook
There is no need to create a file on the filesystem to get started with openpyxl. Just import the Workbook class and start work:
开始使用openpyxl时,无需在文件系统中创建文件,只要导入workbook类就可以了:
>>> from openpyxl import Workbook
>>> wb = Workbook()
A workbook is always created with at least one worksheet. You can get it by using the Workbook.active property:
至少有一个工作表在工作簿创建后,可以通过Workbook.active属性来定位到工作表:
>>> ws = wb.active
Note
This is set to 0 by default. Unless you modify its value, you will always get the first worksheet by using this method.
该工作簿的默认索引是从0开始。除非索引值被修改,否则使用这个方法将总是获取第一个工作表。
You can create new worksheets using the Workbook.create_sheet() method:
可以使用Workbook.create_sheet()方法来创建新工作表
>>> ws1 = wb.create_sheet("Mysheet") # 插入到最后 (默认)

>>> ws2 = wb.create_sheet("Mysheet", 0) # 插入到最前

>>> ws3 = wb.create_sheet("Mysheet", -1) # 插入到倒数第二
Sheets are given a name automatically when they are created. They are numbered in sequence (Sheet, Sheet1, Sheet2, …). You can change this name at any time with the Worksheet.title property:
工作表将在创建时按照数字序列自动命名(如Sheet,Sheet1,Sheet2,……)。可以在任何时候通过Worksheet.title属性修改工作表名:
>>>ws.title = "New Title"
The background color of the tab holding this title is white by default. You can change this providing an RRGGBB color code to the Worksheet.sheet_properties.tabColor attribute:
创建的工作表的标签背景色默认是白色。可以通过在Worksheet.sheet_properties.tabColor对象中设置RRGGBB格式的颜色代码进行修改:
>>>ws.sheet_properties.tabColor = "1072BA"
Once you gave a worksheet a name, you can get it as a key of the workbook:
当设置了worksheet名称,可以将名称作为工作表的索引:
>>> ws3 = wb["New Title"]
You can review the names of all worksheets of the workbook with the Workbook.sheetname attribute
可以通过Workbook.sheetname对象来查看工作簿中所有工作表的名称
>>> print(wb.sheetnames)
['Sheet2', 'New Title', 'Sheet1']
You can loop through worksheets
可以遍历整个工作簿:
>>> for sheet in wb:
...     print(sheet.title)
You can create copies of worksheets within a single workbook:Workbook.copy_worksheet() method:
可以使用Workbook.copy_worksheet()方法来创建一个工作簿中所有表的副本:
>>> source = wb.active
>>> target = wb.copy_worksheet(source)
Note
Only cells (including values, styles, hyperlinks and comments) and certain worksheet attribues (including dimensions, format and properties) are copied. All other workbook / worksheet attributes are not copied - e.g. Images, Charts.
只有单元格(包括值、样式、超链接、备注)和一些工作表对象(包括尺寸、格式和参数)会被复制。其他属性不会被复制,如图片、图表。You also cannot copy worksheets between workbooks. You cannot copy a worksheet if the workbook is open in read-only or write-only mode.
无法在两个工作簿中复制工作表。当工作簿处于只读或只写状态时也无法复制工作表。
数据操作 Playing with data
访问一个单元格 Accessing one cell
Now we know how to get a worksheet, we can start modifying cells content. Cells can be accessed directly as keys of the worksheet:
现在我们知道如何获取一个工作表,我们可以开始修改单元格内容。单元格可以通过工作表中的索引直接访问:
>>> c = ws['A4']
This will return the cell at A4, or create one if it does not exist yet. Values can be directly assigned:
这将返回位于“A4”的单元格内容,如果不存在则创建一个。可以直接对单元格进行赋值:
>>> ws['A4'] = 4
There is also the Worksheet.cell() method.
这是Worksheet.cell()的方法。
This provides access to cells using row and column notation:
工具支持通过行列号访问单元格:
>>> d = ws.cell(row=4, column=2, value=10)
Note
When a worksheet is created in memory, it contains no cells. They are created when first accessed.
当在内存中创建工作表后,表中不包含任何单元格。单元格将在第一次访问时创建。
Warning
Because of this feature, scrolling through cells instead of accessing them directly will create them all in memory, even if you don’t assign them a value.Something like
因为这种特性,遍历而不是访问这些单元格将在内存中全部创建它们,即使并没有给它们赋值。比如说
>>>for x in range(1,101):

...     for y in range(1,101):

...         ws.cell(row=x, column=y)
访问多个单元格 Accessing many cells
Ranges of cells can be accessed using slicing:
可以通过切片访问一个范围内的单元格:
>>> cell_range = ws['A1':'C2']
Ranges of rows or columns can be obtained similarly:
行或列的单元格也可以通过类似的方法访问:
>>> colC = ws['C']
>>> col_range = ws['C:D']
>>> row10 = ws[10]
>>> row_range = ws[5:10]
You can also use the Worksheet.iter_rows() method:
同样也可以使用Worksheet.iter_rows()方法:
>>> for row in ws.iter_rows(min_row=1, max_col=3, max_row=2):
...    for cell in row:
...        print(cell)
<Cell Sheet1.A1>
<Cell Sheet1.B1>
<Cell Sheet1.C1>
<Cell Sheet1.A2>
<Cell Sheet1.B2>
<Cell Sheet1.C2>
Likewise the Worksheet.iter_cols() method will return columns:
类似的,使用Worksheet.iter_cols()方法将返回列:
>>> for col in ws.iter_cols(min_row=1, max_col=3, max_row=2):
...     for cell in col:
...         print(cell)
<Cell Sheet1.A1>
<Cell Sheet1.A2>
<Cell Sheet1.B1>
<Cell Sheet1.B2>
<Cell Sheet1.C1>
<Cell Sheet1.C2>
Note
For performance reasons theWorksheet.iter_cols()method is not available in read-only mode.
出于性能考虑,Worksheet.iter_cols()方法不支持在只读模式使用
If you need to iterate through all the rows or columns of a file, you can instead use the Worksheet.rows property:
如果需要遍历文件内的所有行和列,可以使用Worksheet.rows属性:
>>> ws = wb.active
>>> ws['C9'] = 'hello world'
>>> tuple(ws.rows)
((<Cell Sheet.A1>, <Cell Sheet.B1>, <Cell Sheet.C1>),
(<Cell Sheet.A2>, <Cell Sheet.B2>, <Cell Sheet.C2>),
(<Cell Sheet.A3>, <Cell Sheet.B3>, <Cell Sheet.C3>),
(<Cell Sheet.A4>, <Cell Sheet.B4>, <Cell Sheet.C4>),
(<Cell Sheet.A5>, <Cell Sheet.B5>, <Cell Sheet.C5>),
(<Cell Sheet.A6>, <Cell Sheet.B6>, <Cell Sheet.C6>),
(<Cell Sheet.A7>, <Cell Sheet.B7>, <Cell Sheet.C7>),
(<Cell Sheet.A8>, <Cell Sheet.B8>, <Cell Sheet.C8>),
(<Cell Sheet.A9>, <Cell Sheet.B9>, <Cell Sheet.C9>))
or the Worksheet.columns property:
或者Worksheet.columns属性
>>> tuple(ws.columns)
((<Cell Sheet.A1>,
<Cell Sheet.A2>,
<Cell Sheet.A3>,
<Cell Sheet.A4>,
<Cell Sheet.A5>,
<Cell Sheet.A6>,
...
<Cell Sheet.B7>,
<Cell Sheet.B8>,
<Cell Sheet.B9>),
(<Cell Sheet.C1>,
<Cell Sheet.C2>,
<Cell Sheet.C3>,
<Cell Sheet.C4>,
<Cell Sheet.C5>,
<Cell Sheet.C6>,
<Cell Sheet.C7>,
<Cell Sheet.C8>,
<Cell Sheet.C9>))
Note
For performance reasons theWorksheet.columnsproperty is not available in read-only mode.
处于性能原因,Worksheet.columns属性不支持只读模式
取值 Values only
If you just want the values from a worksheet you can use the Worksheet.values property. This iterates over all the rows in a worksheet but returns just the cell values:
如果只需要从工作表中获取值,可以使用Worksheet.values属性。这将遍历工作表中所有行,但只返回单元格值:
for row in ws.values:
   for value in row:
     print(value)
Both Worksheet.iter_rows() and Worksheet.iter_cols() can take the values_only parameter to return just the cell’s value:Worksheet.iter_rows()和Worksheet.iter_cols()可以只返回单元格值:
>>> for row in ws.iter_rows(min_row=1, max_col=3, max_row=2, values_only=True):
...   print(row)

(None, None, None)
(None, None, None)
赋值 Data storage
Once we have a Cell, we can assign it a value:
当我们创建了一个单元格对象,我们可以对其赋值:
>>> c.value = 'hello, world'
>>> print(c.value)
'hello, world'

>>> d.value = 3.14
>>> print(d.value)
3.14
保存 Saving to a file
The simplest and safest way to save a workbook is by using the Workbook.save() method of the Workbook object:
对Workbook对象使用Workbook.save() 方法可以简单安全的保存工作簿:
>>> wb = Workbook()
>>> wb.save('balances.xlsx')
Warning
This operation will overwrite existing files without warning.
该操作将覆盖同名文件,而不会有任何警告
Note
The filename extension is not forced to be xlsx or xlsm, although you might have some trouble opening it directly with another application if you don’t use an official extension.
文件扩展名不强制为xlsx或xlsm,如果你没有使用常用的扩展名,在使用其他应用打开该文件时可能存在一些异常。
As OOXML files are basically ZIP files, you can also open it with your favourite ZIP archive manager.
因为OOXML文件是基于zip文件,你也可以使用常用的解压软件打开。
以流方式存储 Saving as a stream
If you want to save the file to a stream, e.g. when using a web application such as Pyramid, Flask or Django then you can simply provide a NamedTemporaryFile():
如果需要通过流方式存储文件,比如使用web应用如Pyramid,Flask或Django,你可以使用NamedTemporaryFile()方法:
>>> wb = load_workbook('document.xlsx')
>>> wb.template = True
>>> wb.save('document_template.xltx')
or set this attribute to False (default), to save as a document:
或设置这个对象为False:
>>> wb = load_workbook('document_template.xltx')
>>> wb.template = False
>>> wb.save('document.xlsx', as_template=False)
Warning
You should monitor the data attributes and document extensions for saving documents in the document templates and vice versa, otherwise the result table engine can not open the document.
Note
The following will fail:
>>> wb = load_workbook('document.xlsx')
>>> # Need to save with the extension *.xlsx
>>> wb.save('new_document.xlsm')
>>> # MS Excel can't open the document
>>>
>>> # or
>>>
>>> # Need specify attribute keep_vba=True
>>> wb = load_workbook('document.xlsm')
>>> wb.save('new_document.xlsm')
>>> # MS Excel will not open the document
>>>
>>> # or
>>>
>>> wb = load_workbook('document.xltm', keep_vba=True)
>>> # If we need a template document, then we must specify extension as *.xltm.
>>> wb.save('new_document.xlsm')
>>> # MS Excel will not open the document
读取文件 Loading from a file
The same way as writing, you can use the openpyxl.load_workbook() to open an existing workbook:
和写操作一样,可以使用openpyxl.load_workbook()打开存在的工作簿:
>>> from openpyxl import load_workbook
>>> wb2 = load_workbook('test.xlsx')
>>> print wb2.sheetnames
['Sheet2', 'New Title', 'Sheet1']
更多详细介绍,请参见: