0.前言
身为攻城狮没有自己搭建的博客略微显得有的low,经过一系列拖延,开始慢慢搭建我的自制博客。
继上次集成markdown后,需要向后端发起请求保存我的编写的文档,我插入的图片等。
经过几番百度比较感觉axios还是不错的,就用他了
2021-1-8修改:
发现axios和vue-axios的关系:axios是一个库,并不是vue中的第三方插件,使用时不能通过Vue.use()安装插件,需要在原型上进行绑定,就像上次写的第一节里描述使用Vue.prototype.$axios = axios;绑到原型链上。而vue-axios是将axios集成到Vue.js的小包装器,可以像插件一样进行安装,使用 Vue 的插件写法,更符合 Vue 整体生态环境。集成见第二节。
2021-3-15修改:
封装Axios成统一请求的接口
1.盘他
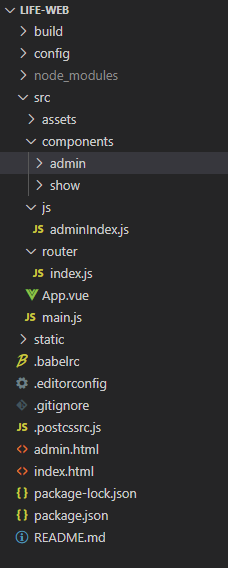
1.1项目构架
依然优先贴出架构
1.2引入
import axios from 'axios'
axios.get();
axios.defaults.headers.common["token"] = ""
axios.defaults.withCredentials = true
axios.defaults.headers.post["Content-type"] = "application/json"
axios.defaults.baseURL = '/api' //设置统一路径前缀,解决跨域问题
此时涉及到一个跨域问题,即:前端8080端口访问后端2716端口为一种跨域(当一个请求url的协议、域名、端口三者之间任意一个与当前页面url不同即为跨域)
1.3解决跨域
1.3.1在main.js
如1.2添加
axios.defaults.baseURL = '/api' //设置统一路径前缀,解决跨域问题
1.3.2在config->index.js里的module.exports里添加
'/api':{


        target: "http://localhost:2716/",
        changeOrigin:true,
        pathRewrite:{


            '^/api':''
        }
      }
如图,如果没有proxyTable就添加

这样他就会把所有请求都加上/api,然后所有的/api都过滤代理成http://localhost:2716/这个地址,就解决了跨域问题
1.4发起请求
1.4.1给后端发送图片
使用继承的MarkDown,直接这样就行了
我遇到的坑:
集成markdown中反写使用$vm.$img2Url(pos, url.data)就行,我是怎么试都不好用,知道原因就是this的问题,组件之间调用,这块掌握不够,弄不懂。就勉强用下面的先用,下次搞懂再来改~⁄(⁄ ⁄•⁄ω⁄•⁄ ⁄)⁄
<mavon-editor v-model="push.articleBody" ref="md" @imgAdd="imgAdd" @imgDel="imgDel" />
imgAdd (pos, $file) {
let formdata = new FormData()
formdata.append('file', $file)
this.$axios({
url: '/file/upload',
method: 'post',
data: formdata,
headers: {
'Content-Type': 'multipart/form-data;charset=UTF-8' ,
'aaa':'aaa'
},
}).then((url) => {
// 第二步.将返回的url替换到文本原位置 -> 
// this.$vm.$img2Url(pos, url.data);
this.$refs.md.$img2Url(pos, url.data);
})
}
1.4.2给后端发送保存文章
这样有点繁琐,下次找到封装成对象的方法再来改下~
<template>
    <div>
        <div class="leftMenu">
            <li>保存</li>
            <li>预览</li>
            <li @click="updateArticle">发布</li>
        </div>

        <div id="editor">
            <div>
                <p>文章标题</p>
                <input type="text" v-model="push.articleName">
            </div>
            <mavon-editor v-model="push.articleBody" ref="md" @imgAdd="imgAdd" @imgDel="imgDel" />
        </div>
        <div>{

   {push.articleBody}}</div>
        <div>{

   {push.articleName}}</div>

    </div>
</template>
data(){


        return {


            push:{


                articleBody: "",
                articleDescription: "",
                articleFlag: 0,
                articleId: 0,
                articleImgUrl: "",
                articleName: "",
                classifyIdList: [
                    1
                ],
                collectStatus: true,
                commentStatus: true,
                starStatus: true
            }
        }
    }
 updateArticle(){


   var add = {


       articleBody: "",
       articleDescription: "",
       articleFlag: 0,
       articleImgUrl: "",
       articleName: "",
       classifyIdList: [
           1
       ],
       collectStatus: true,
       commentStatus: true,
       starStatus: true
   }
   add.articleBody = this.push.articleBody
   add.articleDescription = this.push.articleDescription
   add.articleFlag = this.push.articleFlag
   add.articleImgUrl = this.push.articleImgUrl
   add.articleName = this.push.articleName
   add.classifyIdList = this.push.classifyIdList
   add.collectStatus =  this.push.collectStatus
   add.commentStatus = this.push.commentStatus
   add.starStatus = this.push.starStatus
   document.cookie="user_info=1;path = /"
   this.$axios({


       url :'/admin/updateArticle',
       method : 'post',
       data: add
   }).then((url) => {


       if(url.data.Result == 1){


           alert(url.data.Message)
       }else{


           alert(url.data.Message)
       }
   })
}
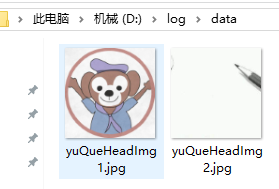
1.5OK大功告成~展示

1.6遗留问题
图片保存本地,浏览器不能读取
2.集成axios和vue-axios
发现axios和vue-axios的关系:axios是一个库,并不是vue中的第三方插件,使用时不能通过Vue.use()安装插件,需要在原型上进行绑定,就像上次写的第一节里描述使用Vue.prototype.$axios = axios;绑到原型链上。而vue-axios是将axios集成到Vue.js的小包装器,可以像插件一样进行安装,使用 Vue 的插件写法,更符合 Vue 整体生态环境。
2.1导入
npm install --save axios vue-axios
2.2引入
import Vue from 'vue'
import axios from 'axios'
import VueAxios from 'vue-axios'

// 使用
Vue.use(VueAxios, axios)
2.3使用
一个Methods里的方法,获取文章列表
listArticle(){


    // 由于 main.js 里全局定义的 axios,此处直接使用 $axios 即可。
    // 由于 main.js 里定义了每个请求前缀,此处的 / 即为http://localhost:2716
    this.axios.get('/listArticle',{


        params:{


            search : "",
            pageNum :this.currentPage,
            pageSize :this.pageSize
        }
    }).then((response) => {


        console.log(response.data)
        if(response.data.Result == 1){


            this.items = response.data.Data
            this.tableData = response.data.Data
            this.articleTotal = response.data.TotalCount
        }
    })
}
这里在昨天引入了Element的表格、分页组件,嘿比自己写表格样式和分页样式方便太多了
此页全部代码如下
<template>
    <div>
        <Vheader></Vheader>
        <div class="articleList">
	        <!--  Element表格组件-->
            <el-table :data="tableData" border style="width: 100%">
                <el-table-column
                fixed
                prop="addTime"
                label="日期"
                width="180">
                </el-table-column>

                <el-table-column
                prop="articleName"
                label="文章名"
                width="400">
                </el-table-column>

                <el-table-column
                label="操作"
                width="100">

                <template slot-scope="scope">
                    <el-button @click="handleClick(scope.row.articleId)" type="text" size="small">查看</el-button>
                    <el-button type="text" size="small">编辑</el-button>
                </template>
                </el-table-column>
            </el-table>

            <!--  Element分页组件-->
            <div class="page_item">
                <div  class="page_item_float">
                    <el-pagination
                    background
                    @size-change="handleSizeChange"
                    @current-change="handleCurrentChange"
                    :current-page.sync="currentPage"
                    :page-sizes="[20, 40, 60, 100]"
                    :page-size="pageSize"
                    layout="total, sizes, prev, pager, next, jumper"
                    :total="articleTotal">
                    </el-pagination>
                </div>
            </div>
        </div>
    </div>
</template>
<script>
import Vheader from './vheader.vue'
// import Vfooter from './vfooter'
    export default {


        data () {


            return {


                msg: "",
                items : [],
                tableData: [],
                currentPage: 1,
                articleTotal:0,
                pageSize:20
            }
        },
        created (){


            // 组件创建完后获取数据,
            // 此时 data 已经被 observed 了
            this.listArticle(1)
        },
        components:{


            Vheader,
            // Vfooter
        },
        watch:{


            // 如果路由有变化,会再次执行该方法
            '$route': 'listArticle'
        },
        methods :{


            listArticle(){


                // 由于 main.js 里全局定义的 axios,此处直接使用 $axios 即可。
                // 由于 main.js 里定义了每个请求前缀,此处的 / 即为http://localhost:2716
                this.axios.get('/listArticle',{


                    params:{


                        search : "",
                        pageNum :this.currentPage,
                        pageSize :this.pageSize
                    }
                }).then((response) => {


                    console.log(response.data)
                    if(response.data.Result == 1){


                        this.items = response.data.Data
                        this.tableData = response.data.Data
                        this.articleTotal = response.data.TotalCount
                    }
                })
            },
            handleSizeChange(val) {


                this.pageSize = val
                this.listArticle()
            },
            handleCurrentChange(val) {


                this.currentPage = val;
                this.listArticle()
            },
            handleClick(row) {


                console.log(row);
                console.log(row.articleId);
            }
        }
    }
</script>

<style scoped>
.articleList{


    width: 70%;
    margin: 0 auto;
}
.page_item{


  width:80%;
  margin: 0 auto ;
  background: green;
}
.page_item_float{


  margin: 10px auto;
  float: left;
}
</style>
2.4齐活儿~,展示

3.封装Axios
查看Vuex的使用的2.4.2章节
躬身自省,淳朴而谦逊否——文文的博客
前辈见之,如有问题,麻烦留言斧正。