最近做个人项目,同时每天学下英语,所以都没写博客了。昨天被qq群友问了ugui text的问题,刚好觉得这个需求挺普遍的,就是给text做一个匹配的背景色。
这类需求我以前做ngui/ugui经常碰到,当时都是ui给我一个九宫格图片,我根据text实际的width和height做一个bgimage的分辨率适配,但是昨天群友的需求有一点点不同:九宫格缩放图片的背景并不能匹配文字缩进和换行后的空白区域,就是说不要用死板的矩形去做背景,最好是按照文字区域匹配。
这需求我想了想,也不算是挑剔啊,在web开发中,这类文字背景色前景色变化的需求实在太常见了。
这里我们就尝试用shader给text设置前景色和背景色,如下:
Shader "Ugui/UguiTextBgShader"
{


    Properties
    {


        _MainTex ("Texture", 2D) = "white" {

    }
        _FontColor("Font Color",Color) = (1,1,1,1)
        _BgColor("Background Color",Color) = (1,1,1,1)
    }
    SubShader
    {


        Tags {

     "RenderType"="Transparent" "Queue"="Transparent" }
        LOD 100

        Pass
        {


            Blend SrcAlpha OneMinusSrcAlpha
            CGPROGRAM
            #pragma vertex vert
            #pragma fragment frag

            #include "UnityCG.cginc"

            struct appdata
            {


                float4 vertex : POSITION;
                float2 uv : TEXCOORD0;
            };

            struct v2f
            {


                float2 uv : TEXCOORD0;
                float4 vertex : SV_POSITION;
            };

            sampler2D _MainTex;
            float4 _MainTex_ST;
            float4 _FontColor;
            float4 _BgColor;

            v2f vert (appdata v)
            {


                v2f o;
                o.vertex = UnityObjectToClipPos(v.vertex);
                o.uv = TRANSFORM_TEX(v.uv, _MainTex);
                return o;
            }

            fixed4 frag (v2f i) : SV_Target
            {


                fixed4 col = tex2D(_MainTex, i.uv);
                col = lerp(_FontColor, _BgColor, 1-col.a);
                return col;
            }
            ENDCG
        }
    }
}
效果如下:
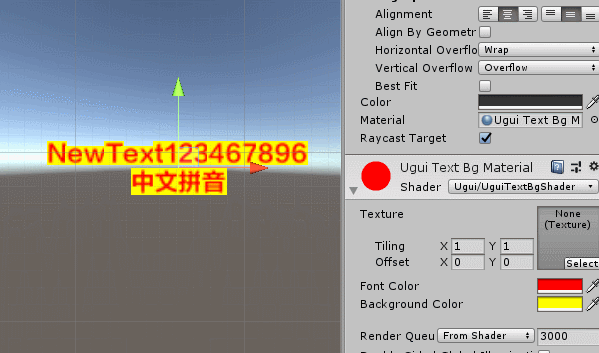
可以看出,原来text组件的绘制几何数据只是一个个字符的外接矩形单元合并起来的drawcall,所以看起来跟狗啃的一样,参差不齐。那么我们的背景色区域需要手动进行绘制,需要的参数包括一个text的行数、每一行首尾字符的边界、字符的最高高度等参数,用来绘制一个匹配的多边形背景图。
btw,当然我们可以追根溯源:为什么text组件几何数据不规则?因为字符的渲染区域不规则,数字、英文、中文三类字符的高度不相同,我们要么使用等高字体,要么在unity文字渲染流水线中做等高几何数据的计算,这样可能更方便解决问题。当然这不是我这次实现的方向。
我们首先通过c#将text的参数打印出来,如下:
using System.Collections;
using System.Collections.Generic;
using UnityEngine;
using UnityEngine.UI;

public class UguiTextParam : BaseMeshEffect
{


    public override void ModifyMesh(VertexHelper vh)
    {


        if (!IsActive())
        {


            return;
        }

        Text text = GetComponent<Text>();

        Debug.LogFormat("text char length = {0}", text.text.Length);

        int count = vh.currentVertCount;

        Debug.LogFormat("uivertices length = {0}", count);

        if (count > 0)
        {


            List<UIVertex> vertices = new List<UIVertex>();
            for (int i = 0; i < count; i++)
            {


                UIVertex vertex = new UIVertex();
                vh.PopulateUIVertex(ref vertex, i);
                vertices.Add(vertex);
            }

            for (int i = 0; i < count; i++)
            {


                UIVertex uivertex = vertices[i];

                Debug.LogFormat("vertex i={0} pos={1} uv0={2}", i, uivertex.position, uivertex.uv0);
            }
        }
    }
}
结果如下:

通过以上数据我们可以看出一个规律:

20个字符占用80个顶点数据,相当于一个字符就是一个quad网格(4个顶点2个三角面),那么我们可以通过这20*4个顶点组来计算text的行数参数和每一行的外接矩形参数,如下:
using System.Collections;
using System.Collections.Generic;
using System.Linq;
using UnityEngine;
using UnityEngine.UI;

public class UguiTextParamCalculate : BaseMeshEffect
{


    public class CharQuad
    {


        public UIVertex TopLeft {

     get; set; }
        public UIVertex TopRight {

     get; set; }
        public UIVertex BottomRight {

     get; set; }
        public UIVertex BottomLeft {

     get; set; }

        public float Left {

     get; set; }
        public float Right {

     get; set; }
        public float Top {

     get; set; }
        public float Bottom {

     get; set; }

        public void Calculate()
        {


            Left = TopLeft.position.x;
            Right = TopRight.position.x;
            Top = TopLeft.position.y;
            Bottom = BottomLeft.position.y;
        }
    }

    public override void ModifyMesh(VertexHelper vh)
    {


        if (!IsActive())
        {


            return;
        }
        int count = vh.currentVertCount;
        if (count <= 0)
        {


            return;
        }
        List<UIVertex> vertices = new List<UIVertex>();
        for (int i = 0; i < count; i++)
        {


            UIVertex vertex = new UIVertex();
            vh.PopulateUIVertex(ref vertex, i);
            vertices.Add(vertex);
        }
        int charlen = count / 4;
#if UNITY_EDITOR
        Debug.LogWarningFormat("text vertices count = {0} charlen = {1}", count, charlen);
#endif
        CharQuad[] charquads = new CharQuad[charlen];
        //根据顶点拓扑顺序
        for (int i = 0; i < charlen; i++)
        {


            CharQuad cquad = new CharQuad();
            cquad.TopLeft = vertices[i * 4];
            cquad.TopRight = vertices[i * 4 + 1];
            cquad.BottomRight = vertices[i * 4 + 2];
            cquad.BottomLeft = vertices[i * 4 + 3];
            cquad.Calculate();
            charquads[i] = cquad;
        }
        //计算text行字符
        //如果字符换行了
        //1.n+1字符的top<=n字符的bottom
        List<CharQuad[]> cquadslist = new List<CharQuad[]>();
        if (charlen == 1)
        {


            cquadslist = new List<CharQuad[]>();
            cquadslist.Add(charquads);
        }
        else
        {


            List<CharQuad> cqlist = new List<CharQuad>();
            cqlist.Add(charquads[0]);
            for (int i = 1; i < charquads.Length; i++)
            {


                CharQuad n0char = charquads[i - 1];
                CharQuad n1char = charquads[i];
                if (n1char.Top <= n0char.Bottom)
                {


                    cquadslist.Add(cqlist.ToArray());
                    cqlist.Clear();
                }
                cqlist.Add(charquads[i]);
            }
            if (cqlist.Count > 0)
            {


                cquadslist.Add(cqlist.ToArray());
            }
        }
        //计算bounds
        //计算text每一行的bound
        Vector4[] bounds = new Vector4[cquadslist.Count];
        for (int i = 0; i < cquadslist.Count; i++)
        {


            CharQuad[] cquads = cquadslist[i];
            float left = float.MaxValue;
            float right = float.MinValue;
            float top = float.MinValue;
            float bottom = float.MaxValue;
            for (int k = 0; k < cquads.Length; k++)
            {


                CharQuad cq = cquads[k];
                if (left > cq.Left)
                {


                    left = cq.Left;
                }
                if (right < cq.Right)
                {


                    right = cq.Right;
                }
                if (top < cq.Top)
                {


                    top = cq.Top;
                }
                if (bottom > cq.Bottom)
                {


                    bottom = cq.Bottom;
                }
            }
#if UNITY_EDITOR
            Debug.LogWarningFormat("text mesh line = {0} charlen = {1} left = {2} right = {3} top = {4} bottom = {5}", i, cquads.Length, left, right, top, bottom);
#endif
            bounds[i] = new Vector4(left, right, top, bottom);
        }
        //bounds参数以text组件中心点为原点,所以参数存在负值,需要处理成正值
        //以text组件左下角为原点,即可完成正值化
        {


            float left = float.MaxValue;
            float right = float.MinValue;
            float top = float.MinValue;
            float bottom = float.MaxValue;
            for (int i = 0; i < bounds.Length; i++)
            {


                Vector4 bound = bounds[i];
                if (left > bound.x)
                {


                    left = bound.x;
                }
                if (right < bound.y)
                {


                    right = bound.y;
                }
                if (top < bound.z)
                {


                    top = bound.z;
                }
                if (bottom > bound.w)
                {


                    bottom = bound.w;
                }
            }
            float width = right - left + 1;
            float height = top - bottom + 1;
#if UNITY_EDITOR
            Debug.LogWarningFormat("text texture left = {0} right = {1} top = {2} bottom = {3} width = {4} height = {5}", left, right, top, bottom, width, height);
#endif
            for (int i = 0; i < bounds.Length; i++)
            {


                Vector4 bound = bounds[i];
                bound.x -= left;
                bound.y -= left;
                bound.z -= bottom;
                bound.w -= bottom;
                bounds[i] = bound;
#if UNITY_EDITOR
                Debug.LogWarningFormat("text line = {0} bound = {1}", i, bound);
#endif
            }
        }
    }
}
计算结果如下:

我们既然把背景texture的各项参数计算出来了,那么接下来通过ComputeShader利用GPU快速绘制,如下:
#pragma kernel CSMain

RWBuffer<float4> Bounds;          //left right top bottom
RWTexture2D<float4> Result;
float4 BgColor;

//判断采样坐标在bound中
bool IsInBound(int x,int y,float4 bound)
{


    if(x<bound.x || x>bound.y)
    {


        return false;
    }
    if(y>bound.z || y<bound.w)
    {


        return false;
    }
    return true;
}

//判断是否为背景色
float4 GetTexRGBA(int x,int y)
{


    for(int i=0;i<Bounds.Length;i++)
    {


        float4 bound = Bounds[i];
        if(IsInBound(x,y,bound))
        {


            return BgColor;
        }
    }
    return float4(0,0,0,0);
}

[numthreads(8,8,1)]
void CSMain (uint3 id : SV_DispatchThreadID)
{


    Result[id.xy] = GetTexRGBA(id.x,id.y);
}
然后通过c#代码调用,如下:
//properties
    public Color bgColor = new Color(1, 0, 0, 1);
    public RawImage bgImage;
    public ComputeShader bgCS;
    private ComputeBuffer csBuf;
    public RenderTexture bgTex;

//通过computeshader进行texture绘制
            if (bgTex != null)
            {


                bgTex.Release();
                bgTex = null;
            }
            bgTex = new RenderTexture((int)width, (int)height, 0, RenderTextureFormat.ARGB32);
            bgTex.enableRandomWrite = true;
            bgTex.Create();
            int kl = bgCS.FindKernel("CSMain");
            csBuf = new ComputeBuffer(bounds.Length, 16);
            csBuf.SetData(bounds);
            bgCS.SetBuffer(kl, "Bounds", csBuf);
            bgCS.SetTexture(kl, "Result", bgTex);
            bgCS.SetVector("BgColor", bgColor);
            bgCS.Dispatch(kl, (int)width / 4, (int)height / 4, 1);
            csBuf.Release();
            csBuf = null;
            bgImage.texture = bgTex;
            bgImage.SetNativeSize();
#if UNITY_EDITOR
            Debug.LogWarningFormat("computeshader dispatch succeed");
#endif
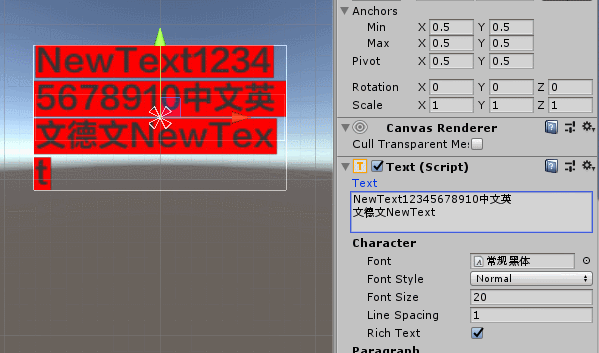
然后我们给text套一个image,可以看到效果:

随后我又看到console窗口有个报错,如下:

这个报错我查了一下,说的是不要嵌套的使用绘制,就是不要在一个uiwidget绘制函数中嵌入其他uiwidget的绘制,要么用coroutine,要么改下自己的处理逻辑,比如:
	StartCoroutine(delayDrawImage());

    IEnumerator delayDrawImage()
    {


        yield return new WaitForEndOfFrame();
        bgImage.texture = bgTex;
        bgImage.SetNativeSize();
    }
这样就好了,起码不至于报错,如下:
当然看到闪得很,因为我们文字背景的原理就是用GPU绘制一张背景图,而且还用了delayDrawImage,所以就导致这样的情况,那么我建议尽量我们就不要实时输入了,就普通的text+bg做一些简单的公告提示显示就行。
如果对实时输入文字背景有强要求,我非常建议做等高字体(bmfont、ngui、tmp等),使用第一种简单的前景背景shader就可以完成需要的效果。
好了,我继续背我的单词了,争取能背15000词汇量,这样我的英语考试通过率就大一些。
