项目使用的是传统springMvc项目的java工程,没有用maven,第一步是导入jar包
rabbitMq需要的jar
spring-rabbit-1.5.1.RELEASE.jar,
spring-amqp-1.5.1.RELEASE.jar,
rabbitmq-client.jar
webSocket部分
javax.websocket-api-1.0.jar
spring-context-4.2.5.RELEASE.jar
spring-websocket-4.2.5.RELEASE.jar
一、rabbitMq部分
1:编写rabbitMq配置文件 spring-rabbitmq.xml
一般的教程中都是先从rabbitMq的直连模式开始说起 我是为了解决当前的问题 直接配置广播模式 fanout
<?xml version="1.0" encoding="UTF-8"?>
<beans xmlns="http://www.springframework.org/schema/beans"
xmlns:xsi="http://www.w3.org/2001/XMLSchema-instance"
xmlns:rabbit="http://www.springframework.org/schema/rabbit"
xmlns:task="http://www.springframework.org/schema/task"
xsi:schemaLocation="
http://www.springframework.org/schema/rabbit
http://www.springframework.org/schema/rabbit/spring-rabbit-1.4.xsd
http://www.springframework.org/schema/task
http://www.springframework.org/schema/task/spring-task-4.1.xsd
http://www.springframework.org/schema/beans
http://www.springframework.org/schema/beans/spring-beans-4.1.xsd">
<!--导入配置文件 -->
<bean id="mysqlSource"
class="org.springframework.beans.factory.config.PropertyPlaceholderConfigurer">
<property name="location" value="classpath:jdbcConfig.properties"/>
</bean>
<!-- 定义RabbitMQ的连接工厂 -->
<rabbit:connection-factory id="connectionFactory"
username="${rabbit.username}" password="${rabbit.password}" host="${rabbit.host}" port="${rabbit.port}"
virtual-host="${rabbit.virtual-host}"
publisher-confirms="true"
publisher-returns="true"
channel-cache-size="5"
/>
<!-- MQ的管理,包括队列、交换器等 -->
<rabbit:admin connection-factory="connectionFactory" />
<!--定义queue -->
<rabbit:queue name="fanout.A" auto-declare="true"/>
<rabbit:queue name="fanout.B" auto-declare="true"/>
<!-- 定义fanout exchange,绑定queue -->
<rabbit:fanout-exchange name="fanoutExchange" auto-declare="true" durable="true">
<rabbit:bindings>
<rabbit:binding queue="fanout.A"/>
<rabbit:binding queue="fanout.B"/>
</rabbit:bindings>
</rabbit:fanout-exchange>
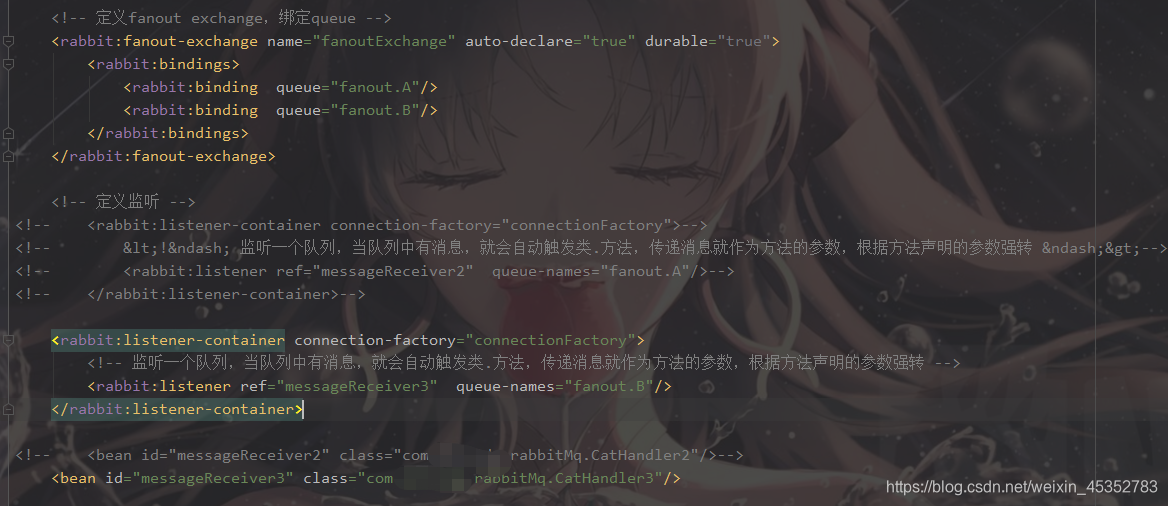
<!-- 定义监听 -->
<rabbit:listener-container connection-factory="connectionFactory">
<!-- 监听一个队列,当队列中有消息,就会自动触发类.方法,传递消息就作为方法的参数,根据方法声明的参数强转 -->
<rabbit:listener ref="messageReceiver2" queue-names="fanout.A"/>
</rabbit:listener-container>
<!-- <rabbit:listener-container connection-factory="connectionFactory">-->
<!-- <!– 监听一个队列,当队列中有消息,就会自动触发类.方法,传递消息就作为方法的参数,根据方法声明的参数强转 –>-->
<!-- <rabbit:listener ref="messageReceiver3" queue-names="fanout.B"/>-->
<!-- </rabbit:listener-container>-->
<bean id="messageReceiver2" class="com.xxx.rabbitMq.CatHandler2"/>
<!-- <bean id="messageReceiver3" class="com.xxx.rabbitMq.CatHandler3"/>-->
<!--定义queue -->
<rabbit:queue name="queueZhoaTopic" auto-declare="true"/>
<!-- 定义主题topic exchange,绑定queue -->
<rabbit:topic-exchange name="exchangeZhoaTopic" auto-declare="true" durable="true">
<rabbit:bindings>
<rabbit:binding pattern="#zhang#" queue="queueZhoaTopic"/>
</rabbit:bindings>
</rabbit:topic-exchange>
<!-- 定义监听 -->
<!--定义消费者监听队列 acknowledge设置消费者手动确认消息 原因是:rabbitmq默认是自动确认消息的,不管消费者有没有消费成功
只要消费者收到消息后就直接确认了,确认后rabbitmq就会将队列中的消息删除掉 如果消费者收到消息后实际没有消费成功,就会导致消息丢失
-->
<rabbit:listener-container connection-factory="connectionFactory" acknowledge="manual">
<!-- 监听一个队列,当队列中有消息,就会自动触发类.方法,传递消息就作为方法的参数,根据方法声明的参数强转 -->
<!-- <rabbit:listener ref="messageReceiver2" queue-names="queueZhoaFanout"/>-->
</rabbit:listener-container>
<!-- <bean id="messageReceiver2" class="com.provide.rabbitMq.CatHandler2"/>-->
</beans>
在配置文件中有一些被注起来的地方,这是多个队列绑定同一个交换机,在本地测试都打开会收到多条消息,在部署的时候,如果是两台服务器,可以一台使用 messageReceiver2 ,一台使用 messageReceiver3
像这样

这些都是我独自摸索,不一定是最优解,如果有更优解,麻烦回复
2:修改spring配置文件 applicationContext.xml
添加
<import resource="classpath*:spring-rabbitmq.xml" />
3:编写消息监听类
import com.alibaba.fastjson.JSON;
import com.provide.dao.SysUserDao;
import com.provide.service.impl.WebSocketServer;
import org.springframework.amqp.core.Message;
import org.springframework.amqp.core.MessageListener;
import org.springframework.beans.factory.annotation.Autowired;
import org.springframework.stereotype.Component;

import java.util.List;
import java.util.Map;

@Component
public class CatHandler2 implements MessageListener {


    @Autowired
    private WebSocketServer webSocketServer;

    @Autowired
    private SysUserDao sysUserDao;

    @Override

    public void onMessage(Message message) {


        try {


            boolean falg = false;
            // 使用jackson解析

            Map map = JSON.parseObject(message.getBody(), Map.class);
            System.out.println(Thread.currentThread().getName() map.get("message"));
            List<Integer> kfId = sysUserDao.findKfId();

            String hh = map.get("message").toString();

			//给webSocket发送消息  业务需要,给指定用户发送消息
             webSocketServer.sendInfo(9,hh);

        } catch (Exception e) {


            e.printStackTrace();
        }
    }
}
再复制一个只有名字不同
import com.alibaba.fastjson.JSON;
import com.provide.dao.SysUserDao;
import com.provide.service.impl.WebSocketServer;
import org.springframework.amqp.core.Message;
import org.springframework.amqp.core.MessageListener;
import org.springframework.beans.factory.annotation.Autowired;
import org.springframework.stereotype.Component;

import java.util.List;
import java.util.Map;

@Component
public class CatHandler3 implements MessageListener {


    @Autowired
    private WebSocketServer webSocketServer;

    @Autowired
    private SysUserDao sysUserDao;

    @Override

    public void onMessage(Message message) {


        try {


            boolean falg = false;
            // 使用jackson解析

            Map map = JSON.parseObject(message.getBody(), Map.class);
            System.out.println(Thread.currentThread().getName() map.get("message"));
            List<Integer> kfId = sysUserDao.findKfId();

            String hh = map.get("message").toString();

			//给webSocket发送消息  业务需要,给指定用户发送消息
             webSocketServer.sendInfo(9,hh);

        } catch (Exception e) {


            e.printStackTrace();
        }
    }
}
4:消息发送类
public String sendMessage2(HttpServletRequest request, HttpSession session) {


		//获取参数
		Map<String, Object> map = UserCommonsUtil.MapUtils.getParamMap(request);
		LogPrinter.info("进入查询工单记录---获取到的参数为:"+map);
		try{


			Map<String, Object> messageMap = new HashMap<>();
			messageMap.put("message", "你有新的待分配工单,请前往查看");
			String json = JSON.toJSONString(messageMap);
			rabbitAckService.sendMessage("fanoutExchange", null, json);
		}catch(Exception e){


			e.printStackTrace();
		}
	}
二、webSocket部分
1、编写配置文件
import org.springframework.context.annotation.Bean;
import org.springframework.context.annotation.Configuration;
import org.springframework.web.socket.server.standard.ServerEndpointExporter;

@Configuration
public class WebSocketConfig {


    /**
     * 注入ServerEndpointExporter,
     * 这个bean会自动注册使用了@ServerEndpoint注解声明的Websocket endpoint
     */
    @Bean
    public ServerEndpointExporter serverEndpointExporter() {


        return new ServerEndpointExporter();
    }
}
2、编写主要的实现类

import com.alibaba.fastjson.JSON;
import org.springframework.stereotype.Component;

import javax.websocket.*;
import javax.websocket.server.PathParam;
import javax.websocket.server.ServerEndpoint;
import java.entity.SocketMessage;
import java.io.IOException;
import java.util.Date;
import java.util.concurrent.ConcurrentHashMap;
import java.util.concurrent.atomic.AtomicInteger;

@ServerEndpoint("/webSocket/{userId}")
@Component
public class WebSocketServer {


	 //静态变量,用来记录当前在线连接数。应该把它设计成线程安全的。
    private static AtomicInteger onlineNum = new AtomicInteger();

    //concurrent包的线程安全Set,用来存放每个客户端对应的WebSocketServer对象。
    private static ConcurrentHashMap<String, Session> sessionPools = new ConcurrentHashMap<>();

    //发送消息
    public void sendMessage(Session session, String message) throws IOException {


        if(session != null){


            synchronized (session) {


                session.getBasicRemote().sendText(message);
            }
        }
    }
    //给指定用户发送信息
    public Integer sendInfo(String userId, String message){


        Session session = sessionPools.get(userId);
        try {


            sendMessage(session, message);
            return 1;
        }catch (Exception e){


            e.printStackTrace();
            return 0;
        }
    }
    // 群发消息
    public void broadcast(String message){


    	for (Session session: sessionPools.values()) {


            try {


                sendMessage(session, message);
            } catch(Exception e){


                e.printStackTrace();
                continue;
            }
        }
    }

    //建立连接成功调用
    @OnOpen
    public void onOpen(Session session, @PathParam(value = "userId") String userId){


        sessionPools.put(userId, session);
        addOnlineCount();
        // 广播上线消息
        SocketMessage msg = new SocketMessage();
        msg.setDate(new Date());
        msg.setTo("0");
        msg.setText(userId);
        broadcast(JSON.toJSONString(msg,true));
    }

    //关闭连接时调用
    @OnClose
    public void onClose(@PathParam(value = "userId") String userId){


        sessionPools.remove(userId);
        subOnlineCount();
        // 广播下线消息
        SocketMessage msg = new SocketMessage();
        msg.setDate(new Date());
        msg.setTo("-2");
        msg.setText(userId);
        broadcast(JSON.toJSONString(msg,true));
    }

    //收到客户端信息后,根据接收人的userId把消息推下去或者群发
    // to=-1群发消息
    @OnMessage
    public void onMessage(String message) throws IOException{


        SocketMessage msg= JSON.parseObject(message, SocketMessage.class);
		msg.setDate(new Date());
		if (msg.getTo().equals("-1")) {


			broadcast(JSON.toJSONString(msg,true));
		} else {


			sendInfo(msg.getTo(), JSON.toJSONString(msg,true));
		}
    }

    //错误时调用
    @OnError
    public void onError(Session session, Throwable throwable){


        throwable.printStackTrace();
    }

    public static void addOnlineCount(){


        onlineNum.incrementAndGet();
    }

    public static void subOnlineCount() {


        onlineNum.decrementAndGet();
    }

    public static AtomicInteger getOnlineNumber() {


        return onlineNum;
    }

    public static ConcurrentHashMap<String, Session> getSessionPools() {


        return sessionPools;
    }
}
3、发送消息的实体类,这个不加可以改下发送消息的部分
import com.alibaba.fastjson.annotation.JSONField;

import java.util.Date;

public class SocketMessage {


	//发送者name
	public String from;
	//接收者name
	public String to;
	//发送的文本
	public String text;
	//发送时间
	@JSONField(format="yyyy-MM-dd HH:mm:ss")
	public Date date;

	public String getFrom() {


		return from;
	}

	public void setFrom(String from) {


		this.from = from;
	}

	public String getTo() {


		return to;
	}

	public void setTo(String to) {


		this.to = to;
	}

	public String getText() {


		return text;
	}

	public void setText(String text) {


		this.text = text;
	}

	public Date getDate() {


		return date;
	}

	public void setDate(Date date) {


		this.date = date;
	}

	@Override
	public String toString() {


		return "SocketMessage{" +
				"from='" + from + '\'' +
				", to='" + to + '\'' +
				", text='" + text + '\'' +
				", date=" + date +
				'}';
	}
}
4、测试接口
import org.springframework.beans.factory.annotation.Autowired;
import org.springframework.stereotype.Controller;
import org.springframework.web.bind.annotation.RequestMapping;
import org.springframework.web.bind.annotation.RequestParam;
import org.springframework.web.bind.annotation.ResponseBody;

import java.service.WebSocketServer;

@Controller
@RequestMapping("/web")
public class WebSocketController {


    @Autowired
    WebSocketServer webSocketServer;

    /**
     * 发送单人消息
     *
     * @param userId 接收人用户ID
     * @param mes    消息
     * @return 1 发送成功  0 发送失败
     */
    @RequestMapping("/sendInfo")
    @ResponseBody
    public Integer sendInfo(@RequestParam("userId") String userId, @RequestParam("mes") String mes) {


        Integer num = webSocketServer.sendInfo(userId, mes);
        return num;
    }


    /**
     * 群发消息
     *
     * @param mes 消息
     * @return 1 发送成功  0 发送失败
     */
    @RequestMapping("/broadcast")
    @ResponseBody
    public void broadcast(@RequestParam String mes) {


        webSocketServer.broadcast(mes);
    }


    /**
     * 测试发送多条
     */
    @RequestMapping("/sendInfoFor")
    @ResponseBody
    public Integer sendInfo() {


        for (int i = 0; i < 100; i++) {


            webSocketServer.sendInfo(1 + "", i + "");
        }

        return 1;
    }

}
5、简单的html页面
<!DOCTYPE html>
<html lang="en">
<head>
    <meta charset="utf-8">
    <meta http-equiv="X-UA-Compatible" content="IE=edge">
    <meta name="viewport" content="width=device-width,initial-scale=1.0">
    <!-- 最新版本的 Bootstrap 核心 CSS 文件 -->
    <link rel="stylesheet" href="https://cdn.jsdelivr.net/npm/[email protected]/dist/css/bootstrap.min.css"
          integrity="sha384-BVYiiSIFeK1dGmJRAkycuHAHRg32OmUcww7on3RYdg4Va+PmSTsz/K68vbdEjh4u" crossorigin="anonymous">
    <title>websocket测试页面</title>
</head>
<body>
<div class="panel panel-default">
    <div class="panel-body">
        <div class="row">
            <div class="col-md-6">
                <div class="input-group">
                    <span class="input-group-addon">ws地址</span>
                    <input type="text" id="address" class="form-control" placeholder="ws地址"
                           aria-describedby="basic-addon1" value="ws://localhost:8010/webSocket/1">
                    <div class="input-group-btn">
                        <button class="btn btn-default" type="submit" id="connect">连接</button>
                    </div>
                </div>
            </div>
        </div>
        <div class="row" style="margin-top: 10px;display: none;" id="msg-panel">
            <div class="col-md-6">
                <div class="input-group">
                    <span class="input-group-addon">消息</span>
                    <input type="text" id="msg" class="form-control" placeholder="消息内容" aria-describedby="basic-addon1">
                    <div class="input-group-btn">
                        <button class="btn btn-default" type="submit" id="send">发送</button>
                    </div>
                </div>
            </div>
        </div>
        <div class="row" style="margin-top: 10px; padding: 10px;">
            <div class="panel panel-default">
                <div class="panel-body" id="log" style="height: 450px;overflow-y: auto;">
                </div>
            </div>
        </div>
    </div>
</div>

<script src="https://cdn.jsdelivr.net/npm/[email protected]/dist/jquery.min.js"></script>
<script src="https://cdn.jsdelivr.net/npm/[email protected]/dist/js/bootstrap.min.js"
        integrity="sha384-Tc5IQib027qvyjSMfHjOMaLkfuWVxZxUPnCJA7l2mCWNIpG9mGCD8wGNIcPD7Txa"
        crossorigin="anonymous"></script>

<script type="text/javascript">
    $(function () {


        var _socket;

        $("#connect").click(function () {


            _socket = new _websocket($("#address").val());
            _socket.init();
        });

        $("#send").click(function () {


            var _msg = $("#msg").val();
            output("发送消息:" + _msg);
            _socket.client.send(JSON.stringify(_msg));
        });
    });

    function output(e) {


        var _text = $("#log").html();
        $("#log").html(_text + "<br>" + e);
    }

    function _websocket(address) {


        this.address = address;
        this.client;

        this.init = function () {


            if (!window.WebSocket) {


                this.websocket = null;
                return;
            }

            var _this = this;
            var _client = new window.WebSocket(_this.address);

            _client.onopen = function () {


                output("websocket打开");
                $("#msg-panel").show();
            };

            _client.onclose = function () {


                _this.client = null;
                output("websocket关闭");
                $("#msg-panel").hide();
            };

            _client.onmessage = function (evt) {


                output(evt.data);
            };

            _this.client = _client;
        };

        return this;
    }
</script>
</body>
</html>
准备测试
可以准备两个tomcat模拟两台服务器
使用nginx方向代理
配置文件主要需要修改的部分
upstream localhost{
			server 127.0.0.1:8110 weight=7;
			server 127.0.0.1:8111 weight=3;
    }


	upstream  ws_weight{
		    server 127.0.0.1:8110 weight=7 fail_timeout=20s;
            server 127.0.0.1:8111 weight=3 fail_timeout=20s;

	}
下面这段放在service{}里面
location /xxx/webSocket/ {


            proxy_redirect off;
			proxy_set_header Host $host;
			proxy_set_header X-Real-IP $remote_addr;
			#proxy_set_header X-Forwarded-Proto https;
			proxy_read_timeout 3600s;
			proxy_pass http://ws_weight;
			proxy_http_version 1.1;
			proxy_set_header Upgrade $http_upgrade;
			proxy_set_header Connection "upgrade";
		}
启动两个tomcat 启动nginx ,开启浏览器,连接webSocket,启动postMan访问测试接口
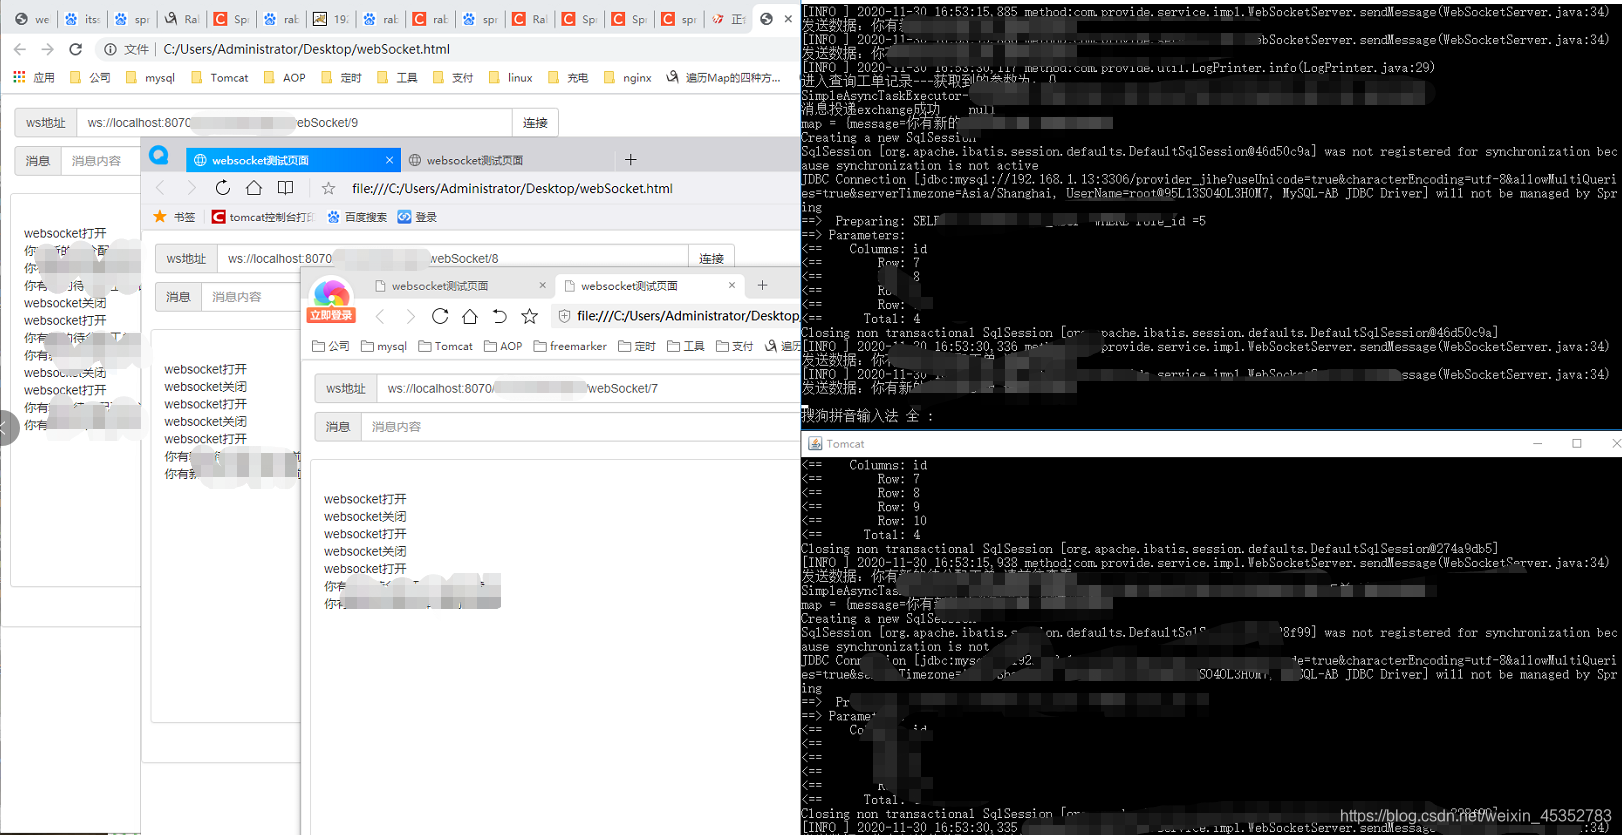
落在每台tomcat上的连接都能收到消息。