下载ActiveMQ 安装包
- 下载地址:http://activemq.apache.org/components/classic/download/
2. 解压
tar -zxvf apache-activemq-5.15.10-bin.tar.gz
- 启动/stop(./activemq stop)
cd apache-activemq-5.15.10/bin
./activemq start
- 检查启动是否完成
netstat -anp | grep 61616
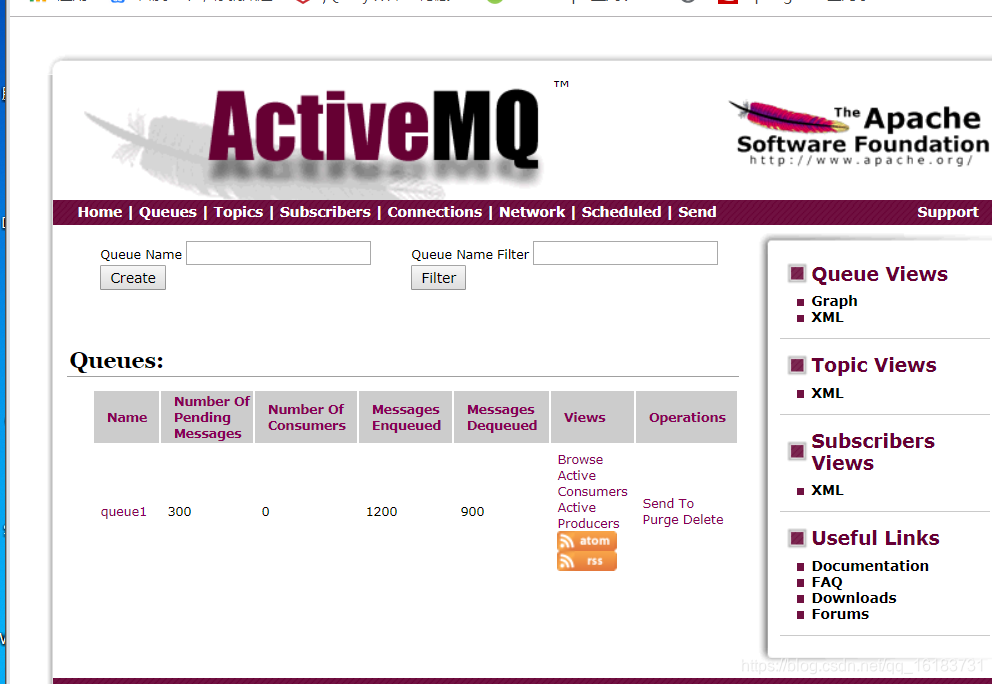
- 登陆界面
ip:8161/admin
- 修改账号密码
修改控制台密码:
conf/jetty-realm.properties
- 新增账号密码
activema.xml 新增账号密码(broker 标签下添加)
- MQS 消息流程

生产者/消费者模式
- 依赖:
 <!-- https://mvnrepository.com/artifact/org.springframework.boot/spring-boot-starter-activemq -->
        <dependency>
            <groupId>org.springframework.boot</groupId>
            <artifactId>spring-boot-starter-activemq</artifactId>
            <version>2.1.5.RELEASE</version>
        </dependency>
- 创建生产者
private static void pointToPoint() throws Exception {


        // 第一步:建立connectionFactory 工厂对象,需要用户名,密码,连接地址,均可采取默认
        ConnectionFactory connectionFactory = new ActiveMQConnectionFactory(ActiveMQConnectionFactory.DEFAULT_USER, ActiveMQConnectionFactory.DEFAULT_PASSWORD, "tcp://192.168.203.132:61616");
        // 第二步: 通过connectionfactory 对象创建一个连接,并且调用connectionfactory 的start 方法
        Connection connection = connectionFactory.createConnection();
        connection.start();
        // 第三步: 通过connection对象创建session 会话,(上下文环境对象),用于接受消息,参数配置1 为是否启用事务,参数配置2 为签收模式,
        // 一般为自动签收
        Session session = connection.createSession(Boolean.FALSE, Session.AUTO_ACKNOWLEDGE);
        // 第四步: 通过session 创建destination 对象,一个客户端来指定生产消息目标和消费信息来源的对象
        // 在PTP模式中,Destination被称作Queue即队列;在Pub/Sub模式,Destination被称作Topic即主题。
        // 在程序中可以使用多个Queue和Topic
        Queue queue1 = session.createQueue("queue1");
//        Topic topic = session.createTopic("topic");
//        session.createDurableConsumer(topic);
        // 第五步 通过session 对象创建消息发送和接收对象(生产者,消费者)
        MessageProducer producer = session.createProducer(queue1);
        // 第六步 通过producer 的setDeliveryMode 方法设置持久化特性 和费持久化特性(DeliveryMode)
        producer.setDeliveryMode(DeliveryMode.NON_PERSISTENT);
        // 第七步 使用KMS 规范的TextMessage 形式创建数据(通过session对象),
        // 通过producer 的send 方法发送数据,recevice 接收消息 关流
        for (int i = 0; i < 100; i++) {


            TextMessage textMessage = session.createTextMessage();
            textMessage.setText("消息有效级别 queue-----:" + i);
            producer.send(textMessage);
            System.err.println("生产者---" + i);
        }
        Thread.sleep(100000);
        if (null != connection) {


            connection.close();
        }
    }
- 创建消费者
public void consumerMessage() throws Exception {


        // 第一步:建立connectionFactory 工厂对象,需要用户名,密码,连接地址,均可采取默认
        ConnectionFactory connectionFactory = new ActiveMQConnectionFactory(ActiveMQConnectionFactory.DEFAULT_USER, ActiveMQConnectionFactory.DEFAULT_PASSWORD, "tcp://192.168.203.132:61616");
        // 第二步: 通过connectionfactory 对象创建一个连接,并且调用connectionfactory 的start 方法
        Connection connection = connectionFactory.createConnection();
        connection.start();
        // 第三步: 通过connection对象创建session 会话,(上下文环境对象),用于接受消息,参数配置1 为是否启用事务,参数配置2 为签收模式,
        // 一般为自动签收
        Session session = connection.createSession(Boolean.FALSE, Session.AUTO_ACKNOWLEDGE);
        // 第四步: 通过session 创建destination 对象,一个客户端来指定生产消息目标和消费信息来源的对象
        // 在PTP模式中,Destination被称作Queue即队列;在Pub/Sub模式,Destination被称作Topic即主题。
        // 在程序中可以使用多个Queue和Topic
        Queue queue1 = session.createQueue("queue1");
        // 第五步 创建消费者
        MessageConsumer consumer = session.createConsumer(queue1);
        while (true) {


            TextMessage receive = (TextMessage) consumer.receive();
            if (null == receive) {


                break;
            }
            System.out.println(receive.getText() + ">>>>>>>>" + number);
        }
        if (null != connection) {


            connection.close();
        }
    }
- Springboot 模板创建消费者,生产者
配置文件:
spring:
  #config:
   # location: classpath:spring-beans.xml
  activemq:
    broker-url: tcp://192.168.203.132:61616
    user: admin
    password: admin
    pool:
      enabled: false
    queueName: queue1
- 生产者/消费者代码
@Service
public class ProducerService {


    @Resource
    private JmsMessagingTemplate jmsMessagingTemplate;
    @Value("${spring.activemq.queueName}")
    private String destinationName;

    // 生产者
    public void sendMess(String message) throws Exception{


        System.out.println("send message>>>>>");
        Destination activeMQQueue = new ActiveMQQueue(destinationName);
        jmsMessagingTemplate.convertAndSend(activeMQQueue,message);
    }

    // 消费者
    @JmsListener(destination = "queue1")
    public void consumerMsg(String text){


        System.out.println("query text:???"+text);
    }


}
生产/消费模式下,消息发出后会存放在队列中,等待消费者消费。一个消费只能被消费一次.
发布/订阅模式
- 发布话题
private static void submationPubsubtion() throws Exception {


        // 第一步:建立connectionFactory 工厂对象,需要用户名,密码,连接地址,均可采取默认
        ConnectionFactory connectionFactory = new ActiveMQConnectionFactory(ActiveMQConnectionFactory.DEFAULT_USER, ActiveMQConnectionFactory.DEFAULT_PASSWORD, "tcp://192.168.203.132:61616");
        // 第二步: 通过connectionfactory 对象创建一个连接,并且调用connectionfactory 的start 方法
        Connection connection = connectionFactory.createConnection();
        connection.start();
        // 第三步: 通过connection对象创建session 会话,(上下文环境对象),用于接受消息,参数配置1 为是否启用事务,参数配置2 为签收模式,
        // 一般为自动签收
        Session session = connection.createSession(Boolean.FALSE, Session.AUTO_ACKNOWLEDGE);
        // 第四步: 通过session 创建destination 对象,一个客户端来指定生产消息目标和消费信息来源的对象
        // 在PTP模式中,Destination被称作Queue即队列;在Pub/Sub模式,Destination被称作Topic即主题。
        // 在程序中可以使用多个Queue和Topic
        Topic topic = session.createTopic("你是哪个");
        // 第五步 通过session 对象创建消息发送和接收对象(生产者,消费者)
        MessageProducer producer = session.createProducer(topic);
        // 第六步 通过producer 的setDeliveryMode 方法设置持久化特性 和费持久化特性(DeliveryMode)
        producer.setDeliveryMode(DeliveryMode.NON_PERSISTENT);
        // 第七步 使用KMS 规范的TextMessage 形式创建数据(通过session对象),
        // 通过producer 的send 方法发送数据,recevice 接收消息 关流
        for (int i = 0; i < 100; i++) {


            TextMessage textMessage = session.createTextMessage();
            textMessage.setText("消息有效级别 topic-----:" + i);
            producer.send(textMessage);
            System.err.println("生产者---" + i);
        }
        Thread.sleep(100000);
        if (null != connection) {


            connection.close();
        }
    }
- 订阅话题
public void consumerMessageTopic() throws Exception {


        // 第一步:建立connectionFactory 工厂对象,需要用户名,密码,连接地址,均可采取默认
        ConnectionFactory connectionFactory = new ActiveMQConnectionFactory(ActiveMQConnectionFactory.DEFAULT_USER, ActiveMQConnectionFactory.DEFAULT_PASSWORD, "tcp://192.168.203.132:61616");
        // 第二步: 通过connectionfactory 对象创建一个连接,并且调用connectionfactory 的start 方法
        Connection connection = connectionFactory.createConnection();
        connection.start();
        // 第三步: 通过connection对象创建session 会话,(上下文环境对象),用于接受消息,参数配置1 为是否启用事务,参数配置2 为签收模式,
        // 一般为自动签收
        Session session = connection.createSession(Boolean.FALSE, Session.AUTO_ACKNOWLEDGE);
        // 第四步: 通过session 创建destination 对象,一个客户端来指定生产消息目标和消费信息来源的对象
        // 在PTP模式中,Destination被称作Queue即队列;在Pub/Sub模式,Destination被称作Topic即主题。
        // 在程序中可以使用多个Queue和Topic
        Topic topic = session.createTopic("你是哪个");

        // 第五步 创建消费者
        MessageConsumer consumer = session.createConsumer(topic);
        while (true) {


            TextMessage receive = (TextMessage) consumer.receive();
            if (null == receive) {


                break;
            }
            System.out.println(receive.getText() + ">>>>>>>>" + number);
        }
        if (null != connection) {


            connection.close();
        }
    }
- Springboot 发布订阅模式
/ 发布订阅模式, 发布者
    public void publish(String message)
    {


        Destination destination =  new ActiveMQTopic(destinationName);
        jmsMessagingTemplate.convertAndSend(destinationName,message);
    }

    @JmsListener(destination = "topic.name",containerFactory ="jmsListenerContainerFactory" )
    public void consumer(String text)
    {


        System.out.println("<<<<<"+text);
    }

    // 发布订阅需要对containerFactory 进行配置
    @Bean(name = "jmsListenerContainerFactory")
    JmsListenerContainerFactory jmsListenerContainerFactory(ConnectionFactory connectionFactory){


        SimpleJmsListenerContainerFactory factory = new SimpleJmsListenerContainerFactory();
        factory.setConnectionFactory(connectionFactory);
        factory.setPubSubDomain(true);
        return factory;
    }
有多个消息接收者时,生产/消费模式下多个消费者会轮流消费队列中的消息,消息会存储在队列中,等待被消费。而pub/sub模式下所有订阅者都会得到所有的消息。并且订阅需要在发布之前,否则不能消费到订阅之前发布者发布的消息
权限设置,认证与授权
在配置文件中加activema.xml 新增账号密码(broker 标签下添加)
具体的权限配置: http://activemq.apache.org/security.html
<broker>
  ..
    <plugins>
      ..
      <authorizationPlugin>
        <map>
          <authorizationMap>
            <authorizationEntries>
              <authorizationEntry queue="TEST.Q" read="users" write="users" admin="users" />
              <authorizationEntry topic="ActiveMQ.Advisory.>" read="all" write="all" admin="all"/>
            </authorizationEntries>
            <tempDestinationAuthorizationEntry>
              <tempDestinationAuthorizationEntry read="admin" write="admin" admin="admin"/>
            </tempDestinationAuthorizationEntry>
          </authorizationMap>
        </map>
      </authorizationPlugin>
      ..
    </plugins>
  ..
</broker>
每个authorizationEntry配置都有read、write和admin属性,分别对应读取、写入和管理。read、write和admin的值为在认证中用户对应的groups属性中的值
消息有两种queue和topic,其中read、write、admin用户指定用户组,其中conf/groups.properties中文件
admins=admin
users=user,publisher,consumer,guest
等号前时候组名,等号后是用户列表,多个用户之间用","分割
<authorizationEntry queue="TEST.Q" read="users" write="users" admin="users" />
对应以TEST.Q开头的消息队列
修改配置文件,每次请求过来都会自动更新配置文件:
**设置reload=true **
vim login.config
activemq {


    org.apache.activemq.jaas.PropertiesLoginModule required
        org.apache.activemq.jaas.properties.user="users.properties"
        org.apache.activemq.jaas.properties.group="groups.properties" reload=true;
};
2.1 将用户名、密码 写入activemq.xml 文件
<simpleAuthenticationPlugin>
                <users>

                    <authenticationUser username="admin" password="password"
                    groups="admins,publishers,consumers"/>

                    <authenticationUser username="publisher" password="password"
                    groups="publishers,consumers"/>

                    <authenticationUser username="consumer" password="password"
                    groups="consumers"/>

                    <authenticationUser username="guest" password="password"
                    groups="guests"/>
                </users>
            </simpleAuthenticationPlugin>
2.2 使用 redentials.properties存储明文凭证,plugins 读取配置。
<plugins>
     <simpleAuthenticationPlugin>
           <users>
                <authenticationUser username="${activemq.username}" password="${activemq.password}" groups="users, admins" />
           </users>
     </simpleAuthenticationPlugin>
</plugins>
修改配置
vim credentials.properties
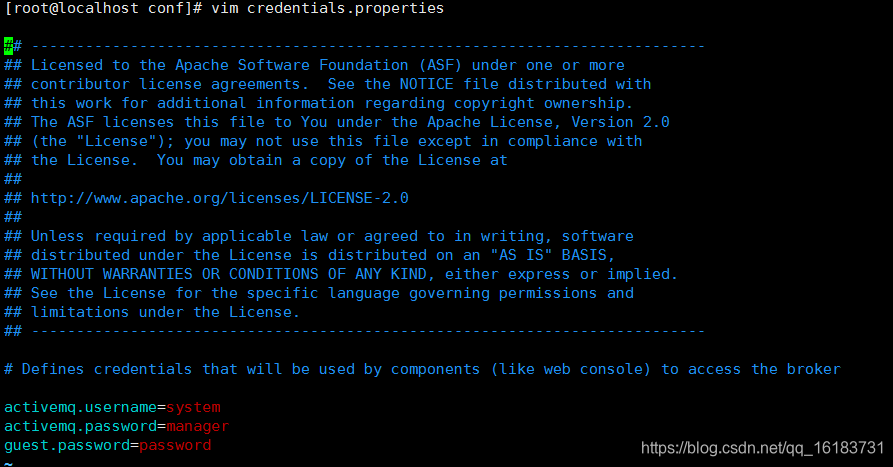
我们可以使用变量的方式引用该文件内部的属性 groups=“users, admins” 表示定义用户所属的用户组, activemq按照用户组分配权限,注意不能删除groups属性,可以置空。
1、 优先级高于,如果配置了 那么用户的验证授权信息将从user.properties和group.properties文件中进行加载;如果只配置那么用户的验证与授权信息直接从子节点authenticationUser中进行定义,此时用户的信息也可以存放在conf/credentials.properties文件中,通过${}进行加载即可。
2、如果配置那么conf/login.config中节点名称一定要为activemq-domain,否则在发送或是接收消息时会抛出
Caused by: javax.security.auth.login.LoginException: No LoginModules configured for activemq-domain