MultiDex原理分析
一、MultiDex是什么,解决了什么问题
MultiDex 顾名思义就是对分包的Dex文件进行读取加载到ClassLoader的库
android 早期的版本中,Dex文件(android对java中字节码 class文件 进行了调整,把所有的class打包到一的Dex文件中)的方法数量是有上限的65536,当一个app中的方法数量超过这个值,在app安装的时候就会抛出错误,无法安装
为什么Dex的方法数量上限是65536呢?
android在安装一个应用的时候其中会有一步工作是使用DexOpt工具对Dex文件进行优化,会将Dex文件转成ODex文件(Optimised Dex 优化了的Dex文件)因为ODex速度更快,DexOpt处理Dex文件的时候会把Dex中的所有方法提取id索引,然后存在一个链表中,链表的长度用short来保存,这个就导致了这个长度不能超过65536
在android5.0以前是有这个问题的,在android5.0以后android系统解决了这个问题,所以MultiDex是针对android5.0以前的这个问题起作用的
解决这个问题要分成2步
1、将Dex分包,分成若干个不同的包
2、将这些不同的Dex加载进入app的ClassLoader中,从而正常加载
第一步:这一步其实用的android studio中的插件来解决的,
multiDexEnabled true
这个是在工程中的app下面的build.gradle文件中 配置的,就是告诉gradle 在编译打包app的时候将app打包成多个Dex的模式
第二步:在app工程中配置MultiDex库,来加载多个Dex文件,这个配置是在app的application中的
protected void attachBaseContext(Context base) {
        super.attachBaseContext(base);
        MultiDex.install(this);
    }
或者直接让自己的application继承MultiDexApplication 就可以了
public class MultiDexApplication extends Application {
    public MultiDexApplication() {
    }

    protected void attachBaseContext(Context base) {
        super.attachBaseContext(base);
        MultiDex.install(this);
    }
}
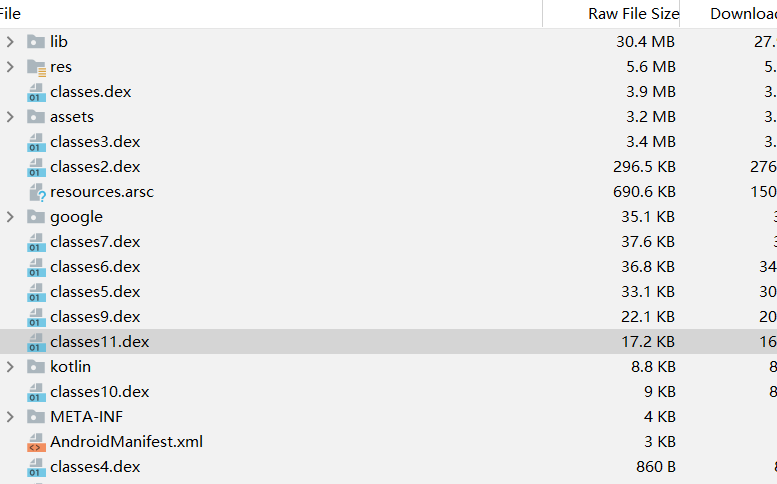
这个就是接入了MultiDex库的 打包app的资源目录图了
可以看到很多的Dex文件
二、MutiDex实现原理
接下来我们来分析下MutiDex如何实现加载多个Dex文件到app的ClassLoader中的
1、ClassLoader分析
classloader是java的类加载器,是用来把java类加载java虚拟器中的作用
在android中的虚拟器是Dalvik把java的虚拟器进行了调整修改,来更加在适配android的轻量化需求
但是这个是在android5.0以前,
android5.0之后变成了AndroidRuntime简称ART,简而言之将android的Dex一次基础性预编译,提前将字节码转为机器码,减少了Dalvik的运行时转机器码的工作量,速度更快了,
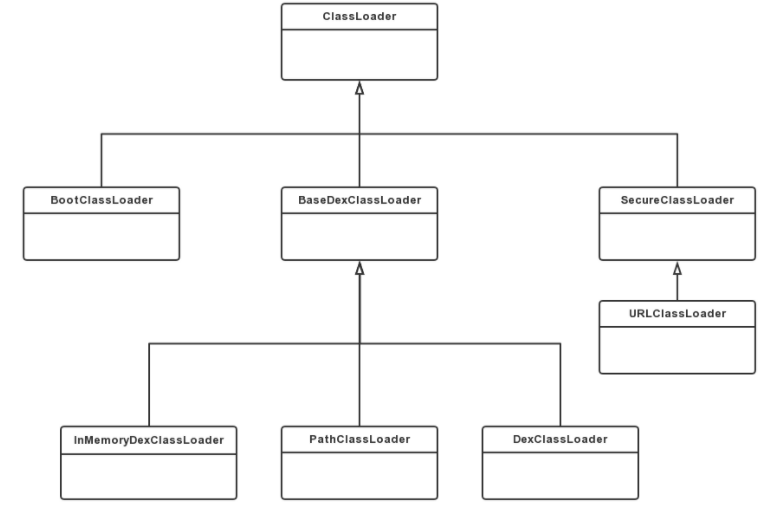
我们来看下ClassLoader的继承结构
-
ClassLoader是一个抽象类,其中定义了ClassLoader的主要功能。BootClassLoader是它的内部类。
-
SecureClassLoader类和JDK8中的SecureClassLoader类的代码是一样的,它继承了抽象类
-
ClassLoader。SecureClassLoader并不是ClassLoader的实现类,而是拓展了ClassLoader类加入了权限方面的功能,加强了ClassLoader的安全性。
-
URLClassLoader类和JDK8中的URLClassLoader类的代码是一样的,它继承自SecureClassLoader,用来通过URl路径从jar文件和文件夹中加载类和资源。
-
InMemoryDexClassLoader是Android8.0新增的类加载器,继承自BaseDexClassLoader,用于加载内存中的dex文件。
-
BaseDexClassLoader继承自ClassLoader,是抽象类ClassLoader的具体实现类,PathClassLoader和DexClassLoader都继承它。
2、MultiDex流程
我们用MultiDex2.0.0为例子
1、MultiDex.install(this);
这个是MultiDex的调用的其实位置,这个是在aplication的attachBaseContext中调用的,所以我们的代码不要在attachBaseContext的MultiDex.install(this) 之前调用,因为这个时候有些Dex还没有加载,会跑出来ClassNotFoundException
2、MultiDex.install内部逻辑
public static void install(Context context) {


        Log.i("MultiDex", "Installing application");
        if (IS_VM_MULTIDEX_CAPABLE) {


            Log.i("MultiDex", "VM has multidex support, MultiDex support library is disabled.");
        } else if (VERSION.SDK_INT < 4) {


            throw new RuntimeException("MultiDex installation failed. SDK " + VERSION.SDK_INT + " is unsupported. Min SDK version is " + 4 + ".");
        } else {


            try {


                ApplicationInfo applicationInfo = getApplicationInfo(context);
                if (applicationInfo == null) {


                    Log.i("MultiDex", "No ApplicationInfo available, i.e. running on a test Context: MultiDex support library is disabled.");
                    return;
                }

                doInstallation(context, new File(applicationInfo.sourceDir), new File(applicationInfo.dataDir), "secondary-dexes", "", true);
            } catch (Exception var2) {


                Log.e("MultiDex", "MultiDex installation failure", var2);
                throw new RuntimeException("MultiDex installation failed (" + var2.getMessage() + ").");
            }

            Log.i("MultiDex", "install done");
        }
    }
1、IS_VM_MULTIDEX_CAPABLE 这个是当前的虚拟器是否支持MutliDex的标志
private static final boolean IS_VM_MULTIDEX_CAPABLE = isVMMultidexCapable(System.getProperty("java.vm.version"));
static boolean isVMMultidexCapable(String versionString) {
        boolean isMultidexCapable = false;
        if (versionString != null) {
            Matcher matcher = Pattern.compile("(\\d+)\\.(\\d+)(\\.\\d+)?").matcher(versionString);
            if (matcher.matches()) {
                try {
                    int major = Integer.parseInt(matcher.group(1));
                    int minor = Integer.parseInt(matcher.group(2));
                    isMultidexCapable = major > 2 || major == 2 && minor >= 1;
                } catch (NumberFormatException var5) {
                }
            }
        }

        Log.i("MultiDex", "VM with version " + versionString + (isMultidexCapable ? " has multidex support" : " does not have multidex support"));
        return isMultidexCapable;
    }
版本是通过System.getProperty(“java.vm.version”) 来获取虚拟器的版本
然后根据版本号判断条件来识别,通过代码可以看出 要大于等2.1.0的版本才具备MutilDex的能力,这个是系统就具备了这个能力 不需要Mutildex这个库来实现了,所以低版本的android 是不具备这个能力的
如果是>=2.1.0 这个库就什么都不做 让系统来完成
2、else if (VERSION.SDK_INT < 4)
这个表示android4一下的不支持 会直接抛异常
3、获取application 获取dex 然后加载
try {
                ApplicationInfo applicationInfo = getApplicationInfo(context);
                if (applicationInfo == null) {
                    Log.i("MultiDex", "No ApplicationInfo available, i.e. running on a test Context: MultiDex support library is disabled.");
                    return;
                }

                doInstallation(context, new File(applicationInfo.sourceDir), new File(applicationInfo.dataDir), "secondary-dexes", "", true);
            } catch (Exception var2) {
                Log.e("MultiDex", "MultiDex installation failure", var2);
                throw new RuntimeException("MultiDex installation failed (" + var2.getMessage() + ").");
            }
ApplicationInfo 的获取没什么好说的,就是获取的app的相关资源和路径等信息,比如apk的安装路径 比如dex路径等
3、doInstallation
private static void doInstallation(Context mainContext, File sourceApk, File dataDir, String secondaryFolderName, String prefsKeyPrefix, boolean reinstallOnPatchRecoverableException) throws IOException, IllegalArgumentException, IllegalAccessException, NoSuchFieldException, InvocationTargetException, NoSuchMethodException, SecurityException, ClassNotFoundException, InstantiationException {


    	//installedApk 这个是判断apk是否已经安装,避免重复加载 节省时间
        synchronized(installedApk) {


            if (!installedApk.contains(sourceApk)) {


                installedApk.add(sourceApk);
                if (VERSION.SDK_INT > 20) {


                    //如果sdk版本高于20,MultiDex 不能保证可行,就是说sdk版本高于android5.0 这个库依然可以执行 但是不保证没问题
                    Log.w("MultiDex", "MultiDex is not guaranteed to work in SDK version " + VERSION.SDK_INT + ": SDK version higher than " + 20 + " should be backed by " + "runtime with built-in multidex capabilty but it's not the " + "case here: java.vm.version=\"" + System.getProperty("java.vm.version") + "\"");
                }

                ClassLoader loader;
                try {


                    //获取app的ClassLoader 这个ClassLoader到底是什么呢?这个下面详解
                    loader = mainContext.getClassLoader();
                } catch (RuntimeException var25) {


                    Log.w("MultiDex", "Failure while trying to obtain Context class loader. Must be running in test mode. Skip patching.", var25);
                    return;
                }

                if (loader == null) {


                    Log.e("MultiDex", "Context class loader is null. Must be running in test mode. Skip patching.");
                } else {


                    try {


                        //清理Dex的缓存目录?难道每次都清楚缓存,那每次进app都要加载 ?
                        //下面详解
                        clearOldDexDir(mainContext);
                    } catch (Throwable var24) {


                        Log.w("MultiDex", "Something went wrong when trying to clear old MultiDex extraction, continuing without cleaning.", var24);
                    }
					//这个就是获取Dex的缓存目录,
                    File dexDir = getDexDir(mainContext, dataDir, secondaryFolderName);
                    //这个类的作用是提取apk中的dex 然后压缩成zip格式的文件 最后返回zip的list
                    MultiDexExtractor extractor = new MultiDexExtractor(sourceApk, dexDir);
                    IOException closeException = null;

                    try {


                        //根据apk里的dex文件 压缩成zip格式 然后返回
                        List files = extractor.load(mainContext, prefsKeyPrefix, false);

                        try {


                            //将zip的dex文件 添加到系统的app的ClassLoader的Dex列表前面
                            //为了能够提前加载
                            //具体过程稍后解析
                            installSecondaryDexes(loader, dexDir, files);
                        } catch (IOException var26) {


                            if (!reinstallOnPatchRecoverableException) {


                                throw var26;
                            }

                            Log.w("MultiDex", "Failed to install extracted secondary dex files, retrying with forced extraction", var26);
                            files = extractor.load(mainContext, prefsKeyPrefix, true);
                            installSecondaryDexes(loader, dexDir, files);
                        }
                    } finally {


                        try {


                            extractor.close();
                        } catch (IOException var23) {


                            closeException = var23;
                        }

                    }

                    if (closeException != null) {


                        throw closeException;
                    }
                }
            }
        }
    }
上面的已经写了相关注释,比较复杂的过程会有详细解释
1、loader = mainContext.getClassLoader();
这个到底是来自哪里
public abstract ClassLoader getClassLoader();
首先这个调用会走到这里 这个是Context里的抽象方法,他的实现是在ContextImpl
ContextImpl:

@Override
275      public ClassLoader getClassLoader() {
276          return mPackageInfo != null ?
277                  mPackageInfo.getClassLoader() : ClassLoader.getSystemClassLoader();
278      }
如果mPackageInfo==null 就调用ClassLoader.getSystemClassLoader() mPackageInfo缓存作用
public abstract class ClassLoader {

    static private class SystemClassLoader {
        public static ClassLoader loader = ClassLoader.createSystemClassLoader();
    }
   private static ClassLoader createSystemClassLoader() {
        String classPath = System.getProperty("java.class.path", ".");
        String librarySearchPath = System.getProperty("java.library.path", "");

        // String[] paths = classPath.split(":");
        // URL[] urls = new URL[paths.length];
        // for (int i = 0; i < paths.length; i++) {
        // try {
        // urls[i] = new URL("file://" + paths[i]);
        // }
        // catch (Exception ex) {
        // ex.printStackTrace();
        // }
        // }
        //
        // return new java.net.URLClassLoader(urls, null);

        // TODO Make this a java.net.URLClassLoader once we have those?
        return new PathClassLoader(classPath, librarySearchPath, BootClassLoader.getInstance());
    }
我们可以清楚的看到 Context 调用的ClassLoader是PathClassLoader,这个是加载我们自己写的类的加载器
同时我们可以看到PathClassLoader的父加载器是BootClassLoader,之前我们提过BootClassLoader是ClassLoader的内部类,这个BootClassLoader 是在虚拟器开始的时候就初始化 然后加载系统的一些类库。
app自定义的类 都是PathClassLoader来完成加载的
我们来看下ClassLoader的loadClass方法
  protected Class<?> loadClass(String name, boolean resolve)
        throws ClassNotFoundException
    {
            // First, check if the class has already been loaded
            //通过虚拟器中查找已经加载过的类信息
            Class<?> c = findLoadedClass(name);
            if (c == null) {
                try {
                    if (parent != null) {
                    	//从父类加载  加载class
                        c = parent.loadClass(name, false);
                    } else {
                        c = findBootstrapClassOrNull(name);
                    }
                } catch (ClassNotFoundException e) {
                    // ClassNotFoundException thrown if class not found
                    // from the non-null parent class loader
                }

                if (c == null) {
                    // If still not found, then invoke findClass in order
                    // to find the class.
                    //上面都都没有了 找不到了 就从当前的类加载器 加载类信息
                    c = findClass(name);
                }
            }
            return c;
    }
双亲委托机制:
我们可以看到ClassLoader的加载是双亲委托机制的,先查找父加载器是否已经加载过,如果加载过了 就直接用父类的,如果没有就从自己的类加载中加载
优点:
1、提高加载性能
这个很容易理解,类加载的过程是比较耗时的,如果避免了重复加载 性能肯定会提高
2、安全性
防止内核的核心类被串改,比如String在系统一开始的时候就被加载了,如果用户自定一个String类,如果不先去parent去查询是否已经加载了,就会直接用用的String的自定义类,那么这个系统毫无安全可言了,核心api可以随意被替换,相反如果加载用户的自定义String类,就先去查询父ClassLoader,始终得到是系统String类,用户自定义的没有起作用了
2、clearOldDexDir
清除旧的dex文件,这里不是清除上次加载的dex文件缓存。
获取dex缓存目录是,会优先获取/data/data/ p a c k a g e N a m e / c o d e − c a c h e 作 为 缓 存 目 录 。 如 果 获 取 失 败 , 则 使 用 / d a t a / d a t a / {packageName}/code-cache作为缓存目录。 如果获取失败,则使用/data/data/ packageName/code−cache作为缓存目录。如果获取失败,则使用/data/data/{packageName}/files/code-cache目录。
这里清除的是第二个目录。
3、MultiDexExtractor#load 方法
    List<? extends File> load(Context context, String prefsKeyPrefix, boolean forceReload) throws IOException {


        Log.i("MultiDex", "MultiDexExtractor.load(" + this.sourceApk.getPath() + ", " + forceReload + ", " + prefsKeyPrefix + ")");
        //文件锁,防止多进程操作 MultiDex.lock 是锁的文件
        if (!this.cacheLock.isValid()) {


            throw new IllegalStateException("MultiDexExtractor was closed");
        } else {


            List files;
            //是否强制重新解压,第一次优先使用已经加载过的dex
            //根据crc和修改时间来判断是否需要重新解压,覆盖安装app后crc和时间会修改
            if (!forceReload && !isModified(context, this.sourceApk, this.sourceCrc, prefsKeyPrefix)) {


                try {


                    files = this.loadExistingExtractions(context, prefsKeyPrefix);
                } catch (IOException var6) {


                    Log.w("MultiDex", "Failed to reload existing extracted secondary dex files, falling back to fresh extraction", var6);
                    files = this.performExtractions();
                    putStoredApkInfo(context, prefsKeyPrefix, getTimeStamp(this.sourceApk), this.sourceCrc, files);
                }
            } else {


                if (forceReload) {


                    Log.i("MultiDex", "Forced extraction must be performed.");
                } else {


                    Log.i("MultiDex", "Detected that extraction must be performed.");
                }

                files = this.performExtractions();
                putStoredApkInfo(context, prefsKeyPrefix, getTimeStamp(this.sourceApk), this.sourceCrc, files);
            }

            Log.i("MultiDex", "load found " + files.size() + " secondary dex files");
            return files;
        }
    }
这个方法的作用就是把apk中的dex文件打包压缩成zip的文件然后返回
下面来看下如果重新解压要走的方法
performExtractions()
private List<MultiDexExtractor.ExtractedDex> performExtractions() throws IOException {


        String extractedFilePrefix = this.sourceApk.getName() + ".classes";
        this.clearDexDir();
        //返回结果集合 实质是file文件集合
        List<MultiDexExtractor.ExtractedDex> files = new ArrayList();、
        //要抽取的apk文件
        ZipFile apk = new ZipFile(this.sourceApk);

        try {


            //dex的序号名字一般都是classes2.dex  classes3.dex
            //第一个dex已经被系统加载了,所以是从第二个dex开始,

            int secondaryNumber = 2;

            for(ZipEntry dexFile = apk.getEntry("classes" + secondaryNumber + ".dex"); dexFile != null; dexFile = apk.getEntry("classes" + secondaryNumber + ".dex")) {


                String fileName = extractedFilePrefix + secondaryNumber + ".zip";
                //这个就是要添加进去的zip文件 这个zip里面后面会从apk里面提取对应的dex放进去
                MultiDexExtractor.ExtractedDex extractedFile = new MultiDexExtractor.ExtractedDex(this.dexDir, fileName);
               //添加入集合
                files.add(extractedFile);
                Log.i("MultiDex", "Extraction is needed for file " + extractedFile);
                int numAttempts = 0;
                boolean isExtractionSuccessful = false;
				//numAttempts :这个是重复次数,因为提取apk 有可能不成功,
                //isExtractionSuccessful 通过这个标志来判断是否提取成功
                while(numAttempts < 3 && !isExtractionSuccessful) {


                    ++numAttempts;
                    //这个方法的核心,从apk里面提取出dex文件 然后放进去extractedFile的zip文件中
                    //这个其实是一些io操作
                    extract(apk, dexFile, extractedFile, extractedFilePrefix);

                    try {


                        extractedFile.crc = getZipCrc(extractedFile);
                        isExtractionSuccessful = true;
                    } catch (IOException var18) {


                        isExtractionSuccessful = false;
                        Log.w("MultiDex", "Failed to read crc from " + extractedFile.getAbsolutePath(), var18);
                    }

                    Log.i("MultiDex", "Extraction " + (isExtractionSuccessful ? "succeeded" : "failed") + " '" + extractedFile.getAbsolutePath() + "': length " + extractedFile.length() + " - crc: " + extractedFile.crc);
                    if (!isExtractionSuccessful) {


                        extractedFile.delete();
                        if (extractedFile.exists()) {


                            Log.w("MultiDex", "Failed to delete corrupted secondary dex '" + extractedFile.getPath() + "'");
                        }
                    }
                }
				//最后如果提取不成功的话 就抛出异常
                if (!isExtractionSuccessful) {


                    throw new IOException("Could not create zip file " + extractedFile.getAbsolutePath() + " for secondary dex (" + secondaryNumber + ")");
                }

                ++secondaryNumber;
            }
        } finally {


            try {


                apk.close();
            } catch (IOException var17) {


                Log.w("MultiDex", "Failed to close resource", var17);
            }

        }

        return files;
    }
4、installSecondaryDexes
这个方法里面就是这个框架的核心了,顾名思义加载dex
这个方法里面会根据sdk的版本 使用不同的加载方案 以此来达到兼容的目的
rivate static void installSecondaryDexes(ClassLoader loader, File dexDir, List<? extends File> files) throws IllegalArgumentException, IllegalAccessException, NoSuchFieldException, InvocationTargetException, NoSuchMethodException, IOException, SecurityException, ClassNotFoundException, InstantiationException {


        if (!files.isEmpty()) {


            if (VERSION.SDK_INT >= 19) {


                MultiDex.V19.install(loader, files, dexDir);
            } else if (VERSION.SDK_INT >= 14) {


                MultiDex.V14.install(loader, files);
            } else {


                MultiDex.V4.install(loader, files);
            }
        }

    }

不同版本的sdk使用不同的加载方案
我们用V19的方案解读,其他版本都类似
private static final class V19 {


        private V19() {


        }

        static void install(ClassLoader loader, List<? extends File> additionalClassPathEntries, File optimizedDirectory) throws IllegalArgumentException, IllegalAccessException, NoSuchFieldException, InvocationTargetException, NoSuchMethodException, IOException {


            /*
            *MultiDex.findField(loader, "pathList");
            *loader:这个就是之前的Context.getClassLoader获取的PathClassLoader
            *pathList 这个是PathClassLoader的父类BaseDexClassLoader的局部属性,一个存储了dex的集			 *合类DexPathList


            */

            Field pathListField = MultiDex.findField(loader, "pathList");
            Object dexPathList = pathListField.get(loader);
            ArrayList<IOException> suppressedExceptions = new ArrayList();
            //expandFieldArray 这个是把两个数组合并到一起
            //把dexPathList(DexPathList)的dexElements的集合和classes2.dex 等的合并
            //classes2.dex 会把这个追加到系统的classloader的dexlist的后面
            //然后把最后的结果设置到DexPathList中
            //下面会说下makeDexElements
            //

            MultiDex.expandFieldArray(dexPathList, "dexElements", makeDexElements(dexPathList, new ArrayList(additionalClassPathEntries), optimizedDirectory, suppressedExceptions));
            if (suppressedExceptions.size() > 0) {


                Iterator var6 = suppressedExceptions.iterator();

                while(var6.hasNext()) {


                    IOException e = (IOException)var6.next();
                    Log.w("MultiDex", "Exception in makeDexElement", e);
                }

                Field suppressedExceptionsField = MultiDex.findField(dexPathList, "dexElementsSuppressedExceptions");
                IOException[] dexElementsSuppressedExceptions = (IOException[])((IOException[])suppressedExceptionsField.get(dexPathList));
                if (dexElementsSuppressedExceptions == null) {


                    dexElementsSuppressedExceptions = (IOException[])suppressedExceptions.toArray(new IOException[suppressedExceptions.size()]);
                } else {


                    IOException[] combined = new IOException[suppressedExceptions.size() + dexElementsSuppressedExceptions.length];
                    suppressedExceptions.toArray(combined);
                    System.arraycopy(dexElementsSuppressedExceptions, 0, combined, suppressedExceptions.size(), dexElementsSuppressedExceptions.length);
                    dexElementsSuppressedExceptions = combined;
                }

                suppressedExceptionsField.set(dexPathList, dexElementsSuppressedExceptions);
                IOException exception = new IOException("I/O exception during makeDexElement");
                exception.initCause((Throwable)suppressedExceptions.get(0));
                throw exception;
            }
        }

        private static Object[] makeDexElements(Object dexPathList, ArrayList<File> files, File optimizedDirectory, ArrayList<IOException> suppressedExceptions) throws IllegalAccessException, InvocationTargetException, NoSuchMethodException {


            Method makeDexElements = MultiDex.findMethod(dexPathList, "makeDexElements", ArrayList.class, File.class, ArrayList.class);
            return (Object[])((Object[])makeDexElements.invoke(dexPathList, files, optimizedDirectory, suppressedExceptions));
        }
    }
1、BaseDexClassLoader
public class BaseDexClassLoader extends ClassLoader {


30      private final DexPathList pathList;
31
32      /**
33       * Constructs an instance.
34       *
35       * @param dexPath the list of jar/apk files containing classes and
36       * resources, delimited by {@code File.pathSeparator}, which
37       * defaults to {@code ":"} on Android
38       * @param optimizedDirectory directory where optimized dex files
39       * should be written; may be {@code null}
40       * @param librarySearchPath the list of directories containing native
41       * libraries, delimited by {@code File.pathSeparator}; may be
42       * {@code null}
43       * @param parent the parent class loader
44       */
45      public BaseDexClassLoader(String dexPath, File optimizedDirectory,
46              String librarySearchPath, ClassLoader parent) {


47          super(parent);
48          this.pathList = new DexPathList(this, dexPath, librarySearchPath, optimizedDirectory);
49      }
BaseDexClassLoader 里面有个pathList属性类,里面存储了已经加载了的dex列表
2、makeDexElements
private static Object[] makeDexElements(Object dexPathList, ArrayList<File> files, File optimizedDirectory, ArrayList<IOException> suppressedExceptions) throws IllegalAccessException, InvocationTargetException, NoSuchMethodException {
    Method makeDexElements = MultiDex.findMethod(dexPathList, "makeDexElements", ArrayList.class, File.class, ArrayList.class);
    return (Object[])((Object[])makeDexElements.invoke(dexPathList, files, optimizedDirectory, suppressedExceptions));
}
这个方法其实就是反射调用DexPathList的makeDexElements 生成Element[] 数组集合,
那我们看下Element
static class Element {


			//这个element对应的file
494          private final File dir;
			//这个file是否是目录
495          private final boolean isDirectory;
			//如果这个file是以zip结尾,那么这个文件会被初始化为DexFile文件,zip会被初始化
496          private final File zip;
			//如果这个文件是以dex结尾 那么这个文件会被初始化为DexFile文件,zip=null
497          private final DexFile dexFile;
498
499          private ClassPathURLStreamHandler urlHandler;
500          private boolean initialized;
501
502          public Element(File dir, boolean isDirectory, File zip, DexFile dexFile) {


503              this.dir = dir;
504              this.isDirectory = isDirectory;
505              this.zip = zip;
506              this.dexFile = dexFile;
507          }
508
private DexFile(String sourceName, String outputName, int flags, ClassLoader loader,
134              DexPathList.Element[] elements) throws IOException {


135          if (outputName != null) {


136              try {


137                  String parent = new File(outputName).getParent();
138                  if (Libcore.os.getuid() != Libcore.os.stat(parent).st_uid) {


139                      throw new IllegalArgumentException("Optimized data directory " + parent
140                              + " is not owned by the current user. Shared storage cannot protect"
141                              + " your application from code injection attacks.");
142                  }
143              } catch (ErrnoException ignored) {


144                  // assume we'll fail with a more contextual error later
145              }
146          }
147  		//这个方法最终会调用到native的方法 并返回dex的native索引,
    		//native中其实这个主要是验证dex的结构合理行,初始化是否正确
148          mCookie = openDexFile(sourceName, outputName, flags, loader, elements);
149          mFileName = sourceName;
150          //System.out.println("DEX FILE cookie is " + mCookie + " sourceName=" + sourceName + " outputName=" + outputName);
151      }
 private static native Object openDexFileNative(String sourceName, String outputName, int flags,
397              ClassLoader loader, DexPathList.Element[] elements);
三、总结
MutliDex框架的核心思想是把其他的dex文件添加进了app的Classloader(PathCloassLoader)中的pathlist(可以理解为dex列表中,其实是DexFile的数组)其实是一种提前往系统注入dex的方法策略 来实分多次加载dex文件的目的
市面上很多的热修复框架都是基于这个思想来做的