https://blog.csdn.net/junehappylove/article/details/75570572
前言:在这里我将用java来简单的实现rabbitMQ。下面我们带着下面问题来一步步的了解和学习rabbitMQ。
1:如果消费者连接中断,这期间我们应该怎么办
2:如何做到负载均衡
3:如何有效的将数据发送到相关的接收者?就是怎么样过滤
4:如何保证消费者收到完整正确的数据
5:如何让优先级高的接收者先收到数据
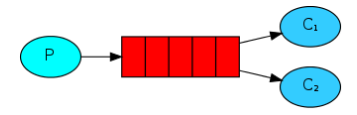
一:”Hello RabbitMQ”
下面有一幅图,其中P表示生产者,C表示消费者,红色部分为消息队列

二:项目开始
2.1:首先引入rabbitMQ jar包
<dependency>
    <groupId>com.rabbitmq</groupId>
    <artifactId>amqp-client</artifactId>
    <version>4.1.1</version>
</dependency>
- 1
- 2
- 3
- 4
- 5
- 6
2.2:创建消费者Producer
/**
 * june.mq:com.june.mq.rabbit.Producer.java
 * 日期:2017年7月11日
 */
package com.june.mq.rabbit;

import static com.june.mq.rabbit.Consts.*;

import java.io.IOException;
import java.util.concurrent.TimeoutException;

import com.rabbitmq.client.Channel;
import com.rabbitmq.client.Connection;
import com.rabbitmq.client.ConnectionFactory;

/**
 * Producer <br>
 * 消息生成者
 *
 * @author 王俊伟 [email protected]
 * @blog https://www.github.com/junehappylove
 * @date 2017年7月11日 下午5:21:46
 * @version 1.0.0
 */
public class Producer {

    /**
     * @param args
     * @throws TimeoutException
     * @throws IOException
     * @date 2017年7月11日 下午5:21:46
     * @writer junehappylove
     */
    public static void main(String[] args) throws IOException, TimeoutException {
        ConnectionFactory factory = new ConnectionFactory();
        factory.setHost(host);
        factory.setUsername(username);
        factory.setPassword(password);
        factory.setPort(port);
        factory.setVirtualHost(virtualHost);
        Connection connection = null;
        Channel channel = null;
        try {
            // 创建一个新的连接
            connection = factory.newConnection();
            // 创建一个通道
            channel = connection.createChannel();
            // 声明一个队列
            channel.queueDeclare(QUEUE_NAME, false, false, false, null);
            String message = "{\"temperature\":100}";
            // 发送消息到队列中
            channel.basicPublish("", QUEUE_NAME, null, message.getBytes("UTF-8"));
            System.out.println("Producer Send +'" + message + "'");

        } catch (Exception e) {
            e.printStackTrace();
        } finally {
            // 关闭通道和连接
            channel.close();
            connection.close();
        }
    }

}
- 1
- 2
- 3
- 4
- 5
- 6
- 7
- 8
- 9
- 10
- 11
- 12
- 13
- 14
- 15
- 16
- 17
- 18
- 19
- 20
- 21
- 22
- 23
- 24
- 25
- 26
- 27
- 28
- 29
- 30
- 31
- 32
- 33
- 34
- 35
- 36
- 37
- 38
- 39
- 40
- 41
- 42
- 43
- 44
- 45
- 46
- 47
- 48
- 49
- 50
- 51
- 52
- 53
- 54
- 55
- 56
- 57
- 58
- 59
- 60
- 61
- 62
- 63
- 64
- 65
注1:queueDeclare
- 第一个参数表示队列名称、
- 第二个参数为是否持久化(true表示是,队列将在服务器重启时生存)、
- 第三个参数为是否是独占队列(创建者可以使用的私有队列,断开后自动删除)、
- 第四个参数为当所有消费者客户端连接断开时是否自动删除队列、
- 第五个参数为队列的其他参数
注2:basicPublish
- 第一个参数为交换机名称、
- 第二个参数为队列映射的路由key、
- 第三个参数为消息的其他属性、
- 第四个参数为发送信息的主体
2.3:创建消费者
/**
 * june.mq:com.june.mq.rabbit.Customer.java
 * 日期:2017年7月11日
 */
package com.june.mq.rabbit;

import static com.june.mq.rabbit.Consts.*;

import java.io.IOException;
import java.util.concurrent.TimeoutException;

import com.rabbitmq.client.AMQP;
import com.rabbitmq.client.Channel;
import com.rabbitmq.client.Connection;
import com.rabbitmq.client.ConnectionFactory;
import com.rabbitmq.client.Consumer;
import com.rabbitmq.client.DefaultConsumer;
import com.rabbitmq.client.Envelope;

/**
 * Customer <br>
 * 消费者
 *
 * @author 王俊伟 [email protected]
 * @blog https://www.github.com/junehappylove
 * @date 2017年7月11日 下午5:32:44
 * @version 1.0.0
 */
public class Customer {

    /**
     * @param args
     * @throws TimeoutException
     * @throws IOException
     * @date 2017年7月11日 下午5:32:45
     * @writer junehappylove
     */
    public static void main(String[] args) throws IOException, TimeoutException {
        // 创建连接工厂
        ConnectionFactory factory = new ConnectionFactory();
        // 设置RabbitMQ地址
        factory.setHost(host);
        factory.setUsername(username);
        factory.setPassword(password);
        factory.setPort(port);
        factory.setVirtualHost(virtualHost);
        // 创建一个新的连接
        Connection connection = factory.newConnection();
        // 创建一个通道
        Channel channel = connection.createChannel();
        // 声明要关注的队列
        channel.queueDeclare(QUEUE_NAME, false, false, false, null);
        System.out.println("Customer Waiting Received messages");
        // DefaultConsumer类实现了Consumer接口,通过传入一个频道,
        // 告诉服务器我们需要那个频道的消息,如果频道中有消息,就会执行回调函数handleDelivery
        Consumer consumer = new DefaultConsumer(channel) {

            @Override
            public void handleDelivery(String consumerTag, Envelope envelope, AMQP.BasicProperties properties,
                    byte[] body) throws IOException {
                String message = new String(body, "UTF-8");
                System.out.println("Customer Received '" + message + "'");
            }
        };
        // 自动回复队列应答 -- RabbitMQ中的消息确认机制
        channel.basicConsume(QUEUE_NAME, true, consumer);
    }

}
- 1
- 2
- 3
- 4
- 5
- 6
- 7
- 8
- 9
- 10
- 11
- 12
- 13
- 14
- 15
- 16
- 17
- 18
- 19
- 20
- 21
- 22
- 23
- 24
- 25
- 26
- 27
- 28
- 29
- 30
- 31
- 32
- 33
- 34
- 35
- 36
- 37
- 38
- 39
- 40
- 41
- 42
- 43
- 44
- 45
- 46
- 47
- 48
- 49
- 50
- 51
- 52
- 53
- 54
- 55
- 56
- 57
- 58
- 59
- 60
- 61
- 62
- 63
- 64
- 65
- 66
- 67
- 68
- 69
- 70
前面代码我们可以看出和生成者一样的,后面的是获取生产者发送的信息,其中envelope主要存放生产者相关信息(比如交换机、路由key等)body是消息实体。
2.4:运行结果
生产者:
Producer Send +'{"temperature":100}'
- 1
- 2
消费者:
Customer Waiting Received messages
Customer Received '{"temperature":100}'
- 1
- 2
- 3
三:实现任务分发
工作队列
一个队列的优点就是很容易处理并行化的工作能力,但是如果我们积累了大量的工作,我们就需要更多的工作者(worker)来处理,这里就要采用分布机制了。
我们新创建一个生产者NewTask
/**
 * june.mq:com.june.mq.rabbit.NewTask.java
 * 日期:2017年7月11日
 */
package com.june.mq.rabbit;

import static com.june.mq.rabbit.Consts.*;

import java.io.IOException;
import java.util.concurrent.TimeoutException;

import com.rabbitmq.client.Channel;
import com.rabbitmq.client.Connection;
import com.rabbitmq.client.ConnectionFactory;
import com.rabbitmq.client.MessageProperties;

/**
 * NewTask <br>
 * 生产者
 *
 * @author 王俊伟 [email protected]
 * @blog https://www.github.com/junehappylove
 * @date 2017年7月11日 下午5:53:02
 * @version 1.0.0
 */
public class NewTask {

    /**
     * @param args
     * @throws IOException
     * @throws TimeoutException
     * @date 2017年7月11日 下午5:53:02
     * @writer junehappylove
     */
    public static void main(String[] args) throws IOException, TimeoutException {
        ConnectionFactory factory = new ConnectionFactory();
        factory.setHost(host);
        factory.setUsername(username);
        factory.setPassword(password);
        factory.setPort(port);
        factory.setVirtualHost(virtualHost);

        Connection connection = factory.newConnection();
        Channel channel = connection.createChannel();
        channel.queueDeclare(TASK_QUEUE_NAME, true, false, false, null);
        // 分发信息
        for (int i = 0; i < 20; i++) {
            String message = "Hello RabbitMQ" + i;
            channel.basicPublish("", TASK_QUEUE_NAME, MessageProperties.PERSISTENT_TEXT_PLAIN, message.getBytes());
            System.out.println("NewTask send '" + message + "'");
        }
        channel.close();
        connection.close();
    }

}
- 1
- 2
- 3
- 4
- 5
- 6
- 7
- 8
- 9
- 10
- 11
- 12
- 13
- 14
- 15
- 16
- 17
- 18
- 19
- 20
- 21
- 22
- 23
- 24
- 25
- 26
- 27
- 28
- 29
- 30
- 31
- 32
- 33
- 34
- 35
- 36
- 37
- 38
- 39
- 40
- 41
- 42
- 43
- 44
- 45
- 46
- 47
- 48
- 49
- 50
- 51
- 52
- 53
- 54
- 55
- 56
- 57
然后创建2个工作者Work1和Work2代码一样
/**
 * june.mq:com.june.mq.rabbit.Work1.java
 * 日期:2017年7月11日
 */
package com.june.mq.rabbit;

import static com.june.mq.rabbit.Consts.*;

import java.io.IOException;
import java.util.concurrent.TimeoutException;

import com.rabbitmq.client.AMQP;
import com.rabbitmq.client.Channel;
import com.rabbitmq.client.Connection;
import com.rabbitmq.client.ConnectionFactory;
import com.rabbitmq.client.Consumer;
import com.rabbitmq.client.DefaultConsumer;
import com.rabbitmq.client.Envelope;

/**
 * Work1 <br>
 * 工作者1
 *
 * @author 王俊伟 [email protected]
 * @blog https://www.github.com/junehappylove
 * @date 2017年7月11日 下午5:55:38
 * @version 1.0.0
 */
public class Work1 {

    /**
     * @param args
     * @throws IOException
     * @throws TimeoutException
     * @date 2017年7月11日 下午5:55:38
     * @writer junehappylove
     */
    public static void main(String[] args) throws IOException, TimeoutException {
        final ConnectionFactory factory = new ConnectionFactory();
        factory.setHost(host);
        factory.setUsername(username);
        factory.setPassword(password);
        factory.setPort(port);
        factory.setVirtualHost(virtualHost);
        Connection connection = factory.newConnection();
        final Channel channel = connection.createChannel();

        channel.queueDeclare(TASK_QUEUE_NAME, true, false, false, null);
        System.out.println("Worker1  Waiting for messages");

        // 每次从队列获取的数量
        //channel.basicQos(1);保证一次只分发一个
        channel.basicQos(1);

        final Consumer consumer = new DefaultConsumer(channel) {
            @Override
            public void handleDelivery(String consumerTag, Envelope envelope, AMQP.BasicProperties properties,
                    byte[] body) throws IOException {
                String message = new String(body, "UTF-8");
                System.out.println("Worker1  Received '" + message + "'");
                try {
                    //throw new Exception();
                    doWork(message);
                } catch (Exception e) {
                    channel.abort();
                } finally {
                    System.out.println("Worker1 Done");
                    channel.basicAck(envelope.getDeliveryTag(), false);
                }
            }
        };
        boolean autoAck = false;
        // 消息消费完成确认
        channel.basicConsume(TASK_QUEUE_NAME, autoAck, consumer);

    }

    private static void doWork(String task) {
        try {
            Thread.sleep(1000); // 暂停1秒钟
        } catch (InterruptedException _ignored) {
            Thread.currentThread().interrupt();
        }
    }
}
- 1
- 2
- 3
- 4
- 5
- 6
- 7
- 8
- 9
- 10
- 11
- 12
- 13
- 14
- 15
- 16
- 17
- 18
- 19
- 20
- 21
- 22
- 23
- 24
- 25
- 26
- 27
- 28
- 29
- 30
- 31
- 32
- 33
- 34
- 35
- 36
- 37
- 38
- 39
- 40
- 41
- 42
- 43
- 44
- 45
- 46
- 47
- 48
- 49
- 50
- 51
- 52
- 53
- 54
- 55
- 56
- 57
- 58
- 59
- 60
- 61
- 62
- 63
- 64
- 65
- 66
- 67
- 68
- 69
- 70
- 71
- 72
- 73
- 74
- 75
- 76
- 77
- 78
- 79
- 80
- 81
- 82
- 83
- 84
- 85
- 86
注:
- channel.basicQos(1);保证一次只分发一个。
- autoAck是否自动回复,如果为true的话,每次生产者只要发送信息就会从内存中删除,那么如果消费者程序异常退出,那么就无法获取数据,我们当然是不希望出现这样的情况,所以才去手动回复,每当消费者收到并处理信息然后在通知生成者。最后从队列中删除这条信息。如果消费者异常退出,如果还有其他消费者,那么就会把队列中的消息发送给其他消费者,如果没有,等消费者启动时候再次发送。
NewTask:
NewTask send 'Hello RabbitMQ0'
NewTask send 'Hello RabbitMQ1'
NewTask send 'Hello RabbitMQ2'
NewTask send 'Hello RabbitMQ3'
NewTask send 'Hello RabbitMQ4'
NewTask send 'Hello RabbitMQ5'
NewTask send 'Hello RabbitMQ6'
NewTask send 'Hello RabbitMQ7'
NewTask send 'Hello RabbitMQ8'
NewTask send 'Hello RabbitMQ9'
NewTask send 'Hello RabbitMQ10'
NewTask send 'Hello RabbitMQ11'
NewTask send 'Hello RabbitMQ12'
NewTask send 'Hello RabbitMQ13'
NewTask send 'Hello RabbitMQ14'
NewTask send 'Hello RabbitMQ15'
NewTask send 'Hello RabbitMQ16'
NewTask send 'Hello RabbitMQ17'
NewTask send 'Hello RabbitMQ18'
NewTask send 'Hello RabbitMQ19'
- 1
- 2
- 3
- 4
- 5
- 6
- 7
- 8
- 9
- 10
- 11
- 12
- 13
- 14
- 15
- 16
- 17
- 18
- 19
- 20
- 21
Work1:
Worker1  Waiting for messages
Worker1  Received 'Hello RabbitMQ0'
Worker1 Done
Worker1  Received 'Hello RabbitMQ1'
Worker1 Done
Worker1  Received 'Hello RabbitMQ2'
Worker1 Done
Worker1  Received 'Hello RabbitMQ3'
Worker1 Done
Worker1  Received 'Hello RabbitMQ4'
Worker1 Done
Worker1  Received 'Hello RabbitMQ5'
Worker1 Done
Worker1  Received 'Hello RabbitMQ7'
Worker1 Done
Worker1  Received 'Hello RabbitMQ9'
Worker1 Done
Worker1  Received 'Hello RabbitMQ11'
Worker1 Done
Worker1  Received 'Hello RabbitMQ13'
Worker1 Done
Worker1  Received 'Hello RabbitMQ15'
Worker1 Done
Worker1  Received 'Hello RabbitMQ17'
Worker1 Done
Worker1  Received 'Hello RabbitMQ19'
Worker1 Done
- 1
- 2
- 3
- 4
- 5
- 6
- 7
- 8
- 9
- 10
- 11
- 12
- 13
- 14
- 15
- 16
- 17
- 18
- 19
- 20
- 21
- 22
- 23
- 24
- 25
- 26
- 27
- 28
Work2:
Worker2 Waiting for messages
Worker2 Received 'Hello RabbitMQ6'
Worker2 Done
Worker2 Received 'Hello RabbitMQ8'
Worker2 Done
Worker2 Received 'Hello RabbitMQ10'
Worker2 Done
Worker2 Received 'Hello RabbitMQ12'
Worker2 Done
Worker2 Received 'Hello RabbitMQ14'
Worker2 Done
Worker2 Received 'Hello RabbitMQ16'
Worker2 Done
Worker2 Received 'Hello RabbitMQ18'
Worker2 Done
- 1
- 2
- 3
- 4
- 5
- 6
- 7
- 8
- 9
- 10
- 11
- 12
- 13
- 14
- 15
- 16
注:
- 上面是先启动的NewTask,然后再分别启动Work1和Work2;
- 启动顺序不一样Work1和Work2得到的结果是不一样的;
- 中途如果某个Work宕掉,输出会转向另一个Work;
- 如果两个都宕掉,那么会等待直到有Work后在输出。