1.监控端口数据案例
1)案例需求
首先启动Flume任务,监控本机44444端口 [服务端];
然后通过netcat工具向本机44444端口发送消息 [客户端];
最后Flume将监听的数据实时显示在控制台。
2)需求分析

3)实现步骤
- 1
[root@flume0 apache-flume-1.9.0-bin]# yum install -y nc
- 2.创建Flume Agent配置文件demo1-netcat-memory-logger.conf
//job目录为flume安装目录下
[root@flume0 job]# touch demo1-netcat-memory-logger.conf

在flume-netcat-logger.conf文件中添加如下内容
[root@flume0 job]# vim demo1-netcat-memory-logger.conf

# 添加内容如下
# Name the components on this agent
a1.sources = r1
a1.sinks = k1
a1.channels = c1

# Describe/configure the source
a1.sources.r1.type = netcat
a1.sources.r1.bind = 0.0.0.0
a1.sources.r1.port = 44444

# Describe the sink
a1.sinks.k1.type = logger

# Use a channel which buffers events in memory
a1.channels.c1.type = memory

# Bind the source and sink to the channel
a1.sources.r1.channels = c1
a1.sinks.k1.channel = c1
注:配置文件来源于官方手册http://flume.apache.org/FlumeUserGuide.html
- 4.先开启flume监听端口
[root@flume0 apache-flume-1.9.0-bin]# bin/flume-ng agent --conf conf --name a1 --conf-file job/demo1-netcat-memory-logger.conf -Dflume.root.logger=INFO,console
参数说明:
–conf conf/ :表示配置文件存储在conf/目录
–name a1 :表示给agent起名为a1
–conf-file job/xxxx.conf :flume本次启动读取的配置文件是在job文件夹下的xxxx.conf文件。
-Dflume.root.logger==INFO,console :-D表示flume运行时动态修改flume.root.logger参数属性值,并将控制台日志打印级别设置为INFO级别。日志级别包括:log、info、warn、error。
- 5.使用netcat工具向本机的44444端口发送内容
[root@flume0 ~]# nc localhost 44444
hello
OK
hello
OK
- 6.在Flume监听页面观察接收数据情况
2020-04-10 13:53:16,000 (SinkRunner-PollingRunner-DefaultSinkProcessor) [INFO - org.apache.flume.sink.LoggerSink.process(LoggerSink.java:95)] Event: {

     headers:{

    } body: 68 65 6C 6C 6F                                  hello }
2020-04-10 13:53:38,108 (SinkRunner-PollingRunner-DefaultSinkProcessor) [INFO - org.apache.flume.sink.LoggerSink.process(LoggerSink.java:95)] Event: {

     headers:{

    } body: 77 6F 72 6C 64                                  world }
2.实时读取本地文件到HDFS案例
准备工作:启动hdfs
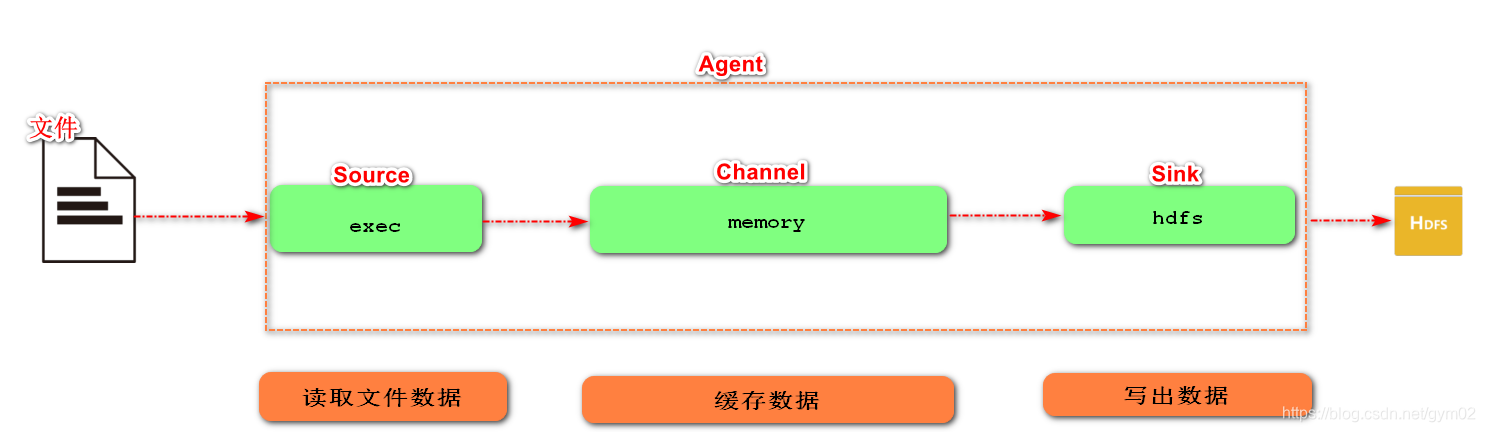
1)案例需求:实时监控日志文件内容,并上传到HDFS中
2)需求分析
3)实现步骤
- 1.Flume要想将数据输出到HDFS,必须持有Hadoop相关jar包
将如下jar包,拷贝到flume/lib文件夹下。

- 2.在job目录下,创建demo2-exec-memory-hdfs.conf文件
[root@flume0 job]# touch demo2-exec-memory-hdfs.conf

# 内容如下
# Name the components on this agent
a2.sources = r2
a2.sinks = k2
a2.channels = c2

# Describe/configure the source
a2.sources.r2.type = exec
a2.sources.r2.command = tail -F /opt/a.log

# Describe the sink
a2.sinks.k2.type = hdfs
a2.sinks.k2.hdfs.path = hdfs://flume0:9000/flume/%Y%m%d/%H
a2.sinks.k2.hdfs.useLocalTimeStamp = true
#设置文件类型
a2.sinks.k2.hdfs.fileType = DataStream
#是否按照时间滚动文件夹
a2.sinks.k2.hdfs.round = true
#多少时间单位创建一个新的文件夹
a2.sinks.k2.hdfs.roundValue = 10
#重新定义时间单位
a2.sinks.k2.hdfs.roundUnit = minute
#多久生成一个新的文件  0代表禁用
a2.sinks.k2.hdfs.rollInterval = 0
#设置每个文件的滚动大小  1048576 = 1M
a2.sinks.k2.hdfs.rollSize = 1048576
#文件的滚动与 Event 数量无关
a2.sinks.k2.hdfs.rollCount = 0

# Use a channel which buffers events in memory
a2.channels.c2.type = memory

# Bind the source and sink to the channel
a2.sources.r2.channels = c2
a2.sinks.k2.channel = c2
对于所有与时间相关的转义序列,Event Header中必须存在以 “timestamp”的key
(除非hdfs.useLocalTimeStamp设置为true,此方法会使用TimestampInterceptor自动添加timestamp)。
- 3.执行监控配置
[root@flume0 apache-flume-1.9.0-bin]# bin/flume-ng agent --conf conf --name a2 --conf-file job/demo2-exec-memory-hdfs.conf -Dflume.root.logger=INFO,console
- 4.使用echo命令,模拟日志生成(在上面的配置文件中配置路径对应的日志文件,增添数据,模拟日志生成)
[root@flume0 opt]# echo hello >> a.log
- 5.访问hdfs(在hdfs上查看产生的文件)
3.实时读取目录文件到HDFS案例
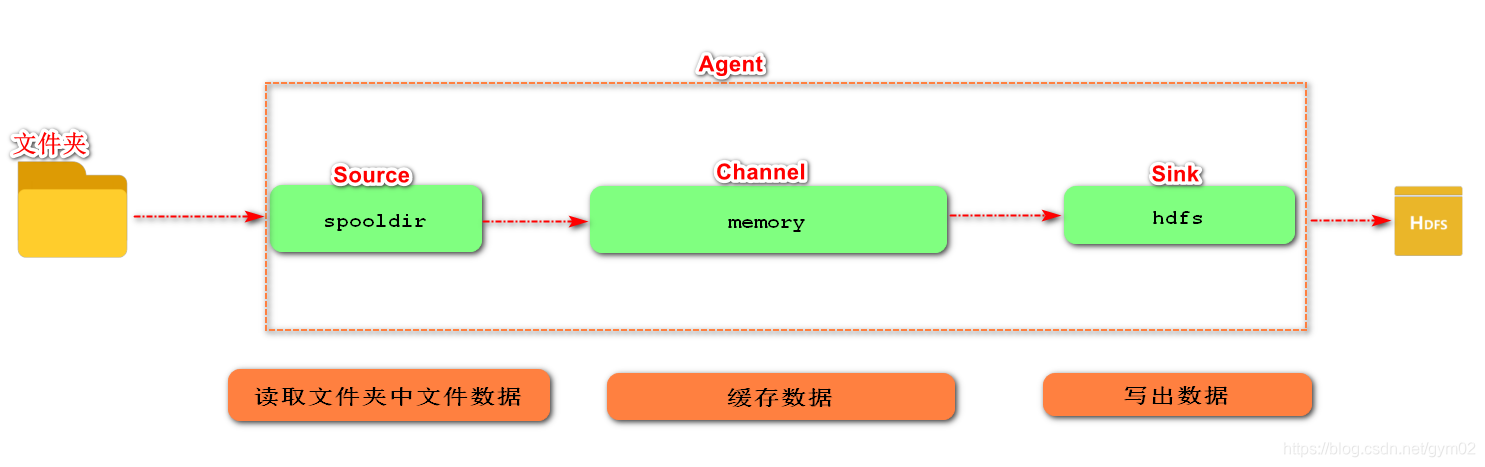
1)案例需求:使用Flume监听整个目录的文件
2)需求分析:
3)实现步骤:
- 1.创建demo3-SpoolingDir-mem-hdfs.conf
[root@flume0 job]# touch demo3-SpoolingDir-mem-hdfs.conf

# 内容如下
a3.sources = r3
a3.sinks = k3
a3.channels = c3

# Describe/configure the source
a3.sources.r3.type = spooldir
a3.sources.r3.spoolDir = /opt/upload
a3.sources.r3.fileSuffix = .done


# Describe the sink
a3.sinks.k3.type = hdfs
a3.sinks.k3.hdfs.path = hdfs://flume0:9000/flume/upload/%Y%m%d/%H
a3.sinks.k3.hdfs.useLocalTimeStamp = true
a3.sinks.k3.hdfs.fileType = DataStream
a3.sinks.k3.hdfs.round = true
a3.sinks.k3.hdfs.roundValue = 10
a3.sinks.k3.hdfs.roundUnit = minute
a3.sinks.k3.hdfs.rollInterval = 0
a3.sinks.k3.hdfs.rollSize = 1048576
a3.sinks.k3.hdfs.rollCount = 0

# Use a channel which buffers events in memory
a3.channels.c3.type = memory

# Bind the source and sink to the channel
a3.sources.r3.channels = c3
a3.sinks.k3.channel = c3
- 2.启动监控文件夹命令
[root@flume0 apache-flume-1.9.0-bin]# bin/flume-ng agent --conf conf --name a3 --conf-file job/demo3-SpoolingDir-mem-hdfs.conf -Dflume.root.logger=INFO,console
说明: 在使用Spooling Directory Source时
1) 不要在监控目录中创建并持续修改文件
2) 上传完成的文件会以.COMPLETED结尾
3) 被监控文件夹每500毫秒扫描一次文件变动

- 3.向upload文件夹中添加文件
[root@flume0 opt]# mkdir /opt/upload
[root@flume0 upload]# touch 1.txt
- 4.访问hdfs
4.单数据源多出口案例(选择器)
单Source多Channel、Sink 如图所示:
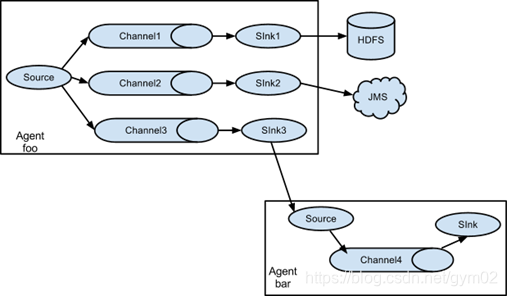
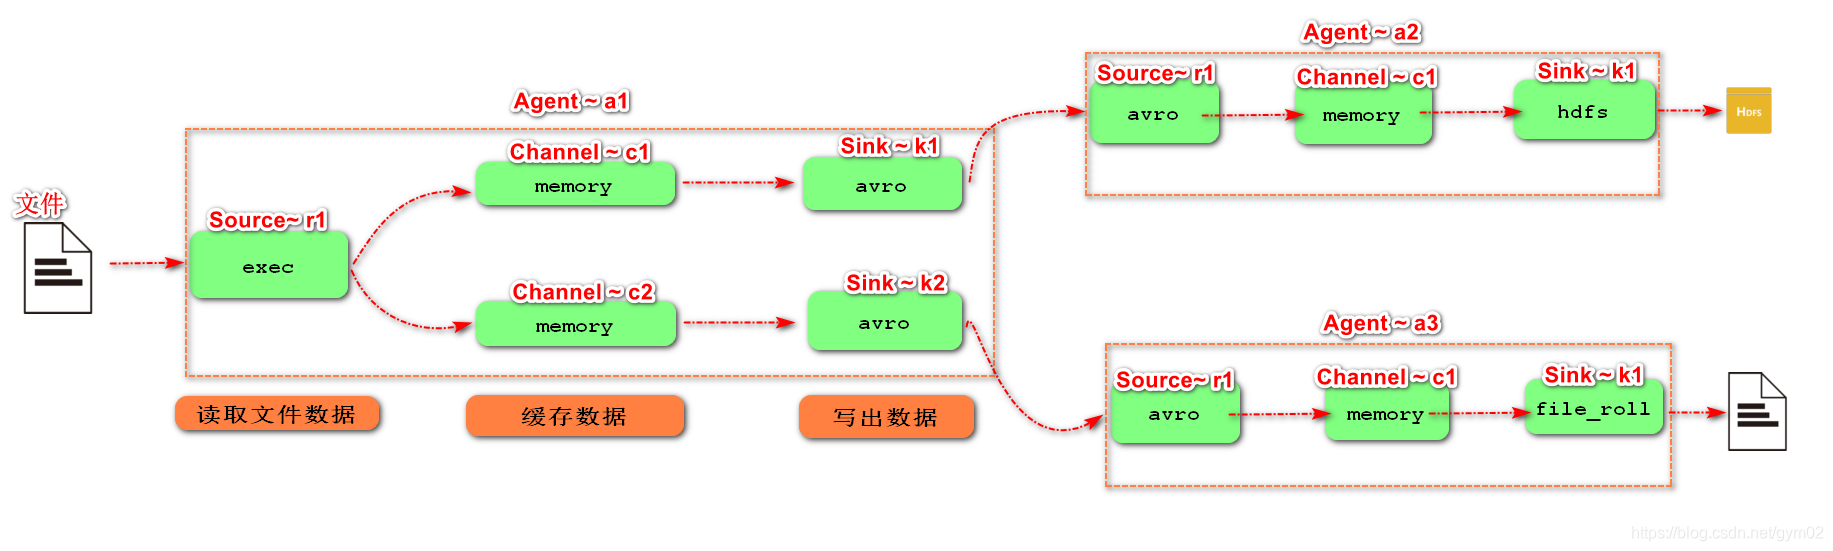
1)案例需求:使用Flume-1监控文件变动,Flume-1将变动内容传递给Flume-2,
    Flume-2负责存储到HDFS。同时Flume-1将变动内容传递给Flume-3,

    Flume-3负责输出到Local FileSystem。
2)需求分析:
3)实现步骤:
- 1.准备工作
在/opt/flume/job目录下创建group1文件夹
[root@flume0 job]# mkdir group1

在/opt目录下创建 datas/flume文件夹
[root@flume0 job]# mkdir -p /opt/datas/flume
- 2.在group1目录下,创建demo4-exec-memory-avro.conf
[root@flume0 job]# cd group1
[root@flume0 group1]# touch demo4-exec-memory-avro.conf

# 配置1个接收日志文件的source和两个channel、两个sink

# 添加内容如下
# Name the components on this agent
a1.sources = r1
a1.sinks = k1 k2
a1.channels = c1 c2
# 将数据流复制给所有channel
a1.sources.r1.selector.type = replicating

# Describe/configure the source
a1.sources.r1.type = exec
a1.sources.r1.command = tail -F /opt/a.log

# Describe the sink
# sink端的avro是一个数据发送者
a1.sinks.k1.type = avro
a1.sinks.k1.hostname = flume0
a1.sinks.k1.port = 4141

a1.sinks.k2.type = avro
a1.sinks.k2.hostname = flume0
a1.sinks.k2.port = 4142

# Describe the channel
a1.channels.c1.type = memory
a1.channels.c2.type = memory

# Bind the source and sink to the channel
a1.sources.r1.channels = c1 c2
a1.sinks.k1.channel = c1
a1.sinks.k2.channel = c2
注:Avro是由Hadoop创始人Doug Cutting创建的一种语言无关的数据序列化和RPC框架。
注:RPC(Remote Procedure Call)—远程过程调用,它是一种通过网络从远程计算机程序上请求服 务,而不需要了解底层网络技术的协议。
- 3.在group1目录下,创建demo4-avro-memory-hdfs.conf
[root@flume0 group1]# touch demo4-avro-memory-hdfs.conf

# 添加如下内容
# Name the components on this agent
a2.sources = r1
a2.sinks = k1
a2.channels = c1

# Describe/configure the source
# source端的avro是一个数据接收服务
a2.sources.r1.type = avro
a2.sources.r1.bind = flume0
a2.sources.r1.port = 4141

# Describe the sink
a2.sinks.k1.type = hdfs
a2.sinks.k1.hdfs.path = hdfs://flume0:9000/flume2/%Y%m%d/%H
#是否使用本地时间戳
a2.sinks.k1.hdfs.useLocalTimeStamp = true

# Describe the channel
a2.channels.c1.type = memory

# Bind the source and sink to the channel
a2.sources.r1.channels = c1
a2.sinks.k1.channel = c1
- 4.在group1目录下,创建demo4-avro-memory-file.conf
[root@flume0 group1]# touch demo4-avro-memory-file.conf

# 添加如下内容
# Name the components on this agent
a3.sources = r1
a3.sinks = k1
a3.channels = c2

# Describe/configure the source
a3.sources.r1.type = avro
a3.sources.r1.bind = flume0
a3.sources.r1.port = 4142

# Describe the sink
a3.sinks.k1.type = file_roll
a3.sinks.k1.sink.directory = /opt/datas/flume

# Describe the channel
a3.channels.c2.type = memory

# Bind the source and sink to the channel
a3.sources.r1.channels = c2
a3.sinks.k1.channel = c2
注意:输出的本地目录必须是已经存在的目录,如果该目录不存在,并不会创建新的目录。
- 5.执行配置文件
[root@flume0 apache-flume-1.9.0-bin]# bin/flume-ng agent --conf conf --name a3 --conf-file job/group1/demo4-avro-memory-file.conf

[root@flume0 apache-flume-1.9.0-bin]# bin/flume-ng agent --conf conf --name a2 --conf-file job/group1/demo4-avro-memory-hdfs.conf

[root@flume0 apache-flume-1.9.0-bin]# bin/flume-ng agent --conf conf --name a1 --conf-file job/group1/demo4-exec-memory-avro.conf
- 6.提交测试数据
[root@flume0 opt]# echo hahaha >> a.log
- 7.检查HDFS上数据

(觉得有用请点个赞哦)