陈拓 2021/12/04-2021/12/04
1. 简介
1.1 官方文档
https://docs.espressif.com/projects/esp-idf/en/latest/esp32/api-guides/build-system.html#component-cmakelists-files
https://docs.espressif.com/projects/esp-idf/zh_CN/latest/esp32/api-guides/build-system.html#id21
1.2 示例说明
此示例在《ESP32 smart_config和airkiss配网》
https://zhuanlan.zhihu.com/p/440454542
https://blog.csdn.net/chentuo2000/article/details/121687760
基础上,增加连接成功后点亮板载LED功能。
实现所需功能后将各功能代码分离,再将分离后的代码构造成组件,使得项目有清晰的结构,方便功能代码移植。
2. 开发环境
《Win10启用Linux子系统安装Ubuntu》
https://blog.csdn.net/chentuo2000/article/details/112131624
《用乐鑫国内Gitee镜像搭建ESP32开发环境》
https://blog.csdn.net/chentuo2000/article/details/113424934
3. 构建项目
- 将之前已经在《ESP32 smart_config和airkiss配网》中编译成功的官方例子项目复制到ESP-IDF开发工具之外,更名为smart_config_demo
cp -r ~/esp/esp-idf/examples/wifi/smart_config ~/esp/smart_config_demo
- 清空build目录
cd ~/esp/smart_config_demo
rm -r build/*
注意,每当添加了新组件就要删除build目录下的全部内容,或者执行下面这条命令:
idf.py fullclean
清除以前的构建。
- 添加组件led
idf.py -C components create-component led
该命令会创建一个新组件。 新组件将包含构建组件所需的一组空文件。我们的工作就是在这一组空文件中写上我们的代码。
- 添加组件smart_config
你可以使用 idf.py create-component命令创建新组件。如果熟悉了组件结构,也可以直接在项目中手工创建。
- 项目树
构建好的项目结构如下:
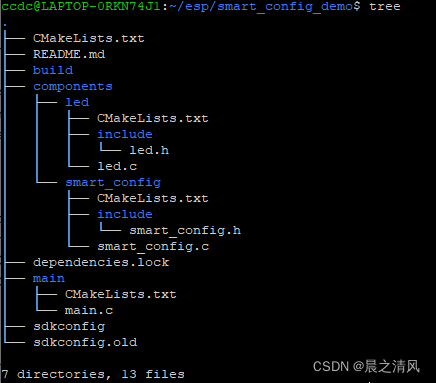
注意:组件目录components名字不能改,其下的组件名可以随意取。build目录是编译时生成的,编译的结果都放在其中。dependencies.lock是随原来的项目复制过来的不要改。sdkconfig文件可以用idf.py menuconfig命令修改。
代码和说明在后面给出。
4. 编译烧写
- 刷新esp-idf环境
get_idf
- 配置项目
idf.py menuconfig
保持默认值,保持,退出。
- 编译项目
idf.py build
- 烧写项目
连接设备时我PC将USB-SERIAL识别为COM3。
idf.py -p /dev/ttyS3 -b 115200 flash
5. 测试
见《ESP32 smart_config和airkiss配网》
https://zhuanlan.zhihu.com/p/440454542
https://blog.csdn.net/chentuo2000/article/details/121687760
6. 代码和说明
各文件的位置关系很重要,请对照前面的项目树看代码文件。
6.1 项目的根CMakeLists.txt文件
# The following lines of boilerplate have to be in your project's CMakeLists
# in this exact order for cmake to work correctly
cmake_minimum_required(VERSION 3.5)

include($ENV{IDF_PATH}/tools/cmake/project.cmake)
project(smart_config_demo)
只需要修改project中的项目名称。
6.2 main目录
- CMakeLists.txt
idf_component_register(SRCS "main.c"
INCLUDE_DIRS ".")- main.c
#include <string.h>
#include <stdlib.h>
#include "nvs_flash.h"
#include "smart_config.h"
#include "led.h"

void app_main(void)
{
    ESP_ERROR_CHECK( nvs_flash_init() ); // 初始化nvs flash,nvs flash用于保存WiFi连接信息,本项目并未使用。
    led_init(); // 初始化led
    led_off(); // 关闭led
    initialise_wifi(); // WiFi配网
}
头文件nvs_flash.h是对系统组件的引用,mart_config.h和led.h是对自定义组件的引用。
6.3 组件led
- CMakeLists.txt
idf_component_register(SRCS "led.c"
INCLUDE_DIRS "include")- led.c
#include <stdio.h>
#include "freertos/FreeRTOS.h"
#include "freertos/task.h"
#include "freertos/queue.h"
#include "driver/gpio.h"
#include "esp_system.h"

#define GPIO_OUTPUT_IO_LED 2 // 板载led在gpio引脚2

void led_init(void)
{
    //定义一个gpio_config类型的结构体,下面的都算对其进行的配置
    gpio_config_t io_conf;
    //禁用中断
    io_conf.intr_type = GPIO_PIN_INTR_DISABLE;
    //设置为输出模式
    io_conf.mode = GPIO_MODE_OUTPUT;
    //你想设置的引脚
    io_conf.pin_bit_mask = (1<<GPIO_OUTPUT_IO_LED);
    //关闭下拉模式
    io_conf.pull_down_en = 0;
    //禁用牵引模式
    io_conf.pull_up_en = 0;
    //配置GPIO与给定的设置。
    gpio_config(&io_conf);
}

void led_on(void) {
    gpio_set_level(GPIO_OUTPUT_IO_LED, 1);
}

void led_off(void) {
    gpio_set_level(GPIO_OUTPUT_IO_LED, 0);
}
参考文档:https://www.cnblogs.com/hongwans/p/9095317.html
- led.h
#ifndef _LED_H_
#define _LED_H_

void led_init(void);
void led_on(void);
void led_off(void);

#endif
6.4 组件smart_config
- CMakeLists.txt
idf_component_register(SRCS "smart_config.c"
                    INCLUDE_DIRS "include"
                    PRIV_REQUIRES led
                    REQUIRES nvs_flash wpa_supplicant)
说明:
1) PRIV_REQUIRES
该参数指定对其它自定义组件的依赖,即私有依赖项。
PRIV_REQUIRES led表示指出在smart_config组件中要用到自定义的led组件。组件名字可以加引号,也可以不加。多个组件用空格分开。
2) REQUIRES
该参数指定对系统组件的依赖,即公共依赖项。
REQUIRES nvs_flash wpa_supplicant表示在smart_config组件中要用到系统组件nvs_flash和wpa_supplicant。
3) 系统组件的确定
对于要依赖的系统组件不像私有依赖项那样一目了然,有时我们并不清楚所要的系统组件名称。比如我们不知道需要组件wpa_supplicant,这时我们可以先编译一次,看看错误信息:

在系统组件所在的目录~/esp/esp-idf/components查找esp_wpa2.h
![]()
这样我们就知道了所需要的系统组件是wpa_supplicant。
- smart_config.c
#include <string.h>
#include <stdlib.h>
#include "freertos/FreeRTOS.h"
#include "freertos/task.h"
#include "freertos/event_groups.h"
#include "esp_wifi.h"
#include "esp_wpa2.h"
#include "esp_event.h"
#include "esp_log.h"
#include "esp_system.h"
#include "nvs_flash.h"
#include "esp_netif.h"
#include "esp_smartconfig.h"
#include "led.h"

/* FreeRTOS event group to signal when we are connected & ready to make a request */
static EventGroupHandle_t s_wifi_event_group;

/* The event group allows multiple bits for each event,
   but we only care about one event - are we connected
   to the AP with an IP? */
static const int CONNECTED_BIT = BIT0;
static const int ESPTOUCH_DONE_BIT = BIT1;
static const char *TAG = "smartconfig_example";

static void smartconfig_example_task(void * parm);

static void event_handler(void* arg, esp_event_base_t event_base,
                                int32_t event_id, void* event_data)
{
    if (event_base == WIFI_EVENT && event_id == WIFI_EVENT_STA_START) {
        xTaskCreate(smartconfig_example_task, "smartconfig_example_task", 4096, NULL, 3, NULL);
    } else if (event_base == WIFI_EVENT && event_id == WIFI_EVENT_STA_DISCONNECTED) {
        esp_wifi_connect();
        xEventGroupClearBits(s_wifi_event_group, CONNECTED_BIT);
    } else if (event_base == IP_EVENT && event_id == IP_EVENT_STA_GOT_IP) {
        xEventGroupSetBits(s_wifi_event_group, CONNECTED_BIT);
    } else if (event_base == SC_EVENT && event_id == SC_EVENT_SCAN_DONE) {
        ESP_LOGI(TAG, "Scan done");
    } else if (event_base == SC_EVENT && event_id == SC_EVENT_FOUND_CHANNEL) {
        ESP_LOGI(TAG, "Found channel");
    } else if (event_base == SC_EVENT && event_id == SC_EVENT_GOT_SSID_PSWD) {
        ESP_LOGI(TAG, "Got SSID and password");

        smartconfig_event_got_ssid_pswd_t *evt = (smartconfig_event_got_ssid_pswd_t *)event_data;
        wifi_config_t wifi_config;
        uint8_t ssid[33] = { 0 };
        uint8_t password[65] = { 0 };
        uint8_t rvd_data[33] = { 0 };

        bzero(&wifi_config, sizeof(wifi_config_t));
        memcpy(wifi_config.sta.ssid, evt->ssid, sizeof(wifi_config.sta.ssid));
        memcpy(wifi_config.sta.password, evt->password, sizeof(wifi_config.sta.password));
        wifi_config.sta.bssid_set = evt->bssid_set;
        if (wifi_config.sta.bssid_set == true) {
            memcpy(wifi_config.sta.bssid, evt->bssid, sizeof(wifi_config.sta.bssid));
        }

        memcpy(ssid, evt->ssid, sizeof(evt->ssid));
        memcpy(password, evt->password, sizeof(evt->password));
        ESP_LOGI(TAG, "SSID:%s", ssid);
        ESP_LOGI(TAG, "PASSWORD:%s", password);
        if (evt->type == SC_TYPE_ESPTOUCH_V2) {
            ESP_ERROR_CHECK( esp_smartconfig_get_rvd_data(rvd_data, sizeof(rvd_data)) );
            ESP_LOGI(TAG, "RVD_DATA:");
            for (int i=0; i<33; i++) {
                printf("%02x ", rvd_data[i]);
            }
            printf("\n");
        }

        ESP_ERROR_CHECK( esp_wifi_disconnect() );
        ESP_ERROR_CHECK( esp_wifi_set_config(WIFI_IF_STA, &wifi_config) );
        esp_wifi_connect();

        led_on();  // 点亮led
    } else if (event_base == SC_EVENT && event_id == SC_EVENT_SEND_ACK_DONE) {
        xEventGroupSetBits(s_wifi_event_group, ESPTOUCH_DONE_BIT);
    }
}

void initialise_wifi(void)
{
    ESP_ERROR_CHECK(esp_netif_init());
    s_wifi_event_group = xEventGroupCreate();
    ESP_ERROR_CHECK(esp_event_loop_create_default());
    esp_netif_t *sta_netif = esp_netif_create_default_wifi_sta();
    assert(sta_netif);

    wifi_init_config_t cfg = WIFI_INIT_CONFIG_DEFAULT();
    ESP_ERROR_CHECK( esp_wifi_init(&cfg) );

    ESP_ERROR_CHECK( esp_event_handler_register(WIFI_EVENT, ESP_EVENT_ANY_ID, &event_handler, NULL) );
    ESP_ERROR_CHECK( esp_event_handler_register(IP_EVENT, IP_EVENT_STA_GOT_IP, &event_handler, NULL) );
    ESP_ERROR_CHECK( esp_event_handler_register(SC_EVENT, ESP_EVENT_ANY_ID, &event_handler, NULL) );

    ESP_ERROR_CHECK( esp_wifi_set_mode(WIFI_MODE_STA) );
    ESP_ERROR_CHECK( esp_wifi_start() );
}

static void smartconfig_example_task(void * parm)
{
    EventBits_t uxBits;
    //ESP_ERROR_CHECK( esp_smartconfig_set_type(SC_TYPE_ESPTOUCH) );
    ESP_ERROR_CHECK( esp_smartconfig_set_type(SC_TYPE_ESPTOUCH_AIRKISS) );
    smartconfig_start_config_t cfg = SMARTCONFIG_START_CONFIG_DEFAULT();
    ESP_ERROR_CHECK( esp_smartconfig_start(&cfg) );
    while (1) {
        uxBits = xEventGroupWaitBits(s_wifi_event_group, CONNECTED_BIT | ESPTOUCH_DONE_BIT, true, false, portMAX_DELAY);
        if(uxBits & CONNECTED_BIT) {
            ESP_LOGI(TAG, "WiFi Connected to ap");
        }
        if(uxBits & ESPTOUCH_DONE_BIT) {
            ESP_LOGI(TAG, "smartconfig over");
            esp_smartconfig_stop();
            vTaskDelete(NULL);
        }
    }
}
说明:
1) #include "led.h"是对自定义组件led的引用
2) static函数和普通函数
原来代码:
static void initialise_wifi(void)
中的static要去掉,写成:
void initialise_wifi(void)
否则编译不过去。因为普通函数的作用域是整个project,而static函数的作用域仅限于本c程序。
- smart_config.h
#ifndef _SMART_CONFIG_H_
#define _SMART_CONFIG_H_

void initialise_wifi(void);

#endif
6.5 关于CMakeLists.txt文件
根和每个目录都有一个CMakeLists.txt文件,开始遇到的问题是不知道目录结构和怎样写CMakeLists.txt文件,要注意每一层目录中CMakeLists.txt文件的写法,本文的例子给出了一个简单的示范。对于复杂的项目还需要更多编写CMakeLists.txt文件的知识,请看简介中给出的官方文档。