PostgreSQL
参考地址:https://github.com/digoal/blog/blob/master/201801/20180121_01.md
介绍
-
PostgreSQL 是一个免费的对象-关系数据库服务器(ORDBMS),在灵活的BSD许可证下发行。
-
PostgreSQL 开发者把它念作 post-gress-Q-L。
-
PostgreSQL 的 Slogan 是 “世界上最先进的开源关系型数据库”。
数据库定位

-
OLTP:(增删改)(on-line transaction processing)翻译为联机事务处理
-
OLAP:(查)(On-Line Analytical Processing)翻译为联机分析处理
从字面上来看OLTP是做事务处理,OLAP是做分析处理。从对数据库操作来看,OLTP主要是对数据的增删改,OLAP是对数据的查询。
-
SMP:对称多处理(Symmetrical Multi-Processing),是指在一个计算机上汇集了一组处理器(多CPU),各CPU之间共享内存子系统以及总线结构。它是相对非对称多处理技术而言的、应用十分广泛的并行技术。
-
JIT:在PostgreSQL等数据库中,JIT指的是即时编译(Just-in-time Compilation),即程序在运行过程中即时进行编译,其中可以把编译的中间代码缓存或者优化。相对于静态编译代码,即时编译的代码可以处理延迟绑定并增强安全性。简单的说 JIT 是一种提高程序运行效率的方法。通常,程序有两种运行方式:静态编译与动态直译。静态编译的程序在执行前全部被翻译为机器码,而直译执行的则是一句一句边运行行边翻译。 JIT 则混合了这二者,一句一句编译源代码,但是会将翻译过的代码缓存起来以降低性能损耗。相对于静态编译代码,即时编译的代码可以处理延迟绑定并增强安全性。
-
向量计算:vops插件中新增了瓦片式数据类型,而瓦片本身支持向量计算。向量计算的本质是一次计算多个值,减少函数调用,上下文切换,尽量的利用CPU的缓存以及向量化执行指令提高性能。新增的瓦片式类型,对应的还新增了对应的向量化执行操作符,所以使用VOPS和正常的使用SQL语法是一样的。
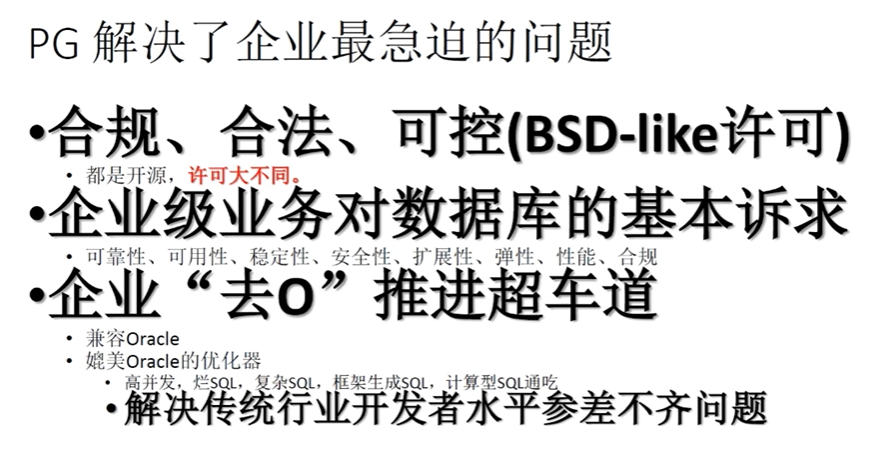
解决的问题

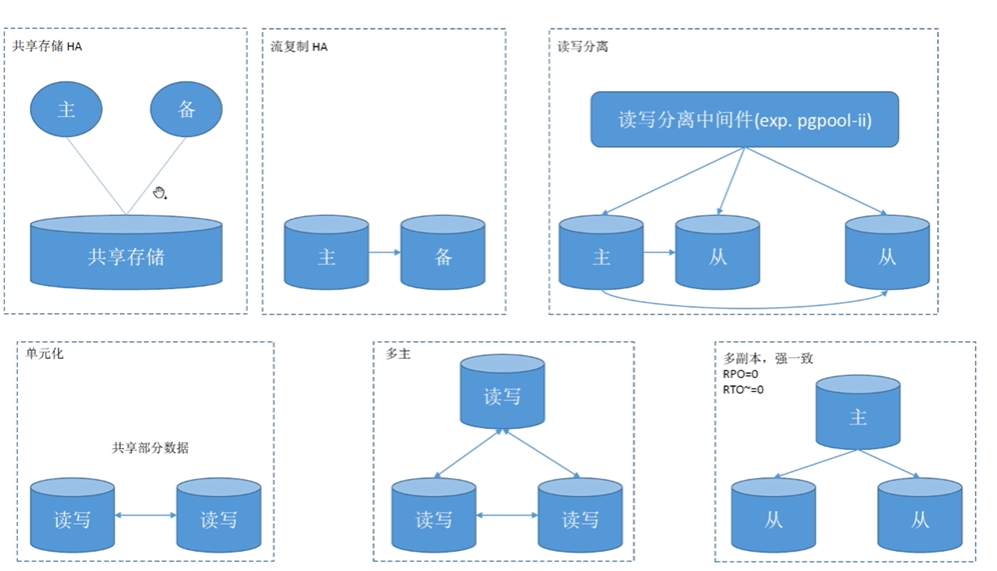
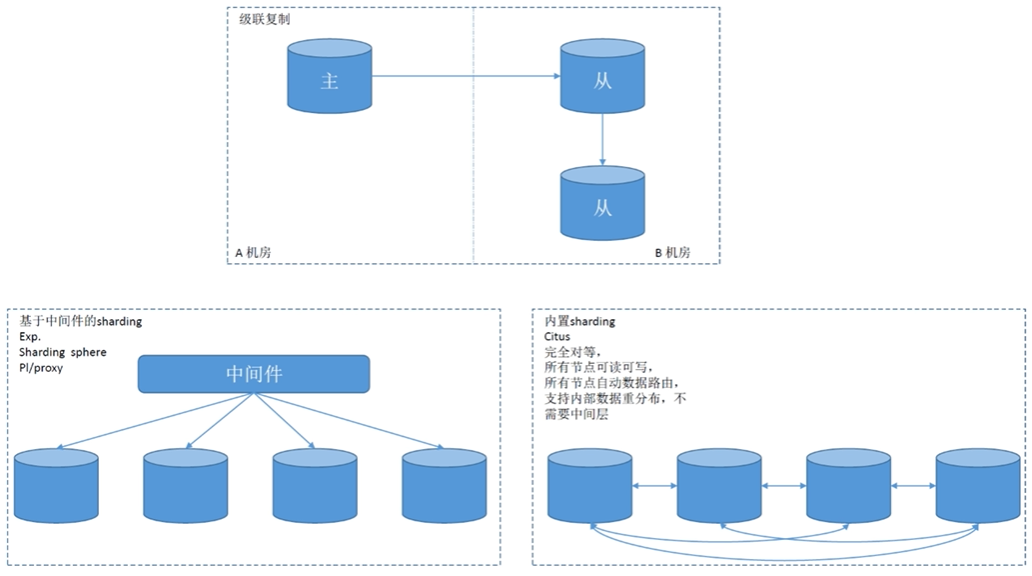
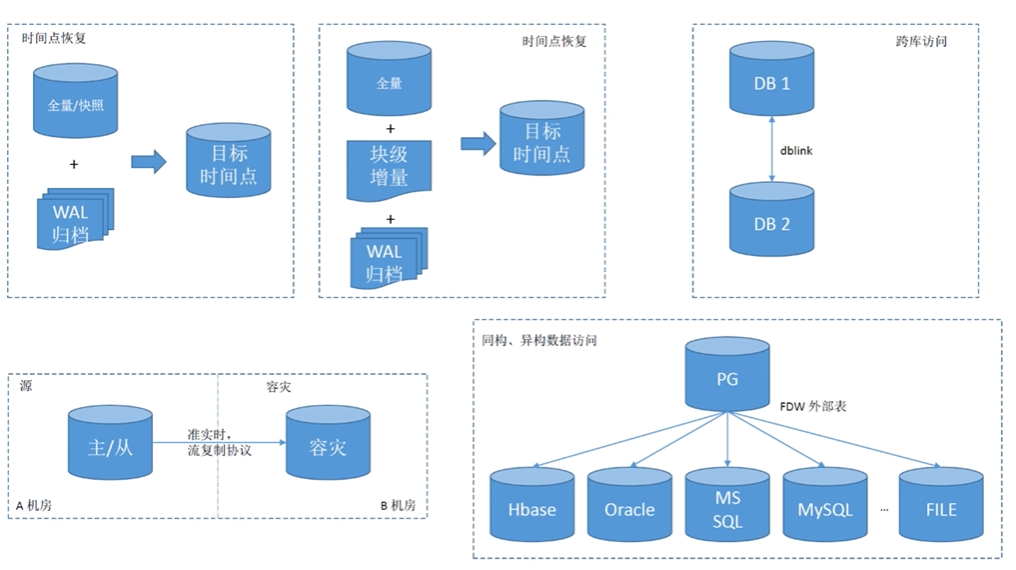
常见集群部署架构
底层都是基于流复制实现的
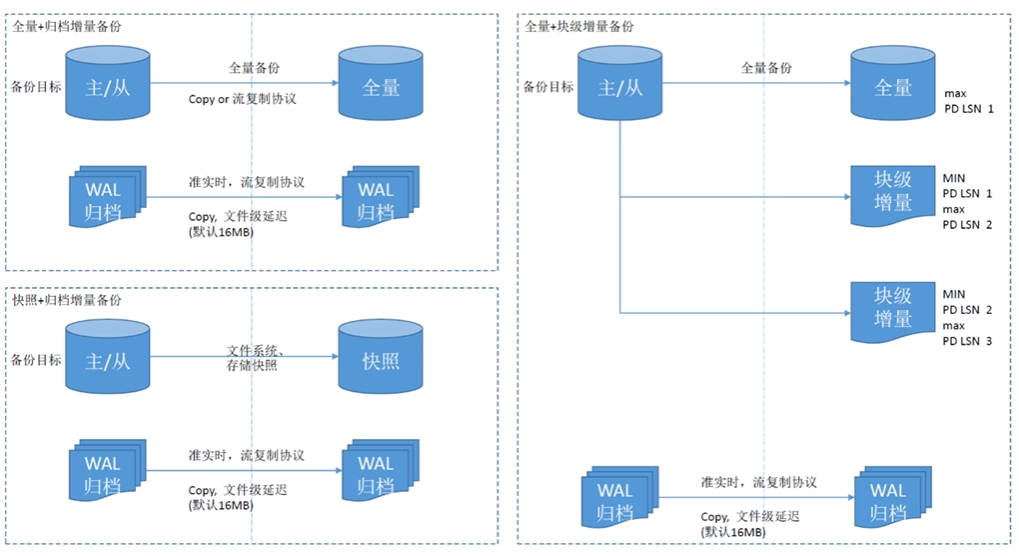
数据备份
数据还原
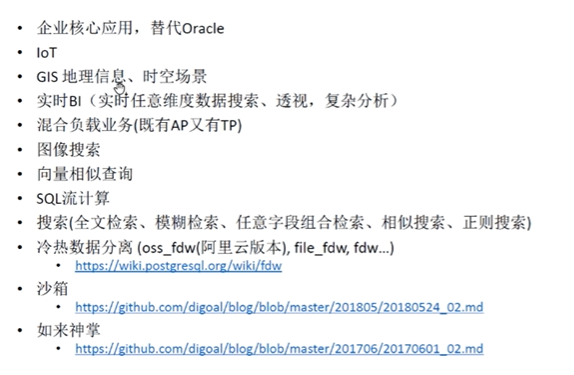
应用场景
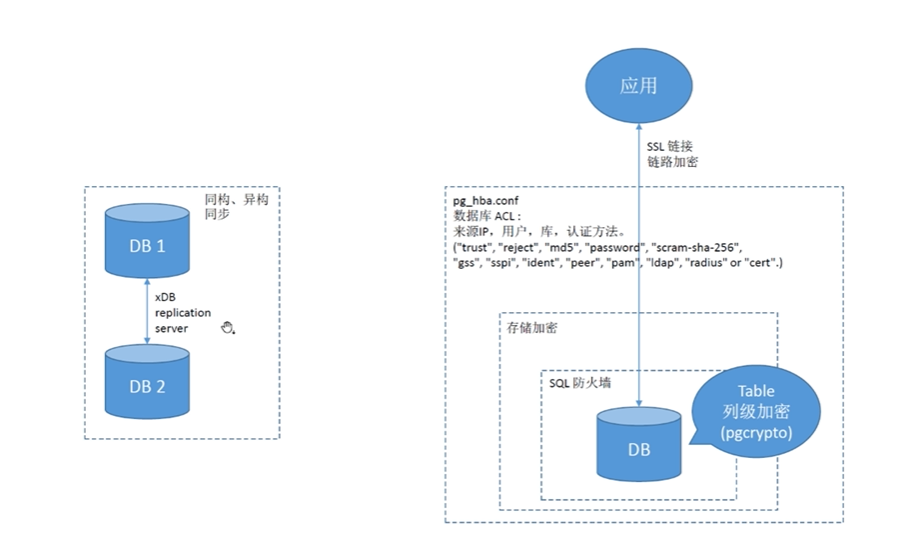
PG多模-解决传统架构痛点
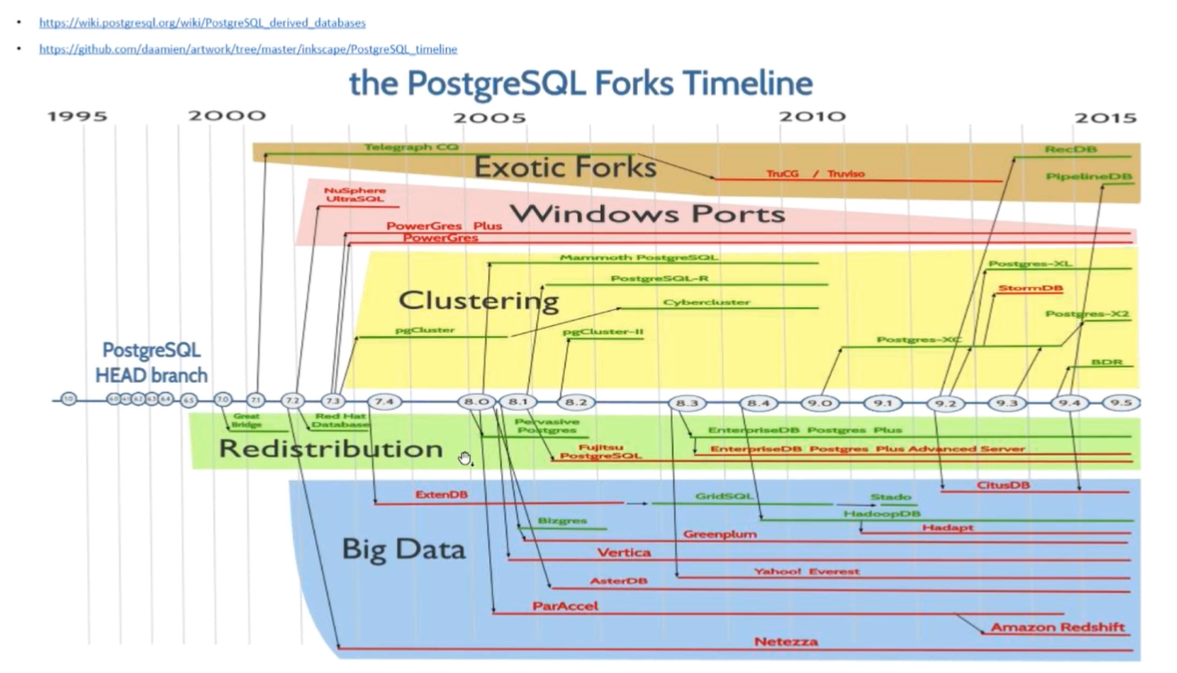
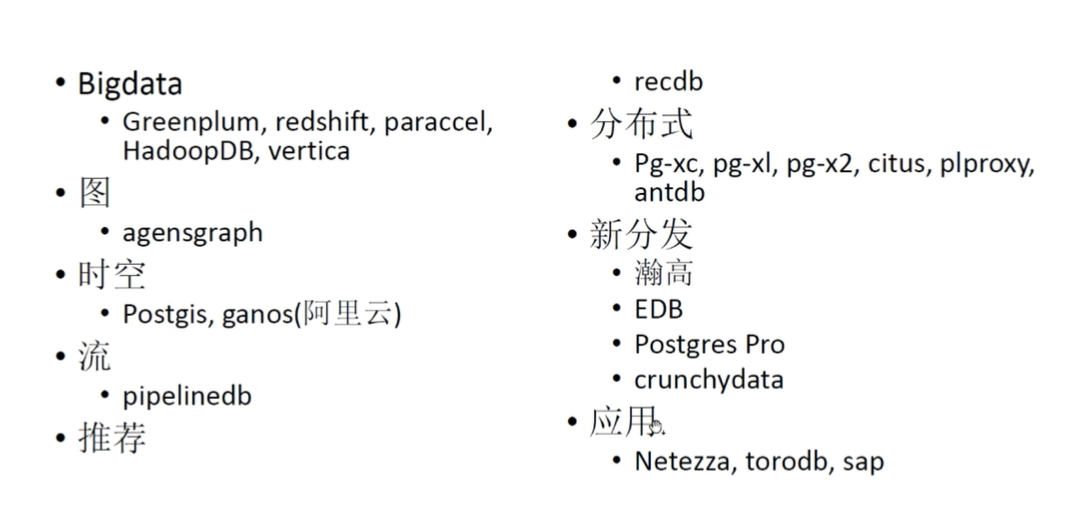
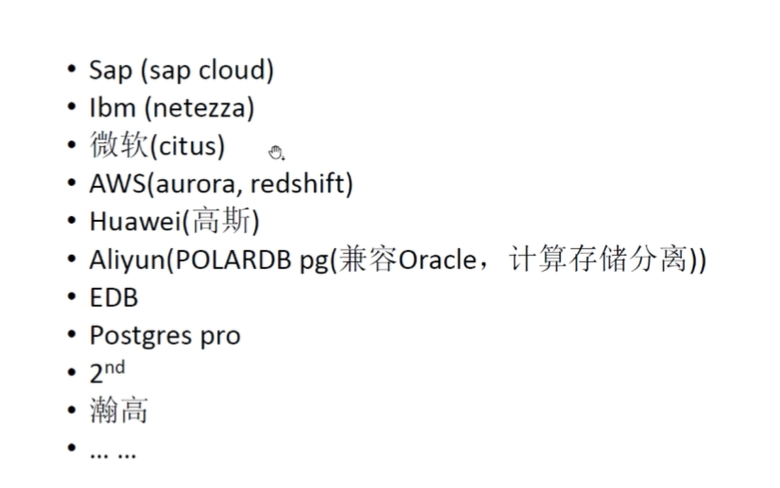
PG相关数据库
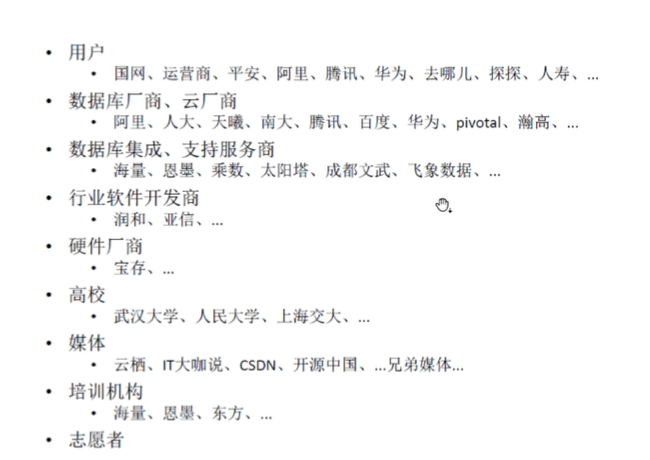
PG用户
安装
- 安装依赖环境
yum install gcc zlib-devel readline-devel -y
- 下载源码(官网下载对应版本)

- 解压
tar -zxvf postgresql-12.5.tar.gz
- 设定源码编译选项
使用**./configure – -help**命令来查看不同选项的帮助信息,示例输出如下:
`configure' configures PostgreSQL 12.5 to adapt to many kinds of systems.

Usage: ./configure [OPTION]... [VAR=VALUE]...

To assign environment variables (e.g., CC, CFLAGS...), specify them as
VAR=VALUE.  See below for descriptions of some of the useful variables.

Defaults for the options are specified in brackets.

Configuration:
  -h, --help              display this help and exit
      --help=short        display options specific to this package
      --help=recursive    display the short help of all the included packages
  -V, --version           display version information and exit
  -q, --quiet, --silent   do not print `checking ...' messages
      --cache-file=FILE   cache test results in FILE [disabled]
  -C, --config-cache      alias for `--cache-file=config.cache'
  -n, --no-create         do not create output files
      --srcdir=DIR        find the sources in DIR [configure dir or `..']

Installation directories:
  --prefix=PREFIX         install architecture-independent files in PREFIX
                          [/usr/local/pgsql]
  --exec-prefix=EPREFIX   install architecture-dependent files in EPREFIX
                          [PREFIX]
  ***
- 现在新建一个存储PostgreSQL程序文件的目录,并在configure命令中使用prefix选项
mkdir /opt/PostgreSQL-12/
./configure --prefix=/opt/PostgreSQL-12
示例输出如下:
checking build system type... x86_64-pc-linux-gnu
checking host system type... x86_64-pc-linux-gnu
checking which template to use... linux
checking whether NLS is wanted... no
checking for default port number... 5432
checking for block size... 8kB
checking for segment size... 1GB
checking for WAL block size... 8kB
checking for WAL segment size... 16MB
checking for gcc... gcc
checking whether the C compiler works... yes
checking for C compiler default output file name... a.out
checking for suffix of executables...
checking whether we are cross compiling... no
checking for suffix of object files... o
checking whether we are using the GNU C compiler... yes
checking whether gcc accepts -g... yes
checking for gcc option to accept ISO C89... none needed
checking whether gcc supports -Wdeclaration-after-statement... yes
checking whether gcc supports -Wendif-labels... yes
checking whether gcc supports -Wmissing-format-attribute... yes
checking whether gcc supports -Wformat-security... yes
checking whether gcc supports -fno-strict-aliasing... yes
checking whether gcc supports -fwrapv... yes
checking whether gcc supports -fexcess-precision=standard... no
....
- 编译完成后,就可以用make命令来生成PostgreSQL
make
- 生成完成后,使用以下命令来进行PostgreSQL的安装
make install
全部执行完成后,Postgresql 12 就会被安装在 /opt/PostgreSQL-12目录。
- 现在需要添加一个postgres用户并创建一个存放数据文件的目录,这个目录的所有者应该为数据库用户postgres,并且将该目录的权限设置为700以保证数据文件的安全性。最后,需要将PostgreSQL的执行文件添加至系统的PATH环境变量中
useradd postgres
passwd postgres
mkdir /pgdatabase/data
chown -R postgres. /pgdatabase/data
echo 'export PATH=$PATH:/opt/PostgreSQL-12/bin' > /etc/profile.d/postgres.sh
- 然后就可以切换至postgres用户来对数据库进行初始化操作了
su postgres
$ initdb -D /pgdatabase/data/ -U postgres -W
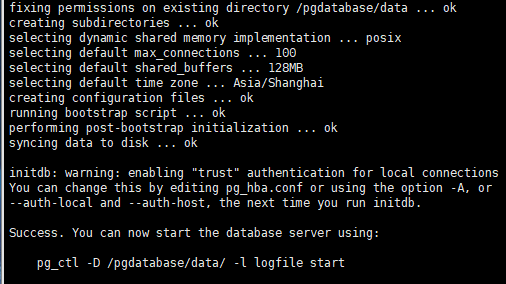
其中-D参数用于指定数据文件位置;-U参数用于指定操作数据库的超级用户;-W参数为需要设置超级用户密码。如果想要了解更多initdb工具的详细信息,可以使用initdb –help命令来获得更多帮助信息。
- 数据库初始化完成后,可以通过修改数据文件目录的postgresql.conf配置文件来达到设置postgresql侦听端口的目的
listen_addresses = '*'
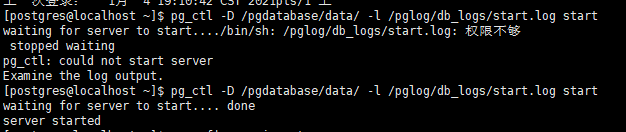
- 修改完配置文件后,需要用以下命令重新启动PostgreSQL
chown -R postgres. /pglog/db_logs/
pg_ctl -D /pgdatabase/data/ -l /pglog/db_logs/start.log start
#停止数据库
# pg_ctl -D /pgdatabase/data/ stop
其中-l /pglog/db_logs/start.log参数是用于设置日志文件,方便查看信息,可以根据自己的实际情况自行设置,如不需要也可以去掉这部分内容,并不影响数据库服务器启动。
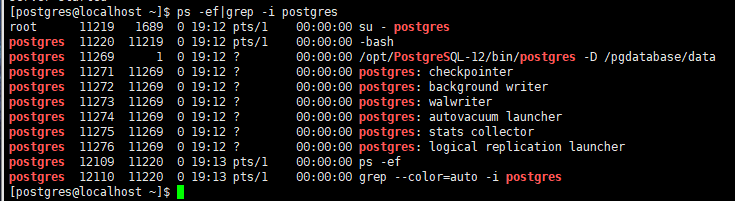
- 数据库服务启动后,可以用以下命令查看进程信息以及端口信息来进行确认
ps -ef |grep -i postgres
netstat -apn |grep -i 5432
- 连接数据库,执行SQL语句
$ psql -p 5432
postgres=# create database test;
postgres=# \l 用于显示所有数据库
postgres=# \q 退出psotgre命令提示符
参考:
https://github.com/digoal/blog/blob/master/201901/20190105_01.md
Linux中内核配置
参考:
-
https://github.com/digoal/blog/blob/master/201611/20161121_01.md
-
https://github.com/digoal/blog/blob/master/201608/20160803_01.md
- sysctl
# vi /etc/sysctl.conf

# add by digoal.zhou
fs.aio-max-nr = 1048576
fs.file-max = 76724600
kernel.core_pattern= /data01/corefiles/core_%e_%u_%t_%s.%p
# /data01/corefiles事先建好,权限777,如果是软链接,对应的目录修改为777
kernel.sem = 4096 2147483647 2147483646 512000
# 信号量, ipcs -l 或 -u 查看,每16个进程一组,每组信号量需要17个信号量。
kernel.shmall = 107374182
# 所有共享内存段相加大小限制(建议内存的80%)
kernel.shmmax = 274877906944
# 最大单个共享内存段大小(建议为内存一半), >9.2的版本已大幅降低共享内存的使用
kernel.shmmni = 819200
# 一共能生成多少共享内存段,每个PG数据库集群至少2个共享内存段
net.core.netdev_max_backlog = 10000
net.core.rmem_default = 262144
# The default setting of the socket receive buffer in bytes.
net.core.rmem_max = 4194304
# The maximum receive socket buffer size in bytes
net.core.wmem_default = 262144
# The default setting (in bytes) of the socket send buffer.
net.core.wmem_max = 4194304
# The maximum send socket buffer size in bytes.
net.core.somaxconn = 4096
net.ipv4.tcp_max_syn_backlog = 4096
net.ipv4.tcp_keepalive_intvl = 20
net.ipv4.tcp_keepalive_probes = 3
net.ipv4.tcp_keepalive_time = 60
net.ipv4.tcp_mem = 8388608 12582912 16777216
net.ipv4.tcp_fin_timeout = 5
net.ipv4.tcp_synack_retries = 2
net.ipv4.tcp_syncookies = 1
# 开启SYN Cookies。当出现SYN等待队列溢出时,启用cookie来处理,可防范少量的SYN攻击
net.ipv4.tcp_timestamps = 1
# 减少time_wait
net.ipv4.tcp_tw_recycle = 0
# 如果=1则开启TCP连接中TIME-WAIT套接字的快速回收,但是NAT环境可能导致连接失败,建议服务端关闭它
net.ipv4.tcp_tw_reuse = 1
# 开启重用。允许将TIME-WAIT套接字重新用于新的TCP连接
net.ipv4.tcp_max_tw_buckets = 262144
net.ipv4.tcp_rmem = 8192 87380 16777216
net.ipv4.tcp_wmem = 8192 65536 16777216
net.nf_conntrack_max = 1200000
net.netfilter.nf_conntrack_max = 1200000
vm.dirty_background_bytes = 409600000
#  系统脏页到达这个值,系统后台刷脏页调度进程 pdflush(或其他) 自动将(dirty_expire_centisecs/100)秒前的脏页刷到磁盘
vm.dirty_expire_centisecs = 3000
#  比这个值老的脏页,将被刷到磁盘。3000表示30秒。
vm.dirty_ratio = 95
#  如果系统进程刷脏页太慢,使得系统脏页超过内存 95 % 时,则用户进程如果有写磁盘的操作(如fsync, fdatasync等调用),则需要主动把系统脏页刷出。
#  有效防止用户进程刷脏页,在单机多实例,并且使用CGROUP限制单实例IOPS的情况下非常有效。
vm.dirty_writeback_centisecs = 100
#  pdflush(或其他)后台刷脏页进程的唤醒间隔, 100表示1秒。
vm.mmap_min_addr = 65536
vm.overcommit_memory = 0
#  在分配内存时,允许少量over malloc, 如果设置为 1, 则认为总是有足够的内存,内存较少的测试环境可以使用 1 .
vm.overcommit_ratio = 90
#  当overcommit_memory = 2 时,用于参与计算允许指派的内存大小。
vm.swappiness = 0
#  关闭交换分区
vm.zone_reclaim_mode = 0
# 禁用 numa, 或者在vmlinux中禁止.
net.ipv4.ip_local_port_range = 40000 65535
# 本地自动分配的TCP, UDP端口号范围
fs.nr_open=20480000
# 单个进程允许打开的文件句柄上限
net.ipv4.tcp_max_syn_backlog = 16384
net.core.somaxconn = 16384

# 以下参数请注意
# vm.extra_free_kbytes = 4096000
# vm.min_free_kbytes = 2097152 # vm.min_free_kbytes 建议每32G内存分配1G vm.min_free_kbytes
# 如果是小内存机器,以上两个值不建议设置
# vm.nr_hugepages = 66536
#  建议shared buffer设置超过64GB时 使用大页,页大小 /proc/meminfo Hugepagesize
# vm.lowmem_reserve_ratio = 1 1 1
# 对于内存大于64G时,建议设置,否则建议默认值 256 256 32
- 生效配置
sysctl -p
概念:
- 脏页-linux内核中的概念,因为硬盘的读写速度远赶不上内存的速度,系统就把读写比较频繁的数据事先放到内存中,以提高读写速度,这就叫高速缓存,linux是以页作为高速缓存的单位,当进程修改了高速缓存里的数据时,该页就被内核标记为脏页,内核将会在合适的时间把脏页的数据写到磁盘中去,以保持高速缓存中的数据和磁盘中的数据是一致的。
Liunx限制设置
# vi /etc/security/limits.conf

# nofile超过1048576的话,一定要先将sysctl的fs.nr_open设置为更大的值,并生效后才能继续设置nofile.

* soft    nofile  1024000
* hard    nofile  1024000
* soft    nproc   unlimited
* hard    nproc   unlimited
* soft    core    unlimited
* hard    core    unlimited
* soft    memlock unlimited
* hard    memlock unlimited
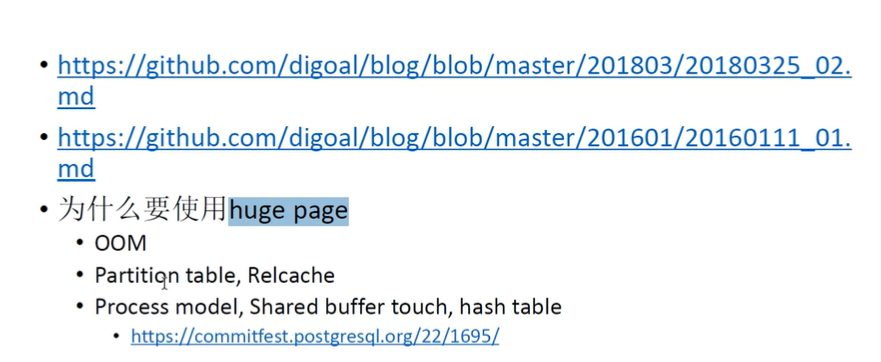
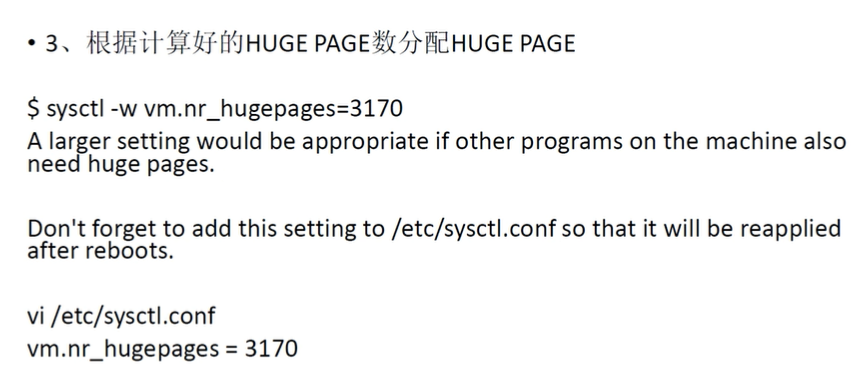
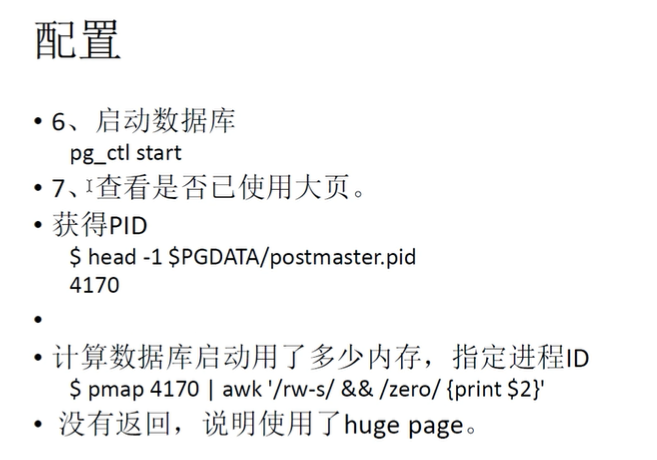
大页配置


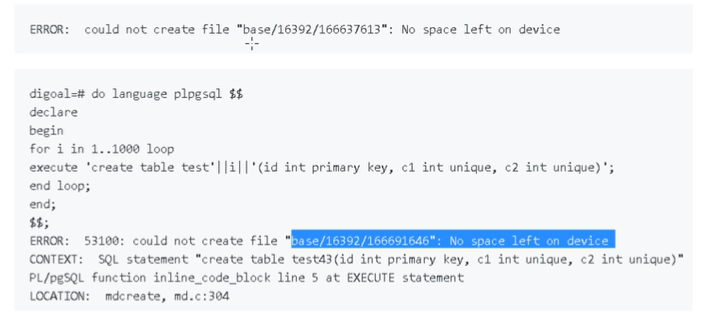
存储卷管理
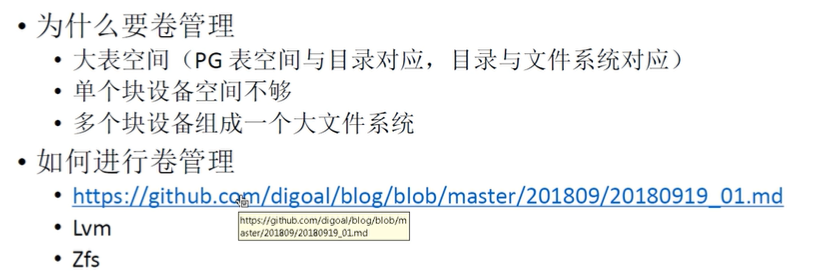
参考:https://github.com/digoal/blog/blob/master/201809/20180919_01.md
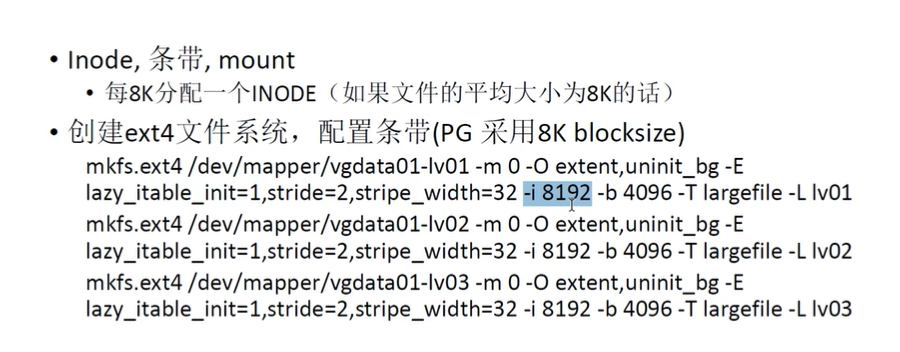
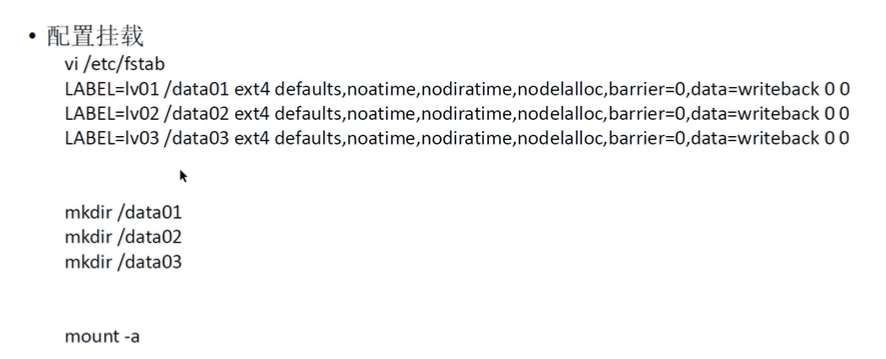
文件系统条带、INODE、MOUNT配置
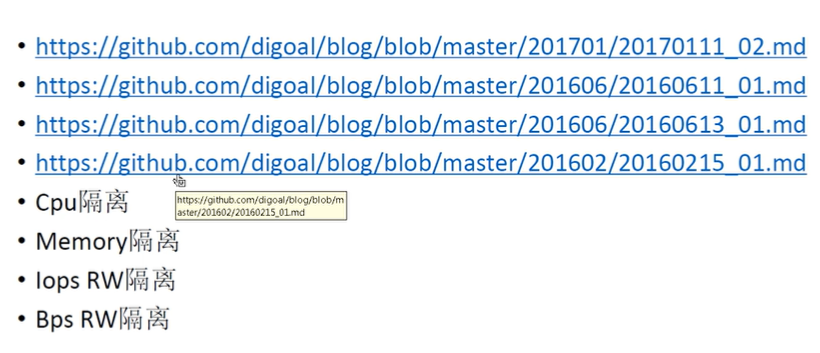
资源隔离
编译安装
参考:
- https://github.com/digoal/blog/blob/master/201611/20161121_01.md
- https://github.com/digoal/blog/blob/master/201710/20171018_01.md
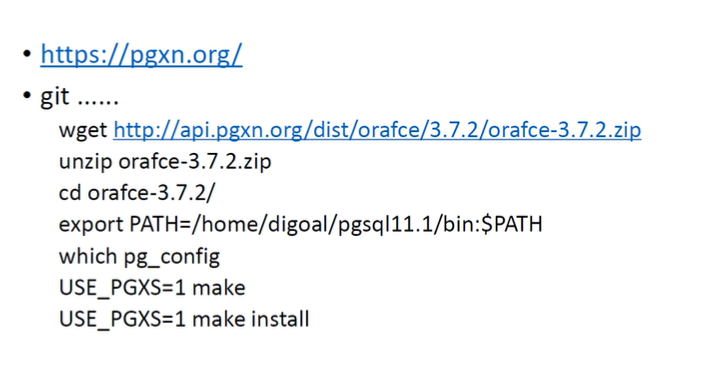
插件安装
大版本升级- 二进制校验

参考:https://github.com/digoal/blog/blob/master/201412/20141219_01.md
实例初始化、基本配置
目标:
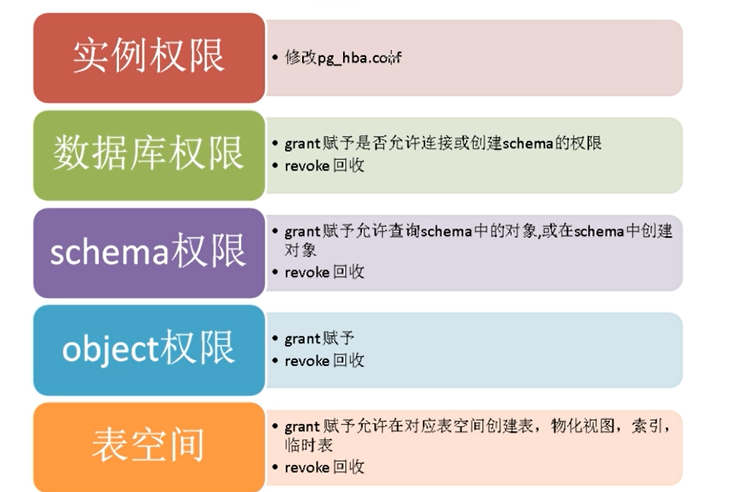
熟悉数据库初始化、参数、防火墙、物理架构、逻辑结构、权限体系
初始化数据库集群
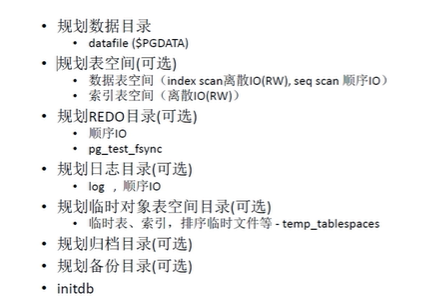
- Redo log是一个基于磁盘的数据格式,在数据库灾难恢复过程中,用于恢复未完成的事物,修复数据的。在正常的操作过程中,redo log将来自于SQL 语句或者其他API调用的请求,转化为数据表中的变化,当对数据的改变操作还未完成之前,遭遇了意外的停机,那这些变化会在数据库启动初始化的过程中进行replay重演,这个重演的过程,是在接受client请求之前,就会完成。
配置文件
优先级
数据库配置 > postgresql.auto.conf > postgresql.conf
-- 查看数据库配置
select * from pg_db_role_setting;

-- 重置指定数据库的所有参数
alter database postgres reset all;

-- 用户的数据操作内存
show work_mem;

-- 查看当前数据库中用户信息
select * from pg_authid;

-- 修改用户密码
alter role user encrypted password '123';

-- 统计获取时间的开销
pg_test_timing
参数优先级
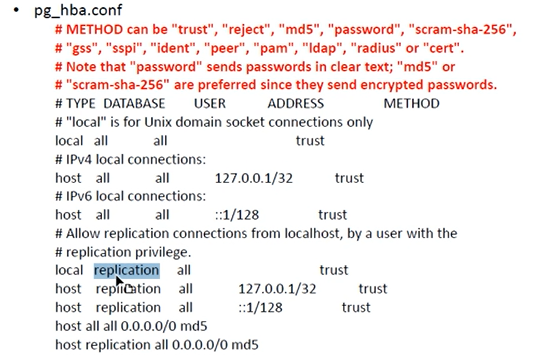
PG防火墙配置
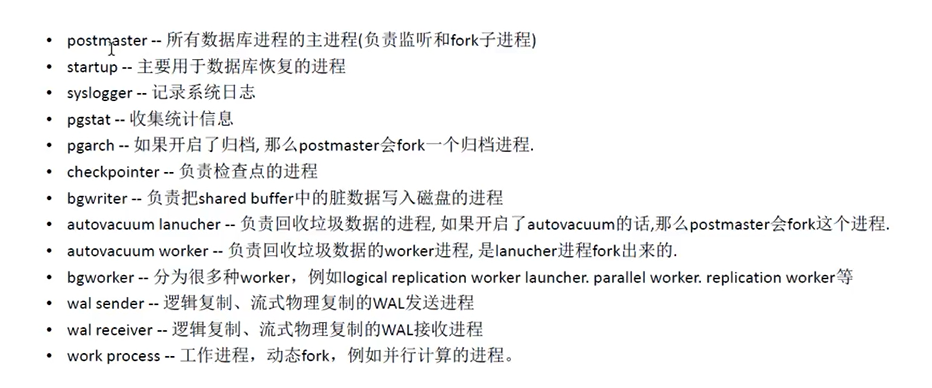
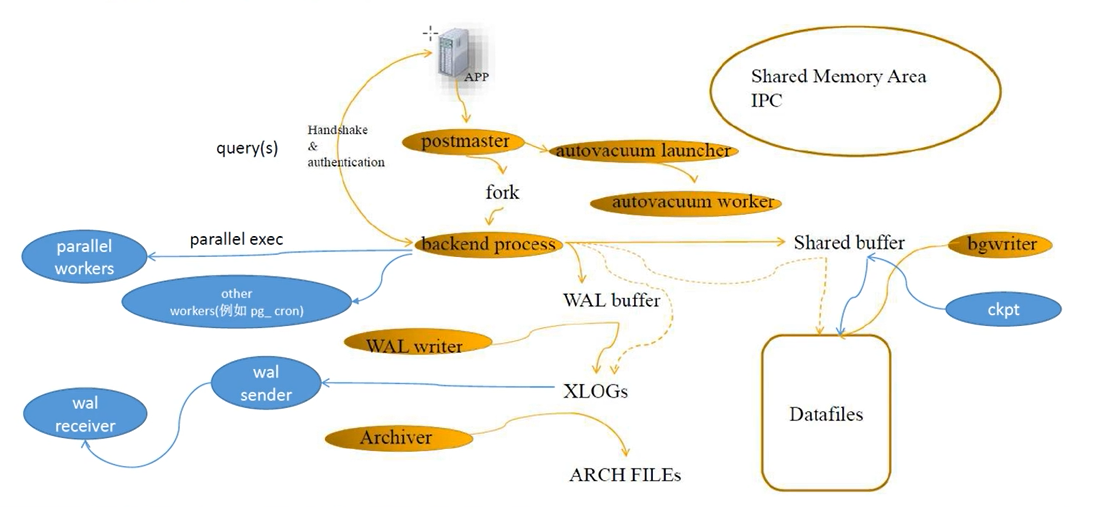
数据库进程结构
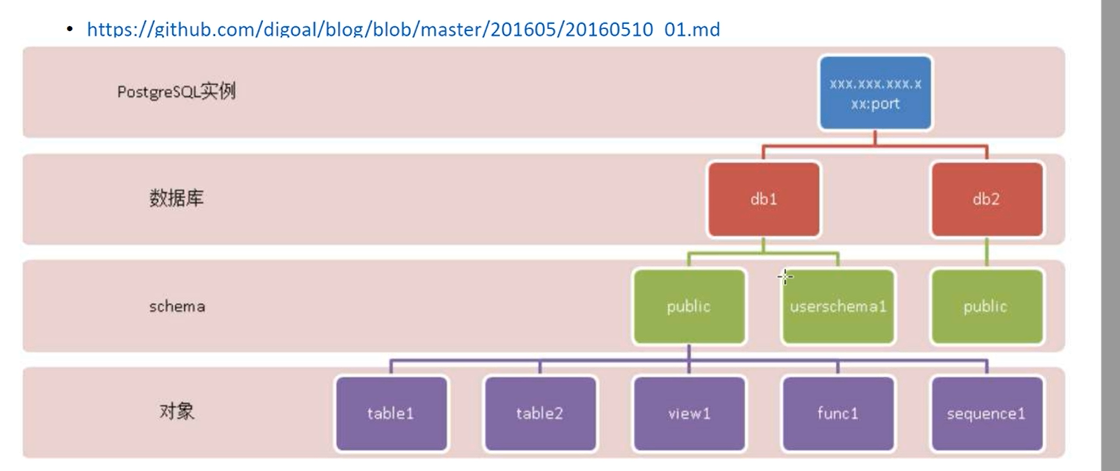
逻辑结构
SSL链路

PostgreSQL常用命令总结
启动关闭
启动

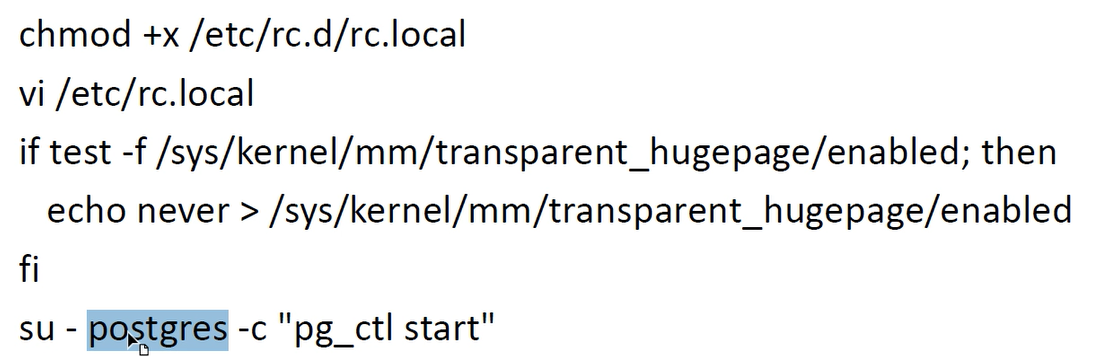
自启动
关闭

单用户模式
su - postgres
psql
-- 快速关闭数据库
pg_ctl stop -m fast
-- 单用户启动某个数据库
postgres --single postgres
-- 回收事务XID
vacuum freeze;

top -c -u postgres
性能测试
- 硬盘读写性能
cd /pgdatabase/data
su postgres
# 测试硬盘读写
pg_test_fsync
结果如下:
5 seconds per test
O_DIRECT supported on this platform for open_datasync and open_sync.

Compare file sync methods using one 8kB write:
(in wal_sync_method preference order, except fdatasync is Linux's default)
        open_datasync                     15080.407 ops/sec      66 usecs/op
        fdatasync                         13709.482 ops/sec      73 usecs/op
        fsync                             12809.898 ops/sec      78 usecs/op
        fsync_writethrough                              n/a
        open_sync                         14083.904 ops/sec      71 usecs/op

Compare file sync methods using two 8kB writes:
(in wal_sync_method preference order, except fdatasync is Linux's default)
        open_datasync                      7601.431 ops/sec     132 usecs/op
        fdatasync                         12942.465 ops/sec      77 usecs/op
        fsync                             12128.903 ops/sec      82 usecs/op
        fsync_writethrough                              n/a
        open_sync                          7065.962 ops/sec     142 usecs/op

Compare open_sync with different write sizes:
(This is designed to compare the cost of writing 16kB in different write
open_sync sizes.)
         1 * 16kB open_sync write         14058.028 ops/sec      71 usecs/op
         2 *  8kB open_sync writes         6994.634 ops/sec     143 usecs/op
         4 *  4kB open_sync writes         3572.526 ops/sec     280 usecs/op
         8 *  2kB open_sync writes         1767.462 ops/sec     566 usecs/op
        16 *  1kB open_sync writes          892.704 ops/sec    1120 usecs/op

Test if fsync on non-write file descriptor is honored:
(If the times are similar, fsync() can sync data written on a different
descriptor.)
        write, fsync, close               12142.198 ops/sec      82 usecs/op
        write, close, fsync               11862.460 ops/sec      84 usecs/op

Non-sync'ed 8kB writes:
        write                            333563.771 ops/sec       3 usecs/op
查看配置命令
- 查看异步REDO是否开启,默认开启
postgres=# show synchronous_commit;
 synchronous_commit
--------------------
 on
(1 row)
- 查看开启REDO后的数据库wal_writer延迟
postgres=# show wal_writer_delay ;
 wal_writer_delay
------------------
 200ms
(1 row)
当服务器崩溃的时候,可能会丢掉200ms内的数据
- 数据wal的大小范围
postgres=# show max_wal_size ;
 max_wal_size
--------------
 1GB
(1 row)

postgres=# show min_wal_size ;
 min_wal_size
--------------
 80MB
(1 row)
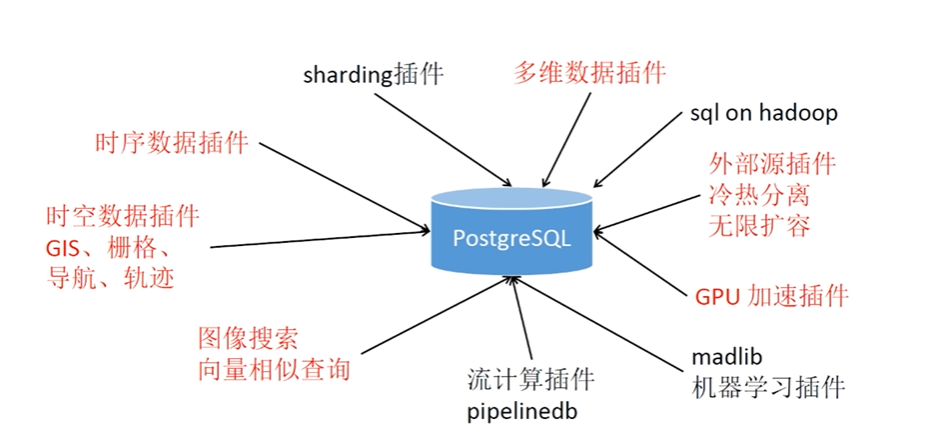
扩展模块
PostgresSQL支持丰富的扩展模块,扩展模块可以完善PostgreSQL的功能,主要分为两类
- 编译安装PostgreSQL时使用world选项安装的扩展模块
- GitHub或第三方网站开源项目
使用gmake命令编译安装PostgreSQL时,指定world选项,安装到$GHOME/share/extension目录
gmake world
gmake install-world
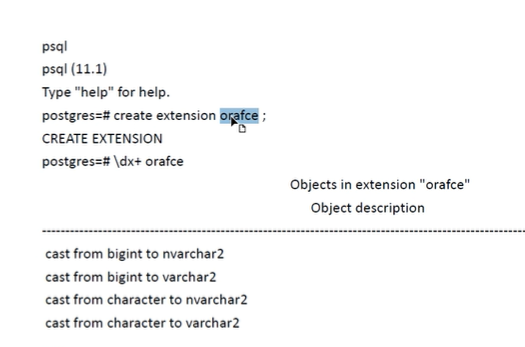
指定数据库安装扩展
CREATE EXTENSION [IF NOT EXISTS] extension_name
-- CREATE EXTENSION pg_buffercache
查看当前数据库的扩展
\dx
SELECT * FROM pg_exteension
查看数据库有哪些可加载的扩展模块
SELECT * FROM pg_available_extension
常用模块
pg_stat_statements
用于收集数据库中的SQL运行信息,例如SQL的总执行时间、调用次数、共享内存命中情况,常用语监控数据库SQL性能
安装:
- 修改postgresql.conf
# 表示要在启动时导入pg_stat_statements 动态库
shared_preload_libraries = 'pg_stat_statements'
# 表示监控的语句最多为10000句
pg_stat_statements.max = 10000
# 设置哪类SQL会被记录,all表示全部,top记录最外层不包含嵌套的SQL
pg_stat_statements.track = all
# 表示对 INSERT/UPDATE/DELETE/SELECT 之外的sql动作也作监控
pg_stat_statements.track_utility = on
# 表示当postgresql停止时,把信息存入磁盘文件以备下次启动时再使用
pg_stat_statements.save = on
- 重启postgres
pg_ctl restart -m fast
使用:
创建表空间
- windows上使用pgadmin4新建表空间,并指定目录,在创建数据库、索引或表的时候指定表空间
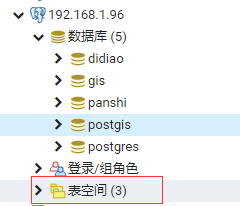

[外链图片转存失败,源站可能有防盗链机制,建议将图片保存下来直接上传(img-zrDzk9A4-1623511674045)(C:\Users\Administrator.DESKTOP-4NR5H5E\AppData\Local\YNote\data\qq6281740119C4FA97138FDED01B463F49\5dc695ab3b8647c288bbf1ff7d706f80\image-20201124094154453.png)]
- linux上可以直接使用命令行创建
# 在指定的数据文件夹下创建目录
mkdir -p /data/pg_data/tsp
# 为postgres用户赋予权限
sudo chown -R postgres:postgres /data/pg_data/tsp
# 创建表空间
create tablespace tbs_test owner postgres location '/data/pg_data/tsp';