1 urllib模块
1.1 urllib模块简介
Python3中将urib与urllib2模块的功能组合,并且命名为urllib。Python3中的urllib模块中包含多个功能的子模块,具体内容如下。
- urllib.request:用于实现基本HTTP请求的模块。
- urlb.error:异常处理模块,如果在发送网络请求时出现了错误,可以捕获的有效处理。
- urllib.parse:用于解析URL的模块。
- urllib.robotparser:用于解析robots.txt文件,判断网站是否可以爬取信息。
1.2 发送网络请求urllib.request.urlopen()
1.2.1 urllib.request.urlopen()函数简介
urllib.request.urlopen(url, data=None, [timeout, ]*, cafile=None, capath=None, cadefault=False, context=None)- url:需要访问网站的URL完整地址
- data:该参数默认为None,通过该参数确认请求方式,如果是None,表示请求方式为GET,否则请求方式为POST。在发送POST请求时,参数daa需要以字典形式的数据作为参数值,并且需要将字典类型的参数值转换为字节类型的数据才可以实现POST请求。
- timeout:设置网站访问超时时间,以秒为单位。
- cafile:指定包含CA证书的单个文件,
- capah:指定证书文件的目录。
- cadefault:CA证书默认值
- context:描述SSL选项的实例。
1.2.2 发送GET请求
import urllib.request
response = urllib.request.urlopen("https://www.baidu.com/")
print("response:",response)
# 输出: response: <http.client.HTTPResponse object at 0x000001AD2793C850>
1.2.3 获取状态码、响应头、获取HTMl代码
import urllib.request
url = "https://www.baidu.com/"
response = urllib.request.urlopen(url=url)
print("响应状态码:",response.status)
# 输出: 响应状态码: 200
print("响应头信息:",response.getheaders())
# 响应头信息: [('Accept-Ranges', 'bytes'), ('Cache-Control', 'no-cache'), ('Content-Length', '227'), ('Content-Type', 'text/html'), ('Date', 'Wed, 09 Mar 2022 10:45:04 GMT'), ('P3p', 'CP=" OTI DSP COR IVA OUR IND COM "'), ('P3p', 'CP=" OTI DSP COR IVA OUR IND COM "'), ('Pragma', 'no-cache'), ('Server', 'BWS/1.1'), ('Set-Cookie', 'BD_NOT_HTTPS=1; path=/; Max-Age=300'), ('Set-Cookie', 'BIDUPSID=5C4759402F5A8C38E347A1E6FB8788EF; expires=Thu, 31-Dec-37 23:55:55 GMT; max-age=2147483647; path=/; domain=.baidu.com'), ('Set-Cookie', 'PSTM=1646822704; expires=Thu, 31-Dec-37 23:55:55 GMT; max-age=2147483647; path=/; domain=.baidu.com'), ('Set-Cookie', 'BAIDUID=5C4759402F5A8C384F12C0C34D5D3B36:FG=1; max-age=31536000; expires=Thu, 09-Mar-23 10:45:04 GMT; domain=.baidu.com; path=/; version=1; comment=bd'), ('Strict-Transport-Security', 'max-age=0'), ('Traceid', '1646822704264784359414774964437731406767'), ('X-Frame-Options', 'sameorigin'), ('X-Ua-Compatible', 'IE=Edge,chrome=1'), ('Connection', 'close')]
print("响应头指定信息:",response.getheader('Accept-Ranges'))
# 响应头指定信息: bytes
print("目标页面的Html代码 \n ",response.read().decode('utf-8'))
# 即为Html文件的内容
1.2.4 发送POST请求
urlopen()方法在默认的情况下发送的是GET请求,如果需要发送POST请求,可以为其设置data参数、该参数是byte类型,需要使用bytes()方法将参数值进行数据类型转换
import urllib.request
import urllib.parse

url = "https://www.baidu.com/"
data = bytes(urllib.parse.urlencode({'hello':'python'}),encoding='utf-8') # 将表单转化为bytes类型,并且设置编码
response = urllib.request.urlopen(url=url,data=data,timeout=0.1) # 发送网络请求 设置超时时间0.1s
print(response.read().decode('utf-8')) # 读取Html代码进行编码
1.2.5 处理网络超市异常
如果遇到了超时异常,爬虫程序将在此处停止。所以在实际开发中开发者可以将超时异常捕获,然后处理下面的爬虫任务。以上述发送网络请求为例,将超时参数imeout设置为0.1s,然后使用try...excpt 捕获异常并判断如果是超时异常就模拟自动执行下一个任务。
import urllib.request
import urllib.error
import socket

url = "https://www.baidu.com/"

try:
    response = urllib.request.urlopen(url=url,timeout=0.1)
    print(response.read().decode('utf-8'))
except urllib.error.URLError as error :
    if isinstance(error.reason,socket.timeout):
        print("当前任务已经超时,即将执行下一任务")
2 设置请求头
2.1 urllib.request.Request()
urlopen()方法可以实现最基本的请求的发起,但如果要加入Headers等信息,就可以利用Request类来构造请求。
2.1.1 函数原型
使用方法为:
urllib.request.Request(url, data=None, headers={}, origin_req_host=None, unverifiable=False, method=None)2.1.2 参数解析
- url:要请求的URL地址
- data :必须是bytes(字节流)类型,如果是字典,可以用urllib.parse模块里的urlencode()编码
- headers:是一个字典类型,是请求头。①在构造请求时通过headers参数直接构造,也可以通过调用请求实例的add_header()方法添加。②通过请求头伪装浏览器,默认User-Agent是Python-urllib。要伪装火狐浏览器,可以设置User-Agent为Mozilla/5.0 (x11; U; Linux i686) Gecko/20071127 Firefox/2.0.0.11
- origin_req_host:指定请求方的host名称或者ip地址
- unverifiable:设置网页是否需要验证,默认是False,这个参数一般也不用设置。
- method :字符串,用来指定请求使用的方法,比如GET,POST和PUT等。
2.1.3 设置请求头的作用
请求头参数是为了模拟浏览器向网页后台发送网络请求,这样可以避免服务器的反爬措施。使用urlopen()方法发送网络请求时,其本身并没有设置请求头参数,所以向测试地址发送请求时,返回的信息中headers将显示默认值。
所以在设置请求头信息前,需要在浏览器中找到一个有效的请求头信息。以谷歌浏览器为例2
2.1.4 手动寻找请求头
F12打开开发工具,选择 Network 选项,接着任意打开一个网页,在请求列表中找到Headers选项中找到请求头。

2.2 设置请求头
import urllib.request
import urllib.parse
url = "https://www.baidu.com/" # 设置请求地址
#设置请求头信息
headers = {"User-Agent": "Mozilla/5.0 (Windows NT 10.0; WOW64) AppleWebKit/537.36 (KHTML, like Gecko) Chrome/86.0.4240.198 Safari/537.36"}
# data转化为bytes类型,并设置编码方式
data = bytes(urllib.parse.urlencode({'hello':'python'}),encoding='utf-8')
# 创建Request类型对象
url_post = urllib.request.Request(url=url,data=data,headers=headers,method='POST')
# 发送网络请求
response = urllib.request.urlopen(url_post)
# 读取HTMl代码并进行UTF-8编码
print(response.read().decode('utf-8'))
3 Cookie
Cookie是服务器向客户端返回响应数据时所留下的标记,当客户端再次访问服务器时将携带这个标记。一般在实现登录一个页面时,登录成功后,会在浏览器的Cookie中保留一些信息,当浏览器再次访问时会携带Cook中的信息,经过服务器核对后便可以确认当前用户已经登录过,此时可以直接将登录后的数据返回。
在使用网络爬虫获取网页登录后的数据时,除了使用模拟登录以外,还可以获取登录后的Cookie,然后利用这个Cookie再次发送请求时,就能以登录用户的身份获取数据。
3.1 模拟登陆
3.1.1 登陆前准备
目标地址:site2.rjkflm.com:666
账号:test01test
密码:123456
3.1.2 查看登陆目标地址
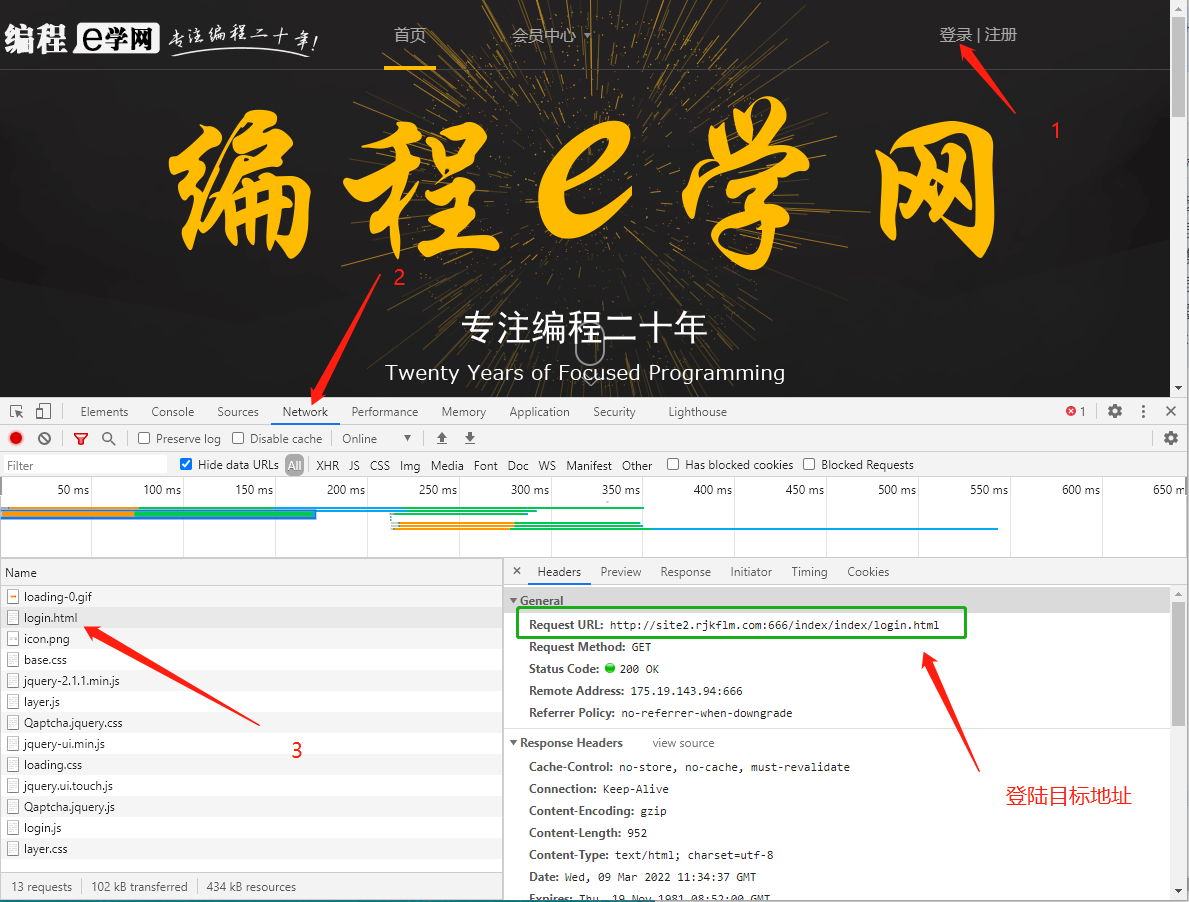
得到以下信息
Request URL:http://site2.rjkflm.com:666/index/index/login.html
3.1.2 实现模拟登陆
import urllib.request
import urllib.parse

url = "http://site2.rjkflm.com:666/index/index/chklogin.html"
# 设置表单
data = bytes(urllib.parse.urlencode({'username':'test01test','password':'123456'}),encoding='utf-8')
# 将bytes转化,并且设置编码
r = urllib.request.Request(url=url,data=data,method='POST')
response = urllib.request.urlopen(r) # 发送请求
print(response.read().decode('utf-8'))
# 返回:{"status":true,"msg":"登录成功!"}
3.1.3 获取Cookies
import urllib.request
import urllib.parse
import http.cookiejar
import json

url = "http://site2.rjkflm.com:666/index/index/chklogin.html"
# 设置表单
data = bytes(urllib.parse.urlencode({'username':'test01test','password':'123456'}),encoding='utf-8')

cookie_file = 'cookie.txt'
cookie = http.cookiejar.LWPCookieJar(cookie_file) # 创建LWPCookieJar对象
# 生成 Cookie处理器
cookie_processor = urllib.request.HTTPCookieProcessor(cookie)
# 创建opener对象
opener = urllib.request.build_opener(cookie_processor)
response = opener.open(url,data=data) # 发送网络请求
response = json.loads(response.read().decode('utf-8'))['msg']
if response == '登陆成功':
    cookie.save(ignore_discard=True,ignore_expires=True) # 保存Cookie文件
3.1.4 载入Cookies
import urllib.request
import http.cookies

import urllib.request  # 导入urllib.request模块
import http.cookiejar  # 导入http.cookiejar子模块
# 登录后页面的请求地址
url = 'http://site2.rjkflm.com:666/index/index/index.html'
cookie_file = 'cookie.txt'   # cookie文件

cookie = http.cookiejar.LWPCookieJar() # 创建LWPCookieJar对象
# 读取cookie文件内容
cookie.load(cookie_file,ignore_expires=True,ignore_discard=True)
# 生成cookie处理器
handler = urllib.request.HTTPCookieProcessor(cookie)
# 创建opener对象
opener = urllib.request.build_opener(handler)
response = opener.open(url) # 发送网络请求
print(response.read().decode('utf-8')) # 打印登录后页面的html代码