常规使用AIDL,无非就是一个.aidl对应一个Service,但是当我们的项目很大时,很多模块都需要用到Service,我们总不能为每一个模块都创建一个Service吧,这样一来我们的应用就会显得很笨重。那么有没有一种解决方案叫我们只需要创建一个Service,然后去管理AIDL呢?在任玉刚的《Android开发艺术探索》中给出了一个解决方案,那就是Binder连接池。在这里我们看一下他是怎么实现的。
Binder连接池原理:
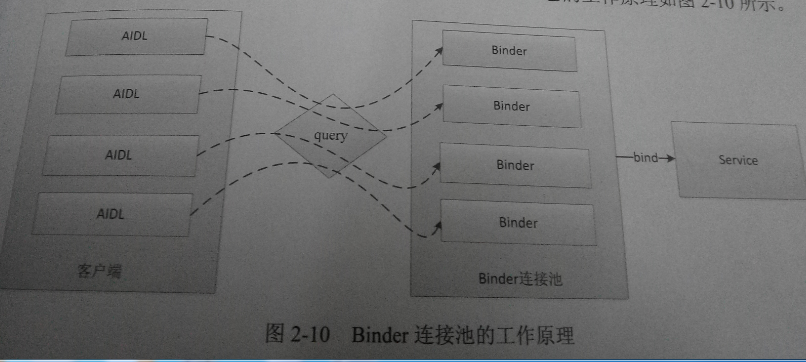
每个业务模块创建自己的AIDL接口并实现此接口,但是不同模块之间不能耦合,所有实现单独开来,然后向服务端提供自己的唯一标识和其相对应的Binder对象,对于服务端来说,只需要一个Service就可以了,服务端提供一个queryBinder接口,这个接口根据业务模块特征返回相应打的Binder对象给客户端,不同业务模块拿到所需的Binder对象后就可以进行远程方法的调用了。由此可见,Binder连接池的作用就是将每个业务模块的Binder请求统一转发到远程Service中去执行,从而避免了重复创建Service的过程,来个示意图:
- 下面就跟据上面的原理,做具体实现。
场景:一个加解密模块,一个计算模块。
实现:(1),常规实现方式,应该是建一个加解密的.aidl,建一个加解密Service,然后建一个计算.aidl,再建一个计算Service,对吧。
(2),Binder连接池实现:
- 下面就跟据上面的原理,做具体实现。
2.1 第一步都一样,肯定是创建.aidl文件
//用于加解密
package com.example.aidl;

interface ISecurityCenter{
 String encrypt(String content);
 String decrypt(String password);

}

//用于计算
package com.example.aidl;

interface ICompute{
    int add(int a,int b);
}
2.2 第二步,那就是各自的单独实现,都很简单
//这就是我们常规的实现吧,没什么不同
public class ISecurityImpl extends ISecurityCenter.Stub {

    private static final char SECRET_CODE='^';

    @Override
    public String encrypt(String content) throws RemoteException {
        char[] chars = content.toCharArray();
        for(int i=0;i<chars.length;i++){
        //普通的异或运算
            chars[i] ^=SECRET_CODE;
        }
        return new String(chars);
    }

    @Override
    public String decrypt(String password) throws RemoteException {

        return encrypt(password);
    }

}

public class IComputeImpl extends ICompute.Stub {

    @Override
    public int add(int a, int b) throws RemoteException {
        return a+b;
    }

}
2.3 这一步就不一样了,这里要声明一个连接池查询接口
package com.example.aidl;

interface IBindPool{
    IBinder queryBinder(int binderCode);
}
2.4 这里就要自己构建一个BinderPool
public class BindPool {
    //Binder唯一标识
    public static final int BIND_NONE = -1;
    public static final int BIND_SECURITY = 0;
    public static final int BIND_COMPUTE = 1;

    private Context mContext;
    private IBindPool mBinderPool;
    private static volatile BindPool mInstance;
    private CountDownLatch mCountDownLatch;

    private BindPool(Context context) {
        //防止内存泄漏
        this.mContext = context.getApplicationContext();
        connectBinderPoolService();
    }

    //多线程中常见的单例模式写法
    public static BindPool getInstance(Context context) {
        if (mInstance == null) {
            synchronized (BindPool.class) {
                if (mInstance == null) {
                    mInstance = new BindPool(context);
                }
            }
        }
        return mInstance;
    }

    /**
     *
     * CountDownLatch,一个同步辅助类,在完成一组正在其他线程中执行的操作之前,它允许一个或多个线程一直等待。
     * 构造方法参数指定了计数的次数
     * countDown方法,当前线程调用此方法,则计数减一
     * await方法,调用此方法会一直阻塞当前线程,直到计时器的值为0
     *
     * */
    private synchronized void connectBinderPoolService() {
        System.out.println("connectBinderPoolService....."+Thread.currentThread().getName());
        mCountDownLatch = new CountDownLatch(1);
        Intent intent = new Intent();
        intent.setAction("com.example.aidl.BookService");
        intent.setPackage("com.example.aidl");
        mContext.bindService(intent, con, Context.BIND_AUTO_CREATE);
        try {
            mCountDownLatch.await();
        } catch (Exception e) {
            System.out.println(e.toString());
        }

        System.out.println("connectBinderPoolService.....wait");

    }

    public IBinder queryBinderByCode(int binderCode) {
        IBinder binder = null;
        try {
            if (mBinderPool != null) {
                binder = mBinderPool.queryBinder(binderCode);
            }
        } catch (Exception e) {
            System.out.println(e.toString());
        }
        return binder;
    }

    private ServiceConnection con = new ServiceConnection() {

        @Override
        public void onServiceDisconnected(ComponentName name) {
            System.out.println("on disconnect....");

        }

        @Override
        public void onServiceConnected(ComponentName name, IBinder service) {
            //接收服务端传来的IBinderPool对象
            mBinderPool = IBindPool.Stub.asInterface(service);
            System.out.println("on connect...."+(mBinderPool==null)+",thread:id:"+Thread.currentThread().getId()+",thread name:"+Thread.currentThread().getName());
            try {
                mBinderPool.asBinder().linkToDeath(recipient, 0);
            } catch (RemoteException e) {
                e.printStackTrace();
                System.out.println(e.toString());
            }finally{
                //放行连接线程
                mCountDownLatch.countDown();
            }
        }
    };

    private IBinder.DeathRecipient recipient = new DeathRecipient() {

        @Override
        public void binderDied() {
            System.out.println(" binder died....");
            mBinderPool.asBinder().unlinkToDeath(recipient, 0);
            mBinderPool = null;
            connectBinderPoolService();
        }

    };

    //IBindPool的实现,跟以前一样
    public static class BinderPoolImpl extends IBindPool.Stub {
        IBinder binder;

        public BinderPoolImpl() {
            super();
        }

        @Override
        public IBinder queryBinder(int binderCode) throws RemoteException {
            switch (binderCode) {
            case BIND_NONE:
                break;
            case BIND_COMPUTE:
                binder = new IComputeImpl();
                break;
            case BIND_SECURITY:
                binder = new ISecurityImpl();
                break;
            default:
                break;
            }
            return binder;
        }

    }

}
2.4 服务端的实现,暴露接口给服务端
public class BookService extends Service {

    //实现写在了BindPool.java
    private Binder binder = new BindPool.BinderPoolImpl();
    // 暴露给客户端
    @Override
    public IBinder onBind(Intent intent) {
        System.out.println("on bind....");
        return binder;
    }

    @Override
    public void onCreate() {
        super.onCreate();
    }

    @Override
    public boolean onUnbind(Intent intent) {
        System.out.println("on unbind.....");
        return super.onUnbind(intent);
    }

    @Override
    public void onDestroy() {
        super.onDestroy();
    }
}
2.5 就是客户端调用服务断了
public class BookActivity extends Activity {

    ISecurityCenter security;
    ICompute compute;
    BindPool bindPool;

    @Override
    protected void onCreate(Bundle savedInstanceState) {
        super.onCreate(savedInstanceState);
        setContentView(R.layout.activity_main);
        System.out.println("thread:id:"+Thread.currentThread().getId()+",thread name:"+Thread.currentThread().getName());

        findViewById(R.id.button2).setOnClickListener(new OnClickListener() {

            @Override
            public void onClick(View v) {
                dowork();
            }
        });

        //新开线程,进行连接,因为连接有可能是耗时的,会阻塞UIThread,不信自己去试
        new Thread(new Runnable() {

            @Override
            public void run() {
                System.out.println(Thread.currentThread().getName());              //连接工作都在这一步
                bindPool = BindPool.getInstance(BookActivity.this);

            }
        }).start();
    }

    private void dowork() {
        //根据唯一标识,获取需要的Binder
        IBinder securityBinder = bindPool.queryBinderByCode(BindPool.BIND_SECURITY);

        security = ISecurityCenter.Stub.asInterface(securityBinder);
        System.out.println("do work......"+(security==null));
        if(security==null){
            return;
        }
        try {
            String msg = "bind pool";
            String password = security.encrypt(msg);
            System.out.println("encypt:" + password + ",decypt:" + security.decrypt(password));

        } catch (RemoteException e) {
            e.printStackTrace();
            System.out.println(e.toString());
        }

        IBinder computeBinder = bindPool.queryBinderByCode(BindPool.BIND_COMPUTE);
        compute = ICompute.Stub.asInterface(computeBinder);
        System.out.println("compute......"+(compute==null));
        if(compute==null){
            return;
        }
        try {
            System.out.println(" compute:" + compute.add(3, 5));
        } catch (RemoteException e) {
            e.printStackTrace();
            System.out.println(e.toString());
        }
    }


    @Override
    protected void onDestroy() {
        super.onDestroy();
    }

}
看一下打印结果:
12-03 16:40:19.753    1672-1672/? I/System.out﹕ thread:id:1,thread name:main
12-03 16:40:19.757    1672-1729/? I/System.out﹕ Thread-83
12-03 16:40:19.757    1672-1729/? I/System.out﹕ connectBinderPoolService.....Thread-83
12-03 16:40:20.389    1730-1730/? I/System.out﹕ on bind....
12-03 16:40:20.389    1672-1672/? I/System.out﹕ on connect....false,thread:id:1,thread name:main
12-03 16:40:20.389    1672-1729/? I/System.out﹕ connectBinderPoolService.....wait
12-03 16:40:23.001    1672-1672/? I/System.out﹕ do work......false
12-03 16:40:23.001    1672-1672/? I/System.out﹕ encypt:<70:~.112,decypt:bind pool
12-03 16:40:23.001    1672-1672/? I/System.out﹕ compute......false
12-03 16:40:23.005    1672-1672/? I/System.out﹕ compute:8
这下把多任务多模块的实现也学了,从此AIDL使用的应该没什么大问题了,俺觉着是。这里的例子还是原理都是从《Android开发艺术探索》摘抄过来的,在这里还是贴到博客上,一是为了自己学习,一是为了让更多的人知道这种方法。
参考:
《Android开发艺术探索》