文章目录
前言
本文使用的YOLOv5版本为v6.1,对YOLOv5-6.x网络结构还不熟悉的同学,可以移步至:【YOLOv5-6.x】网络模型&源码解析
想要尝试改进YOLOv5-6.1的同学,可以参考以下几篇博客:
【魔改YOLOv5-6.x(上)】:结合轻量化网络Shufflenetv2、Mobilenetv3和Ghostnet
【魔改YOLOv5-6.x(中)】:加入ACON激活函数、CBAM和CA注意力机制、加权双向特征金字塔BiFPN
【魔改YOLOv5-6.x(下)】:YOLOv5s+Ghostconv+BiFPN+CA
一般情况下,在深度学习中,为了让神经网路的参数可以正确工作,我们需要大量的数据进行训练,而实际情况中数据并没有我们想象中的那么多,因此我们可以:(1)寻找更多的数据;(2)充分利用已有的数据进行数据增强。
数据增强,可以理解为通过先验知识构造训练样本的邻域值,使得模型不仅在训练集上得到的训练误差很小,并且在验证集上的泛化误差也很小,从而可以提高模型的泛化能力。
数据增强的作用一般包括:
- 丰富训练数据集,增强模型的泛化能力
- 增加数据变化,提高模型的鲁棒性
- 缓解小目标分布不均问题,减少GPU数量
下面对YOLOv5-6.1源码中涉及到的数据增强部分进行讲解,这里放上hyp.scratch-high.yaml中数据增强部分的参数定义(cutout参数是我自己添加的,原文件中没有):
# 1. hsv增强系数 色调 饱和度 亮度
hsv_h: 0.015  # image HSV-Hue augmentation (fraction)
hsv_s: 0.7  # image HSV-Saturation augmentation (fraction)
hsv_v: 0.4  # image HSV-Value augmentation (fraction)

# 2. random_perspective增强系数 旋转角度 平移 缩放 剪切 透明度
degrees: 0.0  # image rotation (+/- deg)
translate: 0.1  # image translation (+/- fraction)
scale: 0.9  # image scale (+/- gain)
shear: 0.0  # image shear (+/- deg)
perspective: 0.0  # image perspective (+/- fraction)

# 3. 图像翻转 上下 左右
flipud: 0.0  # image flip up-down (probability)
fliplr: 0.5  # image flip left-right (probability)

# 4. 图片级数据增强
mosaic: 1.0  # image mosaic (probability)
mixup: 0.1  # image mixup (probability)
cutout: 0.0 # image cutout (probability)
copy_paste: 0.1  # segment copy-paste (probability)
总的来说,YOLOv5-6.1涉及到的数据增强方法主要有以下几种:
1. 对原图做数据增强
- 像素级:HSV增强、旋转、缩放、平移、剪切、透视、翻转等
- 图片级:MixUp、Cutout、CutMix、Mosaic、Copy-Paste(Segment)等
2. 对标签做同样的增强
- 变换后的坐标偏移量
- 防止标签坐标越界
测试用到的四张图片如下所示:

像素级数据增强
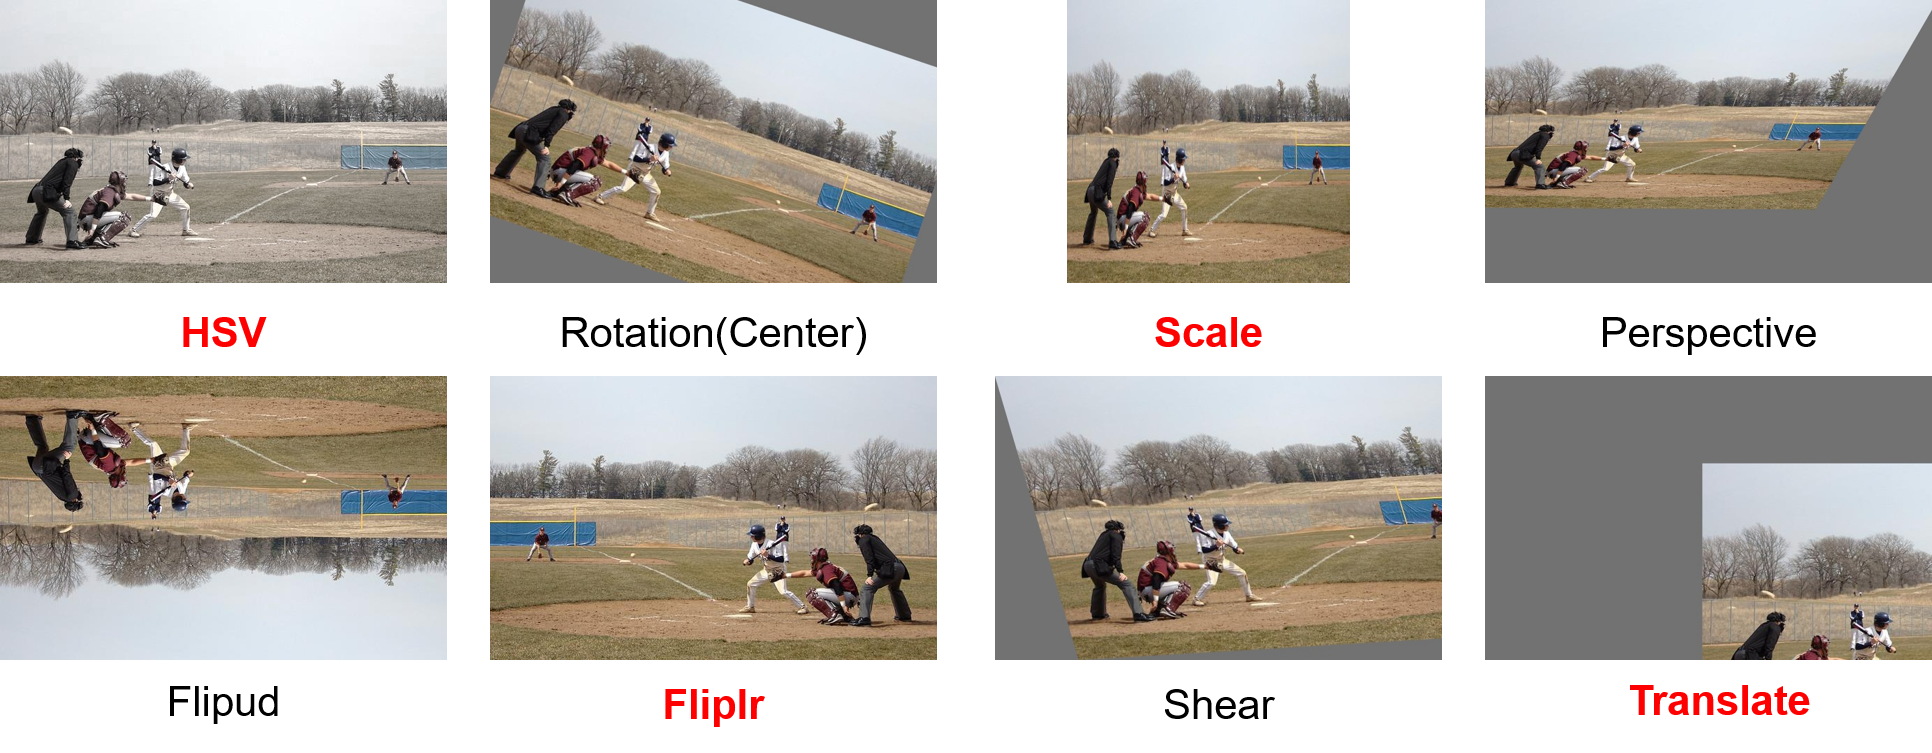
HSV色域变换
# hsv色域变换
elif method == 'hsv':
    """hsv色域增强  处理图像hsv,不对label进行任何处理
    :param img: 待处理图片  BGR [736, 736]
    :param hgain: h通道色域参数 用于生成新的h通道
    :param sgain: h通道色域参数 用于生成新的s通道
    :param vgain: h通道色域参数 用于生成新的v通道
    :return: 返回hsv增强后的图片 img
    """
    hgain, sgain, vgain = 0.015, 0.7, 0.4
    if hgain or sgain or vgain:
    # 随机取-1到1三个实数,乘以hyp中的hsv三通道的系数  用于生成新的hsv通道
    r = np.random.uniform(-1, 1, 3) * [hgain, sgain, vgain] + 1  # random gains
    hue, sat, val = cv2.split(cv2.cvtColor(img, cv2.COLOR_BGR2HSV))  # 图像的通道拆分 h s v
    dtype = img.dtype  # uint8

    # 构建查找表
    x = np.arange(0, 256, dtype=r.dtype)
    lut_hue = ((x * r[0]) % 180).astype(dtype)  # 生成新的h通道
    lut_sat = np.clip(x * r[1], 0, 255).astype(dtype)  # 生成新的s通道
    lut_val = np.clip(x * r[2], 0, 255).astype(dtype)  # 生成新的v通道

    # 图像的通道合并 img_hsv=h+s+v  随机调整hsv之后重新组合hsv通道
    # cv2.LUT(hue, lut_hue)   通道色域变换 输入变换前通道hue 和变换后通道lut_hue
    img_hsv = cv2.merge((cv2.LUT(hue, lut_hue), cv2.LUT(sat, lut_sat), cv2.LUT(val, lut_val)))
    # no return needed  dst:输出图像
    cv2.cvtColor(img_hsv, cv2.COLOR_HSV2BGR, dst=img)
旋转Rotation
# 旋转
elif method == 'rotation':
    a = random.uniform(-45, 45)
    R = cv2.getRotationMatrix2D(angle=a, center=(width / 2, height / 2), scale=1)
    img = cv2.warpAffine(img, R, dsize=(width, height), borderValue=(114, 114, 114))
缩放Scale
# 缩放
elif method == 'scale':
    img = cv2.resize(img, dsize=(640, 640))
翻转Flip
# 上下垂直翻转
if method == 'flipud':
    img = np.flipud(img)

# 左右水平翻转
elif method == 'fliplr':
    img = np.fliplr(img)
平移Translate
# 平移
elif method == 'translation':
    T = np.eye(3)
    tr = 0.1
    T[0, 2] = random.uniform(0.5 - tr, 0.5 + tr) * width  # x translation (pixels)
    T[1, 2] = random.uniform(0.5 - tr, 0.5 + tr) * height  # y translation (pixels)
    img = cv2.warpAffine(img, T[:2], dsize=(width, height), borderValue=(114, 114, 114))
剪切Shear
Shear变换,大概是将矩形图片变成平行四边形的样子,保持图形上各点的某一坐标值不变,而另一坐标值关于该保持不变坐标值进行线性变换,类似于在图像外接平行四边形固定一边的情况下,在该固定边的对边某个角施加了一个推力,该推力的作用线与x或y轴方向平行,在该推力的作用下图像的外接平行四边形发送的形变就是shear。
# 剪切
# https://blog.csdn.net/LaoYuanPython/article/details/113856503
elif method == 'shear':
    S = np.eye(3)
    sh = 20.0
    S[0, 1] = math.tan(random.uniform(-sh, sh) * math.pi / 180)  # x shear (deg)
    S[1, 0] = math.tan(random.uniform(-sh, sh) * math.pi / 180)  # y shear (deg)
    img = cv2.warpAffine(img, S[:2], dsize=(width, height), borderValue=(114, 114, 114))
透视Perspective
Perspective变换,就是利用透视中心、像点、目标点三点共线的条件,将一个平面通过一个投影矩阵投影到指定平面上,Perspective变换之后的图片通常不是平行四边形(除非映射视平面和原来平面平行的情况),而是类似于梯形。
# 透视变换
# 透视变换原理实例代码详解:https://xiulian.blog.csdn.net/article/details/104281693
elif method == 'perspective':
    P = np.eye(3)
    pe = 0.001
    P[2, 0] = random.uniform(-pe, pe)  # x perspective (about y)
    P[2, 1] = random.uniform(-pe, pe)  # y perspective (about x)
    img = cv2.warpPerspective(img, P, dsize=(width, height), borderValue=(114, 114, 114))
三种常用的图片级数据增强
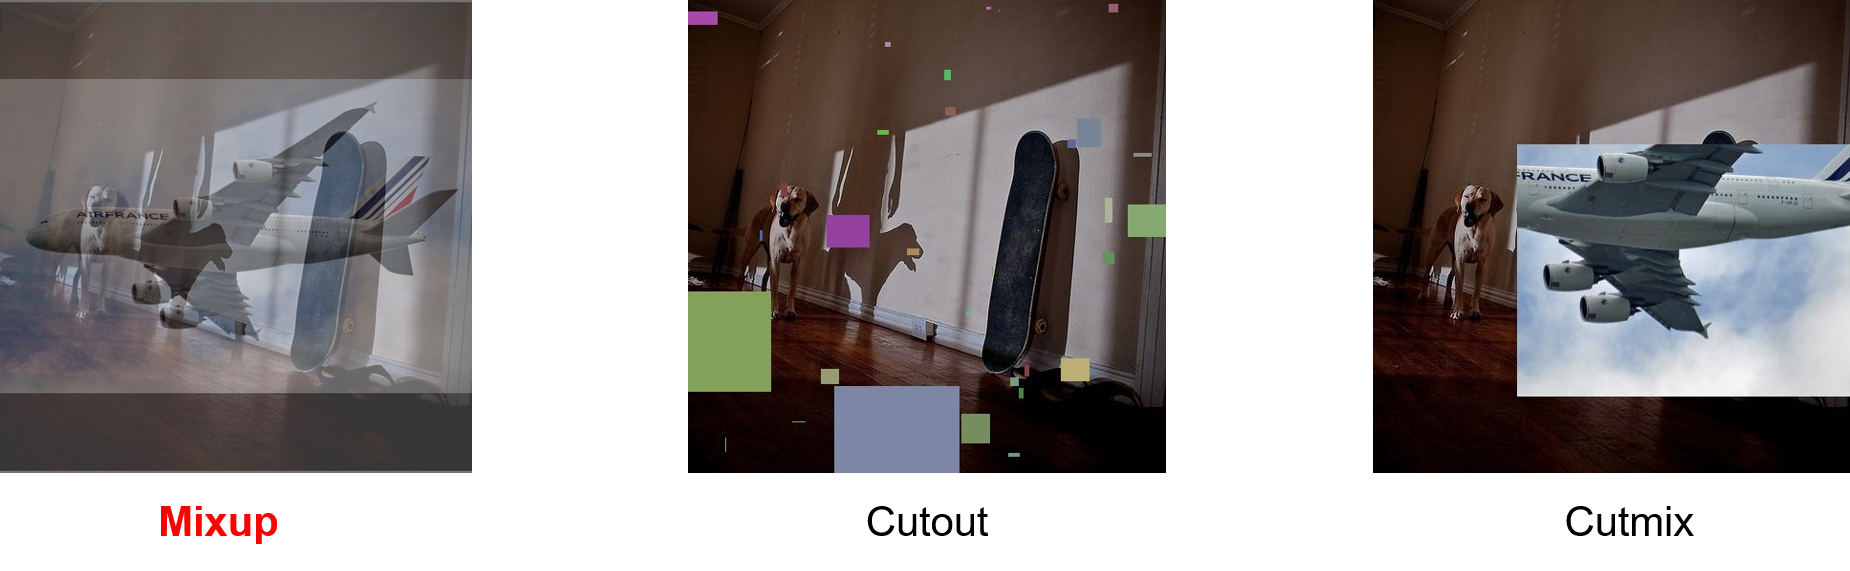
Mixup
在图片A中,叠加图片B,这样经过两幅图片的加权运算可以看到这幅新的图片上既有图A又有图B。
if method == 'mixup':
    # 填充到相同大小 640 × 640
    imgs[:2] = fix_shape(imgs[:2])
    img1 = imgs[0]
    img2 = imgs[1]
    # 显示原图
    htitch = np.hstack((img1, img2))
    cv2.imshow("origin images", htitch)
    cv2.waitKey(0)
    cv2.imwrite('outputs/mixup_origin.jpg', htitch)
    # mixup ratio, alpha=beta=32.0
    r = np.random.beta(32.0, 32.0)
    imgs = (img1 * r + img2 * (1 - r)).astype(np.uint8)
    return imgs
Cutout
将图片中某一块或某几块区域,填充为某种颜色块,模拟遮挡等效果
elif method == 'cutout':
    img = imgs[0]
    cv2.imshow("origin images", img)
    cv2.waitKey(0)
    height, width = img.shape[:2]
    # image size fraction
    scales = [0.5] * 1 + \
            [0.25] * 2 + \
            [0.125] * 4 + \
            [0.0625] * 8 + \
            [0.03125] * 16
    # create random masks
    for s in scales:
        # mask box shape
        mask_h = random.randint(1, int(height * s))
        mask_w = random.randint(1, int(width * s))

        # mask box coordinate
        xmin = max(0, random.randint(0, width) - mask_w // 2)  # 左上角 x坐标
        ymin = max(0, random.randint(0, height) - mask_h // 2)  # 左上角 y坐标
        xmax = min(width, xmin + mask_w)  # 右下角 x坐标
        ymax = min(height, ymin + mask_h)  # 右下角 y坐标

        # apply random color mask
        color = [random.randint(64, 191) for _ in range(3)]
        # color = [0, 0, 0]
        img[ymin:ymax, xmin:xmax] = color
    return img
Cutmix
将图片中的某一块区域剪裁掉,填充到另外一幅图像的对应区域
elif method == 'cutmix':
    # 这里未做fix_shape处理 两张图片大小不一样
    img1, img2 = imgs[0], imgs[1]
    h1, h2 = img1.shape[0], img2.shape[0]
    w1, w2 = img1.shape[1], img2.shape[1]
    # 设定lamda的值,服从beta分布
    alpha = 1.0
    lam = np.random.beta(alpha, alpha)
    cut_rat = np.sqrt(1. - lam)
    # 裁剪第二张图片
    cut_w = int(w2 * cut_rat)  # 要裁剪的图片宽度
    cut_h = int(h2 * cut_rat)  # 要裁剪的图片高度
    # uniform
    cx = np.random.randint(w2)  # 随机裁剪位置
    cy = np.random.randint(h2)

    # 限制裁剪的坐标区域不超过2张图片大小的最小值
    xmin = np.clip(cx - cut_w // 2, 0, min(w1, w2))  # 左上角x
    ymin = np.clip(cy - cut_h // 2, 0, min(h1, h2))  # 左上角y
    xmax = np.clip(cx + cut_w // 2, 0, min(w1, w2))  # 右下角x
    ymax = np.clip(cy + cut_h // 2, 0, min(h1, h2))  # 右下角y

    # 裁剪区域混合
    img1[ymin:ymax, xmin:xmax] = img2[ymin:ymax, xmin:xmax]
    return img1
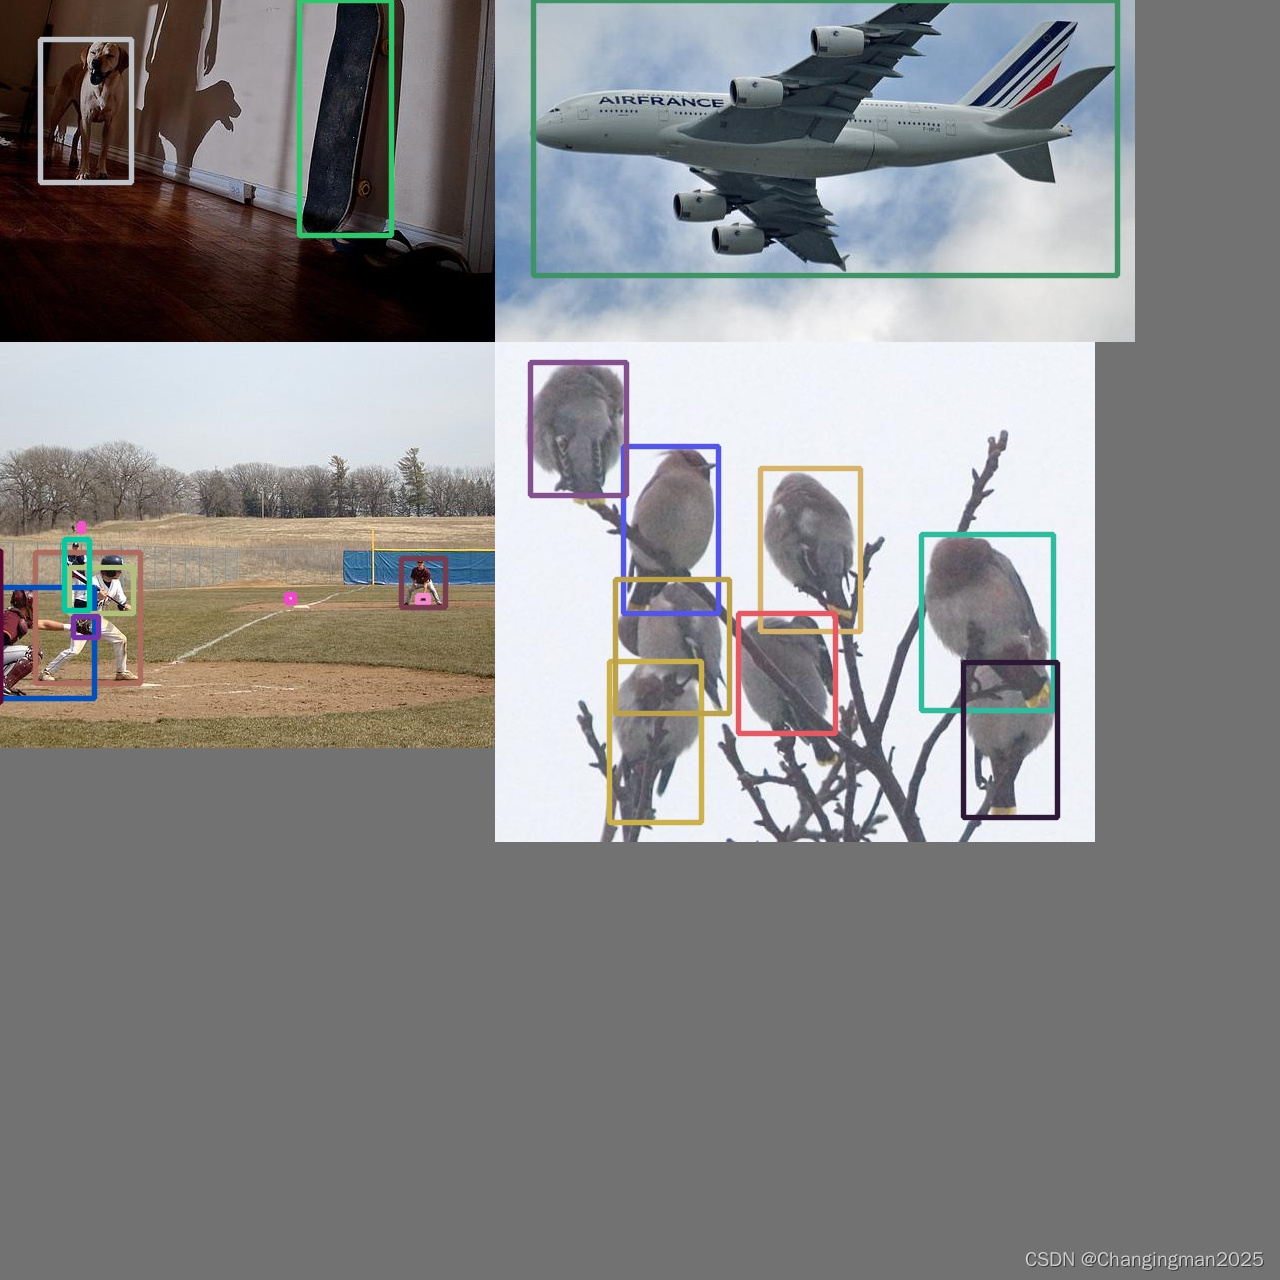
Mosaic数据增强
Mosaic数据增强在YOLOv4就已经被使用,与CutMix有一定的相似性。Mosaic利用了四张图片,对四张图片进行随机拼接,每一张图片都有其对应的GT框,将四张图片拼接之后就获得一张新的图片,同时也获得这张图片对应的GT框,然后我们将这样一张新的图片传入到神经网络当中去训练,这样就极大地丰富了检测物体背景,并且在BN计算的时候会直接计算四张图片。
代码主要流程如下:
- Step1:假设模型输入尺寸为s,首先初始化一幅尺寸为2s*2s的灰色大图
img4 = np.full((s * 2, s * 2, img.shape[2]), 114, dtype=np.uint8)
- Step2:在大图中从点A(s/2, s/2)和点B(3s/2, 3s/2)限定的矩形内随机选择一点作为拼接点
yc, xc = [int(random.uniform(-x, 2 * s + x)) for x in self.mosaic_border] # mosaic center x, y
- Step3:随机选择四张图,取其部分拼入大图,超出的部分将被舍弃
for i in range(len(imgs)):
    img = imgs[i]
    h, w = img.shape[:2]
    # place img in img4
    if i == 0:  # top left
        # 创建马赛克图像 [1280, 1280, 3]=[h, w, c] base image with 4 tiles
        img4 = np.full((s * 2, s * 2, imgs[0].shape[2]), 114, dtype=np.uint8)
        # xmin, ymin, xmax, ymax (large image)
        # 计算马赛克图像中的坐标信息(将图像填充到马赛克图像中)
        # 马赛克图像【大图】:(x1a,y1a)左上角,(x2a,y2a)右下角
        x1a, y1a, x2a, y2a = max(xc - w, 0), max(yc - h, 0), xc, yc
        # xmin, ymin, xmax, ymax (small image)
        # 计算截取的图像区域信息(以xc,yc为第一张图像的右下角坐标填充到马赛克图像中,丢弃越界的区域)
        # 要拼接的图像【小图】:(x1b,y1b)左上角 (x2b,y2b)右下角
        x1b, y1b, x2b, y2b = w - (x2a - x1a), h - (y2a - y1a), w, h
    elif i == 1:  # top right
        x1a, y1a, x2a, y2a = xc, max(yc - h, 0), min(xc + w, s * 2), yc
        x1b, y1b, x2b, y2b = 0, h - (y2a - y1a), min(w, x2a - x1a), h
    elif i == 2:  # bottom left
        x1a, y1a, x2a, y2a = max(xc - w, 0), yc, xc, min(s * 2, yc + h)
        x1b, y1b, x2b, y2b = w - (x2a - x1a), 0, w, min(y2a - y1a, h)
    elif i == 3:  # bottom right
        x1a, y1a, x2a, y2a = xc, yc, min(xc + w, s * 2), min(s * 2, yc + h)
        x1b, y1b, x2b, y2b = 0, 0, min(w, x2a - x1a), min(y2a - y1a, h)
    # img4[ymin:ymax, xmin:xmax]
    # 将截取的图像区域填充到马赛克图像的相应位置   img4[h, w, c]
    # 将图像img的【(x1b,y1b)左上角 (x2b,y2b)右下角】区域截取出来填充到马赛克图像的【(x1a,y1a)左上角 (x2a,y2a)右下角】区域
    img4[y1a:y2a, x1a:x2a] = img[y1b:y2b, x1b:x2b]  # img4[ymin:ymax, xmin:xmax]
- Step4:根据原图坐标的偏移量,重新计算GT框的坐标,并使用
np.clip防止更新后的标签坐标越界
    # 计算小图填充到大图时所产生的偏移 用来计算mosaic数据增强后 标签框的位置
    padw = x1a - x1b
    padh = y1a - y1b

    # 处理图像的labels信息
    label = labels[i].copy()
    if label.size:
        # normalized xywh to pixel xyxy format
        label[:, 1:] = xywhn2xyxy(label[:, 1:], w, h, padw, padh)
    labels4.append(label)

# Concat/clip labels
# 把label4中4张小图的信息整合到一起
labels4 = np.concatenate(labels4, 0)
for x in (labels4[:, 1:]):
    np.clip(x, 0, 2 * s, out=x)  # clip when using random_perspective()
测试结果如下所示:
完整代码及数据
Reference
【YOLO v4】【trick 8】Data augmentation: MixUp、Random Erasing、CutOut、CutMix、Mosic
图像仿射变换shear怎么翻译?剪切、错切、推移哪个译词好?
透视变换原理实例代码详解
详解 OpenCV 透视变换原理及实例
【图像处理】透视变换 Perspective Transformation