阅读目录
- Vue如何封装Axios请求
- Vue 中的路由守卫
- 安装 vuex
- 快速认识 vuex
- 为什么 token 要存在 vuex 中还要存本地一份?
-
- 源码
-
- E:\node\vue296\index.html 根文件 html
- E:\node\vue296\src\App.vue 根组件
- E:\node\vue296\src\main.js 入口文件
- E:\node\vue296\src\vuex\store.js 状态管理模式,组件状态集中管理文件
- E:\node\vue296\src\utils\request.js 封装的 axios 实例文件
- E:\node\vue296\src\router\index.js 路由文件
- E:\node\vue296\src\components\HelloWorld.vue 首页组件
- E:\node\vue296\src\components\Login.vue 登陆组件
- E:\node\vue296\src\components\Hello.vue 组件
- 预览示例的示例功能
Vue如何封装Axios请求
我使用的是 vue-cli 框架,vscode编辑器。
1 安装axios
在控制台通过 npm i axios --save 安装:
PS E:\node\vue296> npm i axios --save
npm WARN optional SKIPPING OPTIONAL DEPENDENCY: fsevents@2.3.2 (node_modules\fsevents):
npm WARN notsup SKIPPING OPTIONAL DEPENDENCY: Unsupported platform for fsevents@2.3.2: wanted {

    "os":"darwin","arch":"any"} (current: {

    "os":"win32","arch":"x64"})
npm WARN optional SKIPPING OPTIONAL DEPENDENCY: fsevents@1.2.13 (node_modules\watchpack-chokidar2\node_modules\fsevents):
npm WARN notsup SKIPPING OPTIONAL DEPENDENCY: Unsupported platform for fsevents@1.2.13: wanted {

    "os":"darwin","arch":"any"} (current: {

    "os":"win32","arch":"x64"})
npm WARN optional SKIPPING OPTIONAL DEPENDENCY: fsevents@1.2.13 (node_modules\webpack-dev-server\node_modules\fsevents):
npm WARN notsup SKIPPING OPTIONAL DEPENDENCY: Unsupported platform for fsevents@1.2.13: wanted {

    "os":"darwin","arch":"any"} (current: {

    "os":"win32","arch":"x64"})

+ axios@0.27.2
added 5 packages from 4 contributors in 12.422s

PS E:\node\vue296>
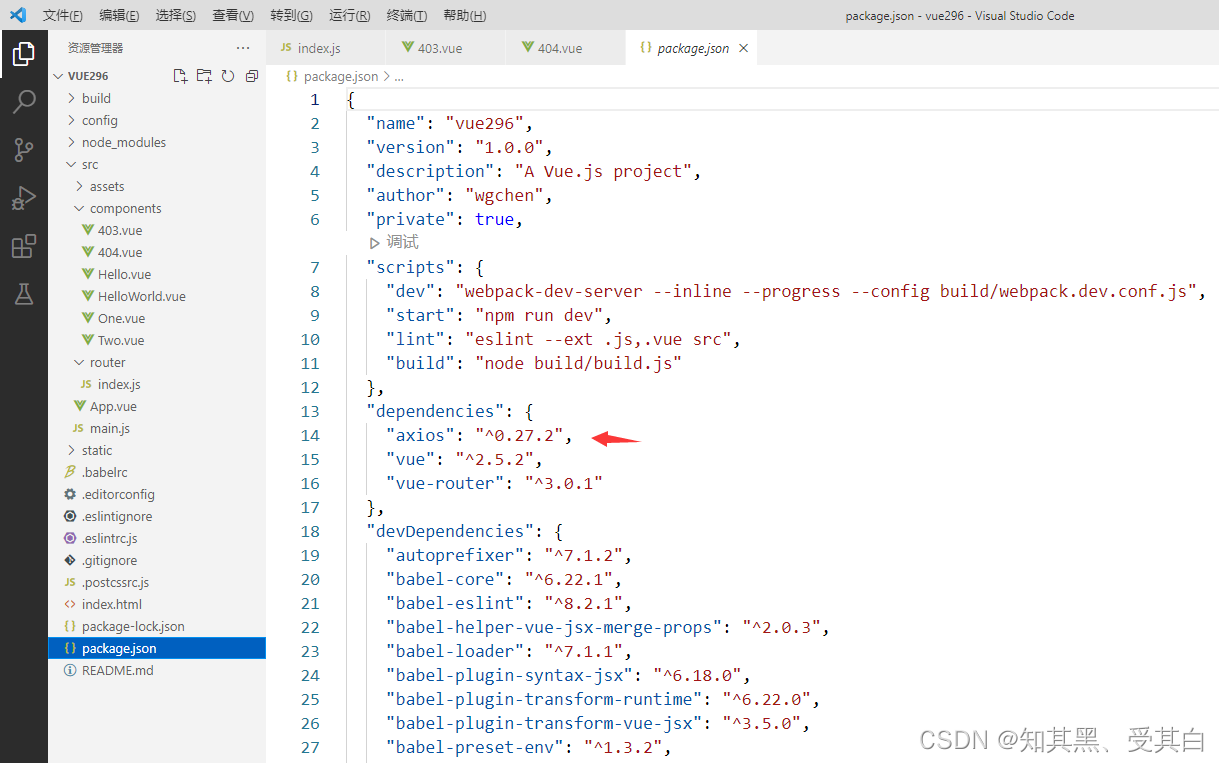
安装好之后,在 package.json 中检查,如图,如果有的话,就说明安装成功。
2 封装代码 axios
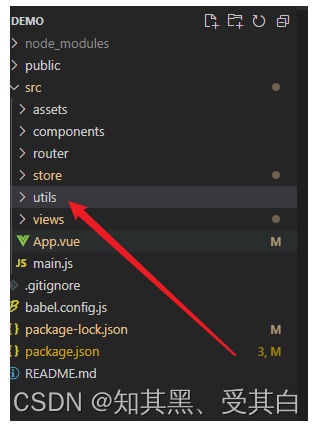
(1)首先在 src 目录下,新建一个 utils 文件夹,用来放置封装的代码文件。
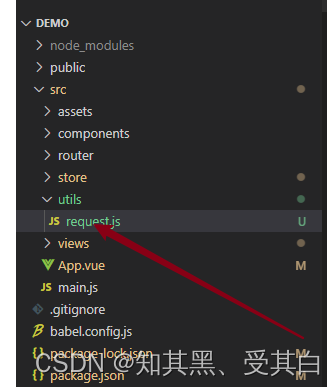
(2)在 utils 问价夹中新建一个 request.js 文件。
(3)在 request.js 中编写代码。
//引入axios
import axios from "axios"

//创建axios实例
const instance = axios.create({


  baseURL: 'http://tt.cc/testData/',//公共地址
  timeout: 1000,//请求超时时间
});

// 添加请求拦截器
instance.interceptors.request.use(function (config) {


    // 在发送请求之前做些什么
    return config;
  }, function (error) {


    // 对请求错误做些什么
    return Promise.reject(error);
  });

// 添加响应拦截器
instance.interceptors.response.use(function (response) {


    // 对响应数据做点什么
    return response;
  }, function (error) {


    // 对响应错误做点什么
    return Promise.reject(error);
  });

//导出axios实例
export default instance
应用方式
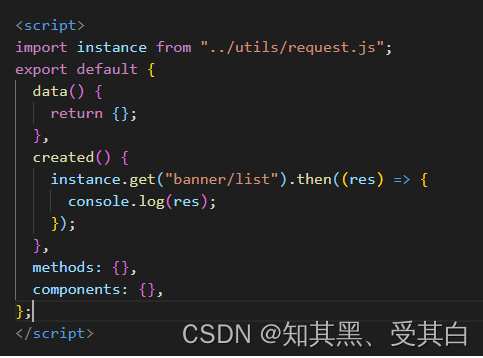
到这一步,封装基本完成,使用时,在 Vue 组件中引入即可,如图:
利用 async,await 对其进行进一步封装。
//引入 axios 实例
import instance from "./utils/request"

# 第一种应用方式
const ax = instance.get('text.php').then(function(response){


	localStorage.setItem("token", response.data.name);
	return response;
})

# 第一种应用方式
ax.then(res=>{


	console.log(res.data);
	this.list = res.data;
});
# 第一种取值方式
setTimeout(() => {


	console.log(this.list.name);
}, 300);
console.log(localStorage.getItem("token"))

# 第二种应用方式
async function getRotationChart() {


		let {

    data} = await instance.get('text.php')
		console.log(data,"sadfasdfasdfs");
		return data
}
console.log(getRotationChart())
Vue 中的路由守卫
路由守卫的分类,Vue 中的路由守卫可以分为:
       全局的路由守卫;
单个路由独享的路由守卫;
     组件级的路由守卫;
1、vue-router 全局有三个守卫:
   router.beforeEach 全局前置守卫 进入路由之前
router.beforeResolve 全局解析守卫(2.5.0+) 在 beforeRouteEnter 调用之后调用
    router.afterEach 全局后置钩子 进入路由之后
2、vue-router 组件内的守卫:
 beforeRouteEnter 进入路由之前
beforeRouteUpdata (2.2新增) 路由更新时
 beforeRouteLeave 离开路由之前
3、vue-router 单个路由独享的守卫
beforeEnter
路由守卫钩子函数里面有三个参数
to,from,next 这三个参数:
to 和 from 是将要进入和将要离开的路由对象,路由对象指的是平时通过 this.$route 获取到的路由对象。
next:Function 这个参数是个函数,且必须调用,否则不能进入路由(页面空白)。
next() 进入该路由。
next(false): 取消进入路由,url 地址重置为 from 路由地址(也就是将要离开的路由地0址)。 next 跳转新路由,当前的导航被中断,重新开始一个新的导航。
使用演示
1 全局守卫
全局守卫写在路由的 js 文件内。如图。
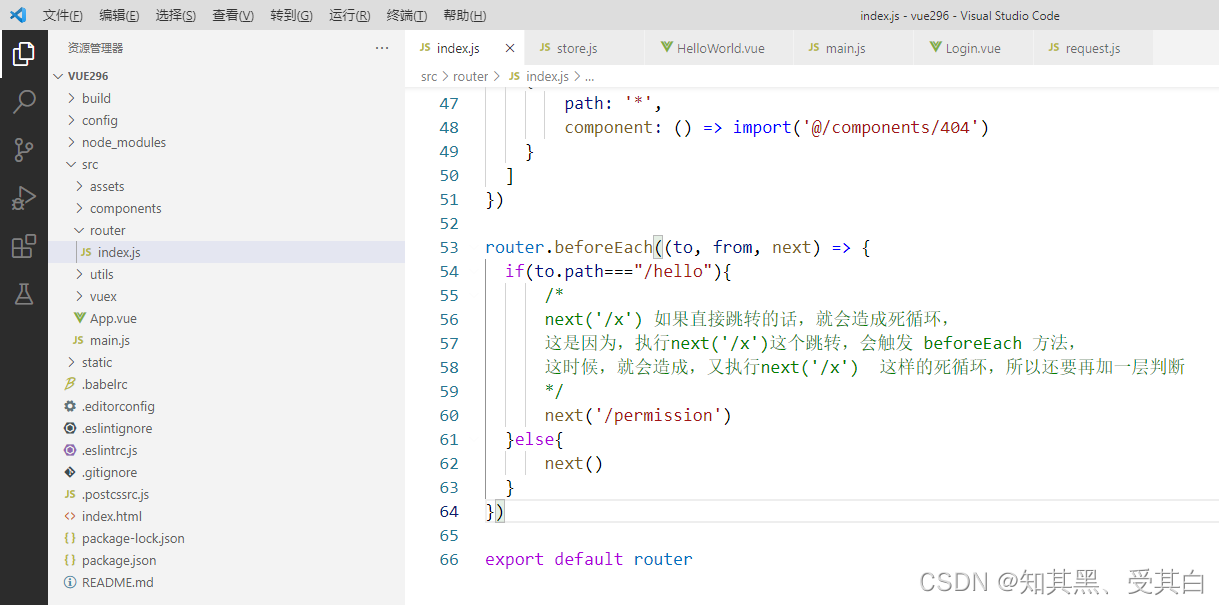
router.beforeEach 里在循环所有的路由地址。
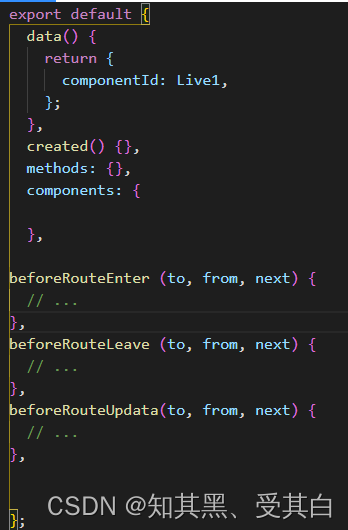
2 组件级守卫
组件级的守卫写在页面组件中,与 data,methods 同级。
如图:这些与全局的方法,参数是一样的,里面写逻辑。
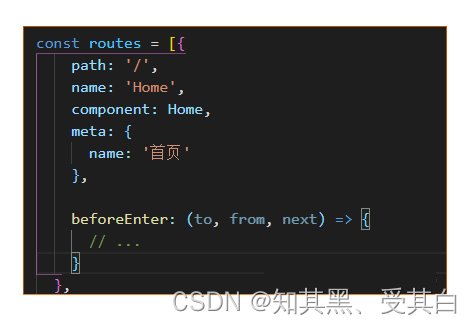
3 单个路由独享的守卫
单个路由独享的守卫写在路由配置中,与path,name同级。如图。
4 官网整个路由守卫被触发流程的步骤:
1.导航被触发。
2.在失活的组件里调用离开守卫。
3.调用全局的 beforeEach 守卫。
4.在重用的组件里调用 beforeRouteUpdate 守卫 (2.2+)。
5.在路由配置里调用 beforeEnter。
6.解析异步路由组件。
7.在被激活的组件里调用 beforeRouteEnter。
8.调用全局的 beforeResolve 守卫 (2.5+)。
9.导航被确认。
10.调用全局的 afterEach 钩子。
11.触发 DOM 更新。
12.用创建好的实例调用 beforeRouteEnter 守卫中传给 next 的回调函数。
安装 vuex
PS E:\node\vue296> npm install --save vuex@3.6.2
npm WARN optional SKIPPING OPTIONAL DEPENDENCY: fsevents@2.3.2 (node_modules\fsevents):
npm WARN notsup SKIPPING OPTIONAL DEPENDENCY: Unsupported platform for fsevents@2.3.2: wanted {

    "os":"darwin","arch":"any"} (current: {

    "os":"win32","arch":"x64"})
npm WARN optional SKIPPING OPTIONAL DEPENDENCY: fsevents@1.2.13 (node_modules\webpack-dev-server\node_modules\fsevents):
npm WARN notsup SKIPPING OPTIONAL DEPENDENCY: Unsupported platform for fsevents@1.2.13: wanted {

    "os":"darwin","arch":"any"} (current: {

    "os":"win32","arch":"x64"})
npm WARN optional SKIPPING OPTIONAL DEPENDENCY: fsevents@1.2.13 (node_modules\watchpack-chokidar2\node_modules\fsevents):
npm WARN notsup SKIPPING OPTIONAL DEPENDENCY: Unsupported platform for fsevents@1.2.13: wanted {

    "os":"darwin","arch":"any"} (current: {

    "os":"win32","arch":"x64"})

+ vuex@3.6.2
added 1 package from 1 contributor in 14.372s
PS E:\node\vue296>
注意版本问题:vue 的 2.x 版本对应 vuex 的 3.x 版本,vue 的 3.x 版本对应 vuex 的 4.x 版本。
1 Vuex 的基本使用
安装浏览器插件:devtools 方便调试
state:存放需要共享的状态信息,使用时通过 $store.state.count 即可拿到状态信息。
在 src 目录下新建 vuex 文件夹(文件夹名称可随意命名),创建 store.js 文件引入、安装、创建并导出 Vuex 对象。
E:\node\vue296\src\vuex\store.js
import Vue from 'vue'
import Vuex from 'vuex'

// 1.安装插件
Vue.use(Vuex)

//2.创建对象
const store = new Vuex.Store({


  state: {


    count: 0
  },
  mutations: {


    inscrease() {


        this.state.count ++
    }
  },
  actions: {


  },
  getters:{


  },
  modules:{


  }
})

//3.导出使用
export default store
2 main.js 文件中挂载使用 vuex 对象
和 vue-router 的使用方式一样,在 main.js 文件中挂载使用。
E:\node\vue296\src\main.js
import Vue from 'vue'
import App from './App'
import router from './router'

// 引入store
import store from './vuex/store'

Vue.config.productionTip = false

/* eslint-disable no-new */
new Vue({


  el: '#app',
  router,
  store, // 全局注入
  components: {

     App },
  template: '<App/>'
})
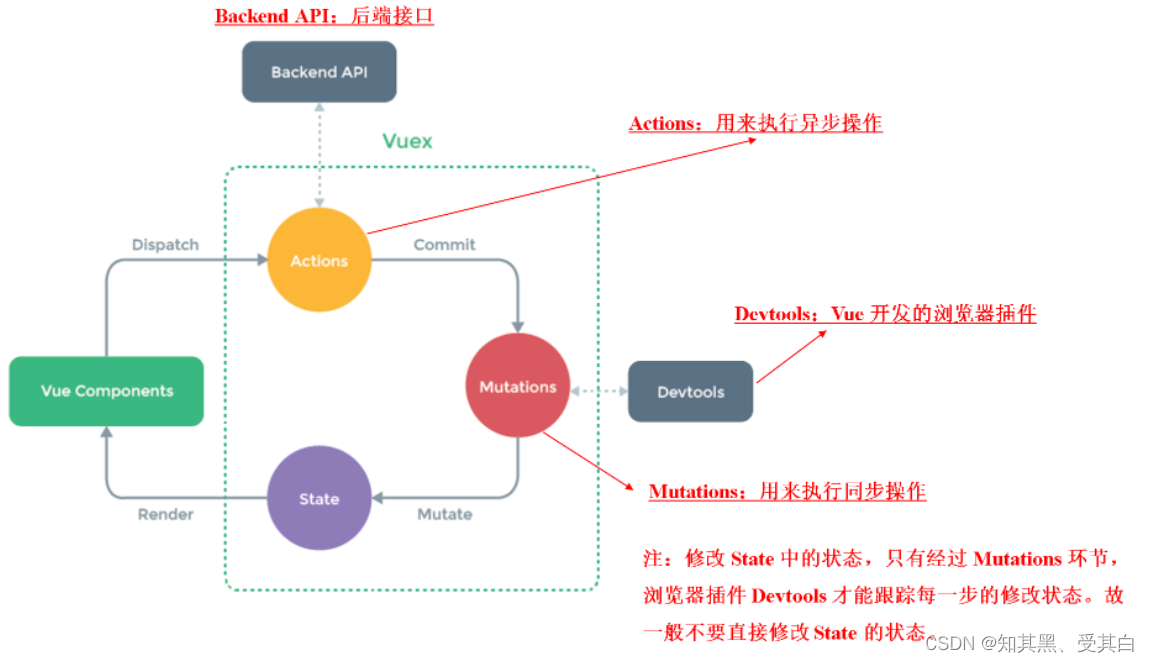
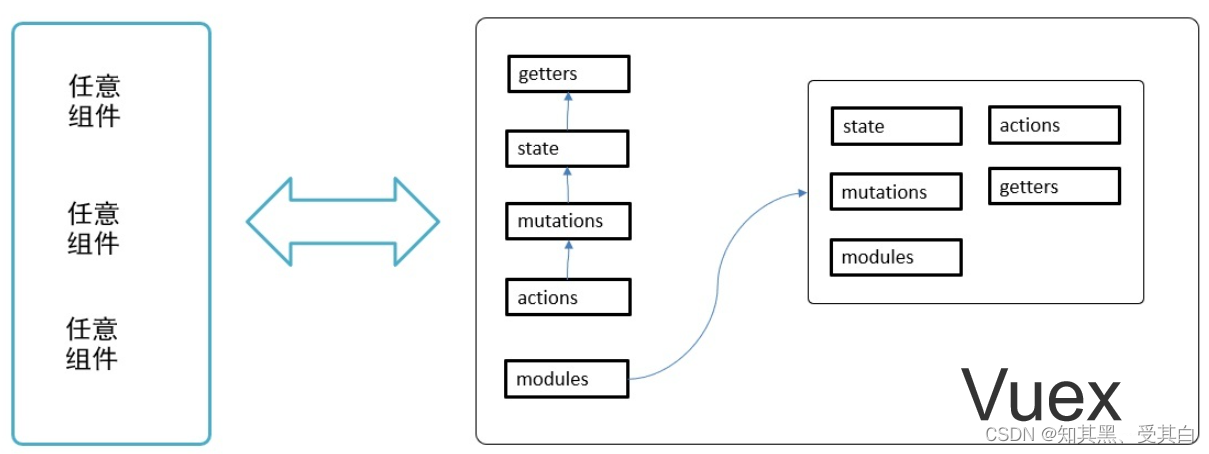
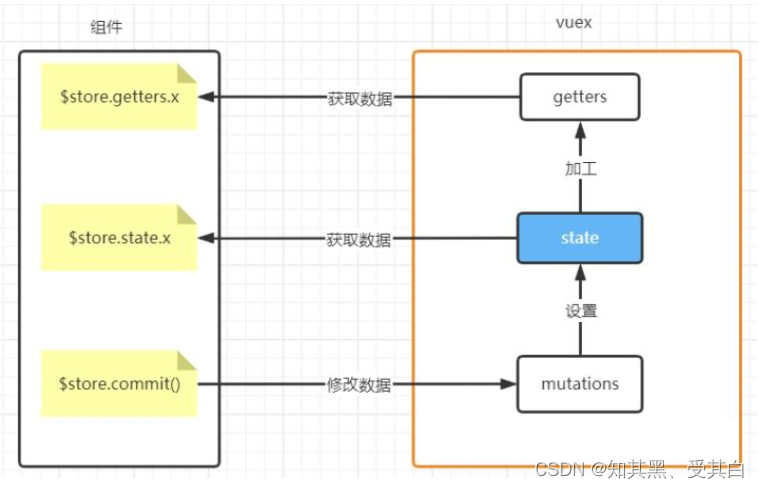
store 对象中存放的东西是固定的,主要有:state、mutations、actions、getters、modules。
下图是官方给出的vuex状态管理图例:
3 组件中应用 vuex
E:\node\vue296\src\components\HelloWorld.vue
对 state 的状态信息进行修改:
先拿到 store 对象,然后通过 commit 提交 mutations 中的方法。
<template>
<div>
<p>导航 :
<router-link to="/">首页 {
{
msg }} </router-link> <br/>
<router-link to="/hello"> 单页 hello</router-link><br/>
<router-link to="/login"> 登陆 </router-link>
</p>
hello info component
<button type="button" @click="add()">添加</button>
</div>
</template>
<script>
import store from '../vuex/store.js'
export default {
name: 'HelloWorld',
store,
data () {
return {
msg: 'HelloWorld'
}
},
methods:{
add() {
console.log('add Event from info!')
store.commit('inscrease')
}
}
}
</script>
<!-- Add "scoped" attribute to limit CSS to this component only -->
<style scoped>
a {
text-decoration:none;
}
</style>
E:\node\vue296\src\components\Login.vue
<template>
    <div class="hello">
        <h1>{

    {

     msg }}</h1>
        <p>vuex {

    {

     msg_vuex }} </p>
        <button @click="goHome">回到首页</button>
    </div>
</template>
<script>
import store from '../vuex/store.js'

export default {


    name:'Login',
    store,
    data () {


        return {


            msg: 'Login Vuex test!',
            // 展示 vuex 的 store 里的 count
            msg_vuex : store.state.count
        }
    },
    methods: {


        goHome(){


            this.$router.push('/');
        }
    }
}
</script>
<style scoped>

</style>
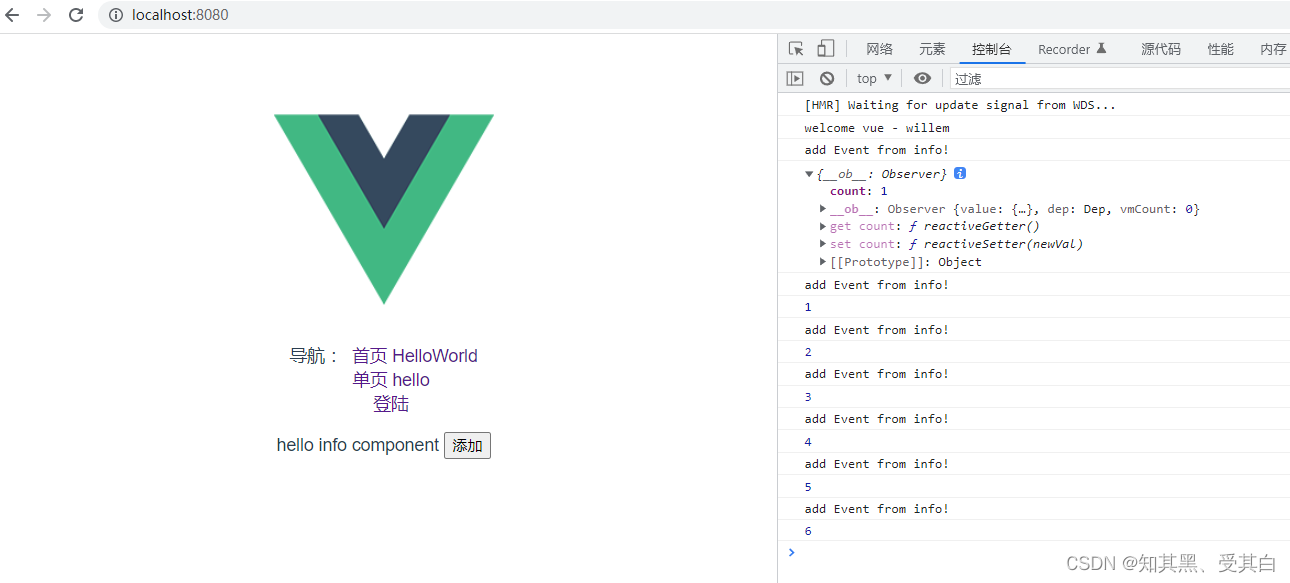
4 预览使用 devtools 调试界面,可以跟踪查看每一次事件操作。

快速认识 vuex
为什么要用Vuex?
首先我来引入一个概念,单向数据流的概念。
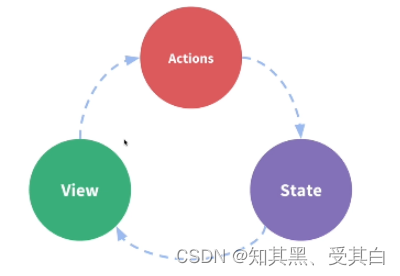
我们页面是有很多个视图 View 组成的,用户的操作 Actions 会带来视图上状态 State 变化,状态的变化又会驱动视图的更新,如果我们的页面没有采用这样的数据流方式开发的话,那么组件间的状态管理就会异常复杂。
我们常见的用 vuex 解决问题,多个视图依赖同一个状态的这样问题,比如菜单导航。
来自不同视图的行为需要改变同一状态的问题,比如评论的弹幕,当我们发出一条评论的时候,我们要去改变弹幕的状态,去给它新增一条弹幕或者说删除一条旧的弹幕。
什么是 vuex ?
vuex 就是为 vue.js 开发的 状态管理模式,组件状态集中管理,组件状态改变遵循统一的原则。
组件之间传值
目标:熟悉组件之间传值的各种情况(关注非父子之间传值)
父组件向子组件传值 props
子组件向父组件传值 $emit
非父子组件之间传值 : 爷孙;兄弟 (发布订阅模式(微博:大V----粉丝))
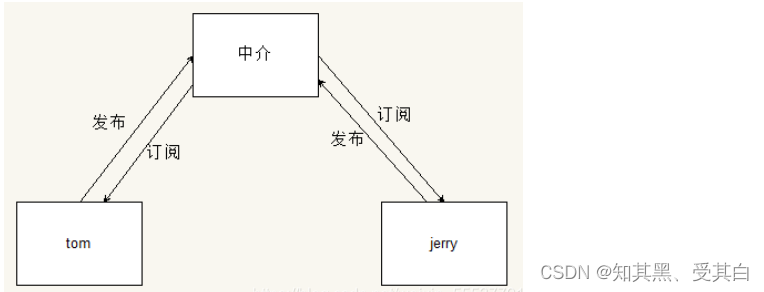
基于Vue实现发布订阅模式
// 相当于中介
const eventBus = new Vue()

// 订阅事件
eventBus.$on('event-b', (param) => {


  console.log(param) // 123
})

// 发布事件
eventBus.$emit('event-b', 123)
通过兄弟组件之间的传值进行验证。
总结:
1 少量的组件之间数据传递可以用这种模式
2 但是不建议大量的组件通信采用这种机制(代码比较乱,后期维护比较麻烦)
状态管理必要性分析
Vuex 是一个专为 Vue.js 应用程序开发的状态管理模式。
它采用集中式存储管理应用的所有组件的状态,并以相应的规则保证状态以一种可预测的方式发生变化。
如果使用了 Vuex,就可以非常方便的进行复杂的组件之间数据传递(非父子关系)
总结:
1 所有组件的数据进行统一管理(存储和变更),每个组件内部就不再需要维护这些数据了
2 数据变更时,统一修改 Store 中数据即可,组件中用到这个数据的组件会自动更新(数据是响应式的)
目标:熟悉 Vuex 是如何实现上述集中管理组件数据这种思想(模式)的。
Devtools 指的是浏览器的 Vue 插件调试工具,它可以监控到数据的所有变更操作。
Vuex 的学习内容
- state: 统一定义公共数据(类似于data(){return {a:1, b:2,xxxxxx}})
- mutations : 使用它来修改数据(类似于 methods ) 更改 state 中的数据必须使用mutations 来进行更改。
- getters: 类似于 computed ( 计算属性,对现有的状态进行计算得到新的数据—派生 )
- actions: 发起异步请求
- modules: 模块拆分
其中最为重要的内容是 state 和 mutations。
Vuex 在 Vue 项目使用 Vuex
情况1:在老项目中使用。 先额外安装 vuex 包,然后在配置。
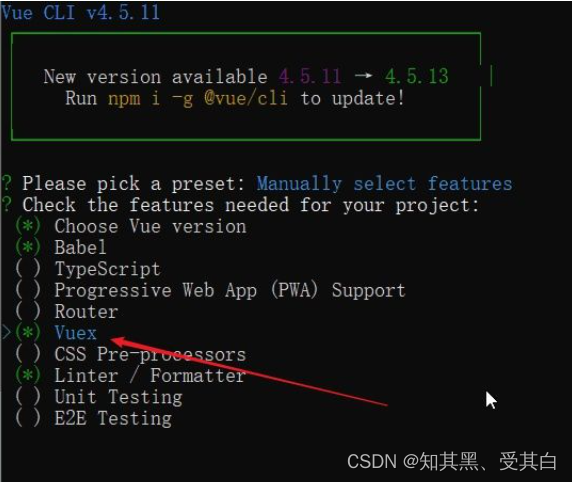
情况2:在新项目中使用, 在配置 vue-cli 中创建项目时,就可以直接选中 vuex 项,这样就不用做任何配置了(脚手架会自动帮我们完成的)。
具体如下图示:
在旧项目中:
1、安装。它是一个独立的包,需要先安装。
2、配置 store/index.js
3、创建 Vuex.Store 实例
4、向 Vue 实例注入 store
5、使用,在组件中使用 store
实例化 store
与 router 一样,当我们在项目中使用 vuex 之后,为了方便代码维护,我们一般需要做特殊的目录调整,约定的结构如下:
|--src
|----- main.js
|----- store
|----------- index.js
在 store/index.js 中放置具体的代码,具体如下:
import Vue from 'vue'
import Vuex from 'vuex'

Vue.use(Vuex)

const store = new Vuex.Store({


  state: {


    count: 0
  }
})
export default store
向 Vue 实例注入 store。在 src/main.js 中:
// 省略其他
// 1. 导入store
import store from './store'

new Vue({


  // 省略其他...
  store // 2. 注入Vue实例
})
组件中使用 store
在任意组件中,通过 this.$store.state 来获取公共数据。
methods:{


  add() {


    console.log('add Event from info!')
    console.log(this.$store.state)
    console.log(this.$store.state.count)
    store.commit('inscrease')
  }
}
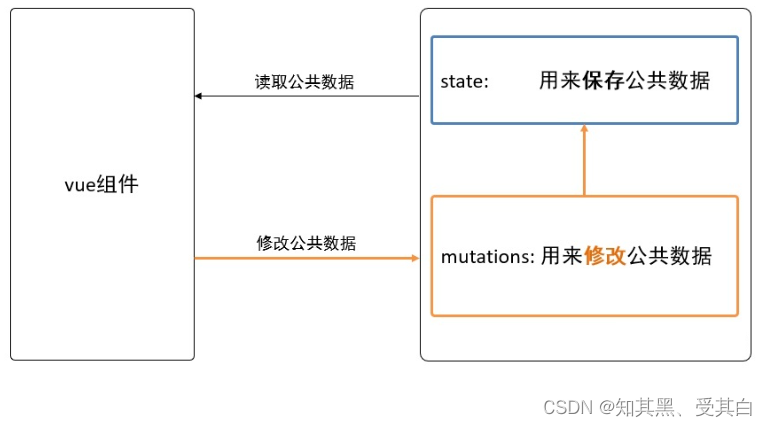
Vuex state 定义公共数据并在组件中使用
state 的作用:vuex 用它来保存公共数据。
定义公共数据
格式
new Vuex.store({


  state: {


   	属性名: 属性值
  }
})
示例
new Vuex.store({


  state: {


    userInfo: {


       name: 'tom',
	 skills: ['A站', 'B站', 'p站'],
    address: '武汉热干面',
       logo: 'https://vuejs.org/images/logo.svg'
       //  https://www.runoob.com/wp-content/uploads/2016/02/react.png
    }
  }
})
使用公共数据
格式:
在组件中:通过 this.$store.state. 属性名来访问。
在模板中:则可以省略 this 而直接写成: {
{ $store.state.属性名 }}

Vuex 辅助函数 mapState 来使用公共数据
mapState 的使用步骤:
// 1. 导入辅助函数 mapState,它是在 vuex 中定义的一个工具函数。

//  es6 按需导入 import { mapState } from 'vuex'
import {

     mapState } from 'vuex'

computed: {


   // 说明1: ...对象 是把对象展开,合并到 computed
   // 说明2: mapState是一个函数
   //  ['数据项1', '数据项2']
   ...mapState(['xxx']),
   ...mapState({

    '新名字': 'xxx'})
}

 js中使用:this.xxx
模板上使用:{

    {

    xxx}}
示例
// 步骤
// 1. 导入辅助函数 mapState,它是在vuex中定义的一个工具函数。
//  es6 按需导入 import { mapState } from 'vuex'
import {

     mapState } from 'vuex'

// 2. 在computed中使用 ...mapState(['books'])
// const res = mapState(['books'])
// res的结果是一个对象: { books: function() {}}
// console.log('mapState', res)

export default {


  computed: {


    c1 () {


      return 'c1'
    },
    // books: function() {}
    // ..res: 把res这个对象合并到computed对象中
    // ...res
    ...mapState(['books']),
    ...mapState({

    'newBooks': 'books'})
  }
}
</script>
mapState 是辅助函数,将 vuex 中的数据投射到组件内部;
computed:{ …mapState() } 这里的 ... 是对象的展开运算符,整体来看是对象的合并。
mapState 中的格式可以是一个数组也可以是一个对象,
对象可以更改名字...mapState(['xxx']), ...mapState({'新名字': 'xxx'}) }
Vuex 用 mutations 修改公共数据
通过调用 mutations 来修改定义在 state 中的公共数据。
分两个格式: 定义的格式,调用的格式 类似 methods
定义格式: 如下
new Vue.store({


  state:{

    },
  // 省略其他...
  mutations:{


    // 每一项都是一个函数,可以声明两个形参
  	mutation名1:function(state [, 载荷]) {


    },
    mutation名2:function(state [, 载荷]) {


    },
	}
})
每一项都是一个函数,可以声明两个形参:
第一个参数是必须的,表示当前的 state。在使用时不需要传入
第二个参数是可选的,表示载荷,是可选的。在使用时要传入的数据
this.$store.commit('mutation名', 实参,给第二个参数)
数据项 url
更新数据项 url 的 mutations
export default new Vuex.Store({


  // state: 用来保存所有的公共数据
  state: {


    userInfo: {


       name: 'tom',
     skills: ['A站', 'B站', 'p站'],
    address: '武汉热干面',
       logo: 'logo图标'
       //  https://www.runoob.com/wp-content/uploads/2016/02/react.png
    }
  },
  // mutations: 用它提供修改数据的方法
  //   中文是:变化,异动。
  //   数据不应该在组件内部直接修改,必须在组件内调用 mutations 来修改
  mutations: {


    setLogo(state, newUrl) {


      state.userInfo.logo = newUrl
    }
  }
}
在组件中,调用
this.$store.commit('setLogo', '换个logo图标')
Vuex 使用辅助函数 mapMutations 修改 state 中的数据
组件中使用:
直接使用: this.$store.commit('mutation名', 参数)
map 辅助函数:
import {

    mapMutations}  from  'vuex'
methods: {


  ...mapMutations(['mutation名']),
  ...mapMutations({

    '新名字': 'mutation名'})
}

使用:this.'mutation名'

PS:
methods: {


  ...mapMutations(['setLogo']),
  changeImg(){


    	this.setLogo('https://www.runoob.com/wp-content/uploads/2016/02/react.png')
  }
}
Vuex-mutaions 拓展理解
Vuex 中的 mutation 非常类似于事件:
每个 mutation 都有一个字符串的 事件类型 (type) 和 一个 回调函数 (handler)。
这个回调函数就是我们实际进行状态更改的地方,并且它会接受 state 作为第一个参数。
数据能在组件内部直接修改吗?
不能。虽然语法上不报错,也有响应式的特点。但是不推荐。特别是在严格模式下会报错。
Vuex 用 getters 的派生状态
在 state 中的数据的基础上,进一步对数据进行加工得到新数据。(与组件中computed一样)
例如:计算总价
new Vuex.store({


  state: {


    books: [
      {


        "name": "javasript技术内幕",
        "price": 100,
        "img": "https://img3m7.ddimg.cn/64/26/29120617-1_u_8.jpg"
      },
      {


        "name": "数学之美",
        "price": 44,
        "img": "https://img3m2.ddimg.cn/18/30/28538352-1_b_5.jpg"
      },
      {


        "name": "认知天性",
        "price": 40,
        "img": "https://img3m3.ddimg.cn/74/33/1732997153-3_u_3.jpg"
      }
    ]
  }
})
定义格式
new Vuex.store({


  // 省略其他...
  getters: {


    // state 就是上边定义的公共数据state
    getter的名字1: function(state) {


      return 要返回的值
    }
  }
})
state 就是上边定义的公共数据 state
使用格式
在组件中通过:$store.getters.getter 的名字来访问。
vuex 使用辅助函数 mapGetters
直接使用:this.$store.getters.xxx
map 辅助函数:
computed: {


  ...mapGetters(['xxx']),
  ...mapGetters({

    '新名字': 'xxx'})
}

PS:
store/index.js
{


  state:{

    },
  getters:{


    total(){


      return 120
    }
  }
}

import {

    mapGetters} from 'vuex'
computed: {


  ...mapGetters(['total'])
}
<div>{

    {

    total}}</div>
Vuex 用 actions 发异步请求
我们可以使用 Action 来修改 state,这一点是类似于 mutation 的,不同在于:
action 中可以通过调用 mutation 来修改 state,而不是直接变更状态。
action 可以包含任意异步(例如ajax请求)操作。
定义格式
new Vuex.store({


  // 省略其他...
  actions: {


    // context对象会自动传入,它与store实例具有相同的方法和属性
    action的名字: function(context, 载荷) {


      // 1. 发异步请求, 请求数据

      // 2. commit调用mutation来修改/保存数据

      // context.commit('mutation名', 载荷)
    }
  }
})
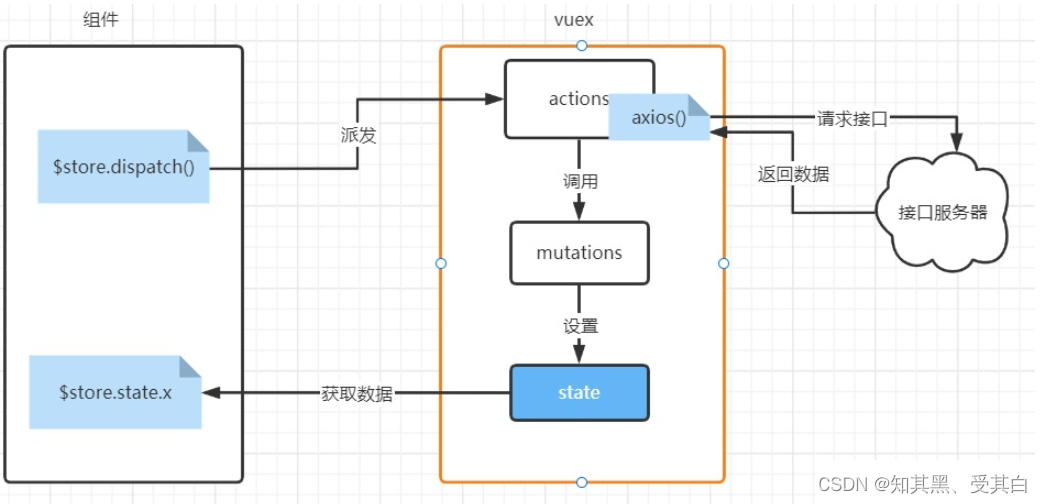
将 ajax 请求放在 actions 中有两个好处:
1、代码得到了进一步封装。将发 ajax 和保存数据到 vuex 绑定在一起。
2、逻辑更通顺。如果数据需要保存在 Vuex 的 state 中,那从接口处获取数据的操作就定义在 Vuex 的 actions 中。
vuex 使用辅助函数 mapActions
如何使用全局 actions
直接使用:this.$store.dispatch('action名', 参数)
map 辅助函数:
methods: {


  ...mapActions(['actions名']),
  ...mapActions({

    '新名字': 'actions名'})
}

PS:
import {

    mapActions}   from  'vuex'
methods: {


  ...mapActions(['getBooks']),
},
created(){


	this.getBooks()
}
Vuex 用 modules 来拆分复杂业务
export default new Vuex.Store({


  // state: 用来保存所有的公共数据
  state: {

    },
  getters: {

    },
  mutations: {

    },
  actions: {

    },
  modules: {


  	模块名1: {


    		// namespaced为true,则在使用mutations时,就必须要加上模块名
      	namespaced: true,
  		state: {

    },
		getters: {

    },
		mutations: {

    },
		actions: {

    },
		modules: {

    }
  	},
    模块名2: {


        // namespaced不写,默认为false,则在使用mutations时,不需要加模块名
		state: {

    },
		getters: {

    },
		mutations: {

    },
		actions: {

    },
		modules: {

    }
  	}
  }
})
也可以更进一步对文件进行拆分。
|--store /
|------- index.js # 引入模块
|------- modules
|-------------- / mod1.js # 模块1
|-------------- / mod2.js # 模块2
访问数据和修改数据的调整
获取数据项:

	{

    {

    $store.state.模块名.数据项名}}

	computed: {


    ...mapState('模块名', ['xxx'])
  }====={

    {

    xxx}}

获取getters:

	{

    {

    $store.getters['模块名/getters名']}}

  computed: {


    ...mapGetters(['xxx'])
  }====={

    {

    xxx}}
访问模块中的 mutations/actions:
如果 namespaced 为 true,则需要额外去补充模块名
如果 namespaced 为 false,则不需要额外补充模块名
$store.commit('mutations名')        // namespaced为false
$store.commit('模块名/mutations名')  // namespaced为true

methods: {


  ...mapMutations('模块名', ['xxx'])===={

    {

    xxx}}
}

$store.dispatch('mutations名')          // namespaced为false
$store.dispatch('模块名/mutations名')   // namespaced为true

methods: {


  ...mapActions('模块名', ['xxx'])===={

    {

    xxx}}
}
在使用 modules 时,建议都给加上 namespaced !
为什么 token 要存在 vuex 中还要存本地一份?
用户登录后,访问其他页面需要携带 token,vuex 是储存在内存里面的,而内存的特点就是快,将 token 存在 vuex 中可以提高获取 token 速度。
因为 localStorage 的读取是一次磁盘读取,读取速度远低于 vuex 的内存读取,为了避免重复读取 localStorage 影响性能,需要将 localStorage 的数据放到 vuex 里维护。
由于 vuex 是储存在内存里面的,所以刷新页面就会消失,所以要存本地一份,刷新后 token 从本地获取。
每次更新 token 也是修改 vuex 中的 token,然后再覆盖到 localstorage中。
源码
E:\node\vue296\index.html 根文件 html
<!DOCTYPE html>
<html>
  <head>
    <meta charset="utf-8">
    <meta name="viewport" content="width=device-width,initial-scale=1.0">
    <title>vue296</title>
  </head>
  <body>
    <div id="app"></div>
    <!-- built files will be auto injected -->
  </body>
</html>
E:\node\vue296\src\App.vue 根组件
这里有全局样式
<template>
  <div id="app">
    <img src="./assets/logo.png">
    <router-view/>
  </div>
</template>

<script>
export default {


  name: 'App'
}
</script>

<style>
#app {


  font-family: 'Avenir', Helvetica, Arial, sans-serif;
  -webkit-font-smoothing: antialiased;
  -moz-osx-font-smoothing: grayscale;
  text-align: center;
  color: #2c3e50;
  margin-top: 60px;
}
</style>
E:\node\vue296\src\main.js 入口文件
// The Vue build version to load with the `import` command
// (runtime-only or standalone) has been set in webpack.base.conf with an alias.
import Vue from 'vue'
import App from './App'
import router from './router'

// 引入store
import store from './vuex/store'

Vue.config.productionTip = false


//引入axios实例
import instance from "./utils/request"

const ax = instance.get('text.php').then(function(response){


  if(response.data){


    localStorage.setItem("token", response.data.name);
  }
})

console.log(localStorage.getItem("token"))
// console.log(store.state.count)

router.beforeEach((to, from, next) => {


  if(to.path==="/hello"){


      /*
      next('/x') 如果直接跳转的话,就会造成死循环,
      这是因为,执行next('/x')这个跳转,会触发 beforeEach 方法,
      这时候,就会造成,又执行next('/x')  这样的死循环,所以还要再加一层判断
      */
      next('/permission')
  }else if(to.path==="/login"){


    next()
  }else{


      next()
  }
})

/* eslint-disable no-new */
new Vue({


  el: '#app',
  router,
  store, // 全局注入
  components: {

     App },
  template: '<App/>'
})
E:\node\vue296\src\vuex\store.js 状态管理模式,组件状态集中管理文件
import Vue from 'vue'
import Vuex from 'vuex'

// 1.安装插件
Vue.use(Vuex)

// 全局管理的数据存储
const state = {


  isLogin:'0',
  ser:null,
  token:localStorage.getItem('token') ? localStorage.getItem('token'):'',// token
  count: 0,
  store_msg: 'store 数据定义'
};

//2.创建对象
const store = new Vuex.Store({


  state,
  // 监听数据变化的
  getters:{


    // 获取本地存储的登录信息
		getStorage(state){


	      if(!state.token){


	        state.token =localStorage.getItem('token')
	      }
	      return state.token
	  }
	},
  mutations: {


    inscrease() {


        this.state.count ++
    },
    setLogo(store,vue_msg) {


        console.log(vue_msg)
        console.log(this.state.store_msg)
        this.state.store_msg = vue_msg;
    }
  },
  actions: {


  },
  getters:{


  },
  modules:{


  }
})

//3.导出使用
export default store
E:\node\vue296\src\utils\request.js 封装的 axios 实例文件
//引入axios
import axios from "axios"
//创建axios实例
const instance = axios.create({


  baseURL: 'http://tt.cc/testData/',//公共地址
  timeout: 1000,//请求超时时间
});
// 添加请求拦截器
instance.interceptors.request.use(function (config) {


    // 在发送请求之前做些什么
    return config;
  }, function (error) {


    // 对请求错误做些什么
    return Promise.reject(error);
  });

// 添加响应拦截器
instance.interceptors.response.use(function (response) {


    // 对响应数据做点什么
    return response;
  }, function (error) {


    // 对响应错误做点什么
    return Promise.reject(error);
  });

//导出axios实例
export default instance
E:\node\vue296\src\router\index.js 路由文件
import Vue from 'vue'
import Router from 'vue-router'
import HelloWorld from '@/components/HelloWorld'
import Hello from '@/components/Hello'
import One from '@/components/One'
import Two from '@/components/Two'
import NO_PERMISSION from '@/components/403'
import Login from '@/components/login'

Vue.use(Router)

const router = new Router({


  mode: 'history', //mode模式
  routes: [
    {


      path: '/',
      name: 'HelloWorld',
      component: HelloWorld
    },
    {


      path: '/login',
      name: 'Login',
      component: Login
    },
    {


      path: '/hello',
      name: 'Hello',
      component: Hello,
      // 嵌套子路由
      children: [
        {


          path: 'one', // 子页面1
          component: One
        },
        {


          path: 'two', // 子页面2
          component: Two
        },
      ]
    },
    {


      path: '/permission',
      name: 'permission',
      component: NO_PERMISSION
    },
    {


        path: '*',
        component: () => import('@/components/404')
    }
  ]
})

export default router
E:\node\vue296\src\components\HelloWorld.vue 首页组件
<template>
<div>
<p>导航 :
<router-link to="/">首页 {
{
msg }} </router-link> <br/>
<router-link to="/hello"> 单页 hello</router-link><br/>
<router-link to="/login"> 登陆 </router-link>
</p>
hello info component
<button type="button" @click="add()">添加</button><br />
{
{
$store.state.store_msg }}
</div>
</template>
<script>
import store from '../vuex/store.js'
export default {
name: 'HelloWorld',
store,
data () {
return {
msg: 'HelloWorld'
}
},
methods:{
add() {
console.log(store.state.store_msg)
store.commit('setLogo', 'setLogo 数据 vue ')
store.commit('inscrease')
}
}
}
</script>
<!-- Add "scoped" attribute to limit CSS to this component only -->
<style scoped>
a {
text-decoration:none;
}
</style>
E:\node\vue296\src\components\Login.vue 登陆组件
<template>
    <div class="hello">
        <h1>{

    {

     msg }}</h1>
        <p>vuex {

    {

     msg_vuex }} </p>
        <button @click="goHome">回到首页</button>
    </div>
</template>
<script>
import store from '../vuex/store.js'

export default {


    name:'Login',
    store,
    data () {


        return {


            msg: 'Login Vuex test!',
            msg_vuex : store.state.count
        }
    },
    methods: {


        goHome(){


            this.$router.push('/');
        }
    }
}
</script>
<style scoped>

</style>
E:\node\vue296\src\components\Hello.vue 组件
<template>
    <div>
        <p>
            {

    {

     msg }} 页 :
            <button @click="goHome">回到首页</button>
        </p>
        <p>
            <router-link to="/hello/one">子页面1</router-link> |
            <router-link to="/hello/two">子页面2</router-link>
        </p>
        <!-- 子页面展示部分 -->
        <router-view/>
    </div>
</template>

<script>
export default {


  name: 'Hello',
  data () {


    return {


      msg: 'Hllo'
    }
  },
  methods: {


    goHome(){


        this.$router.push('/');
    }
  }
}
</script>

<!-- Add "scoped" attribute to limit CSS to this component only -->
<style scoped>
a {


  text-decoration:none;
}
</style>
预览示例的示例功能
