经典卷积网络--VGGNet
借鉴点:小卷积核减少参数的同时,提高识别准确率;网络结构规整,适合并行加速。
1、VGGNet网络模型
在 AlexNet 之后,另一个性能提升较大的网络是诞生于 2014 年的 VGGNet,其 ImageNet Top5 错误率减小到了 7.3 %。
VGGNet 网络的最大改进是在网络的深度上,由 AlexNet 的 8 层增加到了 16 层和 19 层, 更深的网络意味着更强的表达能力,这得益于强大的运算能力支持。VGGNet 的另一个显著特点是仅使用了单一尺寸的 3 * 3 卷积核,事实上,3 * 3 的小卷积核在很多卷积网络中都被大量使用,这是由于在感受野相同的情况下,小卷积核堆积的效果要优于大卷积核,同时参数量也更少。VGGNet 就使用了 3 * 3 的卷积核替代了 AlexNet 中的大卷积核(11 * 11、7 * 7、 5 * 5),取得了较好的效果(事实上我上一篇利用 Keras 实现 AlexNet 时已经采取了这种方式), VGGNet16 的网络结构如图所示。
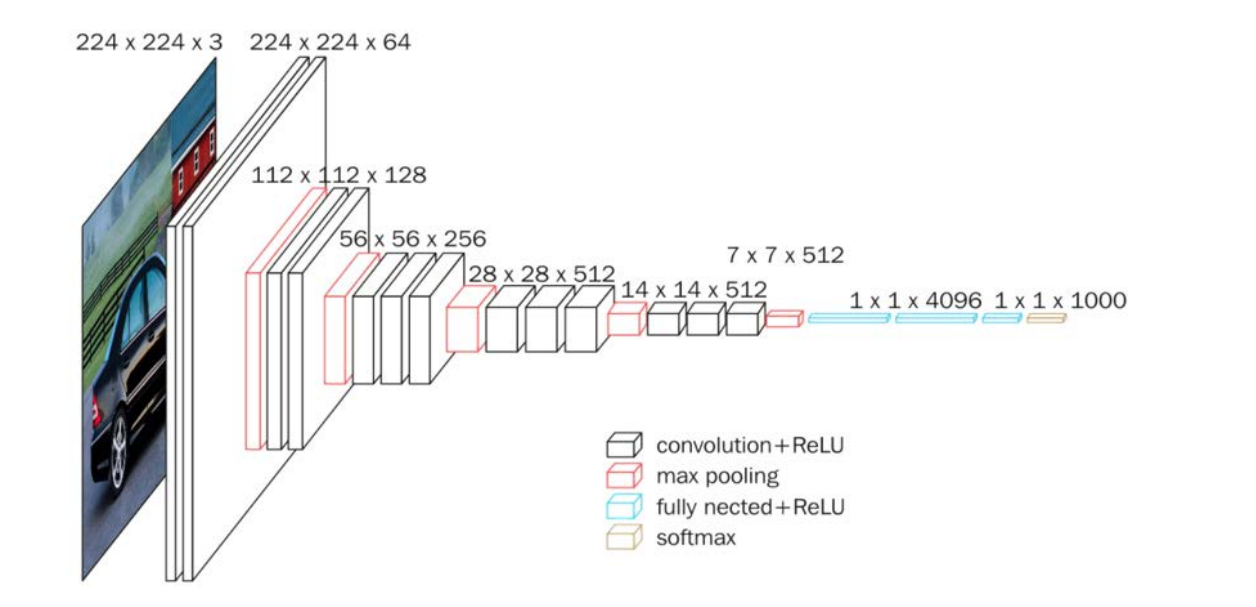
VGGNet16 和 VGGNet19 并没有本质上的区别,只是网络深度不同,前者 16 层(13 层 卷积、3 层全连接),后者 19 层(16 层卷积、3 层全连接)。
2、VGGNet网络模型搭建(使用Tensorflow)
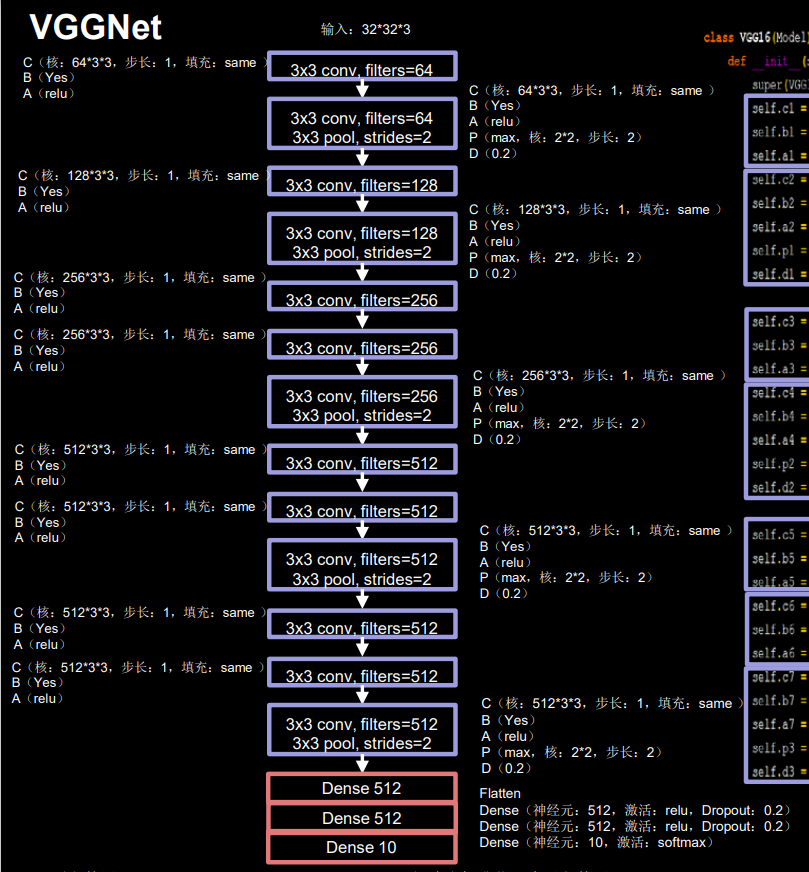
Tensorflow 框架下利用 Keras 来实现 VGG16 网络,为适应 cifar10 数据集,将输入图 像尺寸由 224 * 244 * 3 调整为 32 * 32 * 3,如图所示
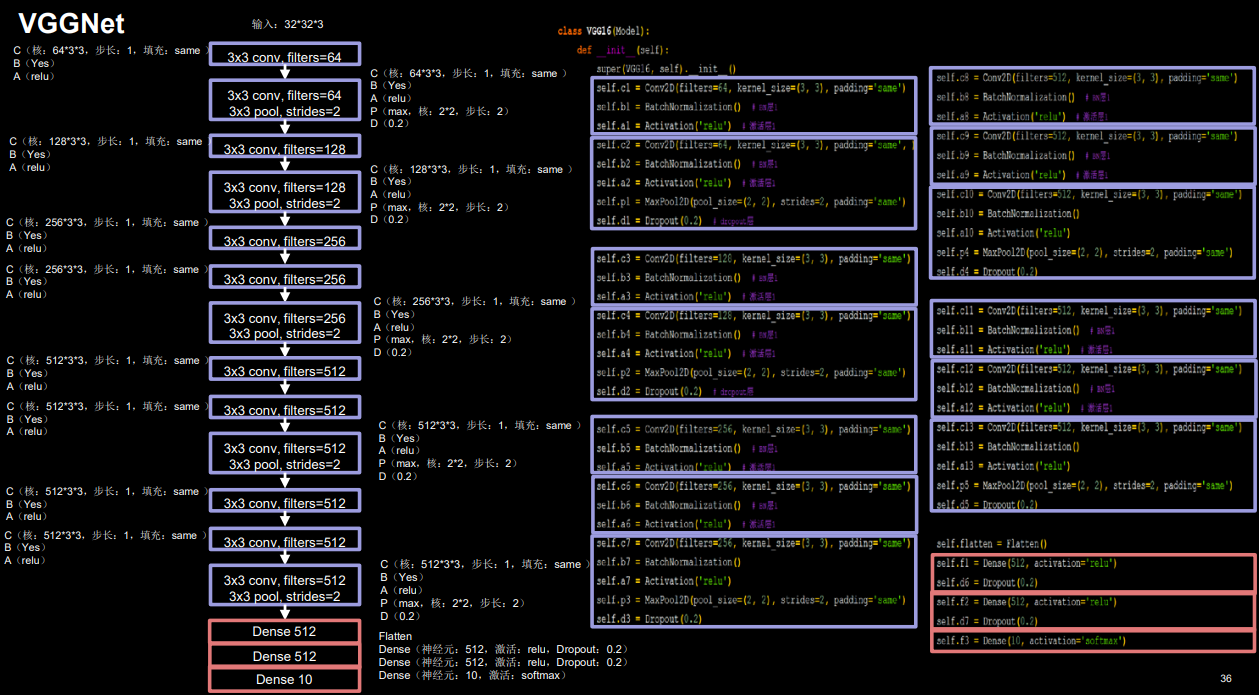
原文使用LRN(local response normalization) 局部响应标准化,这里使用BN(Batch Normalization)替代。
根据特征图尺寸的变化,可以将 VGG16 模型分为六个部分(在 VGG16 中,每进行一 次池化操作,特征图的边长缩小为 1/2,其余操作均未影响特征图尺寸):
- 第一部分:两次卷积(64 个 3 * 3 卷积核、BN、Relu 激活)→最大池化→Dropout

- 第二部分:两次卷积(128 个 3 * 3 卷积核、BN、Relu 激活)→最大池化→Dropout
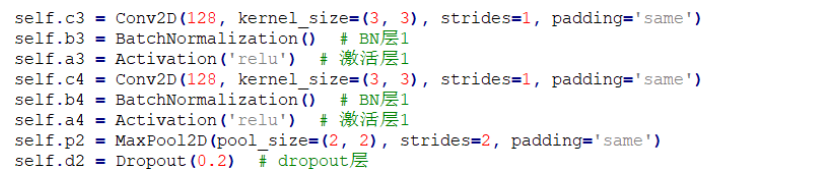
- 第三部分:三次卷积(256 个 3 * 3 卷积核、BN、Relu 激活)→最大池化→Dropout
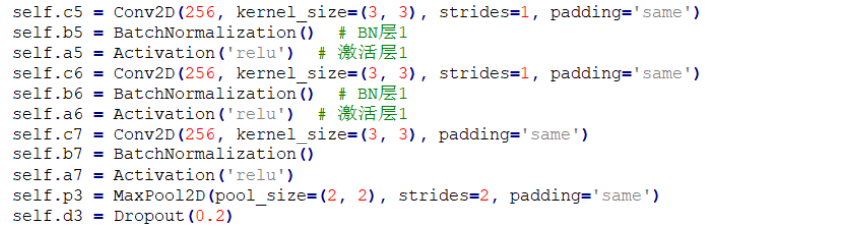
- 第四部分:三次卷积(512 个 3 * 3 卷积核、BN、Relu 激活)→最大池化→Dropout

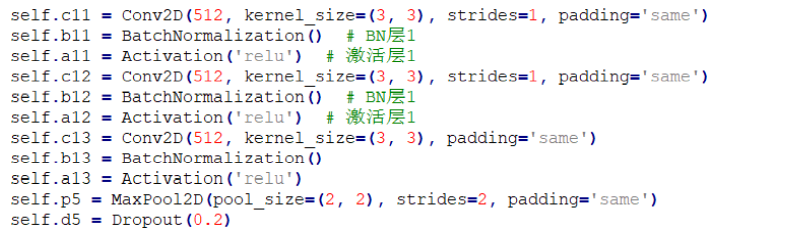
- 第五部分:三次卷积(512 个 3 * 3 卷积核、BN、Relu 激活)→最大池化→Dropout
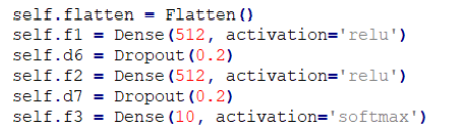
- 第六部分:全连接(512 个神经元)→Dropout→全连接(512 个神经元)→Dropout→全 连接(10 个神经元)
总体来看,VGGNet的结构是相当规整的,它继承了 AlexNet中的Relu激活函数、Dropout 操作等有效的方法,同时采用了单一尺寸的 3 * 3 小卷积核,形成了规整的 C(Convolution, 卷积)、B(Batch normalization)、A(Activation,激活)、P(Pooling,池化)、D(Dropout) 结构,这一典型结构在卷积神经网络中的应用是非常广的。
3、完整代码实现(使用CIFAR10数据集)
import tensorflow as tf
import os
import numpy as np
from matplotlib import pyplot as plt
from tensorflow.keras.layers import Conv2D, BatchNormalization, Activation, MaxPool2D, Dropout, Flatten, Dense
from tensorflow.keras import Model
np.set_printoptions(threshold=np.inf)
cifar10 = tf.keras.datasets.cifar10
(x_train, y_train), (x_test, y_test) = cifar10.load_data()
x_train, x_test = x_train / 255.0, x_test / 255.0
# 定义模型
class VGG16(Model):
def __init__(self):
super(VGG16, self).__init__()
self.c1 = Conv2D(filters=64, kernel_size=(3, 3), padding='same') # 卷积层1
self.b1 = BatchNormalization() # BN层1
self.a1 = Activation('relu') # 激活层1
self.c2 = Conv2D(filters=64, kernel_size=(3, 3), padding='same', )
self.b2 = BatchNormalization() # BN层1
self.a2 = Activation('relu') # 激活层1
self.p1 = MaxPool2D(pool_size=(2, 2), strides=2, padding='same')
self.d1 = Dropout(0.2) # dropout层
self.c3 = Conv2D(filters=128, kernel_size=(3, 3), padding='same')
self.b3 = BatchNormalization() # BN层1
self.a3 = Activation('relu') # 激活层1
self.c4 = Conv2D(filters=128, kernel_size=(3, 3), padding='same')
self.b4 = BatchNormalization() # BN层1
self.a4 = Activation('relu') # 激活层1
self.p2 = MaxPool2D(pool_size=(2, 2), strides=2, padding='same')
self.d2 = Dropout(0.2) # dropout层
self.c5 = Conv2D(filters=256, kernel_size=(3, 3), padding='same')
self.b5 = BatchNormalization() # BN层1
self.a5 = Activation('relu') # 激活层1
self.c6 = Conv2D(filters=256, kernel_size=(3, 3), padding='same')
self.b6 = BatchNormalization() # BN层1
self.a6 = Activation('relu') # 激活层1
self.c7 = Conv2D(filters=256, kernel_size=(3, 3), padding='same')
self.b7 = BatchNormalization()
self.a7 = Activation('relu')
self.p3 = MaxPool2D(pool_size=(2, 2), strides=2, padding='same')
self.d3 = Dropout(0.2)
self.c8 = Conv2D(filters=512, kernel_size=(3, 3), padding='same')
self.b8 = BatchNormalization() # BN层1
self.a8 = Activation('relu') # 激活层1
self.c9 = Conv2D(filters=512, kernel_size=(3, 3), padding='same')
self.b9 = BatchNormalization() # BN层1
self.a9 = Activation('relu') # 激活层1
self.c10 = Conv2D(filters=512, kernel_size=(3, 3), padding='same')
self.b10 = BatchNormalization()
self.a10 = Activation('relu')
self.p4 = MaxPool2D(pool_size=(2, 2), strides=2, padding='same')
self.d4 = Dropout(0.2)
self.c11 = Conv2D(filters=512, kernel_size=(3, 3), padding='same')
self.b11 = BatchNormalization() # BN层1
self.a11 = Activation('relu') # 激活层1
self.c12 = Conv2D(filters=512, kernel_size=(3, 3), padding='same')
self.b12 = BatchNormalization() # BN层1
self.a12 = Activation('relu') # 激活层1
self.c13 = Conv2D(filters=512, kernel_size=(3, 3), padding='same')
self.b13 = BatchNormalization()
self.a13 = Activation('relu')
self.p5 = MaxPool2D(pool_size=(2, 2), strides=2, padding='same')
self.d5 = Dropout(0.2)
self.flatten = Flatten()
self.f1 = Dense(512, activation='relu')
self.d6 = Dropout(0.2)
self.f2 = Dense(512, activation='relu')
self.d7 = Dropout(0.2)
self.f3 = Dense(10, activation='softmax')
def call(self, x):
x = self.c1(x)
x = self.b1(x)
x = self.a1(x)
x = self.c2(x)
x = self.b2(x)
x = self.a2(x)
x = self.p1(x)
x = self.d1(x)
x = self.c3(x)
x = self.b3(x)
x = self.a3(x)
x = self.c4(x)
x = self.b4(x)
x = self.a4(x)
x = self.p2(x)
x = self.d2(x)
x = self.c5(x)
x = self.b5(x)
x = self.a5(x)
x = self.c6(x)
x = self.b6(x)
x = self.a6(x)
x = self.c7(x)
x = self.b7(x)
x = self.a7(x)
x = self.p3(x)
x = self.d3(x)
x = self.c8(x)
x = self.b8(x)
x = self.a8(x)
x = self.c9(x)
x = self.b9(x)
x = self.a9(x)
x = self.c10(x)
x = self.b10(x)
x = self.a10(x)
x = self.p4(x)
x = self.d4(x)
x = self.c11(x)
x = self.b11(x)
x = self.a11(x)
x = self.c12(x)
x = self.b12(x)
x = self.a12(x)
x = self.c13(x)
x = self.b13(x)
x = self.a13(x)
x = self.p5(x)
x = self.d5(x)
x = self.flatten(x)
x = self.f1(x)
x = self.d6(x)
x = self.f2(x)
x = self.d7(x)
y = self.f3(x)
return y
model = VGG16()
#编译模型
model.compile(optimizer='adam',
loss=tf.keras.losses.SparseCategoricalCrossentropy(from_logits=False),
metrics=['sparse_categorical_accuracy'])
#读取模型
checkpoint_save_path = "./checkpoint/VGG16.ckpt"
if os.path.exists(checkpoint_save_path + '.index'):
print('-------------load the model-----------------')
model.load_weights(checkpoint_save_path)
#保存模型
cp_callback = tf.keras.callbacks.ModelCheckpoint(filepath=checkpoint_save_path,
save_weights_only=True,
save_best_only=True)
#训练模型
history = model.fit(x_train, y_train, batch_size=32, epochs=5, validation_data=(x_test, y_test), validation_freq=1,
callbacks=[cp_callback])
#查看模型摘要
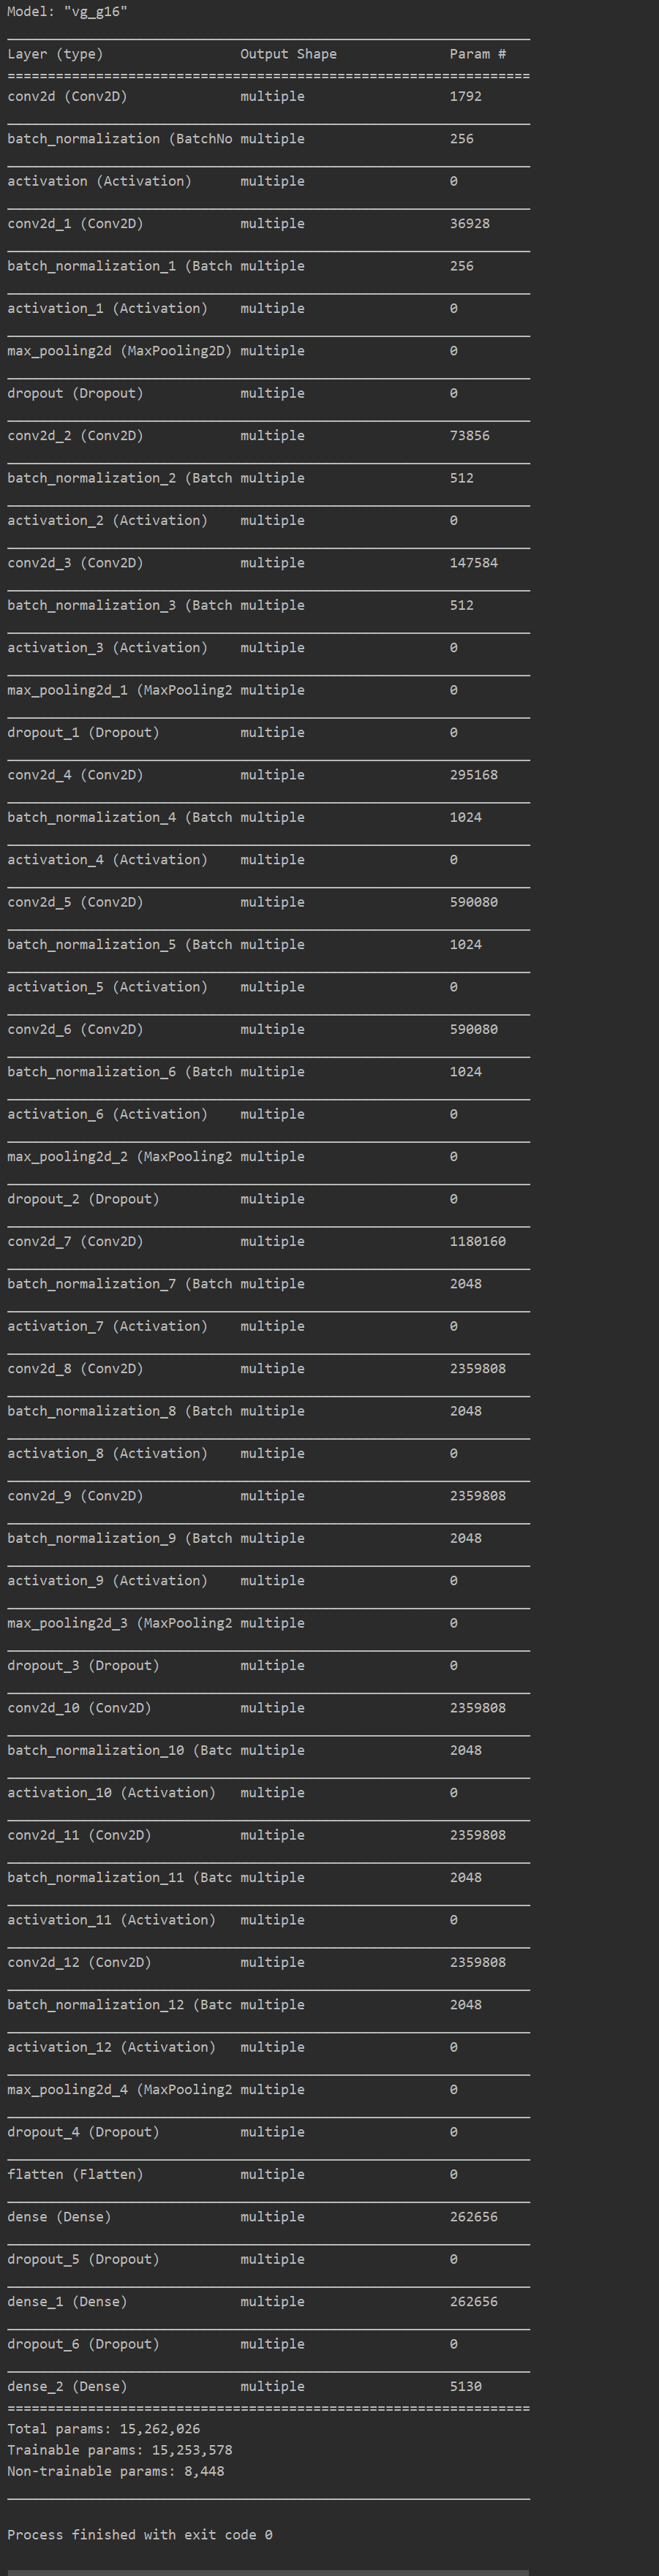
model.summary()
#将模型参数保存入文本
# print(model.trainable_variables)
file = open('./weights.txt', 'w')
for v in model.trainable_variables:
file.write(str(v.name) + '\n')
file.write(str(v.shape) + '\n')
file.write(str(v.numpy()) + '\n')
file.close()
############################################### show ###############################################
# 显示训练集和验证集的acc和loss曲线
acc = history.history['sparse_categorical_accuracy']
val_acc = history.history['val_sparse_categorical_accuracy']
loss = history.history['loss']
val_loss = history.history['val_loss']
plt.subplot(1, 2, 1)
plt.plot(acc, label='Training Accuracy')
plt.plot(val_acc, label='Validation Accuracy')
plt.title('Training and Validation Accuracy')
plt.legend()
plt.subplot(1, 2, 2)
plt.plot(loss, label='Training Loss')
plt.plot(val_loss, label='Validation Loss')
plt.title('Training and Validation Loss')
plt.legend()
plt.show()
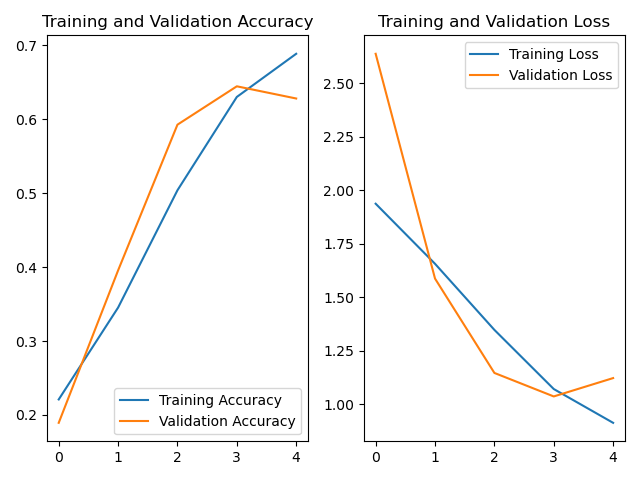
acc和loss曲线:
模型摘要:
参数太多显卡又不行的话,适当调整batch_size即可。