原文网址:SpringBoot整合RabbitMQ--绑定交换机与队列--方法/实例_IT利刃出鞘的博客-CSDN博客
简介
本文用实例介绍SpringBoot中RabbitMQ如何绑定交换机(交换器)与队列。
配置方法概述
交换机
下边两种方式等价。
ExchangeBuilder.topicExchange(EXCHANGE_TOPIC_WELCOME).durable(true).build();new TopicExchange(EXCHANGE_TOPIC_WELCOME, true, false)队列
下边两种方式等价
QueueBuilder.durable("Hi").build();new Queue(QUEUE_HI, true)绑定
下边两种方式等价
注意:第一种的参数并不是字符串。
BindingBuilder.bind(helloQueue).to(welcomExchange).with("hello.#")
new Binding("Queue@hello", Binding.DestinationType.QUEUE,
                "[email protected]", "hello.#", null)
法1:配置类(简洁方法)(推荐)
package com.example.config;

import org.springframework.amqp.core.*;
import org.springframework.beans.factory.annotation.Autowired;
import org.springframework.context.annotation.Bean;
import org.springframework.context.annotation.Configuration;

@Configuration
public class RabbitMQRouterConfig {
    public static final String QUEUE_HELLO              = "Queue@hello";
    public static final String QUEUE_HI                 = "Queue@hi";
    public static final String EXCHANGE_TOPIC_WELCOME   = "[email protected]";
    public static final String ROUTINGKEY_HELLOS        = "hello.#";

    @Autowired
    private AmqpAdmin amqpAdmin;

    @Bean
    public Object initBindingTest() {
        amqpAdmin.declareExchange(new TopicExchange(EXCHANGE_TOPIC_WELCOME, true, false));

        amqpAdmin.declareQueue(new Queue(QUEUE_HI, true));
        amqpAdmin.declareQueue(new Queue(QUEUE_HELLO, true));

        amqpAdmin.declareBinding(new Binding(QUEUE_HELLO, Binding.DestinationType.QUEUE,
                EXCHANGE_TOPIC_WELCOME, ROUTINGKEY_HELLOS, null));

        return new Object();
    }
}
amqpAdmin.declareBinding
需要一个Binding对象作为参数
- exchange:交换器名称
- type:交换器类型。BuiltinExchangeType枚举类,有以下4中类型交换器:DIRECT(“direct”), FANOUT(“fanout”), TOPIC(“topic”), HEADERS(“headers”)
- durable:设置是否持久化。true:持久化,false:非持久化。持久化可以将交换器存盘,在服务器重启时不会丢失相关消息。
- autoDelete:设置是否自动删除。true:自动删除,false:不自动删除。自动删除的前提是至少有一个队列或交换器与这个交换器绑定,之后所有与这个交换器绑定的队列或交换器都与此交换器解绑。
- internal:设置是否内置的。true:内置交换器,false:非内置交换器。内置交换器,客户端无法直接发送消息到这个交换器中,只能通过交换器路由到交换器这种方式。
- arguments:其他一些结构化参数。如备份交换器:alternate-exchange、超时时间。示例配置超时时间方法:
Map<String, Object> params = new HashMap();
params.put("x-message-ttl", 2000);
amqpAdmin.declareBinding(new Binding(QUEUE_HELLO, Binding.DestinationType.QUEUE,
                EXCHANGE_TOPIC_WELCOME, ROUTINGKEY_HELLOS, params));
法2:配置类(繁琐方法)(不推荐)
不推荐的原因
适用于队列和交换器不多时。
代码示例
package com.lly.order.message;

import org.springframework.amqp.core.*;
import org.springframework.context.annotation.Bean;
import org.springframework.context.annotation.Configuration;

@Configuration
public class RabbitMQConfig {
    public final static String QUEUE_DIRECT     = "Queue@direct";
    public final static String QUEUE_TOPIC_ONE  = "Queue@topic_one";
    public final static String TOPIC_QUEUE_TWO  = "Queue@topic_two";
    public final static String QUEUE_FANOUT_ONE = "Queue@fanout_one";
    public final static String QUEUE_FANOUT_TWO = "Queue@fanout_two";

    public final static String EXCHANGE_TOPIC   = "Exchange@topic";
    public final static String EXCHANGE_FANOUT  = "Exchange@fanout";

    public final static String ROUTINGKEY_TOPIC_ONE = "hello.key";
    public final static String ROUTINGKEY_TOPIC_TWO = "*.key";

	//  direct模式队列
    @Bean
    public Queue directQueue() {
        return new Queue(QUEUE_DIRECT, true);
    }

	//  topic 订阅者模式队列
    @Bean
    public Queue topicQueueOne() {
        return new Queue(QUEUE_TOPIC_ONE, true);
    }
    @Bean
    public Queue topicQueueTwo() {
        return new Queue(TOPIC_QUEUE_TWO, true);
    }

	//  fanout 广播者模式队列
    @Bean
    public Queue fanoutQueueOne() {
        return new Queue(QUEUE_FANOUT_ONE, true);
    }
    @Bean
    public Queue fanoutQueueTwo() {
        return new Queue(QUEUE_FANOUT_TWO, true);
    }

	//  topic 交换器
    @Bean
    public TopicExchange topExchange() {
        return new TopicExchange(EXCHANGE_TOPIC);
    }

	//  fanout 交换器
    @Bean
    public FanoutExchange fanoutExchange() {
        return new FanoutExchange(EXCHANGE_FANOUT);
    }

	//   订阅者模式绑定
    @Bean
    public Binding topicExchangeBingingOne() {
        return BindingBuilder.bind(topicQueueOne()).to(topExchange()).with(ROUTINGKEY_TOPIC_ONE);
    }

    @Bean
    public Binding topicExchangeBingingTwo() {
        return BindingBuilder.bind(topicQueueTwo()).to(topicExchange()).with(ROUTINGKEY_TOPIC_TWO);
    }

	//   广播模式绑定
    @Bean
    public Binding fanoutExchangeBingingOne() {
        return BindingBuilder.bind(fanoutQueueOne()).to(fanoutExchange());
    }

    @Bean
    public Binding fanoutExchangeBingingTwo() {
        return BindingBuilder.bind(fanoutQueueTwo()).to(fanoutExchange());
    }
}
法3:使用方配置(不推荐)
不推荐的原因
RabbitMQ的配置最好是统一在一个地方配置,分散配置不利于后期维护。
使用方法
@Component
public class Receiver {
    @RabbitListener(queues = "hello")
    public void process(String hello) {
        System.out.println ("Receiver : "  + hello);
    }

	@RabbitListener(bindings = @QueueBinding(
			exchange = @Exchange(value = "[email protected]",durable = "true",type = "topic"),
			value    = @Queue(value = "Queue@Hello",durable = "true"),
			key      = "key.#"
	))
	public void processMessage1(Message message) {
		System.out.println(message);
	}
}
法4:MQ服务端网页(不推荐)
不推荐的原因
使用方法
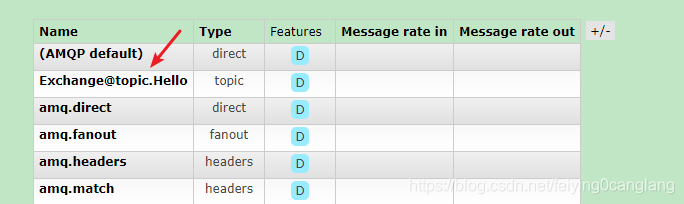
添加交换器
http://localhost:15672/#/exchanges //例如:[email protected]
添加队列
http://localhost:15672/#/queues //例如:Queue@Hello
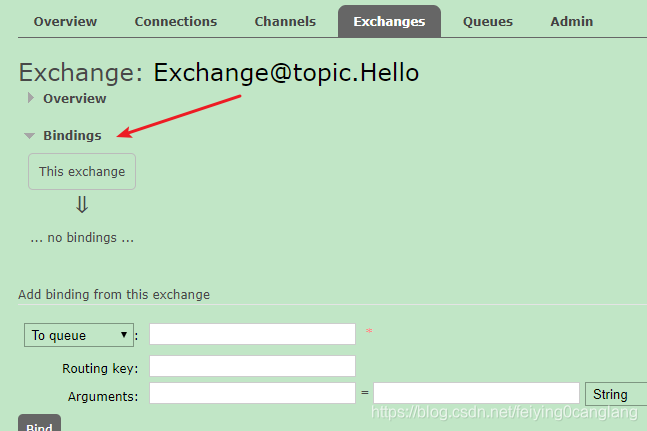
交换器添加路由键
http://localhost:15672/#/exchanges=> 点击交换器名字=> Binding=> 添加队列与路由