本文将介绍常见的线程池的使用方法,介绍线程池的参数、拒绝策略、返回参数获取以及定时调度。
2万字深入源码:线程池这篇真的讲解的透透的了
1.线程池介绍
利用多线程我们可以合理的利用cpu资源,更加高效的完成工作,不过如果我们频繁的创建、销毁线程,也会对系统的资源造成消耗。
因此,我们也可以利用池化技术,就像数据库的连接池一样,使用线程池来管理多个线程,不对这些线程进行销毁,然后反复的使用这些线程。在Tomcat服务器中,可能同一时间服务器会收到大量的请求,频繁的创建、销毁线程肯定不可行,因此就使用了线程池技术。
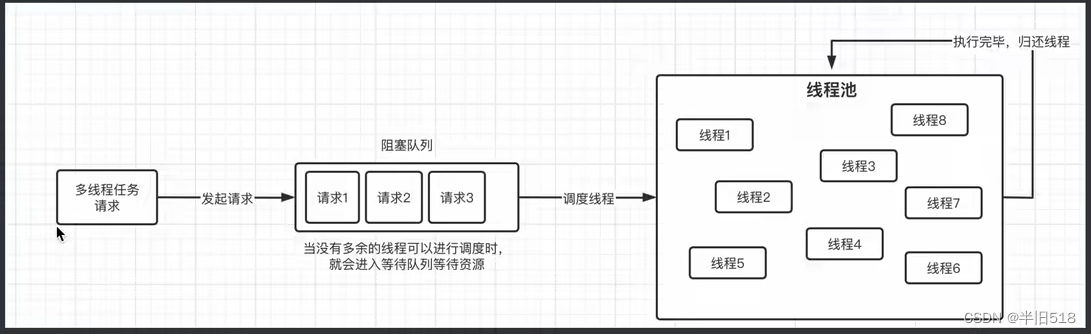
线程池一般具有容量限制,如果所有的线程都处于工作状态,在接受到新的多线程请求时,将会进入阻塞状态,直到有可用的空闲线程,实际上就是使用阻塞队列处理的。
2.线程池的使用
2.1 构造方法参数详解
我们可以使用ThreadPoolExecutor对象来创建线程池,先看看它的构造方法。
public ThreadPoolExecutor(int corePoolSize,
                              int maximumPoolSize,
                              long keepAliveTime,
                              TimeUnit unit,
                              BlockingQueue<Runnable> workQueue,
                              ThreadFactory threadFactory,
                              RejectedExecutionHandler handler) {


        if (corePoolSize < 0 ||
            maximumPoolSize <= 0 ||
            maximumPoolSize < corePoolSize ||
            keepAliveTime < 0)
            throw new IllegalArgumentException();
        if (workQueue == null || threadFactory == null || handler == null)
            throw new NullPointerException();
        this.acc = System.getSecurityManager() == null ?
                null :
                AccessController.getContext();
        this.corePoolSize = corePoolSize;
        this.maximumPoolSize = maximumPoolSize;
        this.workQueue = workQueue;
        this.keepAliveTime = unit.toNanos(keepAliveTime);
        this.threadFactory = threadFactory;
        this.handler = handler;
    }
解释下上面的参数。
corePoolSize:核心线程容量,如果需要使用一个线程,当未达到线程池核心线程容量前,不管有没有空闲的线程,都会创建一个新的线程。也可以使用prestartCoreThread在一开始就一次性完成所有核心线程的创建。workQueue:等待队列,如果需要使用一个线程,当corePoolSize的线程满了,而且没有空闲线程时,线程将会进入等待队列。maximumPoolSize:最大线程池容量,如果等待队列满了,需要使用一个线程时,会直接创建一个新的非核心线程,但创建的线程不可以超过maximumPoolSize。handler:如果又来一个新的任务,此时连最大线程池容量也满了,就需要使用handler来值性拒绝策略。keepAliveTime:非核心线程空闲后的存活时间,当非核心线程空闲超过这个时间后就会被销毁。unit:keepAliveTime的时间单位。threadFactory:线程创建工厂,我们可以干涉线程创建的过程,自定义线程的创建。
了解了ThreadPoolExecutor的构造方法后,我们会发现,线程池大小的限定是很重要的,合理的线程池大小的设置会使线程池的执行效率事半功倍。如何合理设置呢?
首先,线程任务有两种类型:cpu密集型任务和I/O密集型任务。
- cpu密集型:频繁需要使用cpu的计算任务,这种任务的cpu利用率很高,空闲时间较少,可以设置最大同时运行线程数=cpu核心数。比如i5-9400F处理器的核心数为6,可以将cpu最大线程数设置为6。
- I/O密集型:主要是执行I/O操作的任务,比如从硬盘中读取数据,因为I/O的速度比cpu要慢很多,这种类型的任务cpu空间时间较多,可以设置最大同时运行线程数=cpu核心数*2,让更多的线程执行I/O,提高cpu的利用率。
2.2 线程池使用示例
好了,万事俱备,只欠东风,现在我们来正式创建一个线程池看看效果吧。我们这里使用一个参数少点的构造方法。
 public ThreadPoolExecutor(int corePoolSize,
                              int maximumPoolSize,
                              long keepAliveTime,
                              TimeUnit unit,
                              BlockingQueue<Runnable> workQueue) {


        this(corePoolSize, maximumPoolSize, keepAliveTime, unit, workQueue,
             Executors.defaultThreadFactory(), defaultHandler);
    }
来。
public static void main(String[] args) throws InterruptedException {


        //corePoolSize:2 ;maximumPoolSize:4; keepAliveTime:3s;workQueueSize:2
        ThreadPoolExecutor executor = new ThreadPoolExecutor(2, 4, 3, TimeUnit.SECONDS, new ArrayBlockingQueue<>(2));
        for (int i = 0; i < 6; i++) {


            int finalI = i;
            executor.execute(() -> {


                System.out.println("prepare to execute thread :" + finalI);
                try {


                    TimeUnit.SECONDS.sleep(1);
                } catch (InterruptedException exception) {


                    exception.printStackTrace();
                }
                System.out.println("finish to execute thread :" + finalI);
            });
        }

        TimeUnit.SECONDS.sleep(1);
        System.out.println("pool size:" + executor.getPoolSize()); //查看当前线程池中线程数,此时应该最多有4个线程,因为线程池最大容量是4
        TimeUnit.SECONDS.sleep(5); //keepAliveTime已过
        System.out.println("pool size:" + executor.getPoolSize());
    }
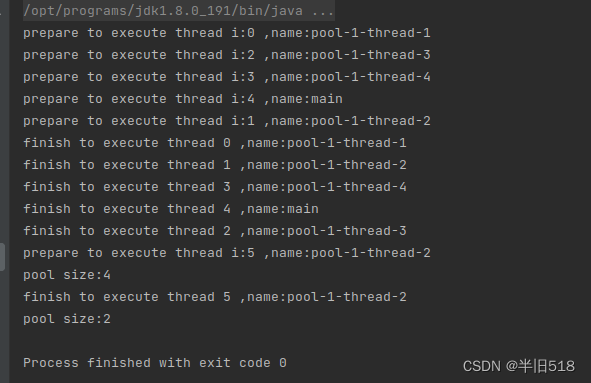
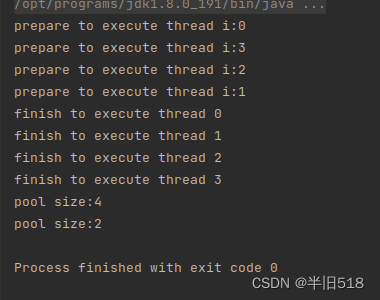
其输出如下。

我们看看i的输出顺序,似乎有点奇怪,我们来分析下。首先i为0,1的线程会先执行,其次i为3,4的线程进入等待队列,最后i为5,6的线程直接对线程池扩容执行,此时线程池满,i为3,4的线程等待有空闲线程时才会执行。所以就是0145先执行,23后执行。至于0,1,4,5或2,3两组内部的执行顺序这里留个坑。
我们还会发现,上面的程序怎么不退出呢?这是因为我们没有销毁线程池。里面的核心线程会一直处于等待状态。来关闭下。
  public static void main(String[] args) throws InterruptedException {


        //
        ThreadPoolExecutor executor = new ThreadPoolExecutor(2, 4, 3, TimeUnit.SECONDS, new ArrayBlockingQueue<>(2));
        for (int i = 0; i < 6; i++) {


            int finalI = i;
            executor.execute(() -> {


                System.out.println("prepare to execute thread " + finalI);
                try {


                    TimeUnit.SECONDS.sleep(1);
                } catch (InterruptedException exception) {


                    exception.printStackTrace();
                }
                System.out.println("finish to execute thread " + finalI);
            });
        }

        TimeUnit.SECONDS.sleep(1);
        System.out.println("pool size:" + executor.getPoolSize());
        TimeUnit.SECONDS.sleep(5);
        System.out.println("pool size:" + executor.getPoolSize());

        executor.shutdownNow(); //关闭线程池,取消等待队列中的任务,试图终止正在执行的任务,不再接收新的任务
        // executor.shutdown(); 执行完等待队列中的任务再关闭
    }
上面我们等待队列使用的是容量为2的ArrayBlockingQueue,我们把它换成SynchronousQueue看看会发生什么?
 public static void main(String[] args) throws InterruptedException {


        //
        ThreadPoolExecutor executor = new ThreadPoolExecutor(2, 4, 3, TimeUnit.SECONDS, new SynchronousQueue<>());
        for (int i = 0; i < 6; i++) {


            int finalI = i;
            executor.execute(() -> {


                System.out.println("prepare to execute thread " + finalI);
                try {


                    TimeUnit.SECONDS.sleep(1);
                } catch (InterruptedException exception) {


                    exception.printStackTrace();
                }
                System.out.println("finish to execute thread " + finalI);
            });
        }

        TimeUnit.SECONDS.sleep(1);
        System.out.println("pool size:" + executor.getPoolSize());
        TimeUnit.SECONDS.sleep(5);
        System.out.println("pool size:" + executor.getPoolSize());

        executor.shutdownNow();
    }
输出如下。
 在线程0,1,2,3执行完后,报出来的异常信息是
java.util.concurrent.RejectedExecutionException,它执行了拒绝策略。我们来分析下,首先1,2执行没问题,3,4首先想要进入等待队列,不过SynchronousQueue根本没有容量,相当于等待队列满了,因此开始进行创建新的线程池,等5,6来时,线程池已经达到最大的线程数,因此执行了拒绝策略。这里的默认拒绝策略使用的是抛出异常。我们也可以修改。并且上面的程序不会退出,原因是啥笔者还没有弄明白,如果有大佬知道欢迎在评论区不吝赐教哟。
2.3 线程池的拒绝策略
线程池的拒绝策略有以下几个。
AbortPolicy: 直接抛出异常CallerRunsPolicy:让提交任务的线程去执行任务(比如上面的线程任务都是主线程提交的)。DiscardOldestPolicy:将最早进入等待队列中的任务丢弃。DiscardPolicy:啥也不做,直接拒绝
先来测试下CallerRunsPolicy
 public static void main(String[] args) throws InterruptedException {


        ThreadPoolExecutor executor = new ThreadPoolExecutor(2, 4, 3, TimeUnit.SECONDS, new SynchronousQueue<>(), new ThreadPoolExecutor.CallerRunsPolicy());
        for (int i = 0; i < 6; i++) {


            int finalI = i;
            executor.execute(() -> {


                System.out.println("prepare to execute thread i:"+ finalI  + " ,name:"+ Thread.currentThread().getName());
                try {


                    TimeUnit.SECONDS.sleep(1);
                } catch (InterruptedException exception) {


                    exception.printStackTrace();
                }
                System.out.println("finish to execute thread " + finalI  + " ,name:"+Thread.currentThread().getName());
            });
        }

        TimeUnit.SECONDS.sleep(1);
        System.out.println("pool size:" + executor.getPoolSize());
        TimeUnit.SECONDS.sleep(5);
        System.out.println("pool size:" + executor.getPoolSize());

        executor.shutdownNow();
    }
其执行结果如下。
可以看到i为4的线程确实是由主线程执行的哟。等它在主线程执行完的时候,正好线程池也有空闲线程了,因此就又可以让线程池的线程执行任务了。
接下来演示下DiscardOldestPolicy。
public static void main(String[] args) throws InterruptedException {


        ThreadPoolExecutor executor = new ThreadPoolExecutor(2, 4, 3, TimeUnit.SECONDS, new ArrayBlockingQueue<>(2), new ThreadPoolExecutor.DiscardOldestPolicy());
        for (int i = 0; i < 7; i++) {


            int finalI = i;
            executor.execute(() -> {


                System.out.println("prepare to execute thread i:"+ finalI );
                try {


                    TimeUnit.SECONDS.sleep(1);
                } catch (InterruptedException exception) {


                    exception.printStackTrace();
                }
                System.out.println("finish to execute thread " + finalI );
            });
        }

        TimeUnit.SECONDS.sleep(1);
        System.out.println("pool size:" + executor.getPoolSize());
        TimeUnit.SECONDS.sleep(5);
        System.out.println("pool size:" + executor.getPoolSize());

        executor.shutdownNow();
    }
其输出如下。
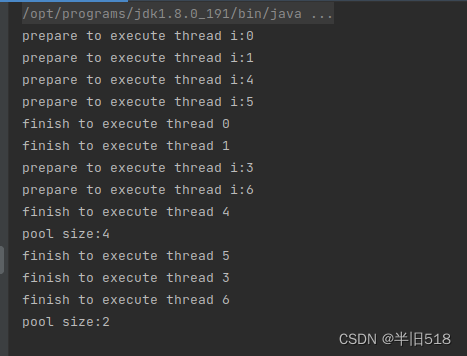
Thread2没有执行,这是因为它是最早进入等待队列的,在最后一个任务提交时,使用拒绝策略DiscardOldestPolicy将其取消了。
如果使用SynchronousQueue做等待队列,DiscardOldestPolicy做拒绝策略,会出现什么情况呢?
 public static void main(String[] args) throws InterruptedException {


        ThreadPoolExecutor executor = new ThreadPoolExecutor(2, 4, 3, TimeUnit.SECONDS, new SynchronousQueue<>(), new ThreadPoolExecutor.DiscardOldestPolicy());
        for (int i = 0; i < 6; i++) {


            int finalI = i;
            executor.execute(() -> {


                System.out.println("prepare to execute thread i:"+ finalI );
                try {


                    TimeUnit.SECONDS.sleep(1);
                } catch (InterruptedException exception) {


                    exception.printStackTrace();
                }
                System.out.println("finish to execute thread " + finalI );
            });
        }

        TimeUnit.SECONDS.sleep(1);
        System.out.println("pool size:" + executor.getPoolSize());
        TimeUnit.SECONDS.sleep(5);
        System.out.println("pool size:" + executor.getPoolSize());

        executor.shutdownNow();
    }
输出结果如下。
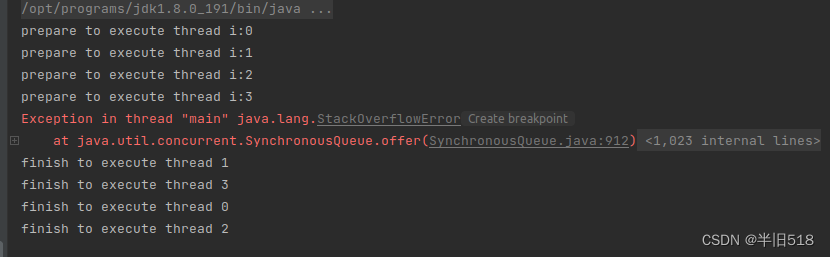 居然直接爆栈了。为什么呢?我们得看看它的源码了。
    public static class DiscardOldestPolicy implements RejectedExecutionHandler {


        public DiscardOldestPolicy() {

     }

        public void rejectedExecution(Runnable r, ThreadPoolExecutor e) {


            if (!e.isShutdown()) {

     //如果线程池没有关闭
                e.getQueue().poll(); //将等待队列队顶中元素出队
                e.execute(r); //再调用线程池的execute方法
            }
        }
    }
原因找到了,原来e.getQueue().poll()对于SynchronousQueue没有任何的意义,它会陷入死循环,一遍遍的执行execute,再执行拒绝策略,最后导致栈溢出。
最后演示下DiscardPolicy。
 public static void main(String[] args) throws InterruptedException {


        ThreadPoolExecutor executor = new ThreadPoolExecutor(2, 4, 3, TimeUnit.SECONDS, new SynchronousQueue<>(), new ThreadPoolExecutor.DiscardPolicy());
        for (int i = 0; i < 6; i++) {


            int finalI = i;
            executor.execute(() -> {


                System.out.println("prepare to execute thread i:"+ finalI );
                try {


                    TimeUnit.SECONDS.sleep(1);
                } catch (InterruptedException exception) {


                    exception.printStackTrace();
                }
                System.out.println("finish to execute thread " + finalI );
            });
        }

        TimeUnit.SECONDS.sleep(1);
        System.out.println("pool size:" + executor.getPoolSize());
        TimeUnit.SECONDS.sleep(5);
        System.out.println("pool size:" + executor.getPoolSize());

        executor.shutdownNow();
    }
结果如下。真的太简单了,不讲解了。
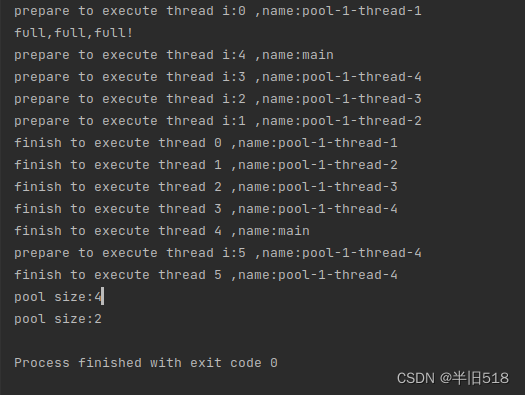
除了官方提供的拒绝策略外,我们也可以使用自定义的拒绝策略哟。
 public static void main(String[] args) throws InterruptedException {


        ThreadPoolExecutor executor = new ThreadPoolExecutor(2, 4, 3, TimeUnit.SECONDS, new SynchronousQueue<>(), (r, e) -> {


            System.out.println("full,full,full!");
            r.run(); //直接在当前的(调用提交方法所在)线程运行
        });
        for (int i = 0; i < 6; i++) {


            int finalI = i;
            executor.execute(() -> {


                System.out.println("prepare to execute thread i:" + finalI + " ,name:" + Thread.currentThread().getName());
                try {


                    TimeUnit.SECONDS.sleep(1);
                } catch (InterruptedException exception) {


                    exception.printStackTrace();
                }
                System.out.println("finish to execute thread " + finalI + " ,name:" + Thread.currentThread().getName());
            });
        }

        TimeUnit.SECONDS.sleep(1);
        System.out.println("pool size:" + executor.getPoolSize());
        TimeUnit.SECONDS.sleep(5);
        System.out.println("pool size:" + executor.getPoolSize());

        executor.shutdownNow();
    }
运行的结果如下。
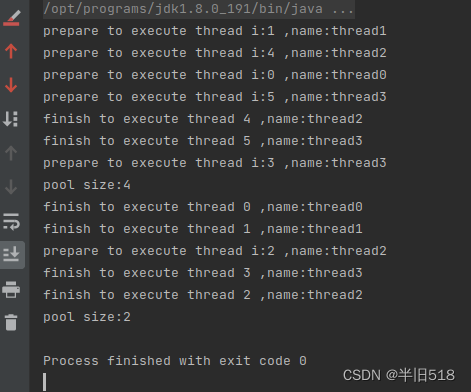
2.4 线程创建工厂
我们之前也提到过,我们可以利用线程创建工厂干涉线程的创建过程。
  public static void main(String[] args) throws InterruptedException {


        ThreadPoolExecutor executor = new ThreadPoolExecutor(2, 4, 3, TimeUnit.SECONDS, new ArrayBlockingQueue<>(2), new ThreadFactory() {


            int count = 0;
            @Override
            public Thread newThread(Runnable r) {

     //改变了线程的命名
                return new Thread(r,"thread" + count++);
            }
        });
        for (int i = 0; i < 6; i++) {


            int finalI = i;
            executor.execute(() -> {


                System.out.println("prepare to execute thread i:" + finalI + " ,name:" + Thread.currentThread().getName());
                try {


                    TimeUnit.SECONDS.sleep(1);
                } catch (InterruptedException exception) {


                    exception.printStackTrace();
                }
                System.out.println("finish to execute thread " + finalI + " ,name:" + Thread.currentThread().getName());
            });
        }

        TimeUnit.SECONDS.sleep(1);
        System.out.println("pool size:" + executor.getPoolSize());
        TimeUnit.SECONDS.sleep(5);
        System.out.println("pool size:" + executor.getPoolSize());

        executor.shutdownNow();
    }
输出结果如下。
2.5 线程异常
如果线程池中的线程遇到异常会出现什么情况呢,会不会被销毁呢?
 public static void main(String[] args) throws InterruptedException {


        ThreadPoolExecutor executor = new ThreadPoolExecutor(1, 1, 0, TimeUnit.SECONDS, new LinkedBlockingDeque<>());
        executor.execute(() -> {


            System.out.println(Thread.currentThread().getName());
            throw new RuntimeException("error");
        });
        TimeUnit.SECONDS.sleep(1);
        executor.execute(() -> {


            System.out.println(Thread.currentThread().getName());
        });
    }
    executor.shutdown();
输出如下,两次输出的线程名字不同。看来线程池中抛异常的确实会被销毁哟。

3.使用Executors创建线程池
3.1 newFixedThreadPool
除了使用new一个ThreadPoolExecutor的方法,我们还可以使用Executors创建一个线程池。
  public static void main(String[] args) throws InterruptedException{


        // 创建容量固定为10的线程池
        ExecutorService service = Executors.newFixedThreadPool(10); //ThreadPoolExecutor extends AbstractExecutorService, AbstractExecutorService implements ExecutorService
        service.execute(() -> {


            System.out.println("hello.word");
        });

        service.shutdown();
    }
对比下之前的创建方式。即使是参数最少的构造方法,Executors创建也比new一个ThreadPoolExecutor更加简洁。
ThreadPoolExecutor executor = new ThreadPoolExecutor(2, 4, 3, TimeUnit.SECONDS, new ArrayBlockingQueue<>(2));
再看看源码。就是说包装是yyds。
    public static ExecutorService newFixedThreadPool(int nThreads) {


        return new ThreadPoolExecutor(nThreads, nThreads,
                                      0L, TimeUnit.MILLISECONDS,
                                      new LinkedBlockingQueue<Runnable>());
    }
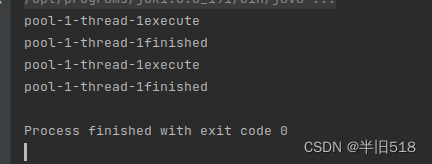
3.2 newSingleThreadExecutor
上面是创建容量固定为10的线程池,还可以创建使用newSingleThreadExecutor容量为1的线程,有点单例的感觉。
  public static void main(String[] args) throws InterruptedException{


        ExecutorService service = Executors.newSingleThreadExecutor(); //ThreadPoolExecutor extends AbstractExecutorService, AbstractExecutorService implements ExecutorService
        for (int i = 0; i < 2; i++) {


            service.submit(() -> {


                System.out.println(Thread.currentThread().getName() + "execute");
                try {


                    TimeUnit.SECONDS.sleep(1);
                } catch (InterruptedException exception) {


                    exception.printStackTrace();
                }
                System.out.println(Thread.currentThread().getName() + "finished");
            });
        }

        service.shutdown();
    }
输出如下。
看看其源码。
public static ExecutorService newSingleThreadExecutor() {


        return new FinalizableDelegatedExecutorService
            (new ThreadPoolExecutor(1, 1,
                                    0L, TimeUnit.MILLISECONDS,
                                    new LinkedBlockingQueue<Runnable>()));
    }
里面返回的是FinalizableDelegatedExecutorService,并且其构造方法的参数是ThreadPoolExecutor对象,点进去看看到底是什么?
 static class FinalizableDelegatedExecutorService
        extends DelegatedExecutorService {


        FinalizableDelegatedExecutorService(ExecutorService executor) {


            super(executor);
        }
        protected void finalize() {


            super.shutdown();
        }
    }
原来里面重写了finalize,当线程池被gc时会调用shutdown方法。将传过来的ThreadPoolExecutor又传给了其父类DelegatedExecutorService.点 super(executor)看看里面做了什么?
 static class DelegatedExecutorService extends AbstractExecutorService {


        private final ExecutorService e;
        DelegatedExecutorService(ExecutorService executor) {

     e = executor; }
        public void execute(Runnable command) {

     e.execute(command); }
        public void shutdown() {

     e.shutdown(); }
        public List<Runnable> shutdownNow() {

     return e.shutdownNow(); }
        public boolean isShutdown() {

     return e.isShutdown(); }
        public boolean isTerminated() {

     return e.isTerminated(); }
        ...
}
原来最后还是调用ExecutorService来实现的逻辑呀。有没有代理的感觉?包装的目的主要是为了安全性。我们看看将它创建的对象强转成ThreadPoolExecutor。
  public static void main(String[] args) throws InterruptedException{


   ThreadPoolExecutor executor = (ThreadPoolExecutor) Executors.newSingleThreadExecutor();
  }
报错。这是因为它根本不是ThreadPoolExecutor类型的对象。

如果是newFixedThreadPool强转运行就不会报错。
  public static void main(String[] args) throws InterruptedException{


        ThreadPoolExecutor executor = (ThreadPoolExecutor) Executors.newFixedThreadPool(1);
        }
输出如下。
 强转以后可以干什么,当然是动态修改参数了。比如。
public static void main(String[] args) throws InterruptedException{


        ThreadPoolExecutor executor = (ThreadPoolExecutor) Executors.newFixedThreadPool(1);
                executor.setCorePoolSize(10);
    }
这样我们线程池的核心容量就改变了。想象要是newSingleThreadExecutor创建的对象也可以改变容量大小,它还可以称之为单线程线程池么?我们使用它来编码,不就有可能因为不知道其容量发生了变化出错吗?
3.3 newCachedThreadPool
看看源码,newCachedThreadPool是做什么的?
    public static ExecutorService newCachedThreadPool(ThreadFactory threadFactory) {


        return new ThreadPoolExecutor(0, Integer.MAX_VALUE,
                                      60L, TimeUnit.SECONDS,
                                      new SynchronousQueue<Runnable>(),
                                      threadFactory);
    }
可以看出来,其核心线程数是0,最大线程数是Integer.MAX_VALUE,空闲等待时间是60s,等待队列没有容量。由于其最大线程数几乎可以让你想创建多少线程就创建多少线程,并且空闲线程等待时间是很长的,有60s,因此可能存在许多隐患,建议谨慎使用。
4.返回执行结果的任务
使用submit方法(而不是execute)提交任务可以获取任务执行的返回。
先使用下面带Callable传参的版本的submit
<T> Future<T> submit(Callable<T> task);
来
public static void main(String[] args) throws InterruptedException, ExecutionException {
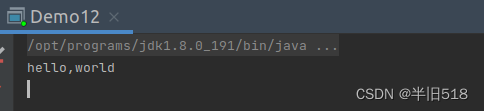
ExecutorService service = Executors.newSingleThreadExecutor();
Future<String> future = service.submit(() -> "hello,world");
System.out.println(future.get()); //注意get方法不带时间参数是默认阻塞等待结果的
}
执行结果如下。
也可以使用submit的下面这个带Runnable和result重载方法。
<T> Future<T> submit(Runnable task, T result);
来。
 public static void main(String[] args) throws InterruptedException, ExecutionException {


        ExecutorService service = Executors.newSingleThreadExecutor();
        Future<String> future = service.submit(() ->{


            try {


                TimeUnit.SECONDS.sleep(1);
            } catch (InterruptedException exception) {


                exception.printStackTrace();
            }
        }, "hello,world");
        System.out.println(future.get());

    }
还可以使用带FutureTask参数的构造方法。这种方式在get时是不是更加简洁一点点?
 public static void main(String[] args) throws InterruptedException, ExecutionException {


        ExecutorService service = Executors.newSingleThreadExecutor();
        FutureTask<String> task = new FutureTask(() -> "hello,world");
        service.submit(task);
        System.out.println(task.get());
        service.shutdown();
    }
上面三种方法都可以获取任务执行的返回结果。我们还可以通过Future对象获取当前任务的执行状态。
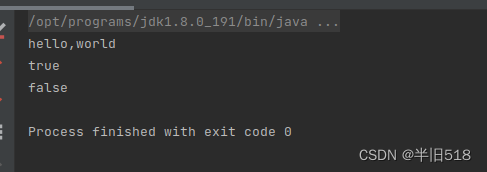
    public static void main(String[] args) throws InterruptedException, ExecutionException {


        ExecutorService service = Executors.newSingleThreadExecutor();
        FutureTask<String> task = new FutureTask(() -> "hello,world");
        service.submit(task);
        System.out.println(task.get());
        System.out.println(task.isDone());
        System.out.println(task.isCancelled());
        service.shutdown();
    }
输出结果如下哟。
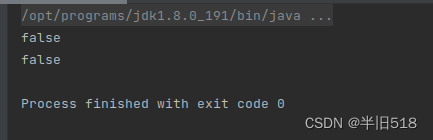
 如果我们不用get来阻塞的等待执行结果,输出结果还会一样吗?
 public static void main(String[] args) throws InterruptedException, ExecutionException {


        ExecutorService service = Executors.newSingleThreadExecutor();
        FutureTask<String> task = new FutureTask(() -> "hello,world");
        service.submit(task);
        System.out.println(task.isDone());
        System.out.println(task.isCancelled());
        service.shutdown();
    }
不一样了哟。
可以在任务执行过程中取消任务。
  public static void main(String[] args) throws InterruptedException, ExecutionException {


        ExecutorService service = Executors.newSingleThreadExecutor();
        Future<String> task = service.submit(() -> {


            TimeUnit.SECONDS.sleep(1);
            return "hello";
        });
        task.cancel(true);
        System.out.println(task.isDone());
        System.out.println(task.isCancelled());
        service.shutdown();
    }
执行结果如下。

5.执行定时任务
jdk5以后,可以使用ScheduledThreadPoolExecutor来执行定时任务,它继承自ThreadPoolExecutor。看看它的构造方法吧。可以发现其最大容量都是Integer.MAX_VALUE,并且使用的等待队列都是DelayedWorkQueue,是不是有种恍然大悟的感觉。
		public ScheduledThreadPoolExecutor(int corePoolSize) {


        super(corePoolSize, Integer.MAX_VALUE, 0, NANOSECONDS,
              new DelayedWorkQueue());
    }


    public ScheduledThreadPoolExecutor(int corePoolSize,
                                       ThreadFactory threadFactory) {


        super(corePoolSize, Integer.MAX_VALUE, 0, NANOSECONDS,
              new DelayedWorkQueue(), threadFactory);
    }

    public ScheduledThreadPoolExecutor(int corePoolSize,
                                       RejectedExecutionHandler handler) {


        super(corePoolSize, Integer.MAX_VALUE, 0, NANOSECONDS,
              new DelayedWorkQueue(), handler);
    }

    public ScheduledThreadPoolExecutor(int corePoolSize,
                                       ThreadFactory threadFactory,
                                       RejectedExecutionHandler handler) {


        super(corePoolSize, Integer.MAX_VALUE, 0, NANOSECONDS,
              new DelayedWorkQueue(), threadFactory, handler);
    }
来使用下吧。太简单了,是不是?
 public static void main(String[] args) {


        ScheduledThreadPoolExecutor executor = new ScheduledThreadPoolExecutor(1); //核心线程数1
        executor.schedule(() ->System.out.println("hello,world!"), 3, TimeUnit.SECONDS);
        executor.shutdown();
    }
还可以设置按照一定的频率周期来执行任务。看看源码就会用。
 public static void main(String[] args) throws InterruptedException {


        ScheduledThreadPoolExecutor executor = new ScheduledThreadPoolExecutor(1);
        executor.scheduleAtFixedRate(() ->System.out.println("hello,world!"), 1,3, TimeUnit.SECONDS); //初始delay1s,之后每3s执行一次
        TimeUnit.SECONDS.sleep(20);
        executor.shutdown();
    }
它还有一个和上面方法很相似的方法scheduleWithFixedDelay。它们甚至连参数都是一毛一样。你运行下看看,会发现好像效果也是一样的。
public static void main(String[] args) throws InterruptedException {


        ScheduledThreadPoolExecutor executor = new ScheduledThreadPoolExecutor(1);
        executor.scheduleWithFixedDelay(() ->System.out.println("hello,world!"), 1,3, TimeUnit.SECONDS);
        TimeUnit.SECONDS.sleep(20);
        executor.shutdown();
    }
那它们到底有什么其区别呢?您再运行下下面的代码。
    public static void main(String[] args) throws InterruptedException {


        ScheduledThreadPoolExecutor executor = new ScheduledThreadPoolExecutor(1);
        executor.scheduleWithFixedDelay(() ->{


            try {


                TimeUnit.SECONDS.sleep(3);
            } catch (InterruptedException exception) {


                exception.printStackTrace();
            }
            System.out.println("hello,world!");
            }, 1,3, TimeUnit.SECONDS);
        TimeUnit.SECONDS.sleep(20);
        executor.shutdown();
    }
原来scheduleAtFixedRate是按一定的频率去执行任务,不管任务有没有执行完,而scheduleWithFixedDelay是在任务执行结束的基础上再delay一定时间去执行任务。