Chapter 3. User Interface
3.1. Introduction
By now you have installed Wireshark and are likely keen to get started capturing your first packets. In the next chapters we will explore:
- How the Wireshark user interface works
- How to capture packets in Wireshark
- How to view packets in Wireshark
- How to filter packets in Wireshark
- … and many other things!
3.2. Start Wireshark
You can start Wireshark from your shell or window manager.
Power user tip
When starting Wireshark it’s possible to specify optional settings using the command line. See Section 11.2, “Start Wireshark from the command line” for details.
The following chapters contain many screenshots of Wireshark. As Wireshark runs on many different platforms with many different window managers, different styles applied and there are different versions of the underlying GUI toolkit used, your screen might look different from the provided screenshots. But as there are no real differences in functionality these screenshots should still be well understandable.
3.3. The Main window
Let’s look at Wireshark’s user interface. Figure 3.1, “The Main window” shows Wireshark as you would usually see it after some packets are captured or loaded (how to do this will be described later).
Figure 3.1. The Main window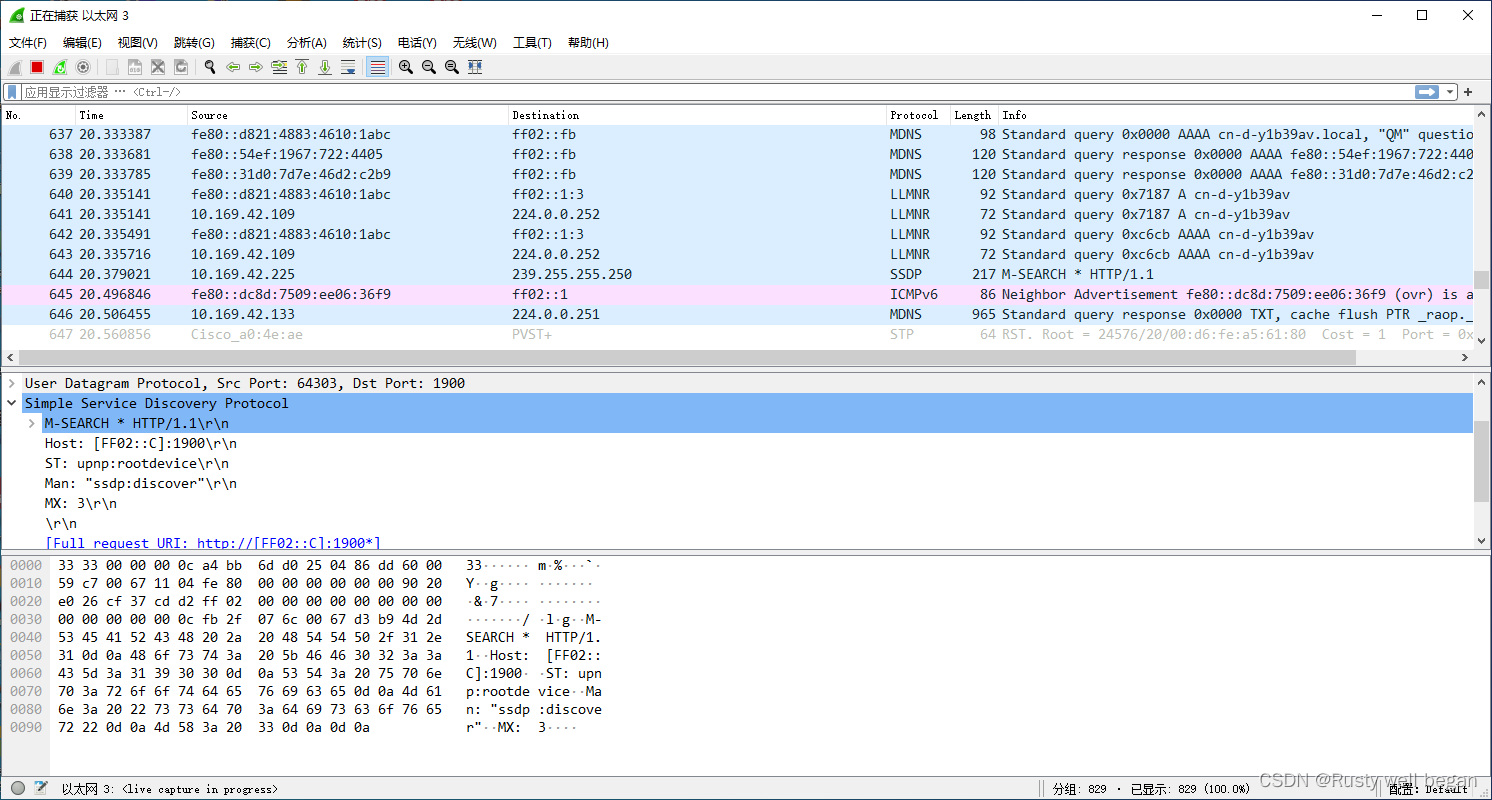
Wireshark’s main window consists of parts that are commonly known from many other GUI programs.
- The menu (see Section 3.4, “The Menu”) is used to start actions.
- The main toolbar (see Section 3.16, “The “Main” Toolbar”) provides quick access to frequently used items from the menu.
- The filter toolbar (see Section 3.17, “The “Filter” Toolbar”) allows users to set display filters to filter which packets are displayed (see Section 6.3, “Filtering Packets While Viewing”).
- The packet list pane (see Section 3.18, “The “Packet List” Pane”) displays a summary of each packet captured. By clicking on packets in this pane you control what is displayed in the other two panes.
- The packet details pane (see Section 3.19, “The “Packet Details” Pane”) displays the packet selected in the packet list pane in more detail.
- The packet bytes pane (see Section 3.20, “The “Packet Bytes” Pane”) displays the data from the packet selected in the packet list pane, and highlights the field selected in the packet details pane.
- The packet diagram pane (see Section 3.21, “The “Packet Diagram” Pane”) displays the packet selected in the packet list as a textbook-style diagram.
- The statusbar (see Section 3.22, “The Statusbar”) shows some detailed information about the current program state and the captured data.
Tip
The layout of the main window can be customized by changing preference settings. See Section 11.5, “Preferences” for details.
3.3.1. Main Window Navigation
Packet list and detail navigation can be done entirely from the keyboard. Table 3.1, “Keyboard Navigation” shows a list of keystrokes that will let you quickly move around a capture file. See Table 3.6, “Go menu items” for additional navigation keystrokes.
Table 3.1. Keyboard Navigation
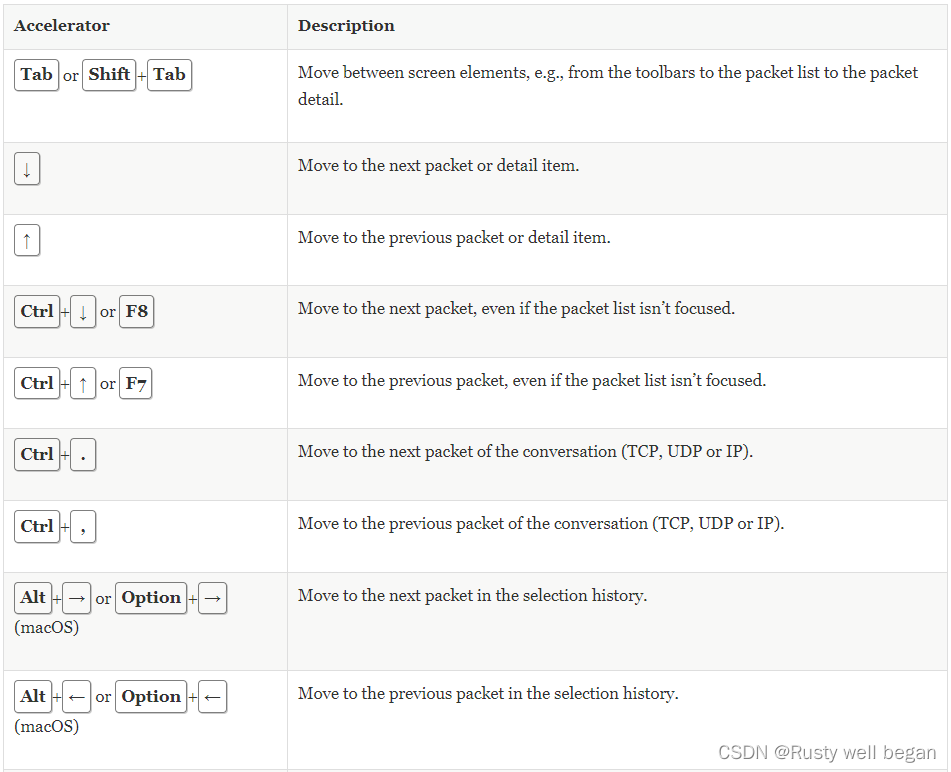
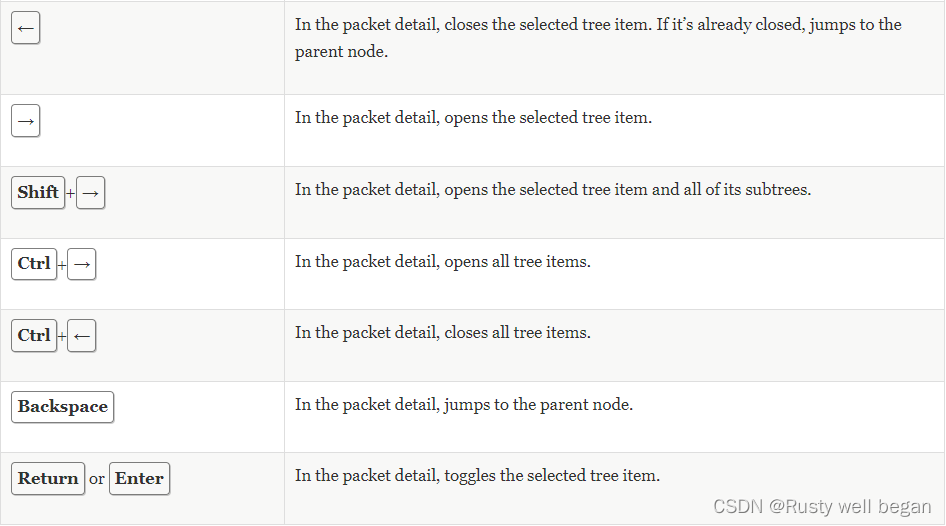
Help → About Wireshark → Keyboard Shortcuts will show a list of all shortcuts in the main window. Additionally, typing anywhere in the main window will start filling in a display filter.
3.4. The Menu
Wireshark’s main menu is located either at the top of the main window (Windows, Linux) or at the top of your main screen (macOS). An example is shown in Figure 3.2, “The Menu”.
Note
Some menu items will be disabled (greyed out) if the corresponding feature isn’t available. For example, you cannot save a capture file if you haven’t captured or loaded any packets.
Figure 3.2. The Menu

The main menu contains the following items:
-
File
This menu contains items to open and merge capture files, save, print, or export capture files in whole or in part, and to quit the Wireshark application. See Section 3.5, “The “File” Menu”. -
Edit
This menu contains items to find a packet, time reference or mark one or more packets, handle configuration profiles, and set your preferences; (cut, copy, and paste are not presently implemented). See Section 3.6, “The “Edit” Menu”. -
View
This menu controls the display of the captured data, including colorization of packets, zooming the font, showing a packet in a separate window, expanding and collapsing trees in packet details, …. See Section 3.7, “The “View” Menu”. -
Go
This menu contains items to go to a specific packet. See Section 3.8, “The “Go” Menu”. -
Capture
This menu allows you to start and stop captures and to edit capture filters. See Section 3.9, “The “Capture” Menu”. -
Analyze
This menu contains items to manipulate display filters, enable or disable the dissection of protocols, configure user specified decodes and follow a TCP stream. See Section 3.10, “The “Analyze” Menu”. -
Statistics
This menu contains items to display various statistic windows, including a summary of the packets that have been captured, display protocol hierarchy statistics and much more. See Section 3.11, “The “Statistics” Menu”. -
Telephony
This menu contains items to display various telephony related statistic windows, including a media analysis, flow diagrams, display protocol hierarchy statistics and much more. See Section 3.12, “The “Telephony” Menu”. -
Wireless
This menu contains items to display Bluetooth and IEEE 802.11 wireless statistics. -
Tools
This menu contains various tools available in Wireshark, such as creating Firewall ACL Rules. See Section 3.14, “The “Tools” Menu”. -
Help
This menu contains items to help the user, e.g., access to some basic help, manual pages of the various command line tools, online access to some of the webpages, and the usual about dialog. See Section 3.15, “The “Help” Menu”.
Each of these menu items is described in more detail in the sections that follow.
Shortcuts make life easier
Most common menu items have keyboard shortcuts. For example, you can press the Control and the K keys together to open the “Capture Options” dialog.
3.5. The “File” Menu
The Wireshark file menu contains the fields shown in Table 3.2, “File menu items”.
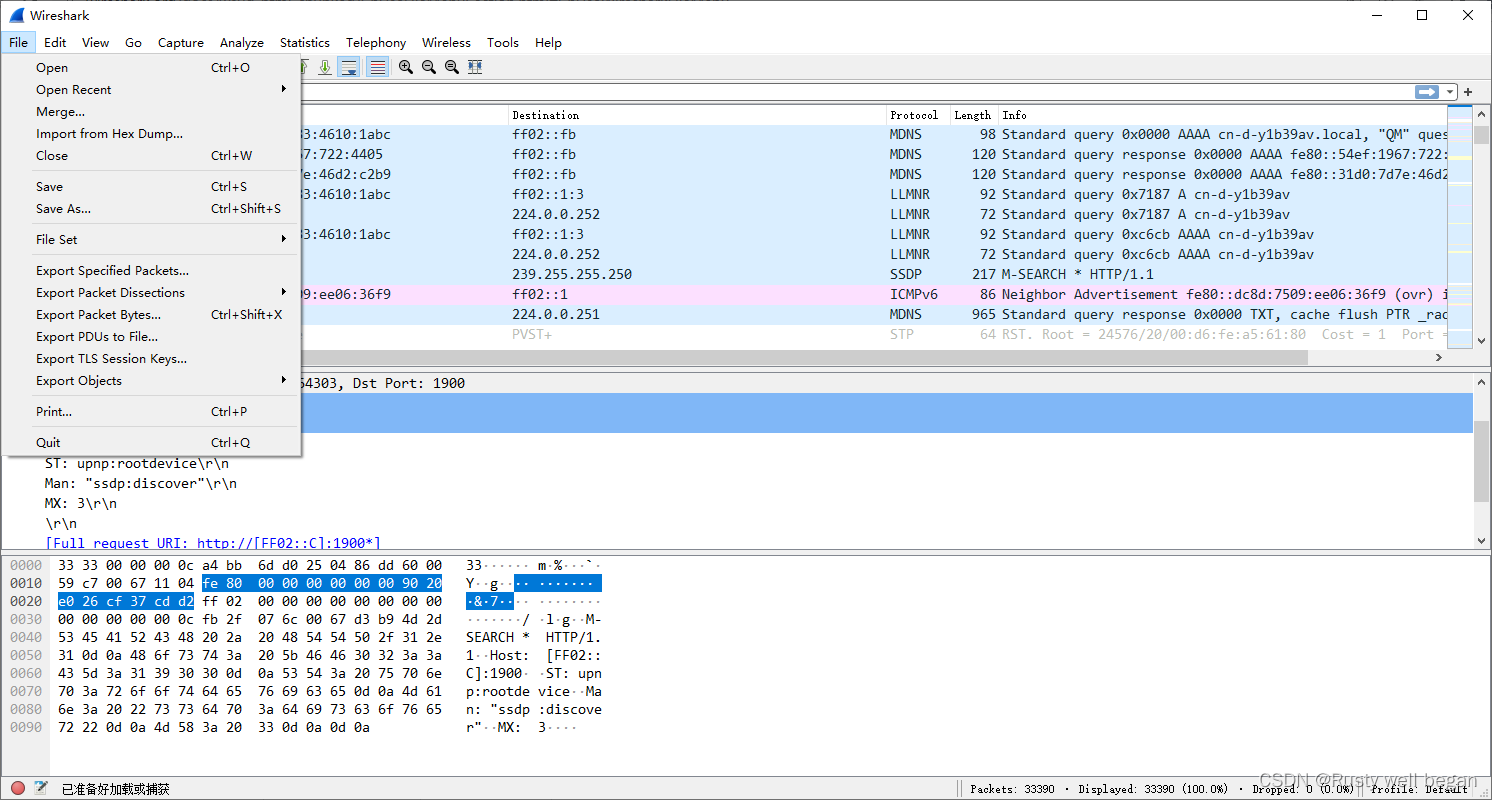
Table 3.2. File menu items
| Menu Item | Accelerator | Description |
|---|---|---|
| Open… | Ctrl+O | This shows the file open dialog box that allows you to load a capture file for viewing. It is discussed in more detail in Section 5.2.1, “The “Open Capture File” Dialog Box”. |
| Open Recent | This lets you open recently opened capture files. Clicking on one of the submenu items will open the corresponding capture file directly. | |
| Merge… | This menu item lets you merge a capture file into the currently loaded one. It is discussed in more detail in Section 5.4, “Merging Capture Files”. | |
| Import from Hex Dump… | This menu item brings up the import file dialog box that allows you to import a text file containing a hex dump into a new temporary capture. It is discussed in more detail in Section 5.5, “Import Hex Dump”. | |
| Close | Ctrl+W | This menu item closes the current capture. If you haven’t saved the capture, you will be asked to do so first (this can be disabled by a preference setting). |
| Save | Ctrl+S | This menu item saves the current capture. If you have not set a default capture file name (perhaps with the -w option), Wireshark pops up the Save Capture File As dialog box (which is discussed further in Section 5.3.1, “The “Save Capture File As” Dialog Box”). If you have already saved the current capture, this menu item will be greyed out.You cannot save a live capture while the capture is in progress. You must stop the capture in order to save. |
| Save As… | Shift+Ctrl+S | This menu item allows you to save the current capture file to whatever file you would like. It pops up the Save Capture File As dialog box (which is discussed further in Section 5.3.1, “The “Save Capture File As” Dialog Box”). |
| File Set → List Files | This menu item allows you to show a list of files in a file set. It pops up the Wireshark List File Set dialog box (which is discussed further in Section 5.6, “File Sets”). | |
| File Set → Next File | If the currently loaded file is part of a file set, jump to the next file in the set. If it isn’t part of a file set or just the last file in that set, this item is greyed out. | |
| File Set → Previous File | If the currently loaded file is part of a file set, jump to the previous file in the set. If it isn’t part of a file set or just the first file in that set, this item is greyed out. | |
| Export Specified Packets… | This menu item allows you to export all (or some) of the packets in the capture file to file. It pops up the Wireshark Export dialog box (which is discussed further in Section 5.7, “Exporting Data”). | |
| Export Packet Dissections… | Ctrl+H | These menu items allow you to export the currently selected bytes in the packet bytes pane to a text file in a number of formats including plain, CSV, and XML. It is discussed further in Section 5.7.3, “The “Export Selected Packet Bytes” Dialog Box”. |
| Export Objects | These menu items allow you to export captured DICOM, HTTP, IMF, SMB, or TFTP objects into local files. It pops up a corresponding object list (which is discussed further in Section 5.7.7, “The “Export Objects” Dialog Box”) | |
| Print… | Ctrl+P | This menu item allows you to print all (or some) of the packets in the capture file. It pops up the Wireshark Print dialog box (which is discussed further in Section 5.8, “Printing Packets”). |
| Quit | Ctrl+Q | This menu item allows you to quit from Wireshark. Wireshark will ask to save your capture file if you haven’t previously saved it (this can be disabled by a preference setting). |
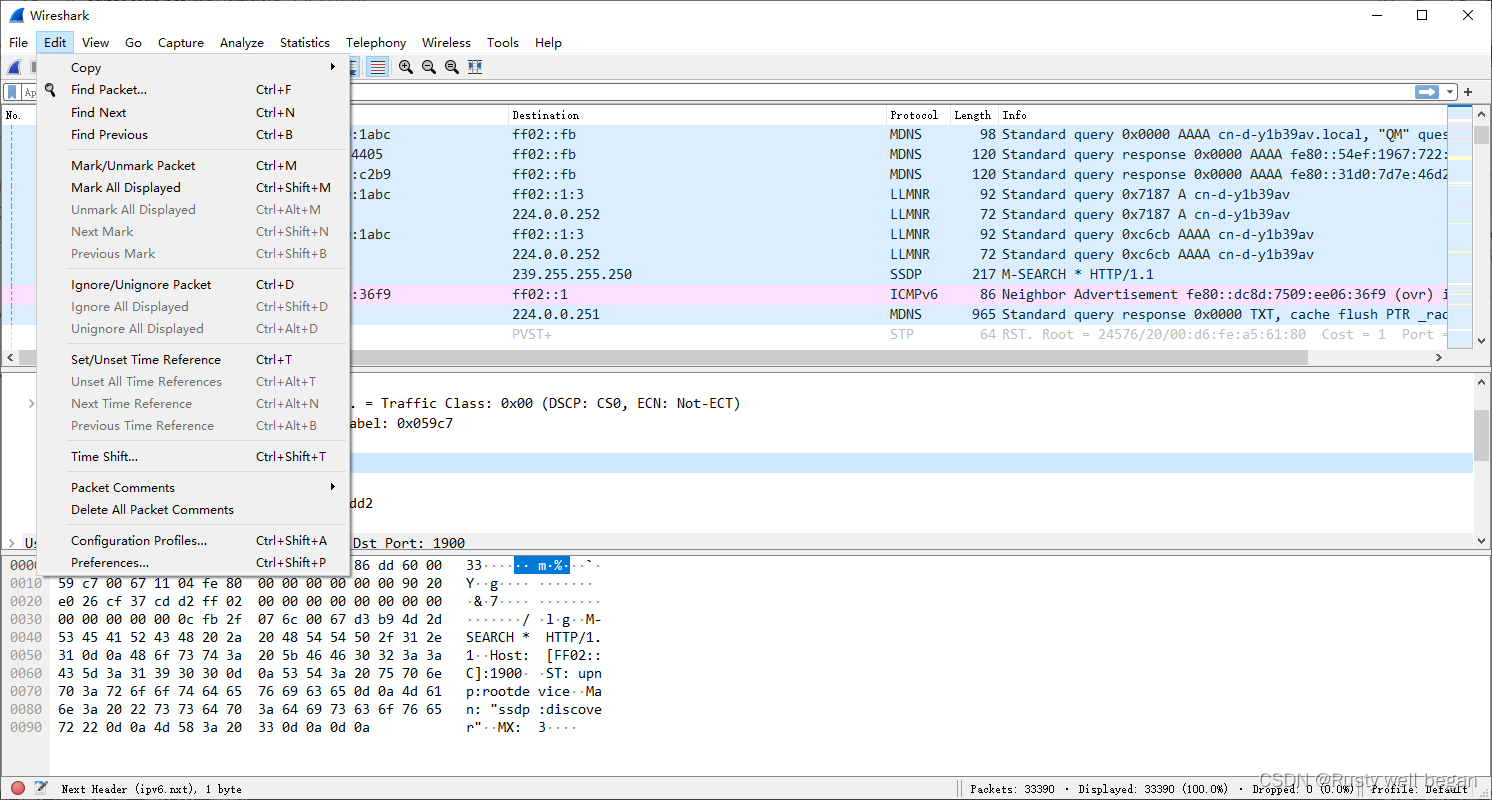
3.6. The “Edit” Menu
The Wireshark Edit menu contains the fields shown in Table 3.3, “Edit menu items”.
Figure 3.4. The “Edit” Menu
