文章目录
前言
徐小宝:本文仅以经验指南,涉及cli脚手架,单点登录,埋点等,方便自我查找刨坑。
一、前期准备
-
由于浙里办的微应用是必须前后端分离,且前端文件需要部署到浙里办服务器上的,所以需要前端项目支持 rpm run build 命令,所以不能使用Hbuilder X直接构建项目,需要如下命令构建,选择默认模板即可,细节参考uniapp官网;
// 安装脚手架
npm install -g @vue/cli
// 新建项目
vue create -p dcloudio/uni-preset-vue 项目名字 -
由于浙里办编译默认输出位置是build,但是uniapp的构建命令默认输出位置是dist;所以,第一种方式是修改uniapp的构建命令输出位置,将pakeage.json中的scripts属性进行如下修改:
“scripts”: {
“serve”: “npm run dev:h5”,
“build”: “npm run build:h5”,
// 在"build:h5"中添加UNI_OUTPUT_DIR='build’即可
“build:h5”: “cross-env UNI_OUTPUT_DIR=‘build’ NODE_ENV=production UNI_PLATFORM=h5 vue-cli-service uni-build”,
“dev:h5”: “cross-env NODE_ENV=development UNI_PLATFORM=h5 vue-cli-service uni-serve”
},
或者在根目录下新建gbc.json文件向浙里办指定输出目录
// gbc.json
{
	"type":"build-config",
	"version":"0.0.1",
	"outputPath":"dist"
}
-
由于前端项目部署在浙里办服务器上,所以还需要对manifest.json文件进行如下修改
{
“name” : “xxxxxxxx”,
“appid” : “”,
“description” : “”,
“versionName” : “1.0.0”,
“versionCode” : “100”,
“transformPx” : false,
“h5” : {
“publicPath” : “./”, // 修改1 不修改此处会出现应用白屏的情况
“router” : {
“base” : “./”, // 修改2 不修改此处会出现图片拿不到的情况
“mode” : “hash” // 修改3 浙里办只支持hash路由
}
}
}
二、浙里办-单点登录功能
由于浙里办微应用需要对支付宝浙里办小程序与浙里办APP进行双端适配,而不同环境下的单点登录跳转链接也不同,所以需要进行应用环境的检测
  const sUserAgent = window.navigator.userAgent.toLowerCase()
  // 浙里办APP
  const bIsDtDreamApp = sUserAgent.indexOf('dtdreamweb') > -1
  // 浙里办支付宝小程序
  const bIsAlipayMini = sUserAgent.indexOf('miniprogram') > -1 && sUserAgent.indexOf('alipay') > -1
-
主要代码实现
isLoad: () => {
if (bIsAlipayMini) {
window.location.href = “https://puser.zjzwfw.gov.cn/sso/alipay.do?action=ssoLogin&servicecode=【接入代码】&goto=【附带跳转地址,以sp参数返回】”;
} else {
window.location.href = “https://puser.zjzwfw.gov.cn/sso/mobile.do?action=oauth&scope=1&servicecode=【接入代码】&goto=【附带跳转地址,以sp参数返回】”;
}
// 或者使用replace()
// window.location.replace(‘https://puser.zjzwfw.gov.cn/sso/alipay.do?action=ssoLogin&servicecode=【接入代码】&goto=【附带跳转地址,以sp参数返回】’);
}
接入码是跟浙里办申请服务接入通过之后给的,goto参数是单点登录跳转的回调地址,如果不指定就以后台设置的sp参数作为回调地址跳转。(sp参数自己无权限修改,必须找服务接入对接人设置,且不设置单点登录登录成功将显示“无权访问业务系统”的提示字样)
Tips:新版使用AK/SK(servicecode 等同于 AccessKey(简称 AK),servicepwd 等同于 SecretKey(简称 SK)),获取地址:https://csss.zj.gov.cn/verifyComList/applyNew ,需政务内网访问。
- 二次回退问题
使用pageshow事件解决二次回退问题
// 浙里办APP判断页面进入状态
watchApp: () => {
	window.onpageshow = (event) => {
		if (event.persisted || (window.performance && window.performance.navigation.type == 2)) {
			ZWJSBridge.close();
		}
		that.isLoad();
	}
},
// 支付宝浙里办小程序判断页面进入状态
watchApply: () => {
	window.onpageshow = (event) => {
		if (event.persisted || (window.performance && (window.performance.navigation.type == 1 || window.performance.navigation.type == 0))) {
			that.isLoad();
		} else {
			my.navigateBack();
		}
	}
}
使用vue router的守卫导航解决二次回退问题
// loading 中转页面
// 单点登录成功后调用 that.$router.push('/index')
beforeRouteEnter(to, from, next) {
	if(to.meta.name === 'loading' && from.meta.name === 'index') {
		if(bIsDtDreamApp){
			ZWJSBridge.close();
		} else {
			my.navigateBack();
		}
	}
}
// 路由配置
{path: '/index', component: () => {'./pages/index/index.vue'}, name: 'index', meta: {name: 'index'}}
{path: '/loading', component: () => {'./pages/index/loading.vue'}, name: 'loading', meta: {name: 'loading'}}
-
获取回调后的ticket参数
// 用法 ==> that.getQuery(‘ticket’)
getQuery: (name) => {
var reg = new RegExp(“(^|&)” + name + “=([^&]*)(&|$)”);
var r = window.location.search.substr(1).match(reg);
if (r != null) return unescape(r[2]);
return null;
}
因为uniapp只能处理应用内的跳转及参数获取,应用内的参数可以在onLoad()及onInit()这两个生命周期函数获取,而单点登录成功的回调属于重定向,参数只能通过location对象获取。
-
完整逻辑
init: () => {
sUserAgent = window.navigator.userAgent.toLowerCase();
bIsDtDreamApp = sUserAgent.indexOf(“dtdreamweb”) > -1; // 浙里办APP
bIsAlipayMini = sUserAgent.indexOf(“miniprogram”) > -1 && sUserAgent.indexOf(“alipay”) > -1;
if (that.getQuery(‘ticket’) == null && that.ticket == “”) {
uni.showLoading({
title: ‘登录中’,
mask: true
});
if (bIsDtDreamApp) {
that.watchApp();
} else if (bIsAlipayMini) {
that.watchApply();
}
} else {
that.ticket = that.getQuery(‘ticket’);
uni.reLaunch({
url:./index?ticket=${that.ticket}
})
}
}
三、获取用户信息
Ⅰ、普通request调取用户数据
-
根据ticket获取token,POST方法queryParams传参
getTonken: () => {
new Promise((resolve, reject) => {
uni.request({
url:https://appapi.zjzwfw.gov.cn/sso/servlet/simpleauth?method=ticketValidation${that.queryParams(that.getTonkenAndUserInfoParams())},
method: ‘POST’,
header:{
“Content-Type”: “application/json”
},
success: (res) => {
if (res.statusCode == 200 && res.data.result == 0) {
resolve(res.data);
} else {
uni.showToast({
title: res.data.result
})
reject(res);
}
},
fail: (err) => {
uni.showToast({
title: ‘网络错误,请稍后重试!’
})
reject(err.errMsg);
}
})
}
} -
根据token获取用户信息
getUserInfo: () => {
new Promise((resolve, reject) => {
uni.request({
url:https://appapi.zjzwfw.gov.cn/sso/servlet/simpleauth?method=getUserInfo${that.queryParams(that.getTonkenAndUserInfoParams(that.token))},
method: ‘POST’,
header:{
“Content-Type”: “application/json”
},
success: (res) => {
if (res.statusCode == 200 && res.data.result == 0) {
resolve(res.data);
} else {
uni.showToast({
title: res.data.result
})
reject(res);
}
},
fail: (err) => {
uni.showToast({
title: ‘网络错误,请稍后重试!’
})
reject(err.errMsg);
}
})
}
} -
统一获取参数
getTonkenAndUserInfoParams: ( token = ‘’) => {
let mTime = that.timeFormat(new Date(), ‘yyyymmddhhMMss’);
let data = {
servicecode: 【接入码】,
time: mTime,
sign: md5Libs.md5(${【接入码】}${【接入码密码】}${mTime}),
datatype: ‘json’
}
if (token == ‘’) {
data.st = that.ticket;
} else {
data.token = token;
}
return data;
} -
时间格式化
function timeFormat(dateTime = null, fmt = ‘yyyy-mm-dd’) {
// 如果为null,则格式化当前时间
if (!dateTime) dateTime = Number(new Date());
// 如果dateTime长度为10或者13,则为秒和毫秒的时间戳,如果超过13位,则为其他的时间格式
if (dateTime.toString().length == 10) dateTime *= 1000;
let date = new Date(dateTime);
let ret;
let opt = {
“y+”: date.getFullYear().toString(), // 年
“m+”: (date.getMonth() + 1).toString(), // 月
“d+”: date.getDate().toString(), // 日
“h+”: date.getHours().toString(), // 时
“M+”: date.getMinutes().toString(), // 分
“s+”: date.getSeconds().toString() // 秒
// 有其他格式化字符需求可以继续添加,必须转化成字符串
};
for (let k in opt) {
ret = new RegExp(“(” + k + “)”).exec(fmt);
if (ret) {
fmt = fmt.replace(ret[1], (ret[1].length == 1) ? (opt[k]) : (opt[k].padStart(ret[1].length, “0”)))
};
};
return fmt;
} -
参数格式化
function queryParams(data = {}, isPrefix = true, arrayFormat = ‘brackets’) {
let prefix = isPrefix ? ‘?’ : ‘’
let _result = []
if ([‘indices’, ‘brackets’, ‘repeat’, ‘comma’].indexOf(arrayFormat) == -1) arrayFormat = ‘brackets’;
for (let key in data) {
let value = data[key]
// 去掉为空的参数
if ([‘’, undefined, null].indexOf(value) >= 0) {
continue;
}
// 如果值为数组,另行处理
if (value.constructor === Array) {
// e.g. {ids: [1, 2, 3]}
switch (arrayFormat) {
case ‘indices’:
// 结果: ids[0]=1&ids[1]=2&ids[2]=3
for (let i = 0; i < value.length; i++) {
_result.push(key + ‘[’ + i + ‘]=’ + value[i])
}
break;
case ‘brackets’:
// 结果: ids[]=1&ids[]=2&ids[]=3
value.forEach(_value => {
_result.push(key + ‘[]=’ + _value)
})
break;
case ‘repeat’:
// 结果: ids=1&ids=2&ids=3
value.forEach(_value => {
_result.push(key + ‘=’ + _value)
})
break;
case ‘comma’:
// 结果: ids=1,2,3
let commaStr = “”;
value.forEach(_value => {
commaStr += (commaStr ? “,” : “”) + _value;
})
_result.push(key + ‘=’ + commaStr)
break;
default:
value.forEach(_value => {
_result.push(key + ‘[]=’ + _value)
})
}
} else {
_result.push(key + ‘=’ + value)
}
}
return _result.length ? prefix + _result.join(‘&’) : ‘’
}
Tips 最新版本单点登录参数签名生成代码详见下文代码
这是在前端直接处理用户信息的方式,但是这样直接调用会引发另一个问题,就是浏览器的CROS跨域问题,这个时候就需要使用其他方式去实现功能,一种是将ticket传回后端,让后端获取用户信息然后回传前端;第二种方式就是使用浙里办提供的RPC网关去实现前端获取用户数据。
Ⅱ、浙里办RPC网关调用的实现
-
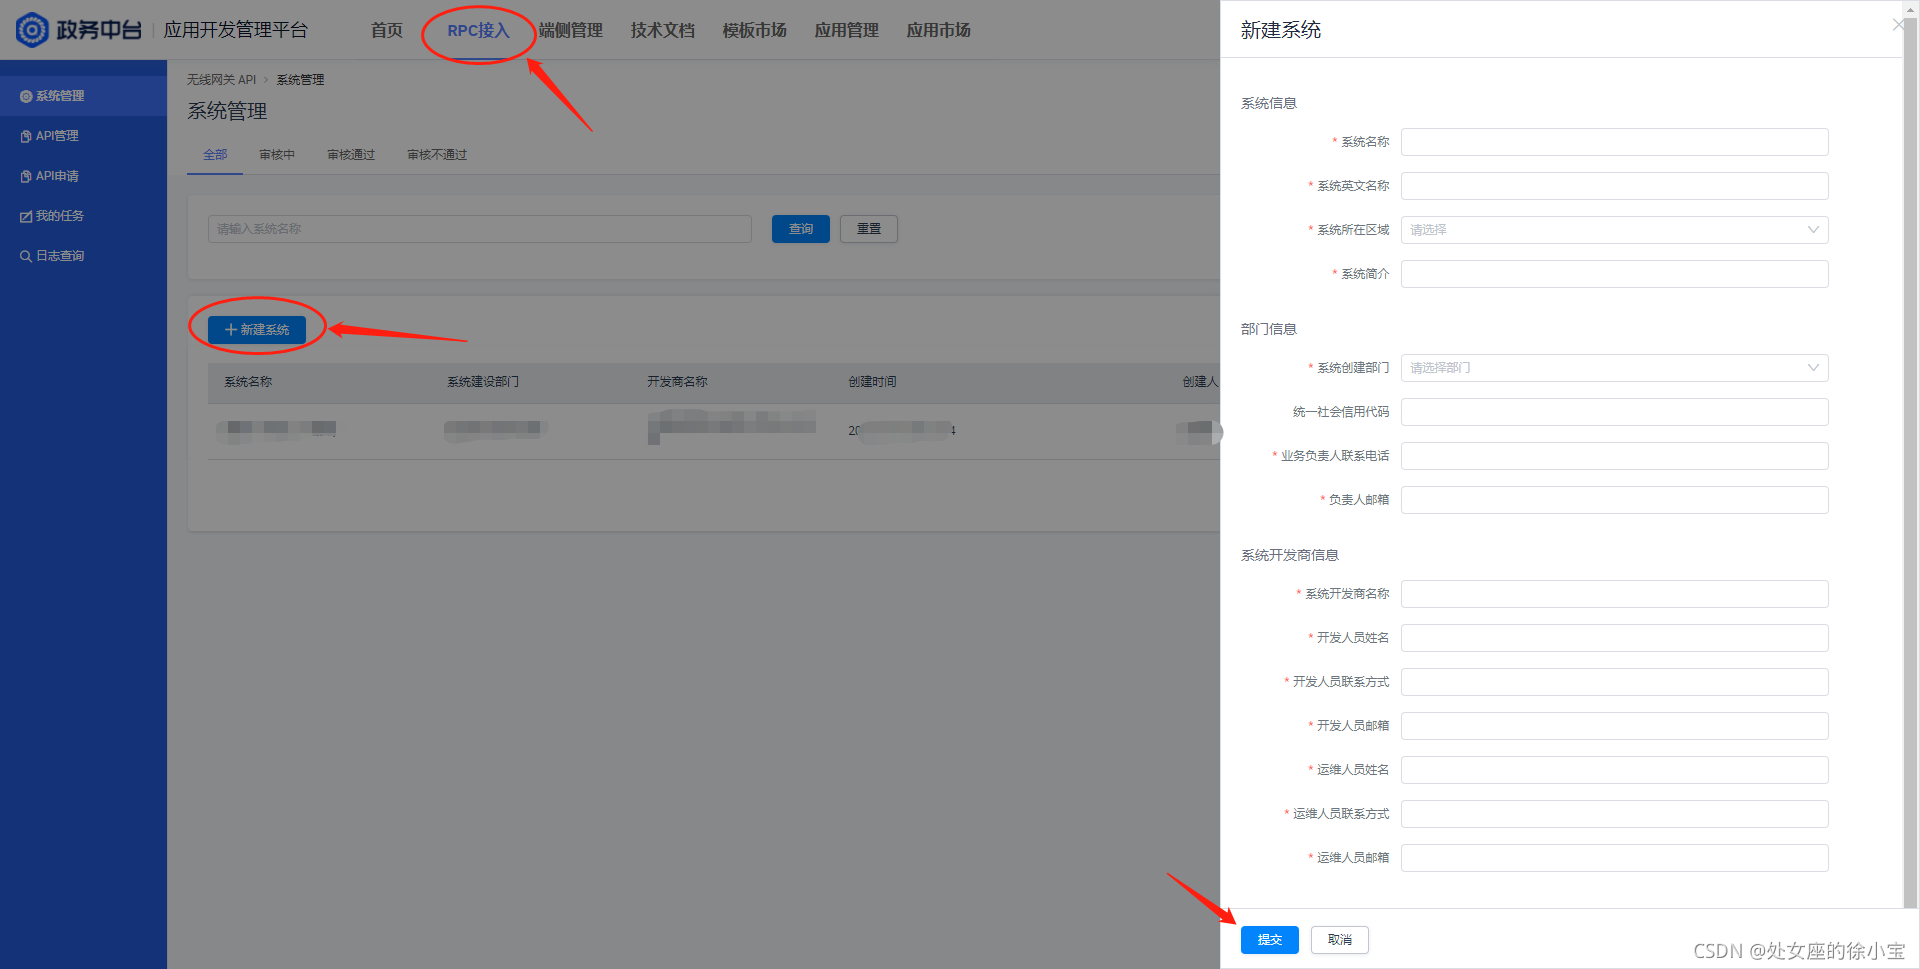
首先需要在浙里办的中控新建一个RPC系统
-
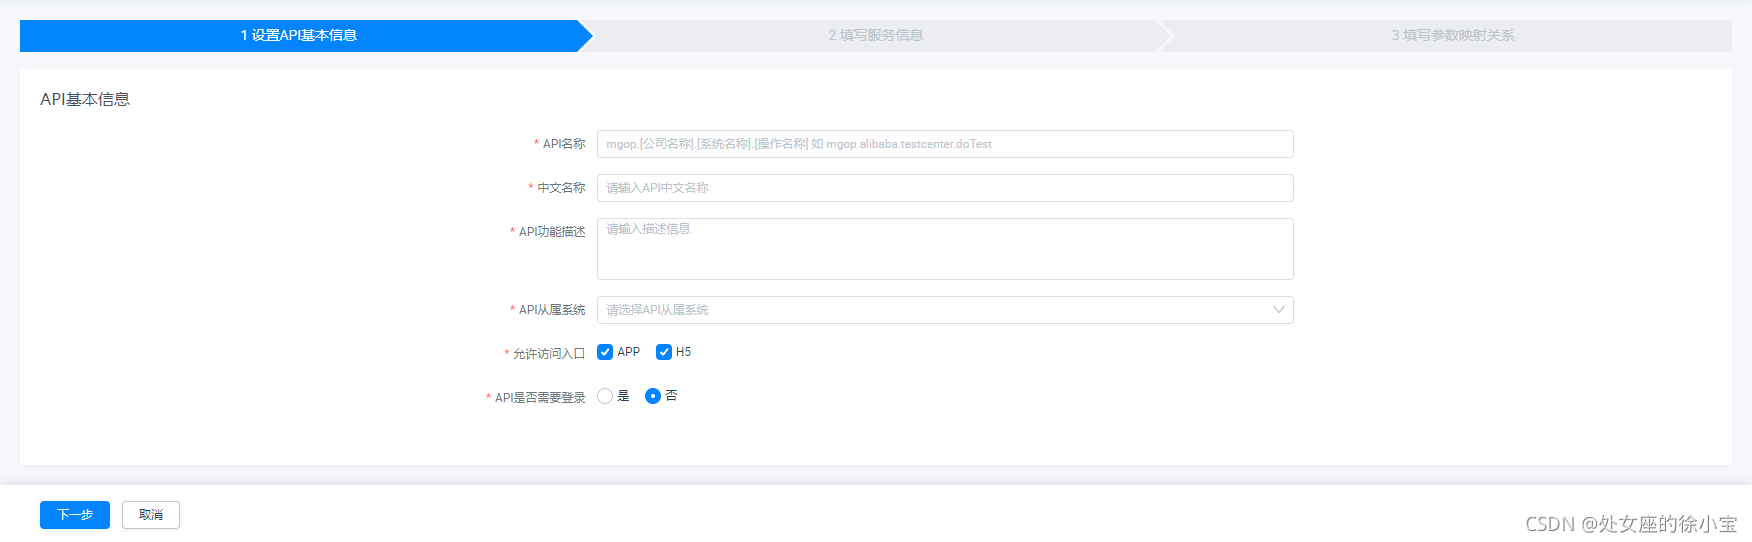
新建API

填写API基本信息,其中API名称是之后需要调用的参数
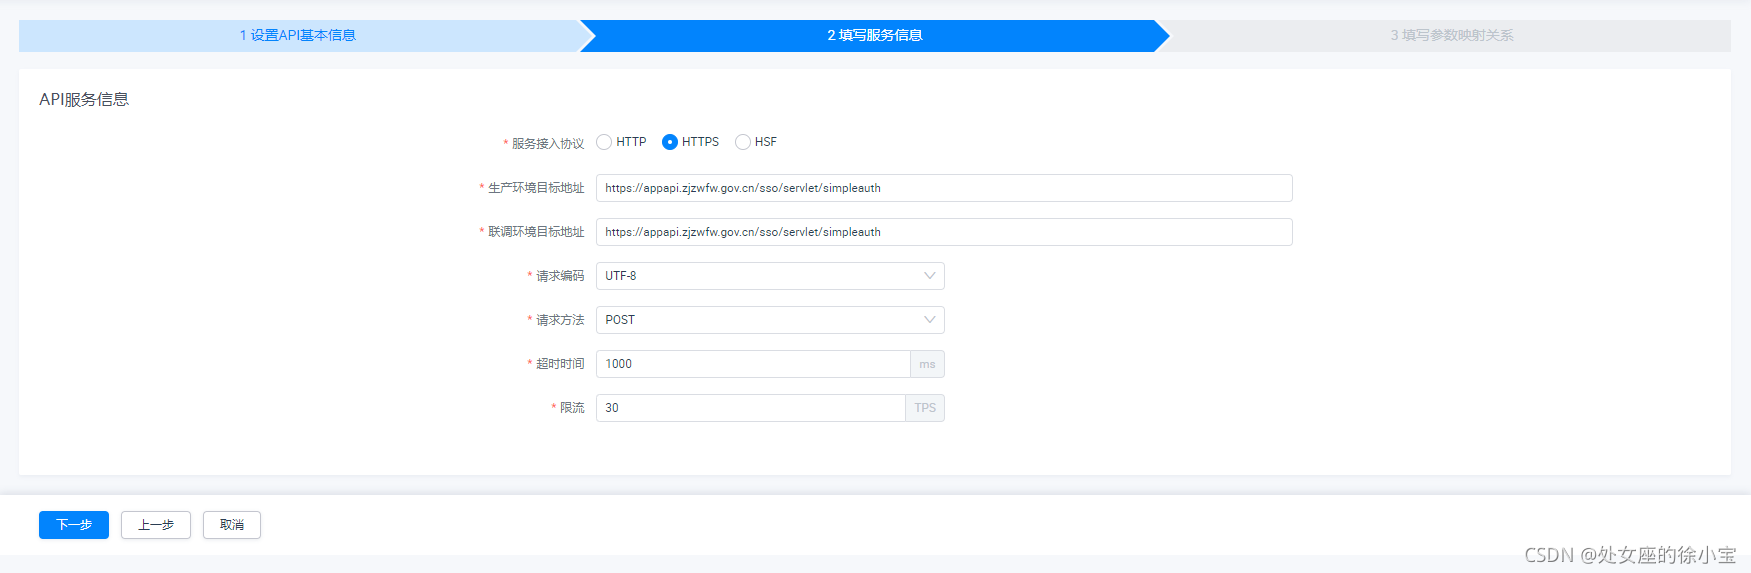
填写服务信息,目标地址均填写:https://appapi.zjzwfw.gov.cn/sso/servlet/simpleauth
填写参数映射关系,传参方式选择query透传,入参和途图中设置一致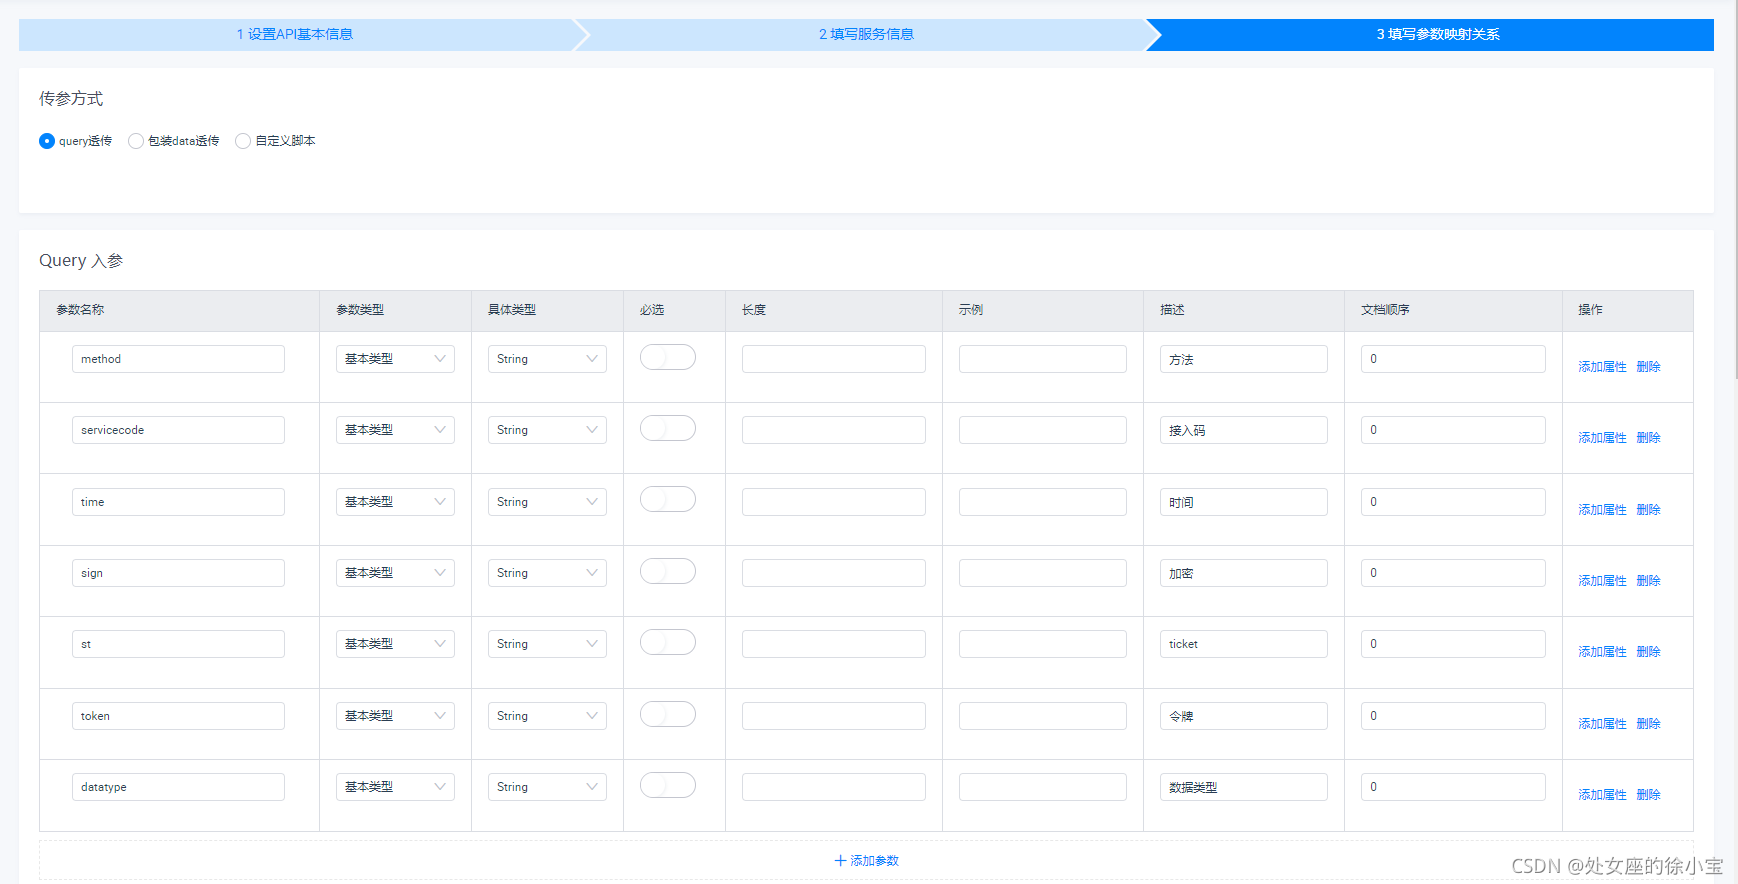
出参按照自己的需求进行设置即可,基本类型,String类型,名称与原浙里办SSO接口规范一致,按需增减即可。其中框选参数必选,后续埋点需要用到。

设置完成API以后,点击上线即可在前端使用网关API进行调用。上线后如需修改,点击升级即可重新编辑。 -
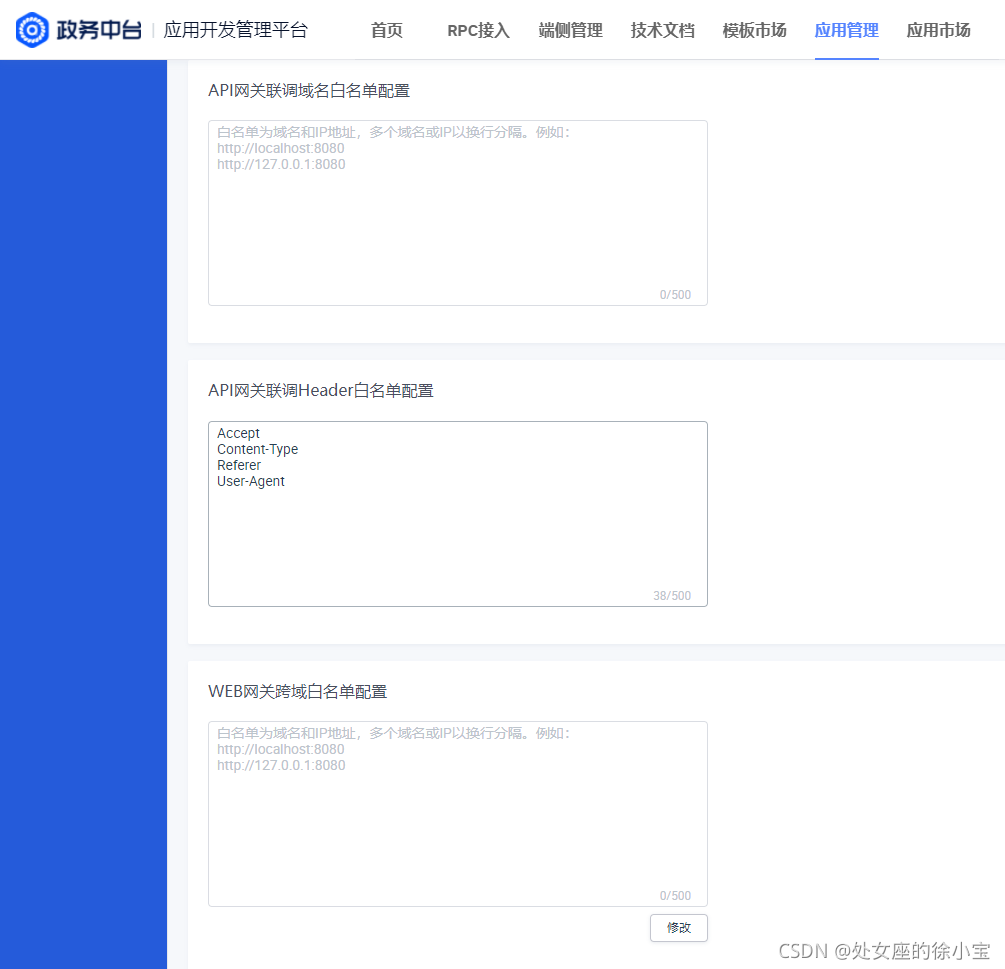
设置API网关白名单
 4. 安装网关依赖
npm i --save @aligov/[email protected]
// 代码中引用
import { mgop } from ‘@aligov/jssdk-mgop’; -
调用方法改造
Tips 最新版本单点登录参数签名生成代码详见下文第7小点代码
getTonkenAndUserInfo: (data) => {
return new Promise((resolve, reject) => {
mgop({
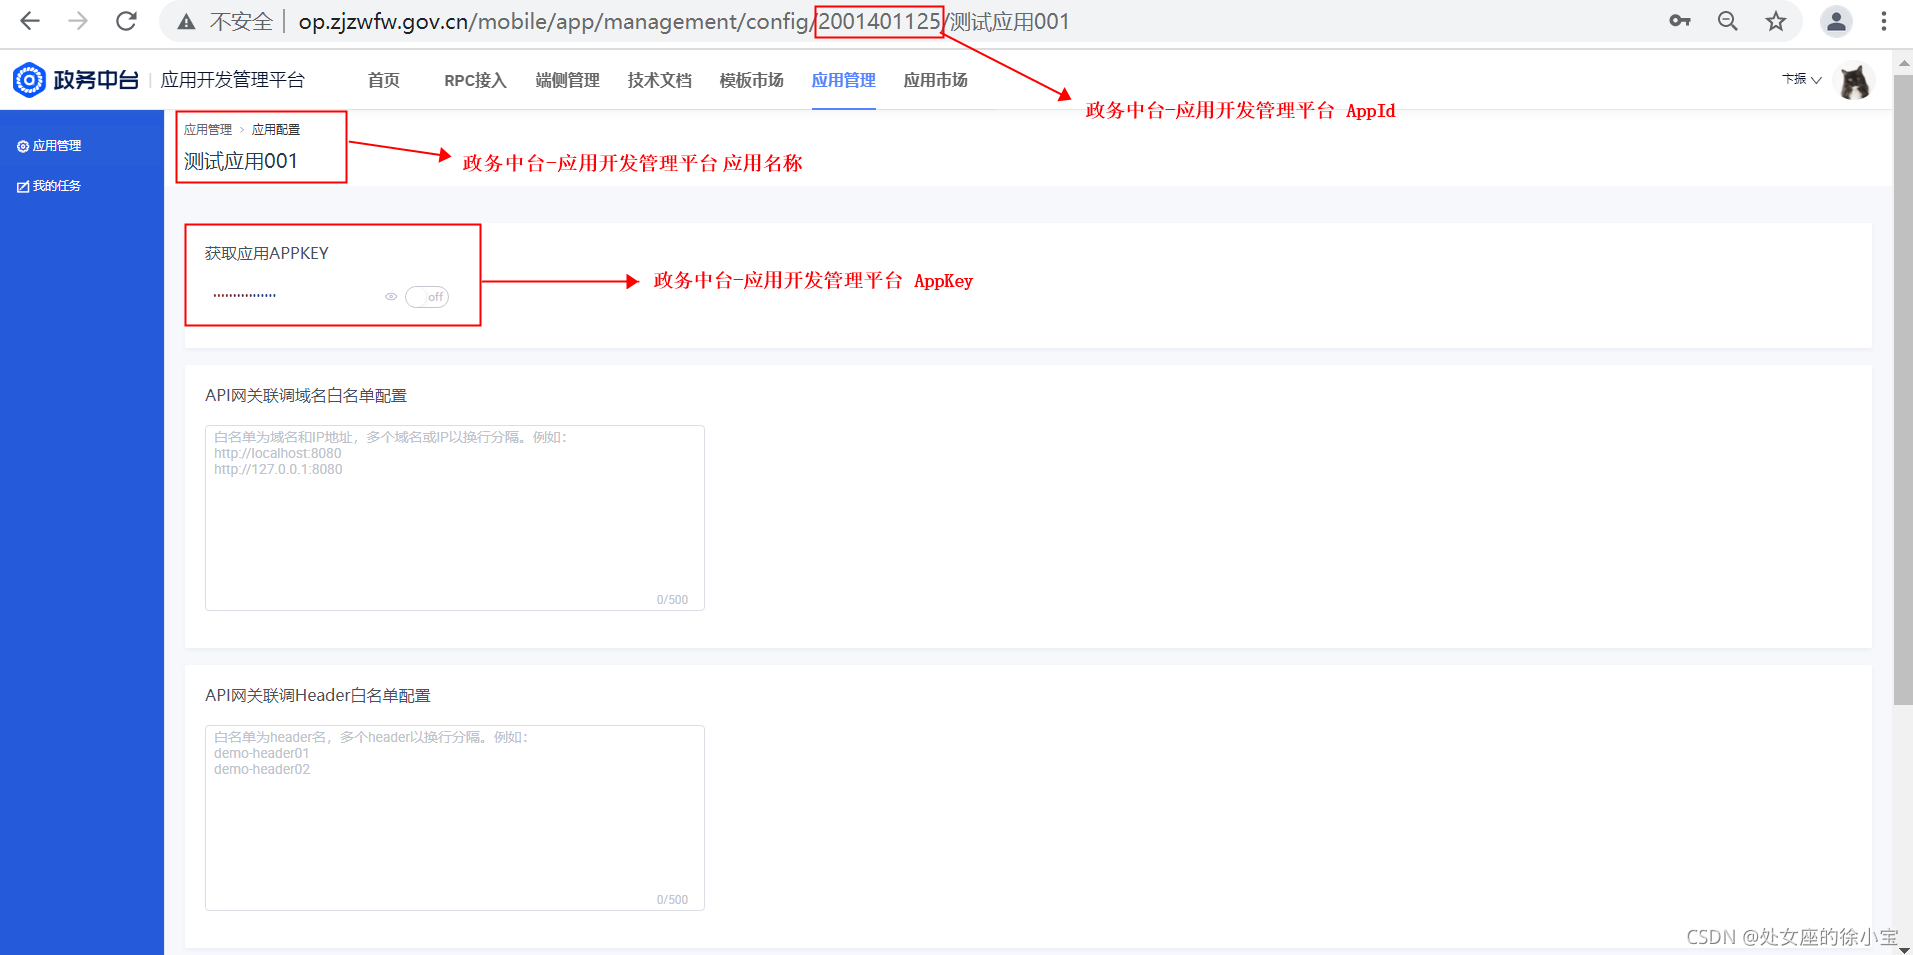
api: '【API名称】',
host: 'https://mapi.zjzwfw.gov.cn/',
data: data,
dataType: 'JSON',
type: 'POST',
appKey: '【应用APPKEY】',
onSuccess: res => {
if (res.data.result && res.data.result == 0) {
resolve(res.data);
}
},
onFail: err => {
reject(err);
}
});
})
},
---------------------------------------
// 安装插件HMAC-SHA256签名插件crypto-js
// npm install crypto-js
// 2022最新规范示例
// Tips 最新版本单点登录参数签名生成代码详见下文代码
import CryptoJS from 'crypto-js/crypto-js';
getTonkenAndUserInfo: (data, method = 'ticketValidation') => {
let xTime = new Date().toGMTString();
return new Promise((resolve, reject) => {
mgop({
api: '【API名称】',
host: 'https://mapi.zjzwfw.gov.cn/',
data: data,
dataType: 'JSON',
type: 'POST',
appKey: '【应用APPKEY】',
header: {
'Content-Type': 'application/x-www-form-urlencoded',
'X-BG-HMAC-SIGNATURE': '【X-BG-HMAC-SIGNATURE】'
'X-BG-HMAC-ALGORITHM': 'hmac-sha256',
'X-BG-HMAC-ACCESS-KEY': '【ak】',
'X-BG-DATE-TIME': xTime
},
onSuccess: res => {
if (res.data.result && res.data.result == 0) {
resolve(res.data);
}
},
onFail: err => {
reject(err);
}
});
})
},
---------------------------------------
getTonkenAndUserInfoParams: (method = 'ticketValidation', token = '') => {
let mTime = that.timeFormat(new Date(), 'yyyymmddhhMMss');
let data = {
method: method,
servicecode: 【接入码】,
time: mTime,
sign: md5Libs.md5(`${【接入码】}${【接入码密码】}${mTime}`),
datatype: 'json'
}
if (token == '') {
data.st = that.ticket;
} else {
data.token = token;
}
return data;
}
-
具体引用实现
that.getTonkenAndUserInfo(that.getTonkenAndUserInfoParams()).then(data => {
return that.getTonkenAndUserInfo(that.getTonkenAndUserInfoParams(‘getUserInfo’, data.token));
}).then(data => {
that.userInfo = data;
}).catch(err => {
console.log(err);
}); -
最新版本单点登录参数签名生成代码
let accessKey = “xxx”; //替换成自己的ak
let secret=“xxxx”; //替换成自己的sklet path = pm.request.url.getPath();
let query=pm.request.url.query;
let queryArray=[];
for(index in query.members){
let member= query.members[index];
if(member[“disabled”]==true){
continue;
}
let value = member[“value”];
if(member[“value”]==null){
value = “”
}
let queryKeyValue = encodeURIComponent(member[“key”])+“=”+encodeURIComponent(value);
queryArray.push(queryKeyValue);
}
queryArray.sort();
let queryString = queryArray.join(“&”);let date = (new Date()).toGMTString();
let singString = pm.request.method+"
“+path+”
“+queryString+”
“+accessKey+”
“+date+”
";
let hash = CryptoJS.HmacSHA256(singString, secret);
let hashInBase64 = CryptoJS.enc.Base64.stringify(hash);pm.environment.set(“X-BG-HMAC-ACCESS-KEY”,accessKey);
pm.environment.set(“X-BG-HMAC-SIGNATURE”,hashInBase64);
pm.environment.set(“X-BG-HMAC-ALGORITHM”,“hmac-sha256”);
pm.environment.set(“X-BG-DATE-TIME”,date); -
如果遇到网关调用返回未知错误,先看看应用是否接入RPC系统服务
Ⅲ、浙里办官方单点登录组件接口网关调用
- 请求头参数
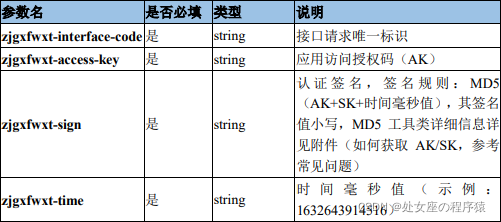
- 请求头参数zjgxfwxt-interface-code与源接口方法对应值
- ticketValidation:atg.biz.resultful.simpleauth.ticketvalidation
- idValidation:atg.biz.resultful.simpleauth.idvalidation
- getUserInfo:atg.biz.resultful.simpleauth.getuserinfo
- generateST:atg.biz.resultful.simpleauth.generates
Tips:构建网关请求参考上文Ⅱ内容
四、埋点操作
1、首先在public/index.html中引入埋点的api脚本,为防止出现https://https://这种双协议头调用,除脚本自身外,还需先填写基础PV日志的埋点函数,如果不需要单点登录采集用户数据则不需要最后的BLOCK,其他均为固定值,照抄就行。
<script>
	(function(w, d, s, q, i) {
		w[q] = w[q] || [];
		var f = d.getElementsByTagName(s)[0],
		j = d.createElement(s);
		j.async = true;
		j.id = 'beacon-aplus';
		j.src = 'https://d.alicdn.com/alilog/mlog/aplus.js?id=202951085';
		f.parentNode.insertBefore(j, f);
	})(window, document, 'script', 'aplus_queue');
	aplus_queue.push({
		action: 'aplus.setMetaInfo',
		arguments: ['aplus-waiting', 'MAN']
	});
	aplus_queue.push({
		action: 'aplus.setMetaInfo',
		arguments: ['aplus-rhost-v', 'alog.zjzwfw.gov.cn']
	});
	aplus_queue.push({
		action: 'aplus.setMetaInfo',
		arguments: ['aplus-rhost-g', 'alog.zjzwfw.gov.cn']
	});
	aplus_queue.push({
		action: 'aplus.setMetaInfo',
		arguments: ['appId', '60506758']
	});
	aplus_queue.push({
		action: 'aplus.setMetaInfo',
		arguments: ['_hold', 'BLOCK']
	});
</script>
2、页面PV日志采集,aplus函数在取得用户经纬度、用户数据、用户类型等数据后再进行调用。如没有单点登录获取用户数据,则仅需要留’aplus.sendPV’这一个。
aplus: () => {
	aplus_queue.push({
		'action': 'aplus.sendPV',
		'arguments': [{
			is_auto: false
		}, {
			miniAppId: '【APPID】',
			miniAppName: '【APPNAME】',
			long: that.longitude,
			lati: that.latitude,
			userType: that.userType,
		}]
	});
	aplus_queue.push({
		action: "aplus.setMetaInfo",
		arguments: ["_user_nick", that.userInfo.username]
	});
	aplus_queue.push({
		action: "aplus.setMetaInfo",
		arguments: ["_user_id", that.userInfo.userid]
	});
	aplus_queue.push({
		action: 'aplus.setMetaInfo',
		arguments: ['_hold', 'START']
	});
}
3、AppId、AppName及AppKey参数位置
五、JSBridge的引入及使用
在浙里办的微应用中,很多地方需要使用到浙里办的一些封装API功能,也就是JSBridge,且所有JSBridgeAPI均支持Promise回调,这里主要讲解下常用的几个API以及引入。
-
JSBriage JS的引入,在public/index.html中引入
-
JSBridge JS初始化,在App.vue中进行全局初始化
onLaunch: function() {
console.log(‘App Launch’)
ZWJSBridge.onReady(() => {
console.log(‘初始化完成后,执行bridge方法’)
})
}, -
初始化完成以后,就可以在单个页面使用 ZWJSBridge.API名称 调用功能了
-
常用的API
// 设置单页面标题
ZWJSBridge.setTitle({
“title”: “标题”
}).then(res => {
console.log(res)
}).catch(err => {
console.log(err)
})
// 获取用户类型
ZWJSBridge.getUserType({}).then(res => {
console.log(res)
}).catch(err => {
console.log(err)
})
// 获取用户地理位置
ZWJSBridge.getLocation({}).then(res => {
console.log(res)
}).catch(err => {
console.log(err)
})
更多的API信息请移步官方文档 ==> JSBridge API介绍
六、适老化改造方案(一种解决方案)
-
获取用户UI风格
ZWJSBridge.getUiStyle().then(res => {
switch (res.uiStyle) {
case ‘elder’:
that.uiStyle = res.uiStyle;
break;
default:
that.uiStyle = ‘normal’;
}
}); -
class编写风格(如下示例)
.normal-row-complaint {
background-color: #F9F5F0;
height: 200rpx;
border-radius: 20rpx;.complaint-back { background-color: #FFFFFF; border-radius: 50%; padding: 20rpx; margin: 20rpx 0; width: 100rpx; text-align: center; } .complaint-title { font-size: 36rpx; color: #8A775C; font-weight: 600; } } .elder-row-complaint { background-color: #F9F5F0; height: 200rpx; border-radius: 20rpx; .complaint-back { background-color: #FFFFFF; border-radius: 50%; padding: 20rpx; margin: 15rpx 0; width: 100rpx; text-align: center; } .complaint-title { font-size: 44rpx; color: #8A775C; font-weight: 600; } } -
vue动态加载class
:class=“[uiStyle+‘-row-complaint’]”
如果设置应用内按钮切换,可以添加全局变量或者设置缓存
七、其他
-
浙里办官方调试工具 ==> 政务中台(直接点击下载)
-
支付宝环境下无法正常调试,需要使用第三方插件eruda,即可在支付宝环境下使用控制台等功能进行调试。
// public/index.html引入
// App.vue onLaunch方法初始化
eruda.init(); -
三方UI选择,题主使用的uView UI,也有很多自带的JS工具,十分方便,可点击查看官方文档,由于uView UI大量使用的是scss预编译,所以需要进行插件的安装,务必使用如下代码引入,官方文档将下载最新版本插件(只支持Vue 3.0),会导致编译不通过,除非项目构建使用的Vue 3.0。(tips:引入UI建议使用文件导入,而不是npm安装)
// 安装node-sass
npm i [email protected] -D// 安装sass-loader
npm i [email protected] -D -
关于页面用户信息脱敏的处理
function desensitization(str, beginLen, endLen = -1) {
let len = str.length;
if (beginLen == 0) {
endLen = endLen * len + 1;
}
let firstStr = str.substr(0, beginLen);
let lastStr = str.substr(endLen);
let middleStr = str.substring(beginLen, len - Math.abs(endLen)).replace(/[sS]/ig, ‘*’);
return${firstStr}${middleStr}${lastStr};
}
// 姓名脱敏示例
desensitization(userInfo.username,0)
// 手机号脱敏示例
desensitization(userInfo.mobile,3,-4)
// 身份证号脱敏示例
desensitization(userInfo.idnum,1,-1) -
使用JSEncrypt加密数据传输
import JSEncrypt from ‘@/common/jsencrypt/jsencrypt.min.js’
const publicKey =
-----BEGIN PUBLIC KEY----- 公钥 -----END PUBLIC KEY-----const privateKey =
-----BEGIN PRIVATE KEY----- 私钥 -----END PRIVATE KEY-----function encrypt(txt) {
const encryptor = new JSEncrypt()
encryptor.setPublicKey(publicKey) // 设置公钥
return encryptor.encrypt(txt) // 对数据进行加密
}// 解密
function decrypt(txt) {
const encryptor = new JSEncrypt()
encryptor.setPrivateKey(privateKey) // 设置私钥
return encryptor.decrypt(txt) // 对数据进行解密
} -
高德地图的引入
// 地图初始化
function initMap() {
return new Promise((resolve, reject) => {
if (window.AMap) {
resolve(window.AMap)
} else {
var url = ‘https://webapi.amap.com/maps?v=1.4.15&key=【key】&callback=onLoad’;
var jsapi = document.createElement(‘script’);
jsapi.charset = ‘utf-8’;
jsapi.src = url;
document.head.appendChild(jsapi);
}
window.onLoad = () => {
resolve(window.AMap)
}
})
}
// 页面调用
initMap().then(AMap => {
that.map = new AMap.Map(‘container’, {
zoom: 12,
center: [longitude, latitude]
});
})
// 批量设置Mark
setMarks: (arr) => {
arr.forEach(item => {
let marker = new AMap.Marker({
icon: ‘//vdata.amap.com/icons/b18/1/2.png’,
position: [longitude, latitude],
});
return that.map.add(marker);
})
},
一些问题
-
使用uView UI的图片上传功能在支付宝环境下,出现图片损毁的情况,解决方案,改写upload组件
// 选择图片–改造–使用JSBridge API
selectFile() {
if (this.disabled) return;
const { name = ‘’, isAlipay, maxCount, multiple, maxSize, sizeType, lists, camera, compressed, maxDuration, sourceType } = this;
let chooseFile = null;
const newMaxCount = maxCount - lists.length;
// 设置为只选择图片的时候使用 chooseImage 来实现
chooseFile = ZWJSBridge.chooseImage({
“upload”: true
})
chooseFile.then(res => {
let file = null;
let listOldLength = this.lists.length;
res.picPath.map((val, index) => {
// 如果是非多选,index大于等于1或者超出最大限制数量时,不处理
if (!multiple && index >= 1) return;
if (val.size > maxSize) {
this.KaTeX parse error: Expected 'EOF', got '}' at position 87: …出允许的文件大小'); }̲ else { if …emit(‘on-exceed’, val, this.lists, this.index);
this.showToast(‘超出最大允许的文件个数’);
return;
}
uni.downloadFile({
url: val,
success: (res) => {
if (res.statusCode === 200) {
lists.push({
url: res.tempFilePath,
progress: 0,
error: false,
file: {
path: res.tempFilePath
}
});
} else {
this.showToast(‘图片选取失败请重新选择’);
}
}
});
}
});
// 每次图片选择完,抛出一个事件,并将当前内部选择的图片数组抛出去
this.KaTeX parse error: Expected 'EOF', got '}' at position 109: …stOldLength); }̲).catch(error =…emit(‘on-choose-fail’, error);
});
} -
使用JSBridge的缓存API(getLocalStorage()和setLocalStorage()) 在支付宝环境下出现第一次加载无法正常使用的问题,解决方案:使用Vuex、全局变量、uniapp的缓存API等,按需求采用。
有什么不到之处,欢迎底下留言!!!