Installation & Quick start
Environment环境
The code is developed using python 3.6.12, pytorch-1.4.0, and CUDA 10.0 on Ubuntu 18.04.
For our experiments, we used 2 NVIDIA 2080Ti GPUs.
该代码是在ubuntu18.04上使用python3.6.12、pytorch-1.4.0和cuda10.0开发的。
在我们的实验中,我们使用了2个nvidia2080ti gpu。
Installation安装
1.Create a conda virtual environment and activate it
1.创建一个conda虚拟环境并激活它
conda create -n DCPose python=3.6.12
source activate DCPose

2.Install dependencies through DCPose_requirements.txt
通过[DCPose_requirements.txt]安装依赖项
原始论文:pip install -r DCPose_requirement.txt
我的:pip install -r /home/cdj/CODE/DCPose-main/DCPose_requirement.txt
按照你的修改
3.Install DCN
cd thirdparty/deform_conv
python setup.py develop
-----------------------
注意需要先找到你文件所在的位置
我的:
cd /home/cdj/CODE/DCPose-main/thirdparty/deform_conv
python setup.py develop

4.Download our pretrained models and supplementary .Put it in the directory ${DCPose_SUPP_DIR}. (Note that part of the pre-trained models are available, and more pre-train models will be released soon later.)
下载我们的预训练模型和补充
把它放在目录里DCPose_SUPP_DIR
请注意,部分预训练模型可用,更多预训练模型将很快发布。
放在主目录下

路径不对会报错


上面网址打不开可以从我的网盘下载
(链接:https://pan.baidu.com/s/1kpdf95H67WH6EGy2uTvDbg
提取码:xgd1
复制这段内容后打开百度网盘手机App,操作更方便哦)
Data preparation数据准备
First, create a folder ${DATASET_DIR} to store the data of PoseTrack17 and PoseTrack18.
首先,创建一个文件夹 ${DATASET_DIR} 来存储PoseTrack17和PoseTrack18的数据。
The directory structure should look like this:
目录结构应如下所示:
${DATASET_DIR}
	|--${POSETRACK17_DIR}
	|--${POSETRACK18_DIR}

# For example, our directory structure is as follows.例如,我们的目录结构如下。
# If you don't know much about configuration file(.yaml), please refer to our settings.如果您不太了解配置文件(.yaml),请参阅我们的设置。
DataSet
	|--PoseTrack17
	|--PoseTrack18
For PoseTrack17 data, we use a slightly modified version of the PoseTrack dataset where we rename the frames to follow %08d format, with first frame indexed as 1 (i.e. 00000001.jpg). First, download the data from PoseTrack download page. Then, rename the frames for each video as described above using this script.
我们使用了PoseTrack数据集的一个稍微修改过的版本,其中我们将帧重命名为%08d格式,第一帧索引为1(即00000001.jpg)。首先,从[PoseTrack下载页]下载数据(https://posetrack.net/users/download.php). 然后,使用[此脚本]如上所述重命名每个视频的帧(https://github.com/facebookresearch/DetectAndTrack/blob/master/tools/gen_posetrack_json.py).
Like PoseWarper, We provide all the required JSON files, which have already been converted to COCO format. Evaluation is performed using the official PoseTrack evaluation code, poseval, which uses py-motmetrics internally. We also provide required MAT/JSON files that are required for the evaluation.
使用py motmetrics内部。我们还提供了评估所需的MAT/JSON文件。
我们提供了所有需要的JSON文件,这些文件已经转换成COCO格式。使用官方的PoseTrack评估代码执行评估poseval
Your extracted PoseTrack17 directory should look like this:
解压缩的PoseTrack17目录应如下所示:
|--${POSETRACK17_DIR}
	|--images
        |-- bonn
        `-- bonn_5sec
        `-- bonn_mpii_test_5sec
        `-- bonn_mpii_test_v2_5sec
        `-- bonn_mpii_train_5sec
        `-- bonn_mpii_train_v2_5sec
        `-- mpii
        `-- mpii_5sec
    |--images_renamed   # first frame indexed as 1  (i.e. 00000001.jpg)
     	|-- bonn
        `-- bonn_5sec
        `-- bonn_mpii_test_5sec
        `-- bonn_mpii_test_v2_5sec
        `-- bonn_mpii_train_5sec
        `-- bonn_mpii_train_v2_5sec
        `-- mpii
        `-- mpii_5sec
For PoseTrack18 data, please download the data from PoseTrack download page. Since the video frames are named properly, you only need to extract them into a directory of your choice (no need to rename the video frames). As with PoseTrack17, we provide all required JSON files for PoseTrack18 dataset as well.
对于PoseTrack18数据,请从[PoseTrack下载页]下载数据(https://posetrack.net/users/download.php). 由于视频帧的命名正确,您只需将它们提取到您选择的目录中(无需重命名视频帧)。与PoseTrack17一样,我们也为PoseTrack18数据集提供了所有必需的JSON文件。
Your extracted PoseTrack18 images directory should look like this:
提取的PoseTrack18图像目录应如下所示:
${POSETRACK18_DIR}
    |--images
        |-- test
        `-- train
        `-- val
Create Symbolic link创建符号链接
ln -s  ${DCPose_SUPP_DIR}  ${DCPose_Project_Dir}  # For DCPose supplementary file
ln -s  ${DATASET_DIR}  ${DCPose_Project_Dir}      #  For Dataset


# For example
${DCPose_Project_Dir} = /your/project/path/Pose_Estimation_DCPose
${DCPose_SUPP_DIR}    = /your/supp/path/DcPose_supp_files
${DATASET_DIR}        = /your/dataset/path/DataSet

ln -s /your/supp/path/DcPose_supp_files  /your/project/path/Pose_Estimation_DCPose  # SUP File Symbolic link
ln -s /your/dataset/path/DataSet         /your/project/path/Pose_Estimation_DCPose  # DATASET Symbolic link 2
Training from scratch从无到有的训练
For PoseTrack17
cd tools
# train & val
python run.py --cfg ../configs/posetimation/DcPose/posetrack17/model_RSN.yaml --train --val
The results are saved in ${DCPose_Project_Dir}/output/PE/DcPose/DCPose_Network_Model_RSN/PoseTrack17/{Network_structure _hyperparameters} by default
默认情况下,结果保存在 ${DCPose_Project_Dir}/output/PE/DcPose/DCPose_Network_Model_RSN/PoseTrack17/{Network_structure _hyperparameters}中
For PoseTrack18
cd tools
# train & val
python run.py --cfg ../configs/posetimation/DcPose/posetrack18/model_RSN.yaml --train --val
The results are saved in ${DCPose_Project_Dir}/output/PE/DcPose/DCPose_Network_Model_RSN/PoseTrack18/{Network_structure _hyperparameters} by default
Validating/Testing from our pretrained models从预训练模型验证/测试
# Evaluate on the PoseTrack17 validation set
python run.py --cfg ../configs/posetimation/DcPose/posetrack17/model_RSN_trained.yaml --val
# Evaluate on the PoseTrack17 test set
python run.py --cfg ../configs/posetimation/DcPose/posetrack17/model_RSN_trained.yaml --test
Run on video
cd demo/
mkdir input/
# Put your video in the input directory
python video.py
##运行过程中的一些错误记录
###错误一缺少yolov3.weights

https://pjreddie.com/media/files/yolov3.weights
自己下载了一个权重,放在了提示的路径下面(我上面网盘链接也有,之前下载好就不用再下载了。再粘贴一次链接:https://pan.baidu.com/s/1kpdf95H67WH6EGy2uTvDbg
提取码:xgd1
复制这段内容后打开百度网盘手机App,操作更方便哦)

##Stoplteration
原因input文件放错位置
方法一
刚开始就怀疑,因为有人说Stoplteration可能是因为读取不到文件,所以先把路径变成绝对路径,如下成功。
debug看一下

方法二
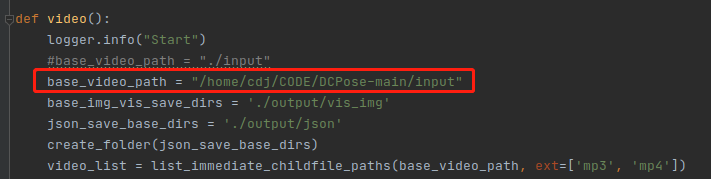
应该在当前video.py文件所在文件夹下方input,例如

##正确运行
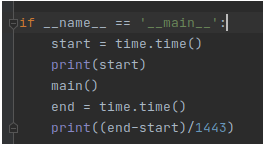
这里为了查看运行速度,加了几行代码,如下
先导入包
import time


会生成一些文件,如下


input文件夹下生成一些图片,其实是将视频剪成一帧一帧图像


output文件夹下生成的一些文件,包括json,vis_img(骨架图),vis_img_box(剪成方框图),fall1.mp4(带有骨架图检测方框的视频)


用命令方式打开视频
ffplay -autoexit fall1.mp4
