先看拓扑图,配置完毕的状态:

1. 配置出口路由器 / 核心交换机 / AC 的 IP 地址、端口
## 配置出口路由器的接口
<AR>sys
[AR]int g 0/0/0
[AR-GigabitEthernet0/0/0]ip ad 10.0.0.2 24

## 配置AC
<AC1>sys
[AC1]vlan batch 10
[AC1]int vlanif 10
[AC1-Vlanif10]ip ad 172.16.1.2 24 # 与核心交换机直连的IP地址
[AC1-Vlanif10]int g 0/0/1
[AC1-GigabitEthernet0/0/1]port link-type trunk
[AC1-GigabitEthernet0/0/1]port trunk allow-pass vlan all

## 配置核心交换机
[LSW1]vlan batch 5 10 # 创建vlan5和10

[LSW1]int vlanif 1
[LSW1-Vlanif1]ip ad 10.0.0.1 24 # 与路由器直连的IP地址

[LSW1-Vlanif1]int vlanif 5
[LSW1-Vlanif5]ip ad 192.168.0.1 24 # AP的网关地址,稍后要用到

[LSW1-Vlanif5]int vlanif 10
[LSW1-Vlanif10]ip ad 172.16.1.1 24 # 与AC直连的地址

[LSW1-Vlanif10]int g 0/0/4
[LSW1-GigabitEthernet0/0/4]port link-type trunk
[LSW1-GigabitEthernet0/0/4]port trunk allow-pass vlan all
2. 配置 AC / 出口路由器的路由,使其能相互通信。
## AC的静态路由
[AC1]ip route-static 0.0.0.0 0 172.16.1.1

## 出口路由器的静态路由
[AR]ip route-static 0.0.0.0 0 10.0.0.1

## 在AC上ping一下路由器,测试网络是否联通:
<AC1>ping 10.0.0.2
PING 10.0.0.2: 56  data bytes, press CTRL_C to break
  Reply from 10.0.0.2: bytes=56 Sequence=1 ttl=254 time=60 ms
  Reply from 10.0.0.2: bytes=56 Sequence=2 ttl=254 time=30 ms
  Reply from 10.0.0.2: bytes=56 Sequence=3 ttl=254 time=40 ms
  Reply from 10.0.0.2: bytes=56 Sequence=4 ttl=254 time=40 ms
  Reply from 10.0.0.2: bytes=56 Sequence=5 ttl=254 time=50 ms

## 确认无误再进行下一步
3. 配置核心交换机 DHCP,使其能分配 IP 地址给 AP
## 配置与AP相连的端口
[LSW1]port-group group-member g0/0/1 to g0/0/3 # 端口组
[LSW1-port-group]port link-type trunk
[LSW1-port-group]port trunk allow-pass vlan all
[LSW1-port-group]port trunk pvid vlan 5
[LSW1-port-group]quit

## 配置DHCP地址池
[LSW1]dhcp enable # 使能DHCP
[LSW1]ip pool vlan5 # 创建地址池
[LSW1-ip-pool-vlan5]network 192.168.0.0 mask 24 # 配置要分配的网段
[LSW1-ip-pool-vlan5]gateway-list 192.168.0.1 # 配置要分配的网关地址
[LSW1-ip-pool-vlan5]option 43 sub-option 3 ascii 172.16.1.2 # 将AC的IP地址下发给AP
[LSW1-ip-pool-vlan5]quit

[LSW1]int vlanif 5
[LSW1-Vlanif5]dhcp select global #在接口上下发IP地址

## 看看AP的地址有没有上来
<guest1>dis ip int bri
Interface                         IP Address/Mask      Physical   Protocol
NULL0                             unassigned           up         up(s)
Vlanif1                           192.168.0.252/24     up         up

## ping一下AC看看通不通
<guest1>ping 172.16.1.2
  PING 172.16.1.2: 56  data bytes, press CTRL_C to break
    Reply from 172.16.1.2: bytes=56 Sequence=1 ttl=254 time=30 ms
    Reply from 172.16.1.2: bytes=56 Sequence=2 ttl=254 time=20 ms
    Reply from 172.16.1.2: bytes=56 Sequence=3 ttl=254 time=10 ms
    Reply from 172.16.1.2: bytes=56 Sequence=4 ttl=254 time=20 ms
    Reply from 172.16.1.2: bytes=56 Sequence=5 ttl=254 time=40 ms

## 确认无误,进行下一步
4. 注册 AP
以下配置,可能会弹出的警告,都选 Y 就行
## 指定capwap协议的信令源地址
[AC1]capwap source interface Vlanif 10
[AC1]wlan # 进入wlan视图
[AC1-wlan-view]ap auth-mode mac-auth # 配置AC的验证方式为MAC验证

## 创建域配置并配置国家码,使AP的射频特性符合国家的法律法规要求
[AC1-wlan-view]regulatory-domain-profile name CN # 创建域配置
[AC1-wlan-regulate-domain-CN]country-code CN # 国家码:中国
[AC1-wlan-regulate-domain-CN]quit

## 创建AP-group
[AC1-wlan-view]ap-group name guest # 创建guest组
[AC1-wlan-ap-group-guest]regulatory-domain-profile CN # 关联刚才的域配置
[AC1-wlan-ap-group-guest]quit
[AC1-wlan-ap-group-work]ap-group name work # 创建work组
[AC1-wlan-ap-group-work]regulatory-domain-profile CN # 关联刚才的域配置
[AC1-wlan-ap-group-work]quit

## 基于mac地址注册AP
[AC1-wlan-view]ap-id 1 ap-mac 00e0-fc61-3600 # 加入AP。mac地址可以通过查看核心交换机的mac地址表,或者右键AP打开设置查看
[AC1-wlan-ap-1]ap-name guest1 # 将AP名字更改为guest1
[AC1-wlan-ap-1]ap-group guest # 将AP加入刚才配置的guest组
[AC1-wlan-ap-1]quit

[AC1-wlan-view]ap-id 2 ap-mac 00e0-fc56-18b0
[AC1-wlan-ap-1]ap-name guest2
[AC1-wlan-ap-1]ap-group guest
[AC1-wlan-ap-1]quit

[AC1-wlan-view]ap-id 3 ap-mac 00e0-fce3-7a10
[AC1-wlan-ap-1]ap-name work1
[AC1-wlan-ap-1]ap-group work
[AC1-wlan-ap-1]quit

## 到此处AP会自动重启,且AP名字会被更改(如果没有自动重启,可以自己手动重启)
## 重启完在AC上查看AP是否注册成功:
[AC1-wlan-view]display ap all
Info: This operation may take a few seconds. Please wait for a moment.done.
Total AP information:
nor  : normal          [1]
--------------------------------------------------------------------------------
ID   MAC            Name    Group IP            Type            State STA Uptime
--------------------------------------------------------------------------------
1    00e0-fc61-3600 guest1  guest 192.168.0.252 AP9131DN        nor   0   1M:3S
2    00e0-fc56-18b0 guest2  guest -             -               idle  0   -
3    00e0-fce3-7a10 work1   work  -             -               idle  0   -
--------------------------------------------------------------------------------
Total: 1

## 可以看到state为nor,说明注册成功;余下两台设备显示为idle,说明注册失败(只是因为我还没重启,想给大家看看没注册成功的状态)
## 等三台设备全部上线,确认无误再进行下一步
5. 分配无线参数
[AC1]vlan pool sta-pool101 # 新建vlan地址池,名称为sta-pool101
[AC1-vlan-pool-sta-pool101]vlan 101
[AC1-vlan-pool-sta-pool101]quit

[AC1]vlan pool sta-pool102
[AC1-vlan-pool-sta-pool102]vlan 102
[AC1-vlan-pool-sta-pool102]quit

## 安全配置(WIFI密码)
[AC1]wlan
[AC1-wlan-view]security-profile name guest # 新建安全配置,名称为guest
[AC1-wlan-sec-prof-guest]security wpa2 psk pass-phrase a12345678 aes # 配置加密方式为wpa2-psk,aes密文存放
[AC1-wlan-sec-prof-guest]quit

[AC1-wlan-view]security-profile name work
[AC1-wlan-sec-prof-work]security wpa2 psk pass-phrase a12345678 aes
[AC1-wlan-sec-prof-work]quit

## SSID配置(WIFI名称)
[AC1-wlan-view]ssid-profile name guest # 新建SSID配置,名称为guest
[AC1-wlan-ssid-prof-guest]ssid guest # 配置SSID名为guest
[AC1-wlan-ssid-prof-guest]quit

[AC1-wlan-view]ssid-profile name work
[AC1-wlan-ssid-prof-work]ssid work
[AC1-wlan-ssid-prof-work]quit

## 虚拟接入点(vpa)配置
[AC1-wlan-view]vap-profile name guest # 新建vap配置,名称为guest
[AC1-wlan-vap-prof-guest]service-vlan vlan-pool sta-pool101  # 应用vlan地址池
[AC1-wlan-vap-prof-guest]security-profile guest # 应用安全配置
[AC1-wlan-vap-prof-guest]ssid-profile guest # 应用SSID
[AC1-wlan-vap-prof-guest]quit

[AC1-wlan-view]vap-profile name work
[AC1-wlan-vap-prof-work]service-vlan vlan-pool sta-pool102
[AC1-wlan-vap-prof-work]security-profile work
[AC1-wlan-vap-prof-work]ssid-profile work
[AC1-wlan-vap-prof-work]quit

## 开启无线电信号
[AC1-wlan-view]ap-group name guest
[AC1-wlan-ap-group-guest]vap-profile guest wlan 1 radio 0 # 应用虚拟接入点配置,wlanid为1,radio 0意思是使用2.4GHz的频段
[AC1-wlan-ap-group-guest]vap-profile guest wlan 1 radio 1 # 配置双射频,radio 1=5GHz
[AC1-wlan-ap-group-guest]quit

[AC1-wlan-view]ap-group name work
[AC1-wlan-ap-group-work]vap-profile work wlan 1 radio 0
[AC1-wlan-ap-group-work]vap-profile work wlan 1 radio 1
6. 配置客户端使用的地址池,结束。检验配置成果。
## 配置核心交换机
[LSW1]vlan batch 101 102
[LSW1]ip pool 101
[LSW1-ip-pool-101]network 192.168.10.0 mask 24
[LSW1-ip-pool-101]gateway-list 192.168.10.1
[LSW1-ip-pool-101]quit

[LSW1]ip pool 102
[LSW1-ip-pool-102]network 192.168.20.0 mask 24
[LSW1-ip-pool-102]gateway-list 192.168.20.1
[LSW1-ip-pool-102]quit

[LSW1]int vlanif 101
[LSW1-Vlanif101]ip ad 192.168.10.1 24
[LSW1-Vlanif101]dhcp select global

[LSW1]int vlanif 102
[LSW1-Vlanif102]ip ad 192.168.20.1 24
[LSW1-Vlanif102]dhcp select global
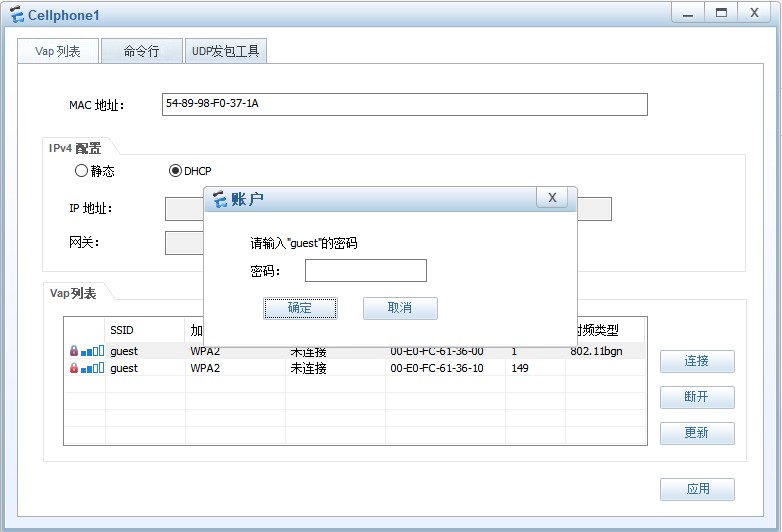
## 在终端设备连接AP,并输入密码
## 然后测试一下网络连通性:
STA>ipconfig
Link local IPv6 address...........: ::
IPv6 address......................: :: / 128
IPv6 gateway......................: ::
IPv4 address......................: 192.168.10.254
Subnet mask.......................: 255.255.255.0
Gateway...........................: 192.168.10.1
Physical address..................: 54-89-98-F0-37-1A
DNS server........................:

## 以上可以看到终端自动获取的IP地址信息是正确的
## 再ping一下出口路由器和AC:
STA>ping 10.0.0.2
Ping 10.0.0.2: 32 data bytes, Press Ctrl_C to break
From 10.0.0.2: bytes=32 seq=1 ttl=254 time=219 ms
From 10.0.0.2: bytes=32 seq=2 ttl=254 time=282 ms
From 10.0.0.2: bytes=32 seq=3 ttl=254 time=203 ms
From 10.0.0.2: bytes=32 seq=4 ttl=254 time=204 ms
From 10.0.0.2: bytes=32 seq=5 ttl=254 time=218 ms

STA>ping 172.16.1.2
Ping 172.16.1.2: 32 data bytes, Press Ctrl_C to break
From 172.16.1.2: bytes=32 seq=1 ttl=254 time=266 ms
From 172.16.1.2: bytes=32 seq=2 ttl=254 time=218 ms
From 172.16.1.2: bytes=32 seq=3 ttl=254 time=203 ms
From 172.16.1.2: bytes=32 seq=4 ttl=254 time=266 ms
From 172.16.1.2: bytes=32 seq=5 ttl=254 time=203 ms