Kubernetes 中存储使用介绍
一、基本介绍
在 Kubernetes 中的应用,都是以 Pod 的形式运行的,当我们要是在 Kubernetes 上运行一些需要存放数据的应用时,便需要关注应用存放的数据是否安全可靠。因为 Pod 是有生命周期的,那么也就是说当 Pod 被删除或重启后,Pod 里面所运行的数据也会随之消失。
因此,K8s 引入了 Volume(数据卷)的概念,使我们可以通过挂载的方式,将 Pod 内所需要存放的数据,挂载到宿主机的目录中。这样,我们便可以防止 Pod 内所运行的数据因为 Pod 的删除/重启而丢失。
1.Volume 类型
emptyDir:临时目录,用于 Pod 内多容器共享目录,并不适用于需要保存数据的应用,因为emptyDir和 Pod 的生命周期相同。hostPath:主机目录,可以保证运行应用的数据不被丢失,但是需要将 Pod 每次都调度到同一台主机上。nfs:共享目录,可以保证运行应用的数据不被丢失。
以上三种是较为常见的数据卷,同时,我们还可以通过配置 PV、PVC、StorageClass 来保证数据的持久化存储。
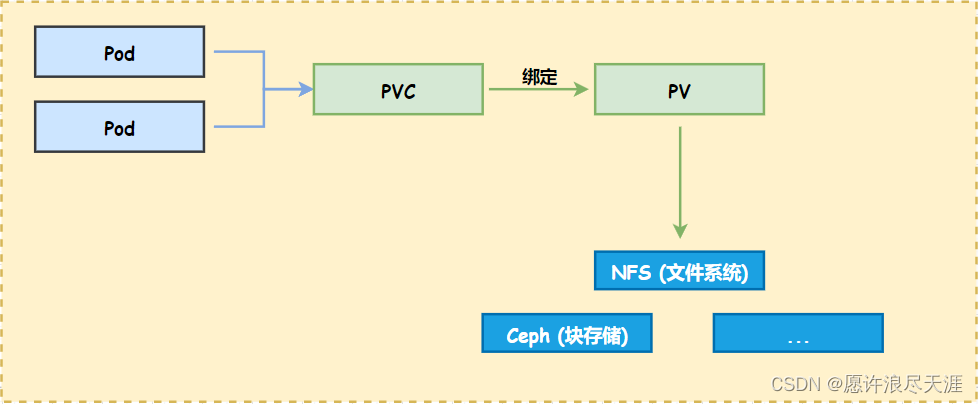
PV 的全称: PersistentVolume(持久化卷),是对底层共享存储的一种抽象,将共享存储定义为一种资源,它属于集群级别资源,不属于任何命名空间。PV 由管理员进行创建和配置,与共享存储的具体实现直接相关。
PVC 的全称: PersistentVolumeClaim(持久化卷声明),用来描述 Pod 对于 PV 存储的要求,以此来分配到合适的 PV 上。
Pod、PV、PVC 关系: 一个 Pod 可以挂载 n 个 PVC,同样一个 PVC 也可以给 n 个 Pod 提供服务。但是,一个 PVC 只能绑定一个 PV,一个 PV 只能对应一种后端存储。
2.PV 和 PVC 绑定条件
- PV 的存储大小和权限需要满足 PVC 所提供的要求;
- PV 和 PVC 的 StorageClassName 需要相同(如果没有指定 StorageClassName,则默认为空)
注意: 要是当我们创建的 Pod 挂载的 PVC 没有和 PV 绑定成功,那么 Pod 将会一直处于 Pending 状态。
3.StorageClass
Kubernetes 提供了一种能够自动管理 PV 的机制,叫做 StorageClass(可以说是 PV 的模板,能够自动的创建 PV)
二、使用介绍
准备工作:
[root@k8s-master01 ~]# yum -y install nfs-utils rpcbind
[root@k8s-master01 ~]# echo "/app *(rw,sync,no_root_squash)" > /etc/exports
[root@k8s-master01 ~]# mkdir /app
[root@k8s-master01 ~]# systemctl start rpcbind nfs
1.创建 PV
[root@k8s-master01 ~]# vim test-pv.yaml
apiVersion: v1
kind: PersistentVolume
metadata:
name: nfs
spec:
capacity:
storage: 2Gi # 存储容量为 2Gi
accessModes:
- ReadWriteOnce
nfs:
path: /app
server: 192.168.1.1
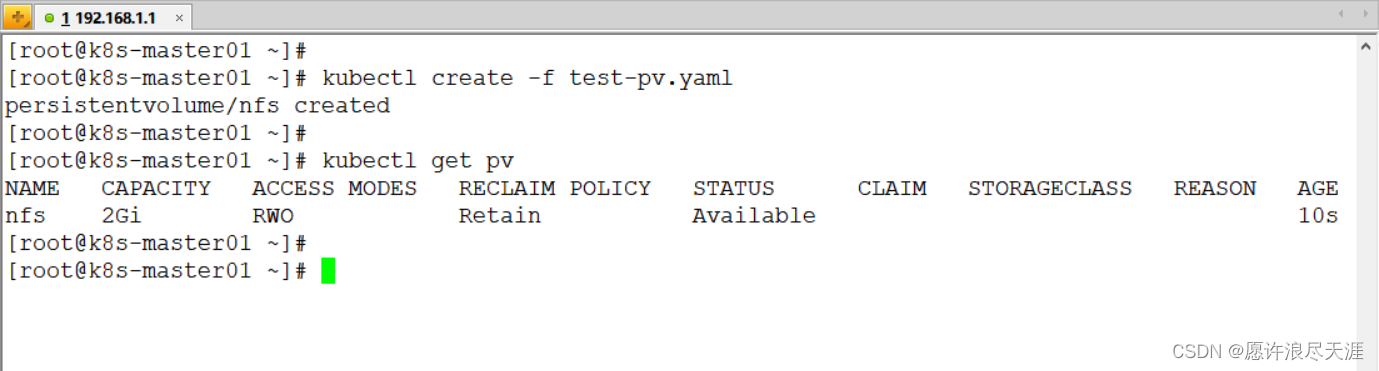
[root@k8s-master01 ~]# kubectl create -f test-pv.yaml
Access Modes 访问模式:
| 模式 | 作用 |
|---|---|
ReadOnlyMany |
ROX,表示该存储允许被多个节点进行挂载,但只有读写权限。 |
ReadWriteMany |
RWX,表示该存储允许被多个节点进行挂载,并且具有读写权限。 |
ReadWriteOnce |
RWO,表示该存储只允许被一个节点进行挂载,并且具有读写权限。 |
ReadWriteOncePod |
表示该存储只允许被单个 Pod 以读写的方式挂载(需要支持 CSI 卷,并且 K8s 要在 1.22 以上版本) |
- 需要注意的是,
accessModes只能针对于块存储来做限制,‘像 NFS 这类的文件系统是支持这样配置的,但是限制不了。
Reclaim Policy 回收策略:
Delete(删除):当 PVC 被删除时,PV 同样会被删除。Retain(保留):当 PVC 被删除时,PV 并不会被删除,需要手动进行删除。Recycle(回收):当 PVC 被删除时,PV 上的数据也会随之删除,以便和新的 PVC 进行绑定(已被遗弃)
2.创建 PVC
1)创建
[root@k8s-master01 ~]# cat <<END > test-pvc.yaml
apiVersion: v1
kind: PersistentVolumeClaim
metadata:
  name: test-pvc
spec:
  accessModes:
  - ReadWriteOnce
  resources:
    requests:
      storage: 2Gi
END
[root@k8s-master01 ~]# kubectl create -f test-pvc.yaml
- 上面 PVC 的配置表示:希望被分配到一个具有
2Gi空间的磁盘,并且只允许我一个 PVC 进行读写。
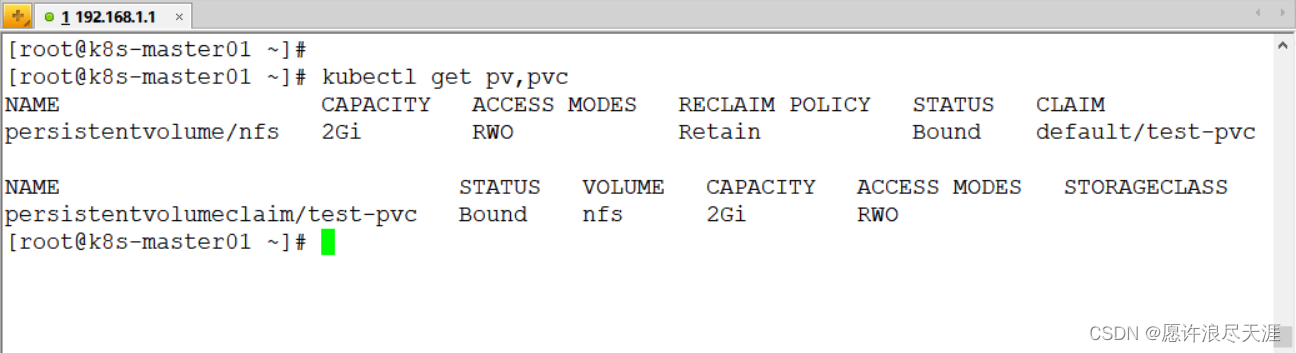
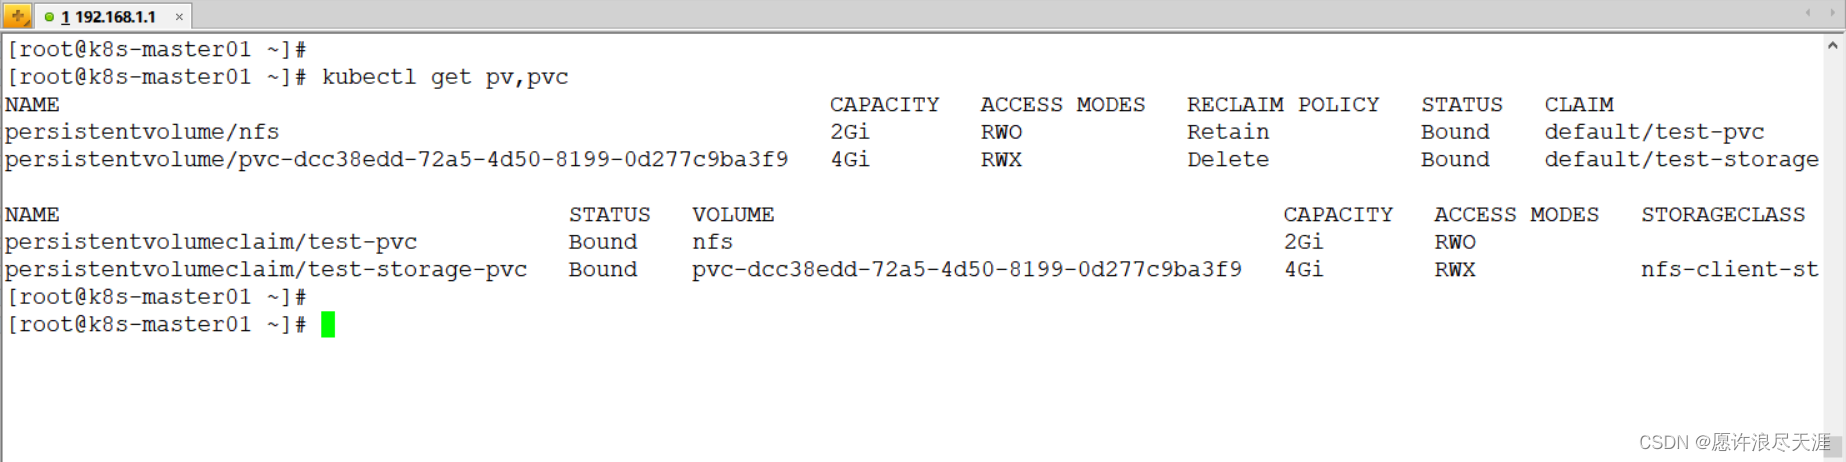
2)查看
[root@k8s-master01 ~]# kubectl get pv,pvc
PV,PVC 绑定状态:
| 操作 | PV 状态 | PVC 状态 |
|---|---|---|
| 创建 PV | Available | - |
| 创建 PVC | Available | Pending |
| Bound | Bound | |
| 删除 PV | -/Terminating | Lost/Bound |
| 重新创建 PV | Bound | Bound |
| 删除 PVC | Released | - |
| 后端存储不可用 | Failed | - |
| 删除 PV 的 claimRef | Available | - |
3)创建 Pod
[root@k8s-master01 ~]# cat <<END > test-web.yaml
apiVersion: v1
kind: Pod
metadata:
  name: test-web
spec:
  containers:
  - name: nginx
    image: nginx:1.21.0
    imagePullPolicy: IfNotPresent
    ports:
    - containerPort: 80
    volumeMounts:
    - name: html
      mountPath: /usr/share/nginx/html
  volumes:
  - name: html
    persistentVolumeClaim:
      claimName: test-pvc
END
[root@k8s-master01 ~]# kubectl create -f test-web.yaml
- 这里需要注意,Pod 所运行在的主机,需要安装
nfs-utils包,不然挂载 NFS 时会出现问题。
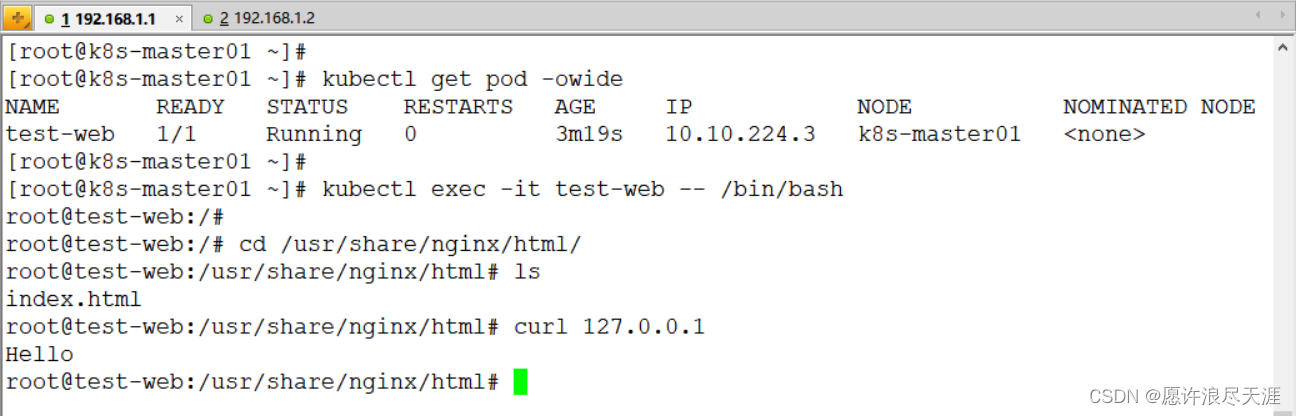
验证: 在挂载目录下创建个 index.html 文件,查看是否挂载成功(尽量不要挂载有用的目录,因为挂载后会进行覆盖)
[root@k8s-master01 ~]# echo "Hello" > /app/index.html
3.创建 StorageClass
1)创建 RBAC 授权文件
[root@k8s-master01 ~]# cat <<END > external-storage-rbac.yaml
apiVersion: v1
kind: ServiceAccount
metadata:
  name: nfs-client-provisioner
  namespace: default
---
kind: ClusterRole
apiVersion: rbac.authorization.k8s.io/v1
metadata:
  name: nfs-client-provisioner-clusterrole
rules:
  - apiGroups: [""]
    resources: ["persistentvolumes"]
    verbs: ["get", "list", "watch", "create", "delete"]
  - apiGroups: [""]
    resources: ["persistentvolumeclaims"]
    verbs: ["get", "list", "watch", "update"]
  - apiGroups: ["storage.k8s.io"]
    resources: ["storageclasses"]
    verbs: ["get", "list", "watch"]
  - apiGroups: [""]
    resources: ["events"]
    verbs: ["create", "update", "patch"]
---
kind: ClusterRoleBinding
apiVersion: rbac.authorization.k8s.io/v1
metadata:
  name: run-nfs-client-provisioner
subjects:
  - kind: ServiceAccount
    name: nfs-client-provisioner
    namespace: default
roleRef:
  kind: ClusterRole
  name: nfs-client-provisioner-clusterrole
  apiGroup: rbac.authorization.k8s.io
---
kind: Role
apiVersion: rbac.authorization.k8s.io/v1
metadata:
  name: leader-locking-nfs-client-provisioner
  namespace: default
rules:
  - apiGroups: [""]
    resources: ["endpoints"]
    verbs: ["get", "list", "watch", "create", "update", "patch"]
---
kind: RoleBinding
apiVersion: rbac.authorization.k8s.io/v1
metadata:
  name: leader-locking-nfs-client-provisioner
subjects:
  - kind: ServiceAccount
    name: nfs-client-provisioner
    namespace: default
roleRef:
  kind: Role
  name: leader-locking-nfs-client-provisioner
  apiGroup: rbac.authorization.k8s.io
END
[root@k8s-master01 ~]# kubectl create -f external-storage-rbac.yaml
2)创建 Deployment 文件
[root@k8s-master01 ~]# cat <<END > external-storage-deploy.yaml
apiVersion: apps/v1
kind: Deployment
metadata:
  name: nfs-client-provisioner
  labels:
    app: nfs-client-provisioner
  namespace: default
spec:
  replicas: 1
  strategy:
    type: Recreate
  selector:
    matchLabels:
      app: nfs-client-provisioner
  template:
    metadata:
      labels:
        app: nfs-client-provisioner
    spec:
      serviceAccountName: nfs-client-provisioner
      containers:
        - name: nfs-client-provisioner
          image: quay.io/external_storage/nfs-client-provisioner:latest
          volumeMounts:
            - name: nfs-client-root
              mountPath: /persistentvolumes
          env:
            - name: PROVISIONER_NAME
              value: tianya/nfs
            - name: NFS_SERVER
              value: 192.168.1.1
            - name: NFS_PATH
              value: /app
      volumes:
        - name: nfs-client-root
          nfs:
            server: 192.168.1.1
            path: /app
END
[root@k8s-master01 ~]# kubectl create -f external-storage-deploy.yaml
3)创建 StorageClass 资源文件
[root@k8s-master01 ~]# cat <<END > external-storage-class.yaml
apiVersion: storage.k8s.io/v1
kind: StorageClass
metadata:
  name: nfs-client-storageclass
provisioner: tianya/nfs
END
[root@k8s-master01 ~]# kubectl create -f external-storage-class.yaml
- 上面的
provisioner配置要和 Deployment 里的PROVISIONER_NAME变量值相同。
4)验证
[root@k8s-master01 ~]# cat <<END > test-storage-pvc.yaml
apiVersion: v1
kind: PersistentVolumeClaim
metadata:
  name: test-storage-pvc
spec:
  storageclassName: nfs-client-storageclass
  accessModes:
  - ReadWriteMany
  resources:
    requests:
      storage: 4Gi
END
[root@k8s-master01 ~]# cat <<END > test-storage-pvc.yaml
问题: 创建完 PVC 后,一直处于 Pending 状态,通过查看 PVC 信息发现,输出:waiting for a volume to be created, either by external provisioner "tianya/nfs" or manually created by system administrator 报错。
原因是因为: 在 Kubernetes 的 1.20 以上版本,默认禁用了 SelfLink 功能。但是由于 nfs-client-privisioner 服务需要依赖此功能。所以,需要在 apiserver 的配置文件中开启此功能。
[root@k8s-master01 ~]# vim /etc/systemd/system/kube-apiserver.service
- 增加:
--feature-gates=RemoveSelfLink=false配置。
查看:
创建 Pod,并挂载新的 PVC 进行验证:
[root@k8s-master01 ~]# cat <<END > test-storage-pod.yaml
apiVersion: v1
kind: Pod
metadata:
  name: test-web
spec:
  containers:
  - name: test-web
    image: nginx:1.21.0
    imagePullPolicy: IfNotPresent
    ports:
    - containerPort: 80
    volumeMounts:
    - name: html
      mountPath: /usr/share/nginx/html
  volumes:
  - name: html
    persistentVolumeClaim:
      claimName: test-storage-pvc
END
[root@k8s-master01 ~]# kubectl create -f test-storage-pod.yaml
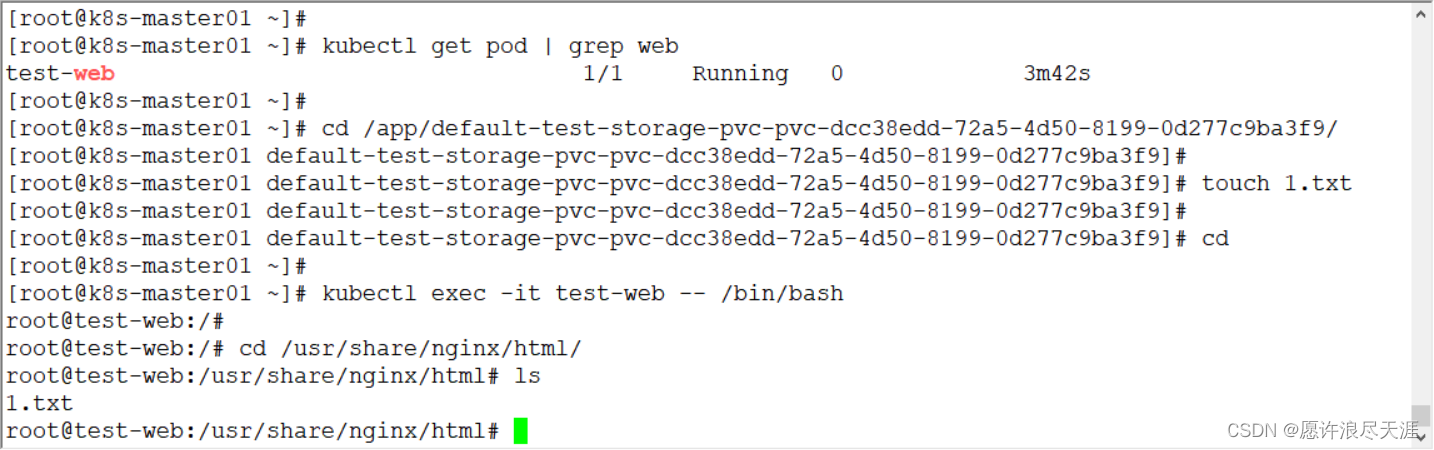
- 上面的
/app/default-test-storage-pvc-pvc-dcc38edd-72a5-4d50-8199-0d277c9ba3f9/是 StorageClass 自动创建的 PV 目录。