前言
(1)在搭建fabric之前要选好虚拟系统,本文基于Ubuntu22.04搭建的。
(2)fabric建议版本:1.4.X和2.2.X,因为朋友说这两个版本是比较稳定的版本。本文选择的版本:fabric2.2.5
(3)建议所有操作都在管理员模式下,至少本文是这样做的。本文通过“sudo -i”再输入密码进入管理员模式。
一、fabric服务搭建
换下载源、下载docker、docker-compose、go等步骤我就不啰嗦啦~在我的博客——《HyperLedger Fabric 2.3 联盟链搭建》 课程学习笔记中有介绍,或者大多数人已经都有配置好这些的吧?哈哈哈。
1、下载源码
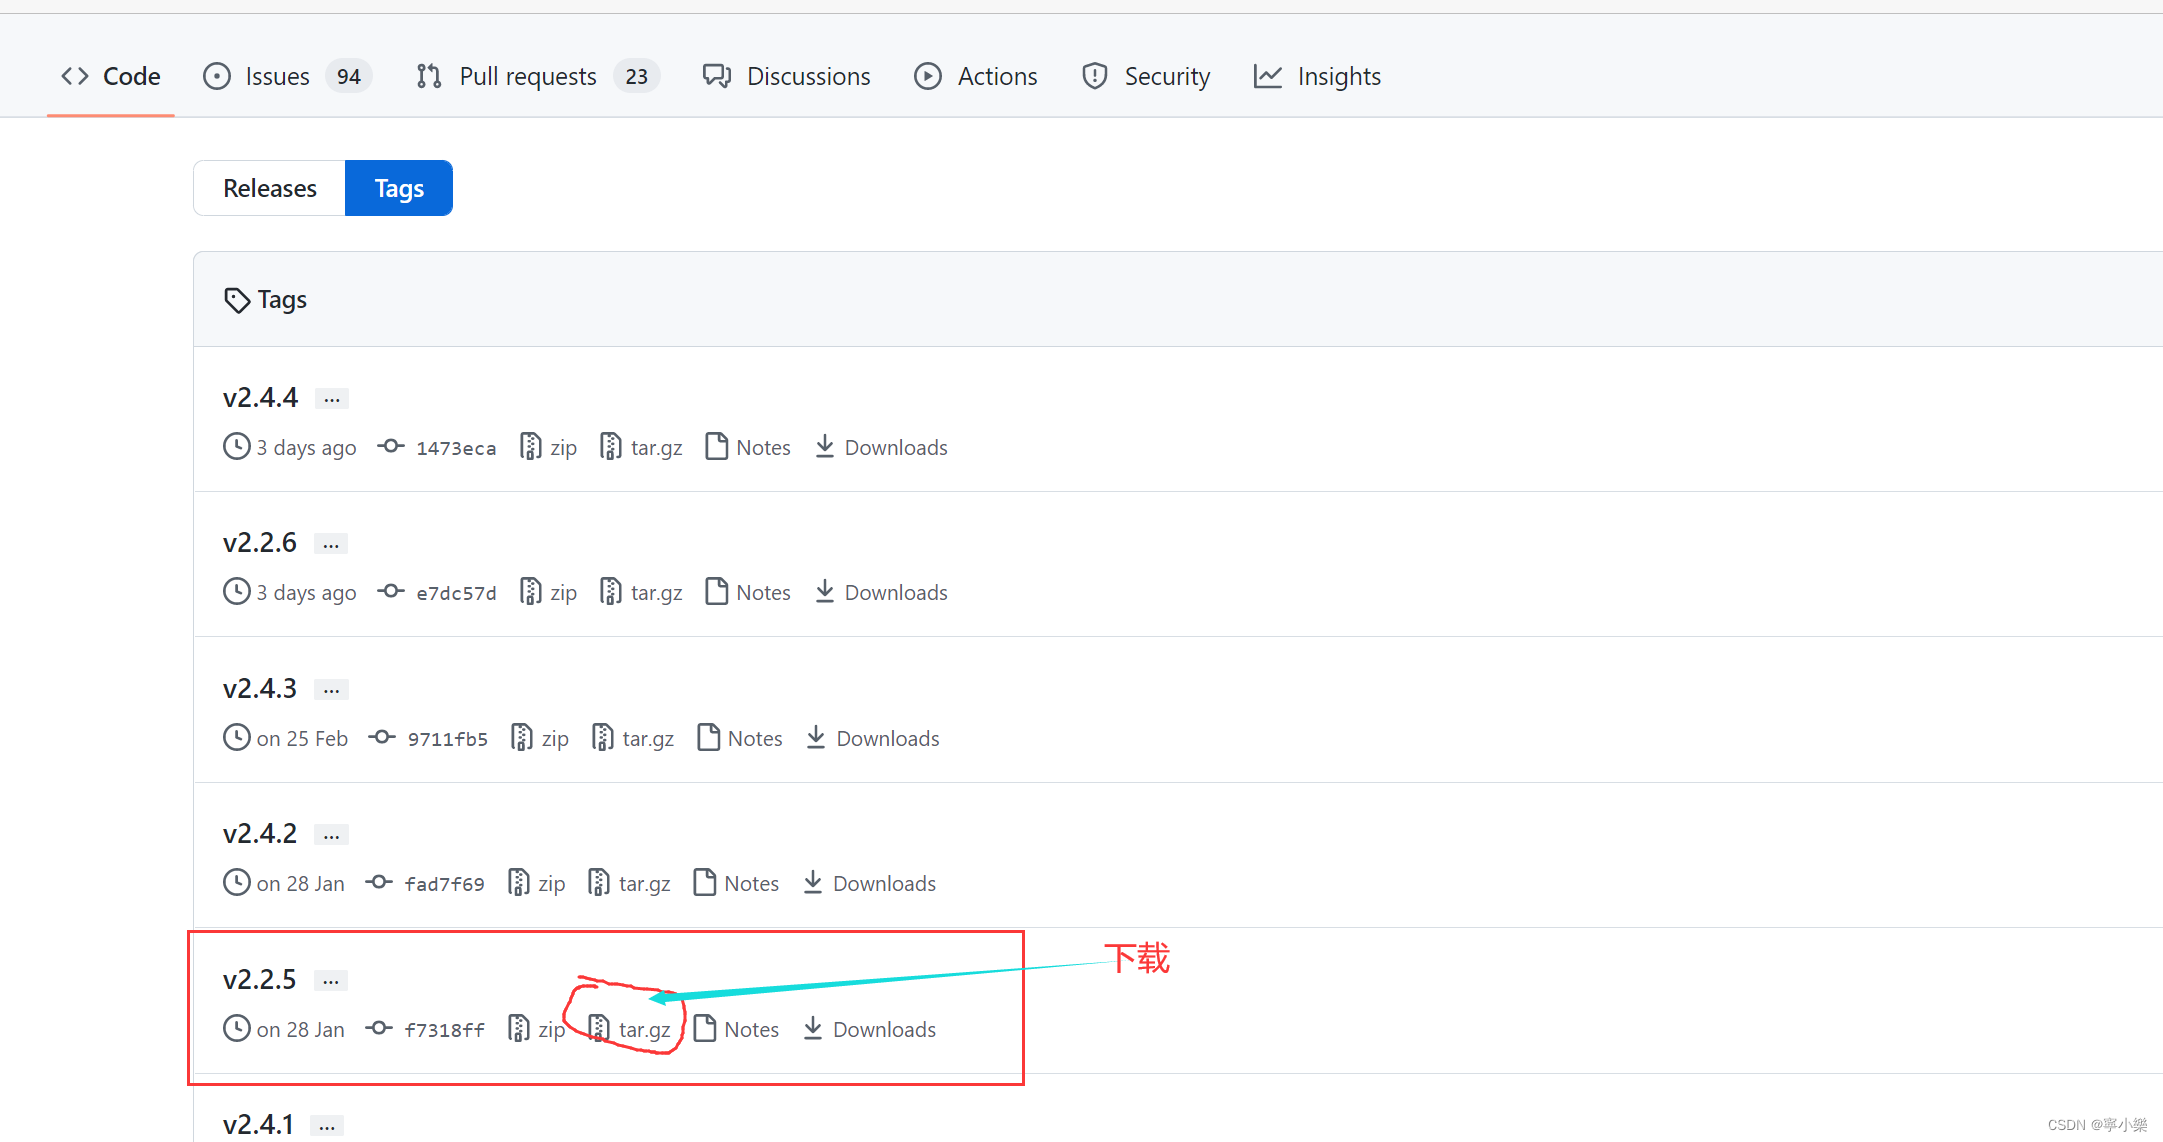
在Ubuntu中打开火狐浏览器,输入网址:https://github.com/hyperledger/fabric
靠近右侧一点,找到Release并点击然后进入下面这个界面->点击Tags,然后找到v2.2.5版本->下载对应的tar.gz。
下载之后可以到Ubuntu上的Download目录查看。
2、解压源码
tar -zxf '/home/gan/Downloads/fabric-2.2.5.tar.gz' -C /opt
3、执行bootstrap.sh
执行这个脚本文件会下载相关组件,包括fabric-samples目录、bin目录、config目录
root@gan-virtual-machine:/opt#  cd /fabric-2.2.5/scripts
root@gan-virtual-machine:/opt/fabric-2.2.5/scripts# ./bootstrap.sh

#这个脚本会自动下载拉取相关组件,中间会有两个done,最后会打印出拉取成功的镜像。才算执行成功。否则的话,重新执行吧。换下载源重新执行,或者换个时间段【比如清晨的时候】,再重新执行,说不定就下载成功啦!再或者就是自己去下载然后自己解压到对应目录下面也是可以的。关于手动配置的话,参考我的学习笔记或百度一下~
4、测试服务能否启动
root@gan-virtual-machine:/opt/fabric-2.2.5/scripts#  cd fabric-samples/test-network
#启动服务
root@gan-virtual-machine:/opt/fabric-2.2.5/scripts/fabric-samples/test-network# ./network.sh up
#执行成功提示:
Creating orderer.example.com    ... done
Creating peer0.org2.example.com ... done
Creating peer0.org1.example.com ... done
Creating cli                    ... done
且会打印当前docker容器

#关闭服务
root@gan-virtual-machine:/opt/fabric-2.2.5/scripts/fabric-samples/test-network# ./network.sh down
#通过这个命令关闭网络,而且会删掉“./network.sh up”创建的一些测试用的文件,比如组织节点的文件目录
二、第一个链码案例——basic
1、部署链码basic
#启动服务并创建通道,不指定通道名字则通道名默认为“mychannel”
root@gan-virtual-machine:/opt/fabric-2.2.5/scripts/fabric-samples/test-network# ./network.sh up createChannel
#执行成功标志
Anchor peer set for org 'Org2MSP' on channel 'mychannel'
Channel 'mychannel' joined
#部署第一个链码【官方链码demo】:basic
root@gan-virtual-machine:/opt/fabric-2.2.5/scripts/fabric-samples/test-network# ./network.sh deployCC -ccn basic -ccp ../asset-transfer-basic/chaincode-go -ccl go
#执行成功标志:
Query chaincode definition successful on peer0.org1 on channel 'mychannel'
Using organization 2
Querying chaincode definition on peer0.org2 on channel 'mychannel'...
Attempting to Query committed status on peer0.org2, Retry after 3 seconds.
+ peer lifecycle chaincode querycommitted --channelID mychannel --name basic
+ res=0
Committed chaincode definition for chaincode 'basic' on channel 'mychannel':
Version: 1.0, Sequence: 1, Endorsement Plugin: escc, Validation Plugin: vscc, Approvals: [Org1MSP: true, Org2MSP: true]
Query chaincode definition successful on peer0.org2 on channel 'mychannel'
Chaincode initialization is not required


部署链码demo——basic
root@gan-virtual-machine:/opt/fabric-2.2.5/scripts/fabric-samples/test-network# ./network.sh deployCC -ccn basic -ccp ../asset-transfer-basic/chaincode-go -ccl go
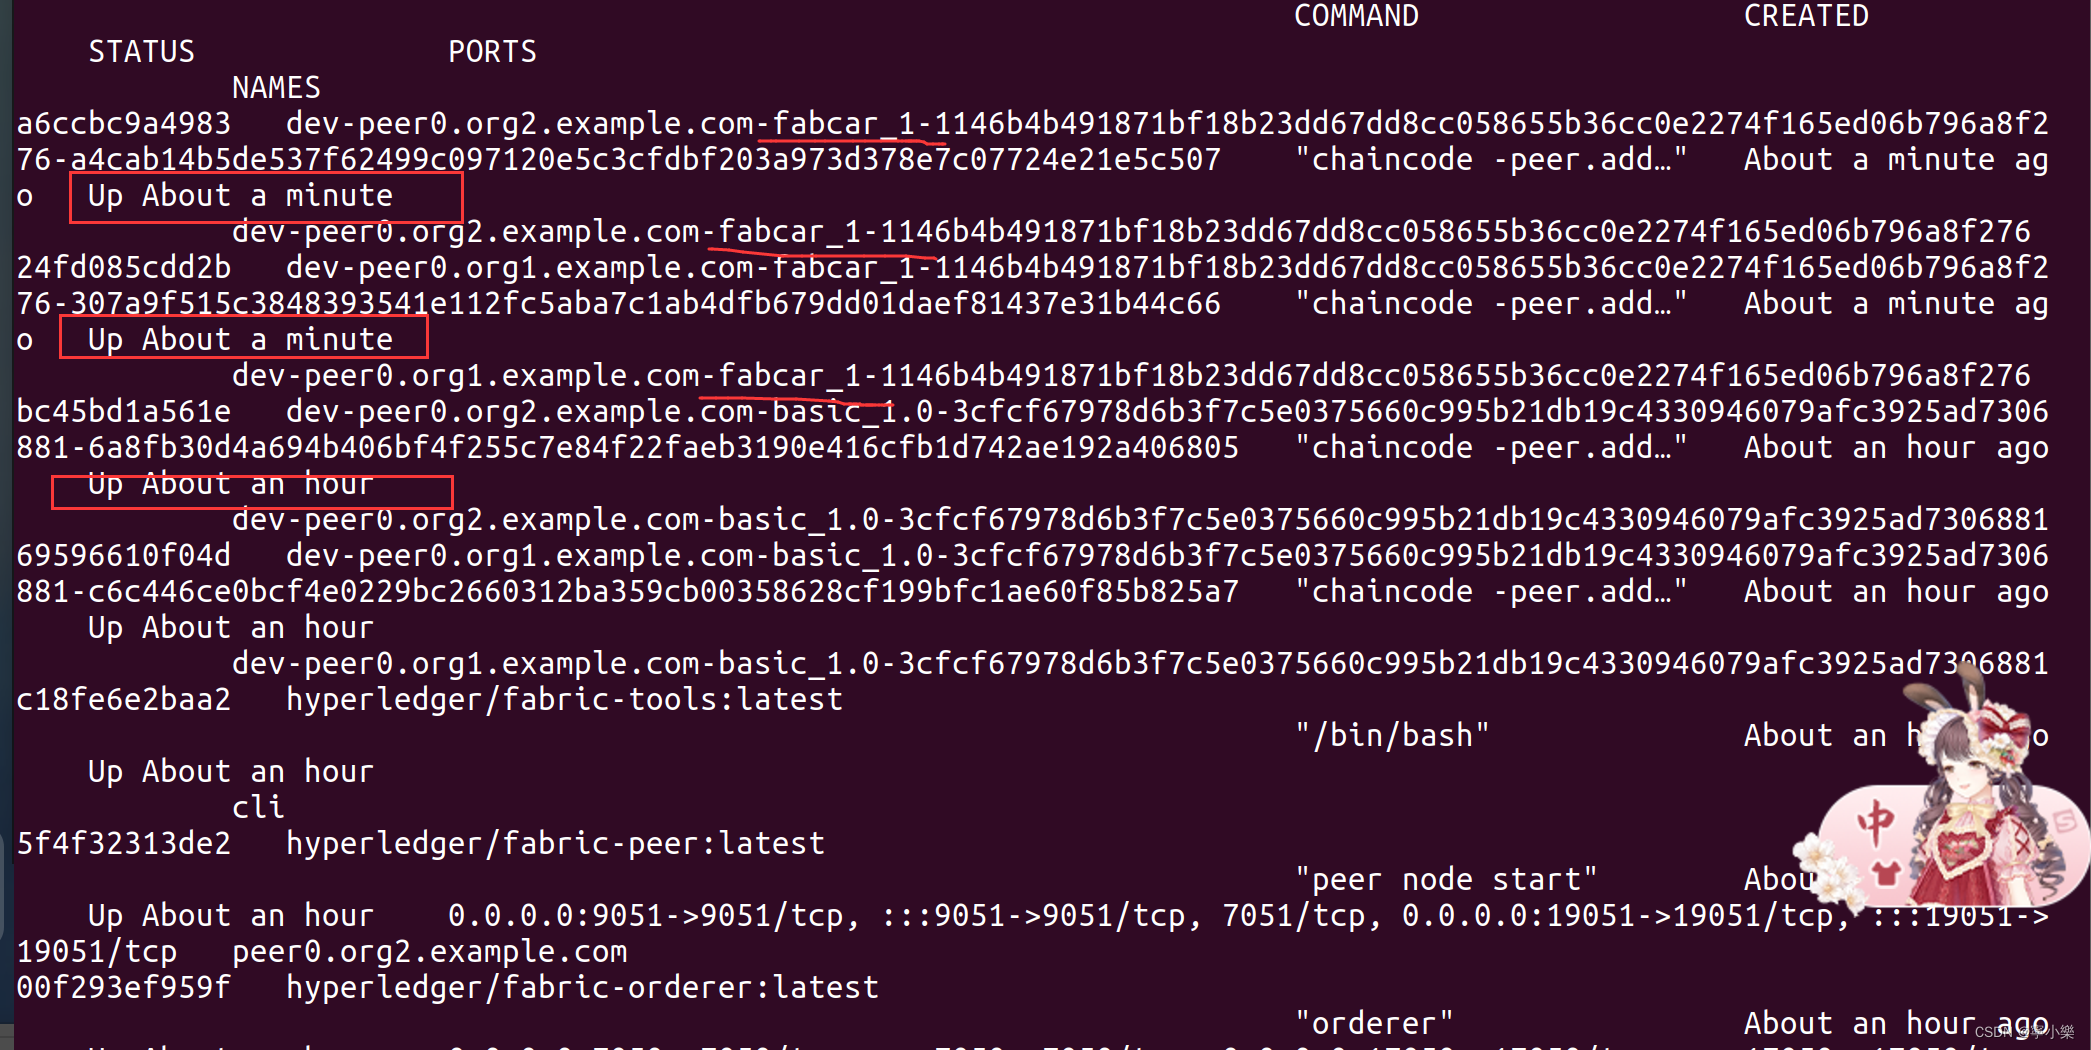
另外。很重要的一点,如果链码部署成功,可以通过docker ps -a查看到处于Up状态的链码容器。
之前我2.3.0一直无法实现链码的invoke,我docker ps -a查询到的链码容器状态是Created。【我到现在也不知道原因,问题编号202206202151】

2、链码invoke
(1)配置身份信息和环境变量
#首先配置身份信息和环境变量:
#新开一个终端,sudo -i进入管理员模式
PWD='/opt/fabric-2.2.5/scripts/fabric-samples/test-network'
export PATH=${

    PWD}/../bin:$PATH
export FABRIC_CFG_PATH=${

    PWD}/../config/
export CORE_PEER_TLS_ENABLED=true
export CORE_PEER_LOCALMSPID="Org1MSP"
export CORE_PEER_TLS_ROOTCERT_FILE=${

    PWD}/organizations/peerOrganizations/org1.example.com/peers/peer0.org1.example.com/tls/ca.crt
export CORE_PEER_MSPCONFIGPATH=${

    PWD}/organizations/peerOrganizations/org1.example.com/users/Admin@org1.example.com/msp
export CORE_PEER_ADDRESS=localhost:7051
(2)链码invoke命令
root@gan-virtual-machine:/opt/fabric-2.2.5/scripts/fabric-samples/test-network# peer chaincode invoke -o localhost:7050 --ordererTLSHostnameOverride orderer.example.com --tls --cafile ${PWD}/organizations/ordererOrganizations/example.com/orderers/orderer.example.com/msp/tlscacerts/tlsca.example.com-cert.pem -C mychannel -n basic --peerAddresses localhost:7051 --tlsRootCertFiles ${PWD}/organizations/peerOrganizations/org1.example.com/peers/peer0.org1.example.com/tls/ca.crt --peerAddresses localhost:9051 --tlsRootCertFiles ${PWD}/organizations/peerOrganizations/org2.example.com/peers/peer0.org2.example.com/tls/ca.crt -c '{"function":"InitLedger","Args":[]}'

#执行结果如下:
2022-06-20 21:11:46.559 CST [chaincodeCmd] chaincodeInvokeOrQuery -> INFO 001 Chaincode invoke successful. result: status:200
(3)链码query命令
root@gan-virtual-machine:/opt/fabric-2.2.5/scripts/fabric-samples/test-network# peer chaincode query -C mychannel -n basic -c '{"Args":["GetAllAssets"]}'


#执行结果
[{

    "ID":"asset1","color":"blue","size":5,"owner":"Tomoko","appraisedValue":300},{

    "ID":"asset2","color":"red","size":5,"owner":"Brad","appraisedValue":400},{

    "ID":"asset3","color":"green","size":10,"owner":"Jin Soo","appraisedValue":500},{

    "ID":"asset4","color":"yellow","size":10,"owner":"Max","appraisedValue":600},{

    "ID":"asset5","color":"black","size":15,"owner":"Adriana","appraisedValue":700},{

    "ID":"asset6","color":"white","size":15,"owner":"Michel","appraisedValue":800}]
三、第二个链码案例——fabcar
1、获取fabcar依赖包
#如果没有配置go代理,可以运行 go env -w GOPROXY=https://goproxy.cn之后再执行下述语句
#进入fabcar链码目录
root@gan-virtual-machine:/# cd /opt/fabric-2.2.5/scripts/fabric-samples/chaincode/fabcar/go
#可以看到拉取了fabcar的依赖包vendor,里面有fabcar链码的依赖
root@gan-virtual-machine:/opt/fabric-2.2.5/scripts/fabric-samples/chaincode/fabcar/go# go mod vendor
root@gan-virtual-machine:/opt/fabric-2.2.5/scripts/fabric-samples/chaincode/fabcar/go# ls
fabcar.go  go.mod  go.sum  vendor
root@gan-virtual-machine:/opt/fabric-2.2.5/scripts/fabric-samples/chaincode/fabcar/go# cd vendor/
root@gan-virtual-machine:/opt/fabric-2.2.5/scripts/fabric-samples/chaincode/fabcar/go/vendor# ls
github.com  golang.org  google.golang.org  gopkg.in  modules.txt
2、添加host记录
#打开hosts文件
root@gan-virtual-machine:/opt/fabric-2.2.5/scripts/fabric-samples/chaincode/fabcar/go# vim /etc/hosts

#按字母“i”进入插入模式,并在文件中添加内容
127.0.0.1 orderer.example.com
127.0.0.1 peer0.org1.example.com
127.0.0.1 peer0.org2.example.com

#按ESC,再按“:wq”保存退出
3、配置环境变量与ORG1组织认证信息
#直接复制粘贴到终端,回车一下就好啦!
PWD='/opt/fabric-2.2.5/scripts/fabric-samples/test-network'
export PATH=${

    PWD}/../bin:$PATH
export FABRIC_CFG_PATH=${

    PWD}/../config/
export CORE_PEER_TLS_ENABLED=true
export CORE_PEER_LOCALMSPID="Org1MSP"
export CORE_PEER_TLS_ROOTCERT_FILE=${

    PWD}/organizations/peerOrganizations/org1.example.com/peers/peer0.org1.example.com/tls/ca.crt
export CORE_PEER_MSPCONFIGPATH=${

    PWD}/organizations/peerOrganizations/org1.example.com/users/Admin@org1.example.com/msp
export CORE_PEER_ADDRESS=localhost:7051
4、用ORG1身份打包链码合约
#前提:fabric网络启动且通道创建完成  可以只使用一个命令./network.sh up createChannel
root@gan-virtual-machine:/opt/fabric-2.3.0/scripts/fabric-samples/test-network# ./network.sh up
root@gan-virtual-machine:/opt/fabric-2.3.0/scripts/fabric-samples/test-network# ./network.sh createChannel

#打包链码
root@gan-virtual-machine:/opt/fabric-2.2.5/scripts/fabric-samples/chaincode/fabcar/go# peer lifecycle chaincode package fabcar.tar.gz --path /opt/fabric-2.2.5/scripts/fabric-samples/chaincode/fabcar/go --label fabcar_1
#打包完成之后,目录下多出fabcar.tar.gz文件
root@gan-virtual-machine:/opt/fabric-2.2.5/scripts/fabric-samples/chaincode/fabcar/go# ls
fabcar.go  fabcar.tar.gz  go.mod  go.sum  vendor
5、ORG1安装链码
#安装智能合约(时间会比稍微有点久,耐心稍等)
root@gan-virtual-machine:/opt/fabric-2.2.5/scripts/fabric-samples/chaincode/fabcar/go# peer lifecycle chaincode install fabcar.tar.gz

#执行结果
2022-06-20 22:14:13.091 CST [cli.lifecycle.chaincode] submitInstallProposal -> INFO 001 Installed remotely: response:<status:200 payload:"\nIfabcar_1:1146b4b491871bf18b23dd67dd8cc058655b36cc0e2274f165ed06b796a8f276\022\010fabcar_1" >
2022-06-20 22:14:13.091 CST [cli.lifecycle.chaincode] submitInstallProposal -> INFO 002 Chaincode code package identifier: fabcar_1:1146b4b491871bf18b23dd67dd8cc058655b36cc0e2274f165ed06b796a8f276


#另外可以通过命令  peer lifecycle chaincode queryinstalled   查看节点已经安装的链码
6、ORG1链码审核
一旦链码包在peer节点上安装后,就可以让背书节点审批链码定义,只有通过所有的背书节点或者绝大部分背书节点(不同的背书策略对通过的数量有要求)审核通过后后续的链码才可以进行实例化与调用。
root@gan-virtual-machine:/opt/fabric-2.2.5/scripts/fabric-samples/chaincode/fabcar/go# peer lifecycle chaincode approveformyorg -o localhost:7050 --ordererTLSHostnameOverride orderer.example.com --tls --cafile /opt/fabric-2.2.5/scripts/fabric-samples/test-network/organizations/ordererOrganizations/example.com/orderers/orderer.example.com/msp/tlscacerts/tlsca.example.com-cert.pem --channelID mychannel --name fabcar --version 1.0 --package-id fabcar_1:1146b4b491871bf18b23dd67dd8cc058655b36cc0e2274f165ed06b796a8f276 --sequence 1

#执行结果
2022-06-20 22:18:16.784 CST [chaincodeCmd] ClientWait -> INFO 001 txid [8b07f8ba8e710cf4342dda11214d4cb3d57c6dfacc5fe6cab45cff6d363951bd] committed with status (VALID) at localhost:7051

#可以用 peer lifecycle chaincode checkcommitreadiness --channelID mychannel --name fabcar --version 1.0 --sequence 1 --output json 命令查看当前链码审核状态,哪些节点通过审核哪些节点没有通过审核
7、配置ORG2组织信息
#直接复制粘贴到终端,回车一下就好啦!
PWD='/opt/fabric-2.2.5/scripts/fabric-samples/test-network'
export PATH=${

    PWD}/../bin:$PATH
export FABRIC_CFG_PATH=${

    PWD}/../config/
export CORE_PEER_TLS_ENABLED=true
export CORE_PEER_LOCALMSPID="Org2MSP"
export CORE_PEER_TLS_ROOTCERT_FILE=${

    PWD}/organizations/peerOrganizations/org2.example.com/peers/peer0.org2.example.com/tls/ca.crt
export CORE_PEER_MSPCONFIGPATH=${

    PWD}/organizations/peerOrganizations/org2.example.com/users/Admin@org2.example.com/msp
export CORE_PEER_ADDRESS=localhost:9051
8、ORG2安装链码
和ORG1安装链码是一样的
root@gan-virtual-machine:/opt/fabric-2.2.5/scripts/fabric-samples/chaincode/fabcar/go# peer lifecycle chaincode install fabcar.tar.gz
2022-06-20 22:21:56.972 CST [cli.lifecycle.chaincode] submitInstallProposal -> INFO 001 Installed remotely: response:<status:200 payload:"\nIfabcar_1:1146b4b491871bf18b23dd67dd8cc058655b36cc0e2274f165ed06b796a8f276\022\010fabcar_1" >
2022-06-20 22:21:56.972 CST [cli.lifecycle.chaincode] submitInstallProposal -> INFO 002 Chaincode code package identifier: fabcar_1:1146b4b491871bf18b23dd67dd8cc058655b36cc0e2274f165ed06b796a8f276
9、ORG2审核链码
root@gan-virtual-machine:/opt/fabric-2.2.5/scripts/fabric-samples/chaincode/fabcar/go# peer lifecycle chaincode approveformyorg -o localhost:7050 --ordererTLSHostnameOverride orderer.example.com --tls --cafile /opt/fabric-2.2.5/scripts/fabric-samples/test-network/organizations/ordererOrganizations/example.com/orderers/orderer.example.com/msp/tlscacerts/tlsca.example.com-cert.pem --channelID mychannel --name fabcar --version 1.0 --package-id fabcar_1:1146b4b491871bf18b23dd67dd8cc058655b36cc0e2274f165ed06b796a8f276 --sequence 1


#执行结果
2022-06-20 22:23:48.460 CST [chaincodeCmd] ClientWait -> INFO 001 txid [3ea1fe7c68c16e5d3ef63c5cb8a1b23710fa3d816e51427290dc0bce1ea7d235] committed with status (VALID) at localhost:9051
10、通过ORG2查看链码审核状态并提交链码
#ORG2查看链码审核状态并提交链码。这时候ORG1,ORG2已经同时通过审核,这次链码可以最终提交
ot@gan-virtual-machine:/opt/fabric-2.2.5/scripts/fabric-samples/chaincode/fabcar/go# peer lifecycle chaincode checkcommitreadiness --channelID mychannel --name fabcar --version 1.0 --sequence 1 --output json

#运行结果
{


	"approvals": {


		"Org1MSP": true,
		"Org2MSP": true
	}
}


#最终把链码提交给组织节点
root@gan-virtual-machine:/opt/fabric-2.2.5/scripts/fabric-samples/chaincode/fabcar/go# peer lifecycle chaincode commit -o localhost:7050 --ordererTLSHostnameOverride orderer.example.com --tls --cafile /opt/fabric-2.2.5/scripts/fabric-samples/test-network/organizations/ordererOrganizations/example.com/orderers/orderer.example.com/msp/tlscacerts/tlsca.example.com-cert.pem --channelID mychannel --name fabcar --peerAddresses localhost:7051 --tlsRootCertFiles /opt/fabric-2.2.5/scripts/fabric-samples/test-network/organizations/peerOrganizations/org1.example.com/peers/peer0.org1.example.com/tls/ca.crt --peerAddresses localhost:9051 --tlsRootCertFiles /opt/fabric-2.2.5/scripts/fabric-samples/test-network/organizations/peerOrganizations/org2.example.com/peers/peer0.org2.example.com/tls/ca.crt --version 1.0 --sequence 1

#返回的结果如下
2022-06-20 22:24:58.357 CST [chaincodeCmd] ClientWait -> INFO 001 txid [1de741d45dab120a08c4c04c73eb9e59aee00b3b319878ae45a35e4f58f4f01a] committed with status (VALID) at localhost:9051
2022-06-20 22:24:58.418 CST [chaincodeCmd] ClientWait -> INFO 002 txid [1de741d45dab120a08c4c04c73eb9e59aee00b3b319878ae45a35e4f58f4f01a] committed with status (VALID) at localhost:7051
这时候,我们可以看下链码容器是否启动起来了。我这边的启动好了的,快乐就是这一瞬间~好歹没有之前那样的问题了。继续前进!
11、初始化
root@gan-virtual-machine:/opt/fabric-2.2.5/scripts/fabric-samples/chaincode/fabcar/go# peer chaincode invoke -o orderer.example.com:7050 --tls true --cafile /opt/fabric-2.2.5/scripts/fabric-samples/test-network/organizations/ordererOrganizations/example.com/orderers/orderer.example.com/msp/tlscacerts/tlsca.example.com-cert.pem -C mychannel -n fabcar --peerAddresses peer0.org1.example.com:7051 --tlsRootCertFiles /opt/fabric-2.2.5/scripts/fabric-samples/test-network/organizations/peerOrganizations/org1.example.com/peers/peer0.org1.example.com/tls/ca.crt --peerAddresses peer0.org2.example.com:9051 --tlsRootCertFiles /opt/fabric-2.2.5/scripts/fabric-samples/test-network/organizations/peerOrganizations/org2.example.com/peers/peer0.org2.example.com/tls/ca.crt -c '{"function":"InitLedger","Args":[]}'


#运行结果
2022-06-20 22:46:06.442 CST [chaincodeCmd] chaincodeInvokeOrQuery -> INFO 001 Chaincode invoke successful. result: status:200
12、查询
root@gan-virtual-machine:/opt/fabric-2.2.5/scripts/fabric-samples/chaincode/fabcar/go# peer chaincode query -C mychannel -n fabcar -c '{"Args":["QueryCar","CAR0"]}'

#运行结果
{

    "make":"Toyota","model":"Prius","colour":"blue","owner":"Tomoko"}
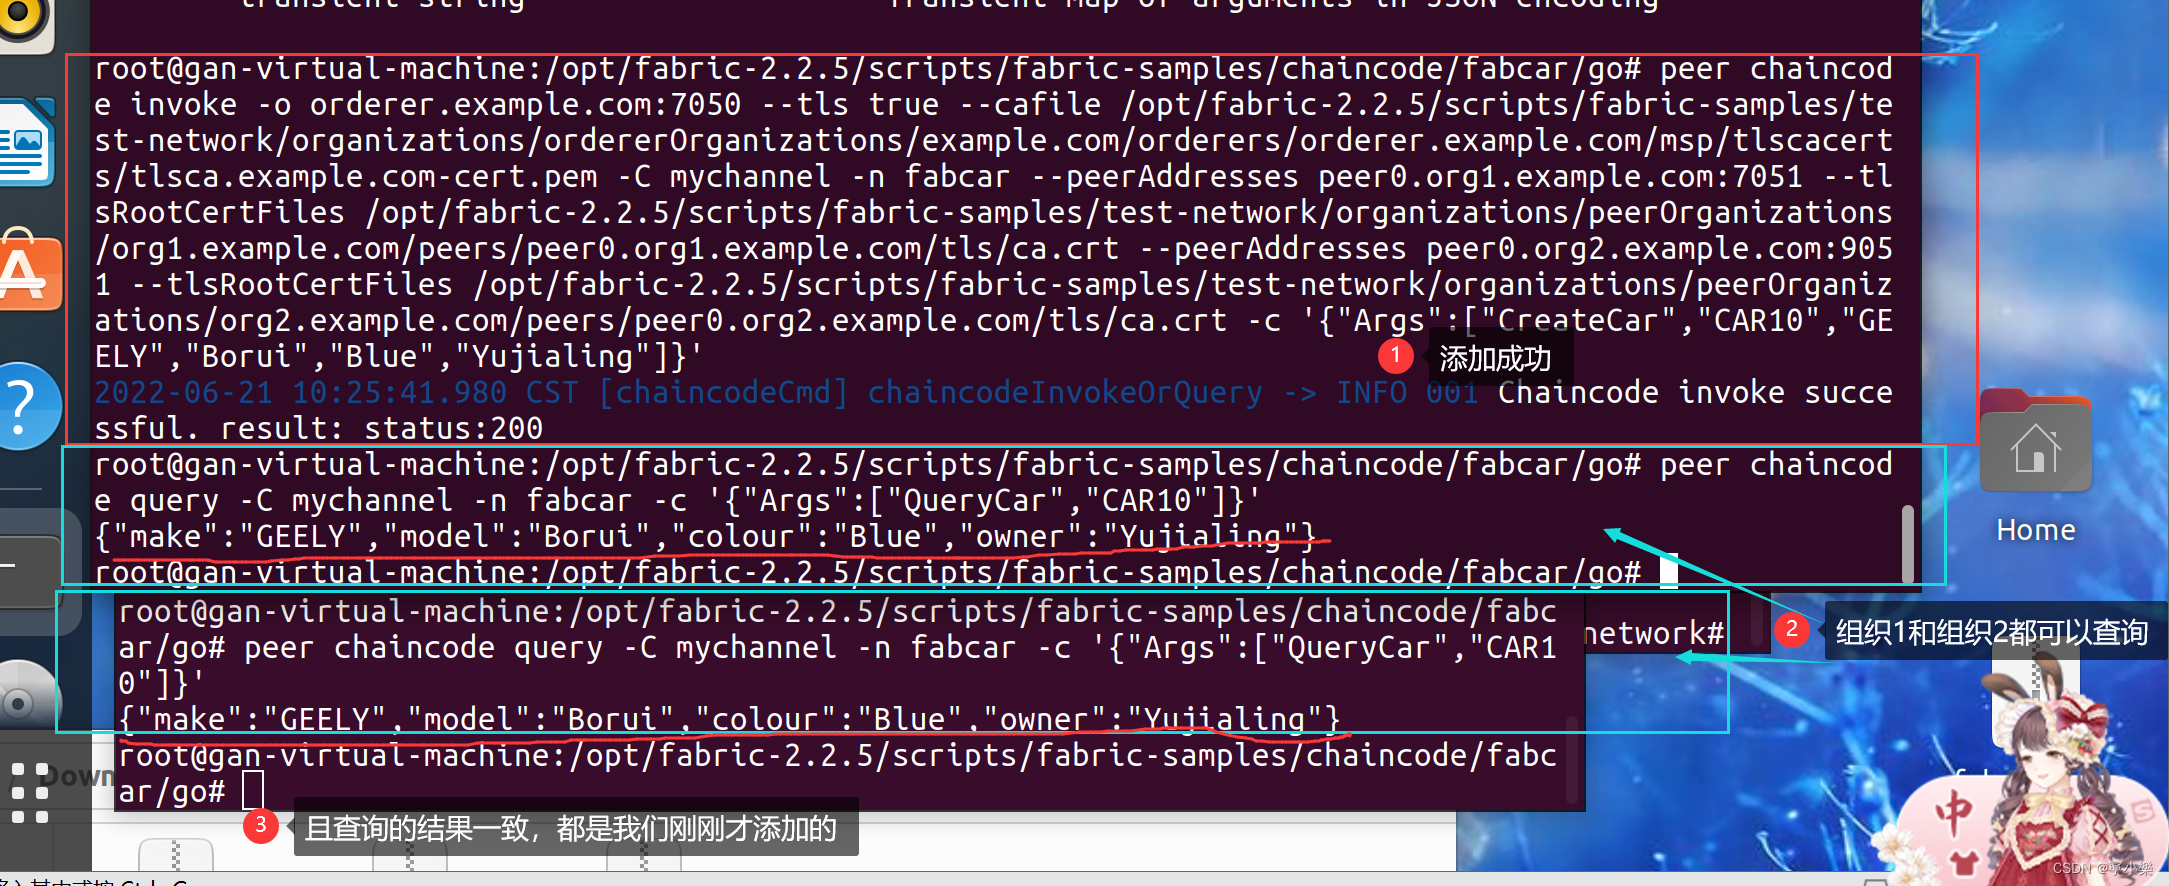
13、增加
采用invoke调用链码的CreateCar新增一辆汽车
root@gan-virtual-machine:/opt/fabric-2.2.5/scripts/fabric-samples/chaincode/fabcar/go# peer chaincode invoke -o orderer.example.com:7050 --tls true --cafile /opt/fabric-2.2.5/scripts/fabric-samples/test-network/organizations/ordererOrganizations/example.com/orderers/orderer.example.com/msp/tlscacerts/tlsca.example.com-cert.pem -C mychannel -n fabcar --peerAddresses peer0.org1.example.com:7051 --tlsRootCertFiles /opt/fabric-2.2.5/scripts/fabric-samples/test-network/organizations/peerOrganizations/org1.example.com/peers/peer0.org1.example.com/tls/ca.crt --peerAddresses peer0.org2.example.com:9051 --tlsRootCertFiles /opt/fabric-2.2.5/scripts/fabric-samples/test-network/organizations/peerOrganizations/org2.example.com/peers/peer0.org2.example.com/tls/ca.crt -c '{"Args":["CreateCar","CAR10","GEELY","Borui","Blue","Yujialing"]}'

#运行结果
2022-06-21 10:25:41.980 CST [chaincodeCmd] chaincodeInvokeOrQuery -> INFO 001 Chaincode invoke successful. result: status:200
14、查看是否增加成功
采用query调用链码中的QueryCar方法查询新增的汽车
root@gan-virtual-machine:/opt/fabric-2.2.5/scripts/fabric-samples/chaincode/fabcar/go# peer chaincode query -C mychannel -n fabcar -c '{"Args":["QueryCar","CAR10"]}'

#查询结果
{

    "make":"GEELY","model":"Borui","colour":"Blue","owner":"Yujialing"}
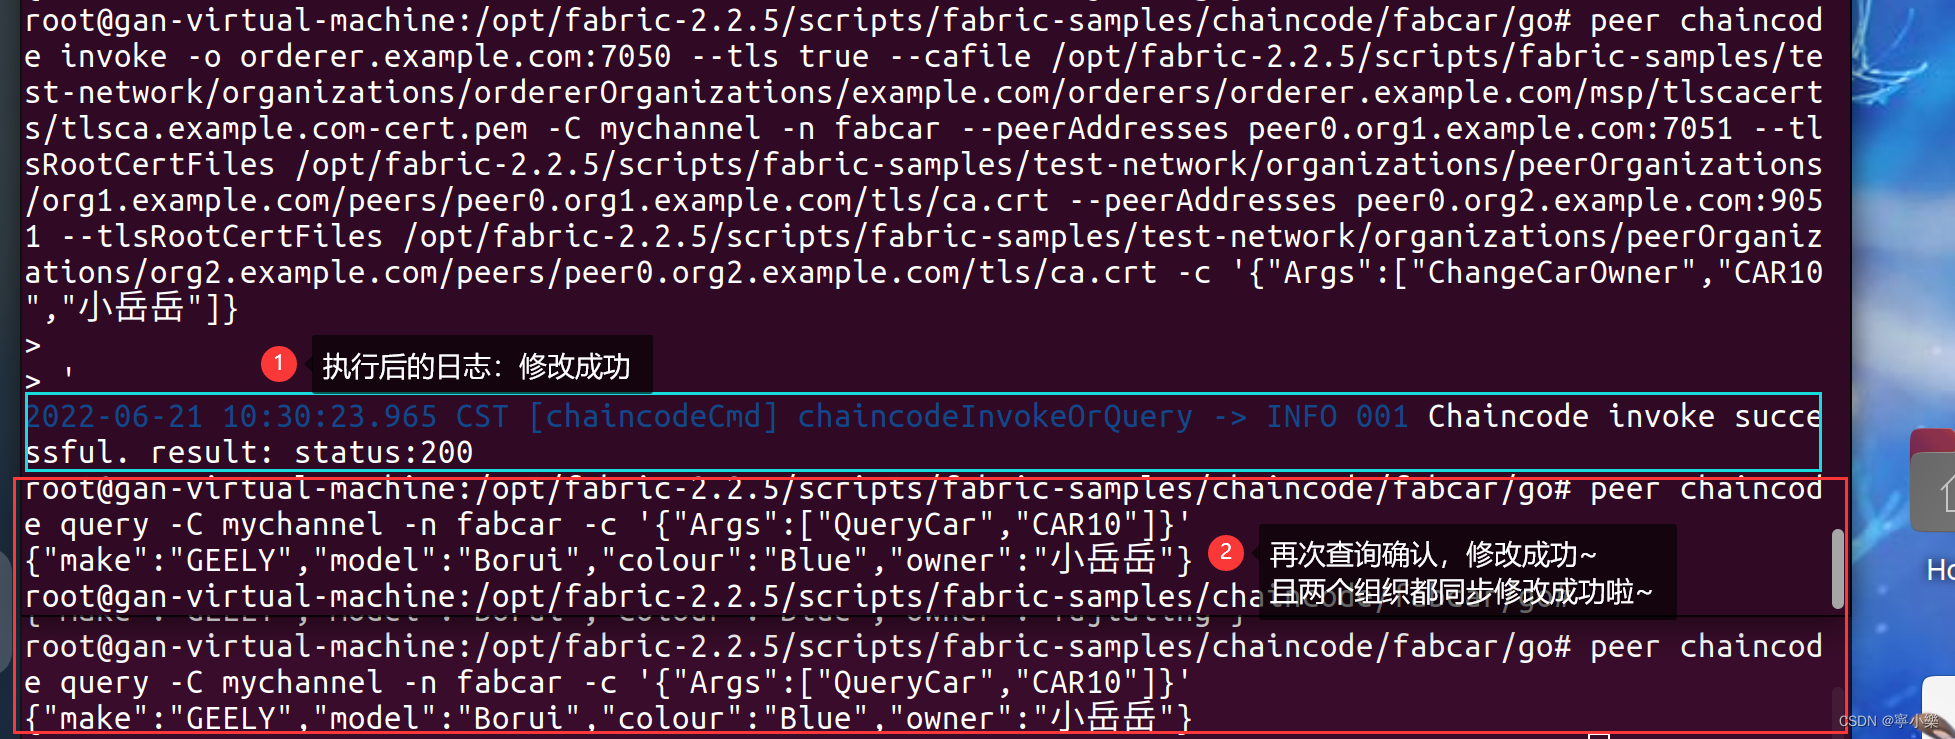
15、修改:更新汽车所有者
采用invoke调用链码的ChangeCarOwner 更新汽车所有者
peer chaincode invoke -o orderer.example.com:7050 --tls true --cafile /opt/fabric-2.2.5/scripts/fabric-samples/test-network/organizations/ordererOrganizations/example.com/orderers/orderer.example.com/msp/tlscacerts/tlsca.example.com-cert.pem -C mychannel -n fabcar --peerAddresses peer0.org1.example.com:7051 --tlsRootCertFiles /opt/fabric-2.2.5/scripts/fabric-samples/test-network/organizations/peerOrganizations/org1.example.com/peers/peer0.org1.example.com/tls/ca.crt --peerAddresses peer0.org2.example.com:9051 --tlsRootCertFiles /opt/fabric-2.2.5/scripts/fabric-samples/test-network/organizations/peerOrganizations/org2.example.com/peers/peer0.org2.example.com/tls/ca.crt -c '{"Args":["ChangeCarOwner","CAR10","小岳岳"]}'
四、后记:情绪垃圾,请略过~
感觉本身也没几句命令,但还是学了一周多。
中间卡在2.3.0版本进行链码初始化、查询时出现问题,后来发现可能在拉取该版本组件时出现了什么问题,文件内容不完整或者缺少文件?导致启动docker容器时出现Created状态。所以选择更换到2.2.5版本进行链码增删改查的学习。
虽然从现在可以执行官方实例了,但是还不会自己编写链码,而且还没有能力完成实验,也不能进行开发工作,总之要学习的还有很多很多。“前路漫漫,道阻且长。”
要加油呀!
路漫漫其修远兮,吾将上下而求索。