一、企业级LNMP架构
1、运维十年演变发展史
1. 项目开发流程
公司老板和产品经理根据市场调查,决定开发的一整套互联网产品
==互动社交+电商+用户论坛(BBS)==
产品决策(老板+产品+UI设计)=》代码开发(程序开发人员[前端开发[客户端页面或者APP]和后端开发[java php python node ruby])=》测试工作(测试人员)=》部署上线(运维人员)(SA、dev 开发ops 运维)
项目从开始策划,实施,上线,维护,一直到结束。称之为==项目的生命周期==。
作为运维人员来说,不仅仅是在上线流程中参与。
需要在策划,实施之初,就进行准备工作。学习对应架构和方案的知识点等。
比如:
①项目代码使用lnmp架构 那么就需要对lnmp架构熟悉
②开发人员需要多人协作开发,合并代码,就需要服务器上搭建代码版本控制器
③测试人员需要用到的测试环境等等
2. 企业架构分布式集群解决方案
集群:多台服务器在一起作同样的事 。
分布式 :多台服务器在一起作不同的事 。
小饭店原来只有一个厨师,切菜洗菜备料炒菜全干。后来客人多了,厨房一个厨师忙不过来,又请了个厨师,两个厨师都能炒一样的菜,这两个厨师的关系是集群。为了让厨师专心炒菜,把菜做到极致,又请了个配菜师负责切菜,备菜,备料,厨师和配菜师的关系是分布式,一个配菜师也忙不过来了,又请了个配菜师,两个配菜师关系是集群

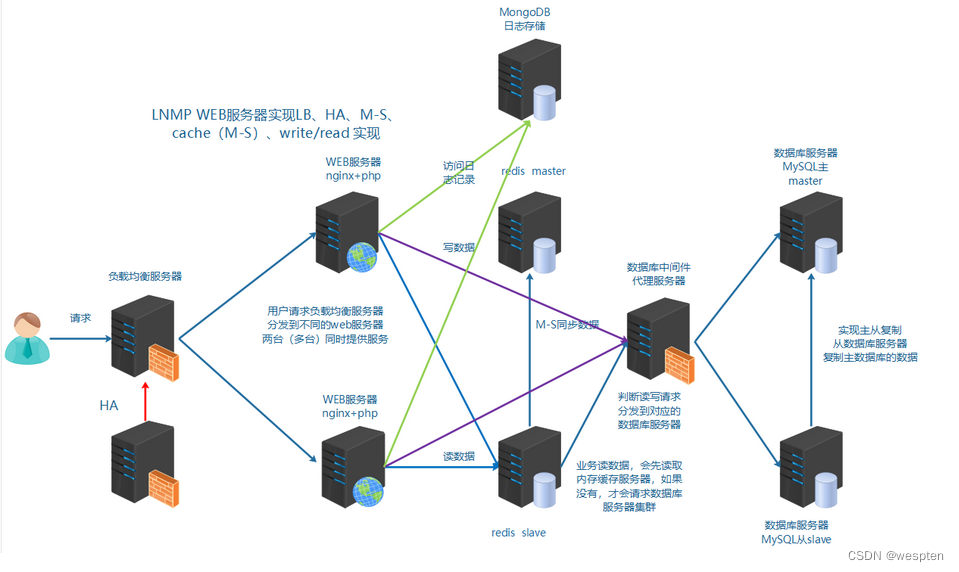
最终的架构图示:
实现负载均衡LB、高可用HA、数据库主从复制M-S、读写分离R-W、缓存中间件[memcached、Redis] nosql[mongodb]·······
3. 业务背景
年份:2008-2010
发布产品类型:互联网动态站点 社区论坛 商城 社交类站点
用户数量: 100-500
PV : 1000-3000(24小时访问次数总和 8小时) 页面访问数量 点击量
QPS: 5-10(每秒访问查询次数) 并发量 吞吐量 TPS RPS
DAU: 10-50(每日活跃用户数) 日活数 根据用户登录等方式
QPS 两种方法:
① 计算 pv/时间 = qps
② 压测 使用ab等并发测试软件 在规定时间发送一定的请求数量
2、服务器基本环境部署
为了学习的方便和需要,需要先进行基本环境的搭建
1、安装一台虚拟机,centos6.9操作系统
2、网络配置
3、机器名FQDN设置
4、DNS解析设置 本地Hosts解析
5、各类防火墙暂时关闭
6、配置需要的yum环境及其源地址
7、vim安装配置
8、网络校时 ntpd
1. 虚拟机软件搭建
略过。
2. 准备好ISO镜像文件
这里安装系统镜像,采用==minimal的方式==,自定义==选择开发工具==。安装更加快速,系统也更加轻便。
以上操作完成基本服务器镜像系统的安装。
3. 网络配置和检测
维护的机器数量比较多时,单独配置静态IP是很繁琐。这里使用NAT模式,DHCP自动分配IP
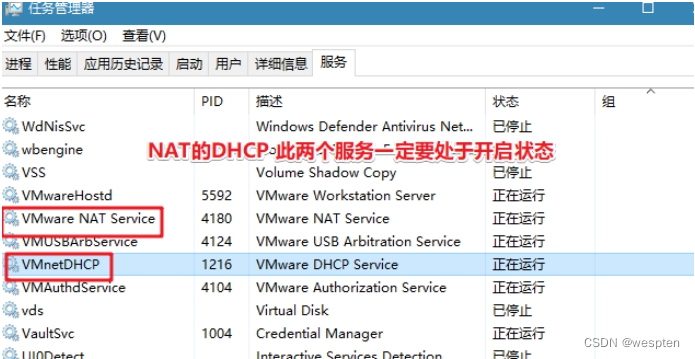
① vmware NAT连接方式,本地DHCP服务启用
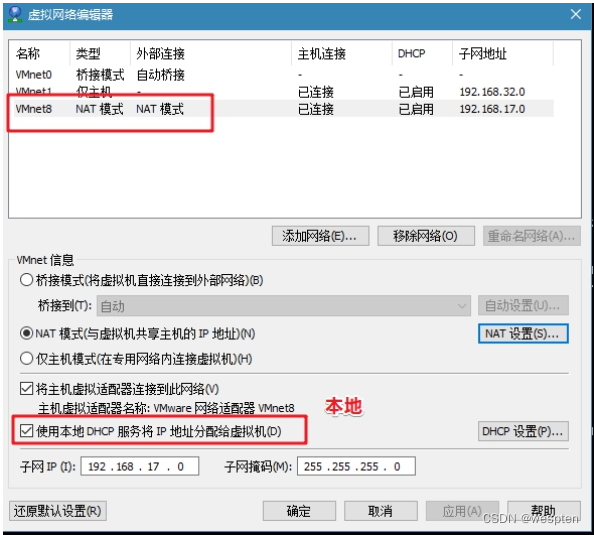
注意NAT服务和DHCP服务需要启动:
② IP租约和续约

不管采用何种方式获取到IP都可以,能够管理清晰和使用明白即可。
4. FQDN设置(重要)
在集群中配置FQDN,有助于进行区分主机身份。
server01 server01.lnmp.com
① 添加修改/etc/hosts
```shell shell > vim /etc/hosts在文件里追加一行:
192.168.17.102 server01.lnmp.com server01 ```② 网卡配置/etc/sysconfig/network
```shell shell > vim /etc/sysconfig/network修改HOSTNAME的值为server01
HOSTNAME=server01 ```5. 防火墙关闭
centos6.x系列中
① 关闭iptables
```shell
关闭iptables:
shell > service iptables stop关闭开机自启动:
shell > chkconfig iptables off ```②关闭selinux
```shell
临时关闭:
shell > setenforce 0 &>>/dev/null修改配置文件 永久关闭:
shell > sed -i "s/SELINUX=enforcing/SELINUX=disabled/" /etc/selinux/config; ```6. yum源环境配置
配置本地光盘源,使用centos的两个光盘:
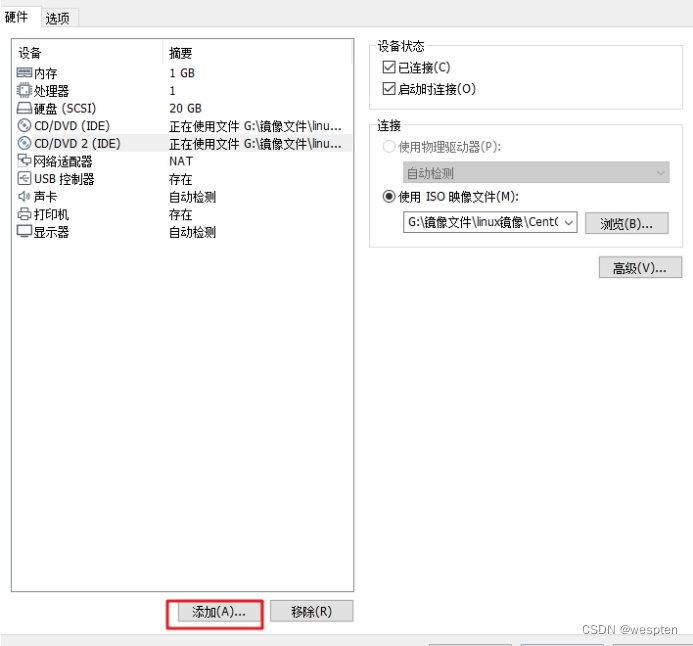
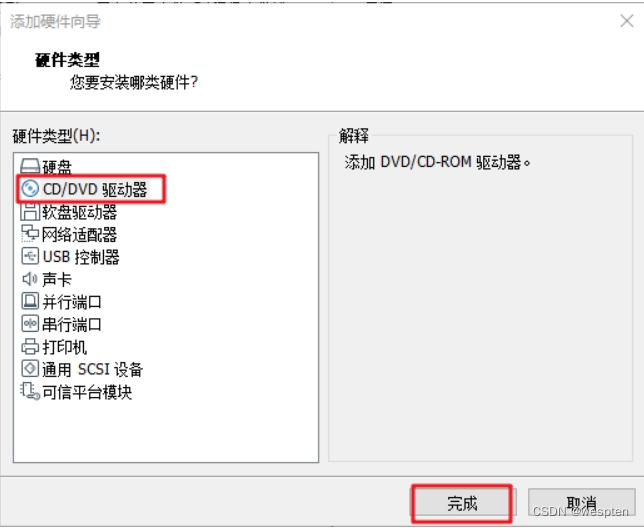
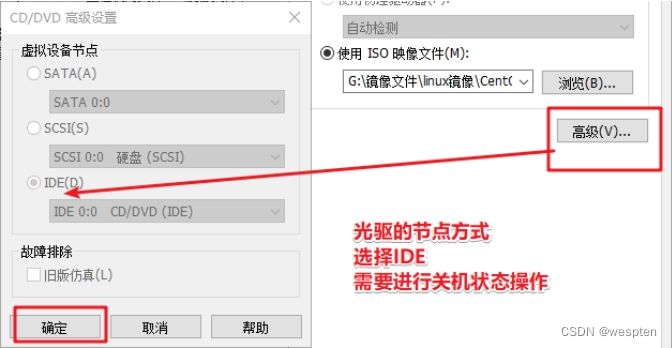
① 虚拟机添加新光驱并选择光盘路径
注意添加设备,需要关闭虚拟机里的操作系统:
② linux挂载多个光盘
```shell建立光盘挂载目录文件夹:
shell > mkdir /dvd1 /dvd2手动挂载光盘 顺便调整光盘顺序:
shell > mount /dev/sr0 /dvd2 shell > mount /dev/sr1 /dvd1lsblk查看是否挂载成功
添加到开启加载脚本 开机自动挂载光盘:
shell > echo "mount /dev/sr0 /dvd2" >> /etc/rc.local shell > echo "mount /dev/sr1 /dvd1" >> /etc/rc.local ```③ 配置yum本地光盘源
```shell shell > cd /etc/yum.repos.d shell > mkdir bak移动默认源 备份并使其失效:
shell > mv ./* ./bak按照挂载光盘位置,配置光盘源:
vim local.repo

# CentOS-Media.repo
#
#  This repo can be used with mounted DVD media, verify the mount point for
#  CentOS-6.  You can use this repo and yum to install items directly off the
#  DVD ISO that we release.
#
# To use this repo, put in your DVD and use it with the other repos too:
#  yum --enablerepo=c6-media [command]
#
# or for ONLY the media repo, do this:
#
#  yum --disablerepo=\* --enablerepo=c6-media [command]

[local]
name=CentOS-$releasever - local
baseurl=file:///dvd1/
        file:///dvd2/
gpgcheck=1
enabled=1
gpgkey=file:///etc/pki/rpm-gpg/RPM-GPG-KEY-CentOS-6
7. 安装vim编辑器并配置
① yum 安装vim配置显示行号
```shell shell > yum -y install vim配置vim默认显示行号:
shell > echo "set nu" >> /root/.vimrc ```② grep搜索关键字高亮显示
```shell搜索关键字高亮:
shell > sed -i "8calias grep='grep --color'" /root/.bashrc当前窗口重新加载配置:
shell > source /root/.bashrc ```8. 网络校时(重要)
服务器校时的原因:
①因为计划任务要执行,提供准确的时间
②服务器间进行通信时,需要统一的一致时间
```shell
安装校时命令和服务:
shell > yum -y install ntp开启ntpd服务:
shell > service ntpd start开机自启ntpd:
shell > chkconfig ntpd on ```国内第三方NTP校时网址
https://opsx.alibaba.com/service?lang=zh-cn&activeKey=2
完整案例:
#!/bin/bash
if [ ! $1 ];then
  hostname='server01'
else
  hostname=$1
fi
if [ ! $2 ];then
  domain='server01.lnmp.com'
else
  domain=$2
fi
#设置主机名称
sed -i "s/localhost.localdomain/$hostname/" /etc/sysconfig/network;
#解析
echo "192.168.17.102   $hostname $domain" >> /etc/hosts;
#关闭防火墙
#iptables
service iptables stop >> /dev/null
chkconfig iptables off
#关闭selinux
setenforce 0 &>>/dev/null
sed -i "s/SELINUX=enforcing/SELINUX=disabled/" /etc/selinux/config;
#yum源配置
if [[ ! -d /dvd1 ]] && [[ ! -d /dvd2 ]];then
   mkdir /dvd1 /dvd2
fi
#挂载一下顺序 dvd1为4.2G dvd2 1.2G
mount /dev/sr0 /dvd2 &>> /dev/null
mount /dev/sr1 /dvd1 &>> /dev/null
#开机自动挂载
echo 'mount /dev/sr0 /dvd2' >> /etc/rc.local
echo 'mount /dev/sr1 /dvd1' >> /etc/rc.local
#备份原来的源
cd /etc/yum.repos.d
if [ ! -d /etc/yum.repos.d/bak ];then
   mkdir bak
fi
mv ./* ./bak &>>/dev/null
#配置本地源
cp /root/local.repo ./
yum makecache &>>/dev/null
#安装vim
yum -y install vim
#行号
echo "set nu" >> /root/.vimrc
#搜索关键字高亮
sed -i "8calias grep='grep --color'" /root/.bashrc
#ntpd服务 时间校时
yum install -y ntp
chkconfig ntpd on
3、企业服务器LNMP环境搭建
常见的软件架构:
① C/S client/server
② B/S browser/server
不管是C还是B,都是属于客户端属于前端。那么运维人员主要负责和管理的是server端,也统称为服务器端。为了能够提供快速的提供服务端使用,互联网中有多种解决方案和架构,其中以下两种架构有着广泛的使用基础。
1> LAMP Linux+Apache+MySQL+PHP 2> LNMP Linux+Nginx+MySQL+PHP
lnmpa nginx+mysql+php+apache
lnmt nginx+mysql+tomcat(jdk)
nginx+mysql+(python+nodejs|ruby)
之前已经学习过了LAMP架构,接上来学习==LNMP架构解决方案==。
在企业中搭建实际业务环境时,一般依赖文件(小文件)使用yum安装解决,生产业务环境需要使用源码编译的方式进行安装。
源码编译预估时间:
Mysql 852s≈15m
Nginx 27s≈1m
PHP 564s≈10m
1. MySQL
1.1、相关参数介绍
编译参数的说明:
| -DCMAKEINSTALLPREFIX | 安装到的软件目录 | | ------------------------------- | --------------------------------- | | -DMYSQLDATADIR | 数据文件存储的路径 | | -DSYSCONFDIR | 配置文件路径 (my.cnf) | | -DENABLEDLOCALINFILE=1 | 使用localmysql客户端的配置 | | -DWITHPARTITIONSTORAGEENGINE | 使mysql支持分表 | | -DEXTRACHARSETS | 安装支持的字符集 | | -DDEFAULTCHARSET | 默认字符集使用 这里配置为utf8mb4 | | -DDEFAULTCOLLATION | 连接字符集 | | -DWITHSSL | 开启mysql的ssl使用 |
初始化参数说明:
| --basedir | 安装到的软件目录 | | --------- | ---------------- | | --datadir | 数据文件存储路径 | | --user | mysql使用的用户 |1.2、脚本实现安装及其初始化
源码编译安装MySQL:
```shell

!/bin/bash

mysql_install() { #1、创建用户 id mysql &>/dev/null [ $? -ne 0 ] && useradd -s /sbin/nologin -M mysql
2. 解决依赖
yum install -y cmake yum install -y ncurses-devel3. 编译安装
cd /root/soft tar zxvf mysql-5.6.33.tar.gz cd mysql-5.6.33 cmake \ -DCMAKEINSTALLPREFIX=/usr/local/mysql \ -DMYSQLDATADIR=/usr/local/mysql/data \ -DSYSCONFDIR=/etc \ -DENABLEDLOCALINFILE=1 \ -DWITHPARTITIONSTORAGEENGINE=1 \ -DEXTRACHARSETS=all \ -DDEFAULTCHARSET=utf8mb4 \ -DDEFAULTCOLLATION=utf8mb4generalci\ -DWITHSSL=bundled make && make install配置文件:
rm -rf /etc/my.cnf cp /usr/local/mysql/support-files/my-default.cnf /etc/my.cnf授权并初始化数据库:
chown -R mysql:mysql /usr/local/mysql /usr/local/mysql/scripts/mysqlinstalldb --basedir=/usr/local/mysql --datadir=/usr/local/mysql/data --user=mysql配置服务、自启动和环境变量:
cp /usr/local/mysql/support-files/mysql.server /etc/init.d/mysqld service mysqld start chkconfig --add mysqld echo 'PATH=/usr/local/mysql/bin:$PATH' >> /etc/profile删除匿名用户
设置root域名的密码:
rpm -qa|grep expect if [ $? -ne 0 ];then yum -y install expect fi导入环境变量PATH:
export PATH=/usr/local/mysql/bin:$PATH初始化root密码 删除匿名用户:
echo '#!/usr/bin/expect set timeout 60 spawn mysqlsecureinstallation expect { "enter for none" { send "\r"; expcontinue} "Y/n" { send "Y\r" ; expcontinue} "password" { send "123456\r"; expcontinue} "Cleaning up" { send "\r"} } interact ' > mysqlsecureinstallation.exp chmod +x mysqlsecure_installation.exp ./mysqlsecureinstallation.exp }脚本开始时间:
start_time=date +%s执行的脚本代码:
mysql_install脚本结束时间:
end_time=date +%s脚本执行花费时间:
consttime=$((endtime-starttime)) echo 'Take time is: '$consttime's' ```完整案例:
#!/bin/bash
#源码编译安装MySQL
mysql_install() {
	#1、创建用户
`id mysql` &>/dev/null
[ $? -ne 0 ] && useradd -s /sbin/nologin -M mysql
#2、解决依赖
yum install -y cmake
yum install -y ncurses-devel
#3、编译安装
cd /root/soft
tar zxvf mysql-5.6.33.tar.gz
cd mysql-5.6.33
cmake \
-DCMAKE_INSTALL_PREFIX=/usr/local/mysql \
-DMYSQL_DATADIR=/usr/local/mysql/data \
-DSYSCONFDIR=/etc \
-DENABLED_LOCAL_INFILE=1 \
-DWITH_PARTITION_STORAGE_ENGINE=1 \
-DEXTRA_CHARSETS=all \
-DDEFAULT_CHARSET=utf8mb4 \
-DDEFAULT_COLLATION=utf8mb4_general_ci \
-DWITH_SSL=bundled
make && make install
#配置文件
rm -rf /etc/my.cnf
cp /usr/local/mysql/support-files/my-default.cnf /etc/my.cnf
#授权并初始化数据库
chown -R mysql:mysql /usr/local/mysql
/usr/local/mysql/scripts/mysql_install_db --basedir=/usr/local/mysql --datadir=/usr/local/mysql/data --user=mysql
#配置服务、自启动和环境变量
cp /usr/local/mysql/support-files/mysql.server /etc/init.d/mysqld
service mysqld start
chkconfig --add mysqld
echo 'PATH=/usr/local/mysql/bin:$PATH' >> /etc/profile
#删除匿名用户
#设置root域名的密码
rpm -qa|grep expect
if [ $? -ne 0 ];then
   yum -y install expect
fi
#导入环境变量PATH
export PATH=/usr/local/mysql/bin:$PATH
#初始化root密码 删除匿名用户
echo '#!/usr/bin/expect
set timeout 60
spawn mysql_secure_installation
expect {
"enter for none" { send "\r"; exp_continue}
"Y/n" { send "Y\r" ; exp_continue}
"password" { send "123456\r"; exp_continue}
"Cleaning up" { send "\r"}
}
interact ' > mysql_secure_installation.exp
chmod +x mysql_secure_installation.exp
./mysql_secure_installation.exp
}
#脚本开始时间
start_time=`date +%s`
#执行的脚本代码
mysql_install
#脚本结束时间
end_time=`date +%s`
#脚本执行花费时间
const_time=$((end_time-start_time))
echo 'Take time is: '$const_time's'
2. Nginx
2.1、介绍
常见用法:
1) web服务器软件 httpd http协议
同类的web服务器软件:apache nginx(俄罗斯) IIS(微软 fastcgi) lighttpd(德国)
2) 代理服务器 反向代理
3) 邮箱代理服务器 IMAP POP3 SMTP
4) 负载均衡功能 LB loadblance
Nginx架构的特点:
① 高可靠:稳定性 master进程 管理调度请求分发到哪一个worker=> worker进程 响应请求 一master多worker
② 热部署 :(1)平滑升级 (2)可以快速重载配置
③ 高并发:可以同时响应更多的请求 事件 epoll模型 几万
④ 响应快:尤其在处理静态文件上,响应速度很快 sendfile
⑤ 低消耗:cpu和内存 1w个请求 内存2-3MB
⑥ 分布式支持 :反向代理 七层负载均衡
官方网址:nginx news
2.2、安装
常见安装方式:
① yum安装配置,需使用Nginx官方源或者EPEL源
② 源码编译
==问题编译过程中出现问题:==


==依赖解决==
shell shell > yum -y install pcre-devel zlib-devel openssl-devel安装步骤及其脚本
```shell
!/bin/bash
编译安装Nginx:
nginx_install(){
创建软件运行用户:
id www &>>/dev/null if [ $? -ne 0 ];then useradd -s/sbin/nologin -M www fi安装依赖:
yum -y install pcre-devel zlib-devel openssl-devel编译安装:
cd /root/soft tar xvf nginx-1.14.2.tar.gz cd nginx-1.14.2 ./configure --prefix=/usr/local/nginx --user=www --group=www --with-httpsslmodule --with-httpstubstatusmodule --with-httprealip_module && make && make install }脚本开始时间:
start_time=date +%s执行的脚本代码:
nginx_install脚本结束时间:
end_time=date +%s脚本执行花费时间:
consttime=$((endtime-starttime)) echo 'Take time is: '$consttime's' ```编译参数说明
| 参数 | 作用 | | ------------------------------ | ------------------------------------------------------------ | | --prefix | 编译安装到的软件目录 | | --user | worker进程运行用户 | | --group | worker进程运行用户组 | | --with-httpsslmodule | 支持https 需要==pcel-devel==依赖 | | --with-httpstubstatus_module | 基本状态信息显示 查看请求数、连接数等 | | --with-httprealipmodule | 定义客户端地址和端口为header头信息 常用于反向代理后的真实IP获取 |2.3、目录介绍
查看安装目录/usr/local/nginx
|目录|作用 | | ---- | ------------ | | conf | 配置文件 | | html | 网站默认目录 | | logs | 日志 | | sbin | 可执行文件 [软件的启动 停止 重启等] |2.4、软件操作参数
查看nginx的二进制可执行文件的相关参数:
shell shell > cd /usr/local/nginx/sbin shell > ./nginx -h执行后显示:
```shell nginx version: nginx/1.14.2 Usage: nginx [-?hvVtTq] [-s signal] [-c filename] [-p prefix] [-g directives]Options:
查看帮助:
-?,-h : this help查看版本并退出:
-v : show version and exit查看版本和配置选项并退出:
-V : show version and configure options then exit检测配置文件语法并退出:
-t : test configuration and exit检测配置文件语法打印它并退出:
-T : test configuration, dump it and exit在配置测试期间禁止显示非错误信息:
-q : suppress non-error messages during configuration testing发送信号给主进程 stop强制退出 quit优雅的退出 reopen重开日志 reload重载配置:
-s signal : send signal to a master process: stop, quit, reopen, reload设置nginx目录 $prefix路径:
-p prefix : set prefix path (default: /usr/local/nginx/)指定启动使用的配置文件:
-c filename : set configuration file (default: conf/nginx.conf)在配置文件之外设置全局指令:
-g directives : set global directives out of configuration file ```一般主要使用:
-s参数控制管理nginx服务
-V参数查看nginx开启的模块和编译参数
-t参数检测配置文件是否有错误
2.5、服务配置
① 使用社区的服务配置文件
nginx编译包里默认没有服务启动脚本模板,可以通过社区获得:
Red Hat NGINX Init Script | NGINX
上传脚本到/etc/init.d目录下
shell > vim /etc/init.d/nginx修改软件和配置路径:
```shell执行文件路径 第22行:
nginx="/usr/local/nginx/sbin/nginx"配置文件路径 第25行:
NGINIXCONFFILE="/usr/local/nginx/conf/nginx.conf" ```② 添加自启动
shell shell > chmod +x /etc/init.d/nginx shell > chkconfig --add nginx shell > chkconfig nginx on注意在服务脚本中,有chkconfig配置开启模式、开启顺序、关闭顺序设置。
```shell

!/bin/sh
nginx - this script starts and stops the nginx daemon
开启模式(0-6) 开启顺序 关闭顺序:
chkconfig: - 85 15
```
完整案例:
#!/bin/bash
#编译安装Nginx
nginx_install(){
#创建软件运行用户
`id www` &>>/dev/null
if [ $? -ne 0 ];then
   useradd -s/sbin/nologin -M www
fi
#安装依赖
yum -y install pcre-devel zlib-devel openssl-devel
#编译安装
cd /root/soft
tar xvf nginx-1.14.2.tar.gz
cd nginx-1.14.2
./configure --prefix=/usr/local/nginx --user=www --group=www --with-http_ssl_module --with-http_stub_status_module --with-http_realip_module && make && make install
}
#脚本开始时间
start_time=`date +%s`
#执行的脚本代码
nginx_install
#脚本结束时间
end_time=`date +%s`
#脚本执行花费时间
const_time=$((end_time-start_time))
echo 'Take time is: '$const_time's'
补充:
nginx服务文件:
#!/bin/sh
#
# nginx - this script starts and stops the nginx daemon
#
# chkconfig:   - 85 15
# description:  NGINX is an HTTP(S) server, HTTP(S) reverse \
#               proxy and IMAP/POP3 proxy server
# processname: nginx
# config:      /etc/nginx/nginx.conf
# config:      /etc/sysconfig/nginx
# pidfile:     /var/run/nginx.pid

# Source function library.
. /etc/rc.d/init.d/functions

# Source networking configuration.
. /etc/sysconfig/network

# Check that networking is up.
[ "$NETWORKING" = "no" ] && exit 0

nginx="/usr/local/nginx/sbin/nginx"
prog=$(basename $nginx)

NGINX_CONF_FILE="/usr/local/nginx/conf/nginx.conf"

[ -f /etc/sysconfig/nginx ] && . /etc/sysconfig/nginx

lockfile=/var/lock/subsys/nginx

make_dirs() {
   # make required directories
   user=`$nginx -V 2>&1 | grep "configure arguments:.*--user=" | sed 's/[^*]*--user=\([^ ]*\).*/\1/g' -`
   if [ -n "$user" ]; then
      if [ -z "`grep $user /etc/passwd`" ]; then
         useradd -M -s /bin/nologin $user
      fi
      options=`$nginx -V 2>&1 | grep 'configure arguments:'`
      for opt in $options; do
          if [ `echo $opt | grep '.*-temp-path'` ]; then
              value=`echo $opt | cut -d "=" -f 2`
              if [ ! -d "$value" ]; then
                  # echo "creating" $value
                  mkdir -p $value && chown -R $user $value
              fi
          fi
       done
    fi
}

start() {
    [ -x $nginx ] || exit 5
    [ -f $NGINX_CONF_FILE ] || exit 6
    make_dirs
    echo -n $"Starting $prog: "
    daemon $nginx -c $NGINX_CONF_FILE
    retval=$?
    echo
    [ $retval -eq 0 ] && touch $lockfile
    return $retval
}

stop() {
    echo -n $"Stopping $prog: "
    killproc $prog -QUIT
    retval=$?
    echo
    [ $retval -eq 0 ] && rm -f $lockfile
    return $retval
}

restart() {
    configtest || return $?
    stop
    sleep 1
    start
}

reload() {
    configtest || return $?
    echo -n $"Reloading $prog: "
    killproc $nginx -HUP
    RETVAL=$?
    echo
}

force_reload() {
    restart
}

configtest() {
  $nginx -t -c $NGINX_CONF_FILE
}

rh_status() {
    status $prog
}

rh_status_q() {
    rh_status >/dev/null 2>&1
}

case "$1" in
    start)
        rh_status_q && exit 0
        $1
        ;;
    stop)
        rh_status_q || exit 0
        $1
        ;;
    restart|configtest)
        $1
        ;;
    reload)
        rh_status_q || exit 7
        $1
        ;;
    force-reload)
        force_reload
        ;;
    status)
        rh_status
        ;;
    condrestart|try-restart)
        rh_status_q || exit 0
            ;;
    *)
        echo $"Usage: $0 {start|stop|status|restart|condrestart|try-restart|reload|force-reload|configtest}"
        exit 2
esac
mynginx服务文件:
#!/bin/bash
#Nginx管理文件位置
EXEC=/usr/local/nginx/sbin/nginx
start(){
   $EXEC
   if [ $? -eq 0 ];then
      echo -e "\033[32m nginx is running \033[0m"
   fi
}

stop(){
  $EXEC -s quit
   if [ $? -eq 0 ];then
      echo -e "\033[31m nginx is not run \033[0m"
   fi
}
status(){
  if [ -f '/usr/local/nginx/logs/nginx.pid' ];then
     echo -e "\033[32m nginx is running \033[0m"
  else
     echo -e "\033[31m nginx is not run \033[0m"
  fi
}
restart(){
  stop
  start
}

reload(){
  $EXEC -s reload
}

configtest(){
  $EXEC -t
}

#调用执行
case "$1" in
   start)
      start;;
   stop)
      stop;;
   restart)
      restart;;
   status)
      status;;
   reload)
      reload;;
   configtest)
      configtest;;
   *)
   echo '{start|stop|restart|reload|configtest}'
   ;;
esac
3. PHP
3.1、介绍
==PHP==(外文名:PHP: Hypertext Preprocessor,中文名:“超文本预处理器”)是一种通用开源脚本语言。语法吸收了C语言、Java和Perl的特点,利于学习,使用广泛,==主要适用于Web开发领域==。PHP 独特的语法混合了C、Java、Perl以及PHP自创的语法。它可以比CGI或者Perl更快速地执行动态网页。用PHP做出的动态页面与其他的编程语言相比,==PHP是将程序嵌入到HTML(标准通用标记语言下的一个应用)文档中去执行,执行效率比完全生成HTML标记的CGI要高许多==;PHP还可以执行编译后代码,编译可以达到加密和优化代码运行,使代码运行更快。
==PHP-FPM(FastCGI Process Manager:FastCGI进程管理器==)对于PHP 5.3.3之前的php来说,是一个补丁包 ,旨在将FastCGI进程管理整合进PHP包中。 相对Spawn-FCGI,PHP-FPM在CPU和内存方面的控制都更胜一筹,而且前者很容易崩溃,必须用crontab定时进行监控,而PHP-FPM则没有这种烦恼。 PHP5.3.3已经集成php-fpm了,不再是第三方的包了。PHP-FPM提供了更好的PHP进程管理方式,可以有效控制内存和进程、可以平滑重载PHP配置,比spawn-fcgi具有更多优点,所以被PHP官方收录了。==在./configure的时候带 –enable-fpm参数即可开启PHP-FPM。==
页面分类:
静态页面 一般普通访问到的页面;
动态页面 用户可以和服务器进行交互页面;
执行动态页面,需要和服务器进行交互,使用后端语言进行开发。
LNMP使用php进行开发交互:

LAMP和LNMP在使用和配置PHP的区别:

3.2、安装
解压进入目录:
shell shell > tar zxf php-7.2.12.tar.gz shell > cd php-7.2.12编译参数配置:
shell shell > ./configure --prefix=/usr/local/php --with-config-file-path=/usr/local/php/etc --enable-fpm --with-fpm-user=www --with-fpm-group=www --with-mysqli=mysqlnd --with-pdo-mysql=mysqlnd --with-iconv-dir --with-freetype-dir --with-jpeg-dir --with-png-dir --with-zlib --with-libxml-dir --enable-xml --disable-rpath --enable-bcmath --enable-shmop --enable-sysvsem --enable-inline-optimization --with-curl --enable-mbregex --enable-mbstring --enable-ftp --with-gd --with-openssl --with-mhash --enable-pcntl --enable-sockets --with-xmlrpc --with-libzip --enable-soap --without-pear --with-gettext --disable-fileinfo --enable-maintainer-zts--with 代表需要手动开启 可能需要加载第三方模块 第三方模块没有,就会error
--enable 代表开启php的默认功能
--without 关闭默认加载的模块
解决遇到的依赖软件问题:


shell shell > yum -y install libxml2-devel libjpeg-devel libpng-devel freetype-devel curl-devel openssl-devel编译并安装到目录:
shell shell > make && make install查看PHP的安装目录:
shell > cd /usr/local/php shell > ls| 目录名称 | 作用 | | -------- | ------------------------------------------------------------ | | bin | php相关命令目录 php phpize、php-config在源码编译扩展时用 | | etc | 配置文件目录 | | include | php默认类库 | | lib | php第三方扩展类库 | | php | man文档文件 | | sbin | php-fpm执行文件 | | var | log日志目录 run运行目录 保存pid文件 |3.3、配置
使用php-fpm进行管理php服务,有两个配置文件:
① php.ini #默认php配置文件
② php-fpm.conf #php-fpm相关的配置
复制配置文件:
shell shell > cp /usr/local/php/etc/php-fpm.conf.default /usr/local/php/etc/php-fpm.conf shell > cp /usr/local/php/etc/php-fpm.d/www.conf.default /usr/local/php/etc/php-fpm.d/www.conf shell > cp /root/soft/php-7.2.12/php.ini-development /usr/local/php/etc/php.ini添加启动服务:
shell shell > cp /root/soft/php-7.2.12/sapi/fpm/init.d.php-fpm /etc/init.d/php-fpm shell > chmod +x /etc/init.d/php-fpm shell > chkconfig --add php-fpm添加环境变量(方便php、phpize、phpconfig查找使用):
shell shell > echo 'PATH=/usr/local/php/bin:$PATH' >> /etc/profile shell > source /etc/profilephp安装脚本及其初始化配置
以下脚本,作为编译安装和配置php的参考。
```shell

!/bin/bash
php_install(){
php编译安装
和nginx使用相同的用户,如果没有就创建:
id www &> /dev/null [ $? -ne 0 ] && useradd -s /sbin/nologin -M www解决依赖:
yum -y install libxml2-devel libjpeg-devel libpng-devel freetype-devel curl-devel openssl-devel解压:
tar xvf php-7.2.12.tar.gz cd php-7.2.12编译安装php:
./configure --prefix=/usr/local/php --with-config-file-path=/usr/local/php/etc --enable-fpm --with-fpm-user=www --with-fpm-group=www --with-mysqli=mysqlnd --with-pdo-mysql=mysqlnd --with-iconv-dir --with-freetype-dir --with-jpeg-dir --with-png-dir --with-zlib --with-libxml-dir --enable-xml --disable-rpath --enable-bcmath --enable-shmop --enable-sysvsem --enable-inline-optimization --with-curl --enable-mbregex --enable-mbstring --enable-ftp --with-gd --with-openssl --with-mhash --enable-pcntl --enable-sockets --with-xmlrpc --with-libzip --enable-soap --without-pear --with-gettext --disable-fileinfo --enable-maintainer-zts && make && make install配置文件初始化:
cp php.ini-development /usr/local/php/etc/php.iniphp-fpm服务配置文件:
cp /usr/local/php/etc/php-fpm.conf.default /usr/local/php/etc/php-fpm.confphp-fpm服务子配置文件:
cp /usr/local/php/etc/php-fpm.d/www.conf.default /usr/local/php/etc/php-fpm.d/www.conf配置服务及其环境变量:
cp /root/soft/php-7.2.12/sapi/fpm/init.d.php-fpm /etc/init.d/php-fpm chmod +x /etc/init.d/php-fpm service php-fpm start chkconfig --add php-fpm echo 'PATH=/usr/local/php/bin:$PATH' >> /etc/profile }脚本开始时间:
start_time=date +%s执行的脚本代码:
php_install脚本结束时间:
end_time=date +%s脚本执行花费时间:
consttime=$((endtime-starttime)) echo 'Take time is: '$consttime's' ```3.4、Nginx+php-fpm配置
① 编写测试文件
shell shell > vim /usr/local/nginx/html/index.php文件内容:
php <?php phpinfo();② 在nginx.conf中配置
修改配置文件,告知nginx如果接收到.php结尾的请求,交由给php-fpm进行处理:
shell shell > vim /usr/local/nginx/conf/nginx.conf打开location .php 结尾那一段注释,并修改script为$document_root
```nginx把root变量提升上层:
root html; location / { #root html; index index.html index.htm; }

  #error_page  404              /404.html;

    # redirect server error pages to the static page /50x.html
    #
    error_page   500 502 503 504  /50x.html;
    location = /50x.html {
        root   html;
    }

    # proxy the PHP scripts to Apache listening on 127.0.0.1:80
    #
    #location ~ \.php$ {
    #    proxy_pass   http://127.0.0.1;
    #}

    # pass the PHP scripts to FastCGI server listening on 127.0.0.1:9000
    #
    location ~ \.php$ {
      #2、默认使用上层的root变量
    #    root           html;
        fastcgi_pass   127.0.0.1:9000;
        fastcgi_index  index.php;
      #3、把script修改为$document_root  $document_root 就是上面的root
        fastcgi_param  SCRIPT_FILENAME  $document_root$fastcgi_script_name;
        include        fastcgi_params;
    }
完整案例:
#!/bin/bash
php_install(){
#php编译安装
#和nginx使用相同的用户,如果没有就创建
`id www` &> /dev/null
[ $? -ne 0 ] && useradd -s /sbin/nologin -M www
#解决依赖
yum -y install libxml2-devel libjpeg-devel libpng-devel freetype-devel curl-devel openssl-devel
#解压
tar xvf php-7.2.12.tar.gz
cd php-7.2.12
#编译安装php
./configure --prefix=/usr/local/php --with-config-file-path=/usr/local/php/etc --enable-fpm --with-fpm-user=www --with-fpm-group=www --with-mysqli=mysqlnd --with-pdo-mysql=mysqlnd --with-iconv-dir --with-freetype-dir --with-jpeg-dir --with-png-dir --with-zlib --with-libxml-dir --enable-xml --disable-rpath --enable-bcmath --enable-shmop --enable-sysvsem --enable-inline-optimization --with-curl --enable-mbregex --enable-mbstring --enable-ftp --with-gd --with-openssl --with-mhash --enable-pcntl --enable-sockets --with-xmlrpc --with-libzip --enable-soap --without-pear --with-gettext --disable-fileinfo --enable-maintainer-zts && make && make install
#配置文件初始化
cp php.ini-development /usr/local/php/etc/php.ini
#php-fpm服务配置文件
cp /usr/local/php/etc/php-fpm.conf.default /usr/local/php/etc/php-fpm.conf
#php-fpm服务子配置文件
cp /usr/local/php/etc/php-fpm.d/www.conf.default /usr/local/php/etc/php-fpm.d/www.conf
#配置服务及其环境变量
cp /root/soft/php-7.2.12/sapi/fpm/init.d.php-fpm /etc/init.d/php-fpm
chmod +x /etc/init.d/php-fpm
service php-fpm start
chkconfig --add php-fpm
echo 'PATH=/usr/local/php/bin:$PATH' >> /etc/profile
}
#脚本开始时间
start_time=`date +%s`
#执行的脚本代码
php_install
#脚本结束时间
end_time=`date +%s`
#脚本执行花费时间
const_time=$((end_time-start_time))
echo 'Take time is: '$const_time's'
二、企业级Nginx架构
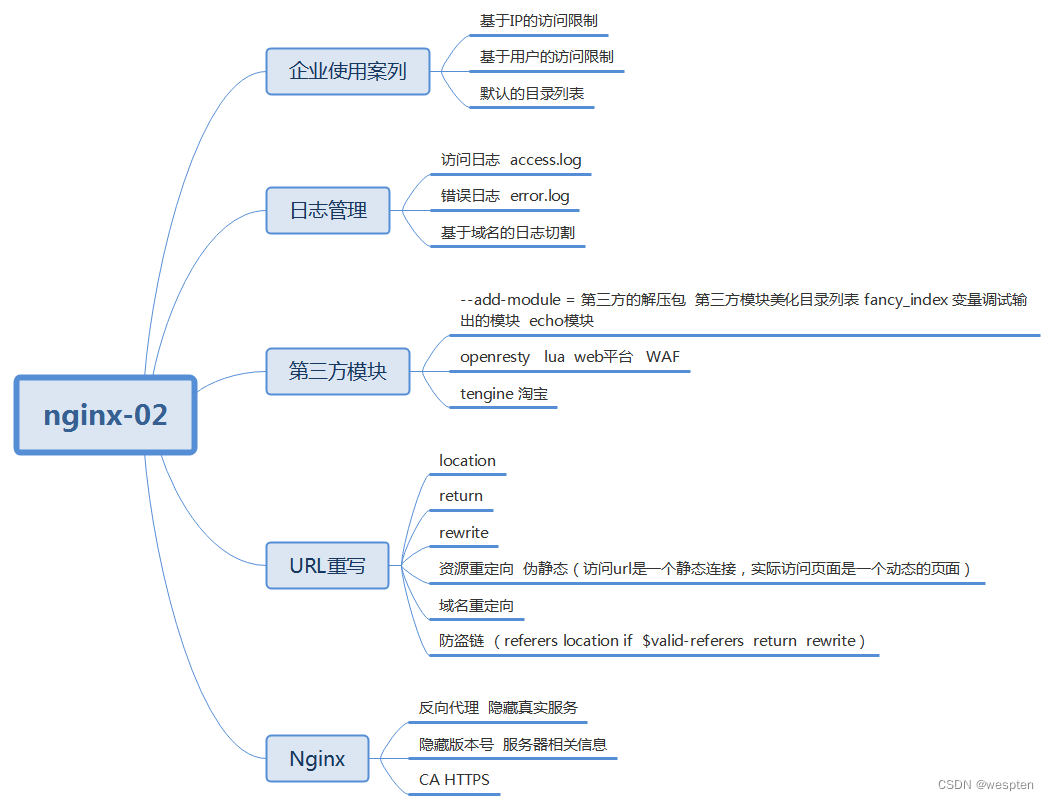
思维导图:

1、重装和升级
在实际业务场景中,需要使用软件新版本的功能、特性。就需要对原有软件进行升级或者重装操作。
旧statble 稳定版 1.14
stable 稳定版 1.16
mainline 主线版本 最新的 1.17
1. 信号参数
Kill 命令 传输信号给进程 Nginx的主进程。
TERM, INT(快速退出,当前的请求不执行完成就退出) -s stop
QUIT (优雅退出,执行完当前的请求后退出) -s quit
HUP (重新加载配置文件,用新的配置文件启动新worker进程,并优雅的关闭旧的worker进程) -s reload
USR1 (重新打开日志文件) -s reopen
USR2 (平滑的升级nginx二进制文件 拉起一个新的主进程 旧主进程不停止)
WINCH (优雅的关闭worker进程)
以上几个信息命令都是发送给master主进程的
语法:
```shell Kill 选项参数 pid关闭nginx
快速关闭:
kill -INT pid优雅关闭:
kill -QUIT pid ```2. 重新安装
① 停止掉服务,删除编译的安装的软件包和源码包
② 重新解压编译安装即可
注意:如果有需要,请备份配置文件和网站目录里的资源文件
3. 平滑升级
升级软件版本之后,需要启动新的版本,启动不了,端口已经被占用
如果直接把旧版本的服务停止掉,会影响线上业务的使用
最佳解决办法:
① 旧的不先停掉
② 新的又可以起来
③ 旧的和新的同时提供服务,旧的请求完成之后,就停掉旧进程
-USR2 平滑启动一个进程(平滑升级)
-WINCH 优雅的关闭子进程
-QUIT 优雅关闭主进程
① 编译安装新版本
shell shell > tar xvf nginx-1.16.0.tar.gz shell > cd nginx-1.16.0 shell > ./configure --prefix=/usr/local/nginx --user=www --group=www --with-http_ssl_module --with-http_stub_status_module --with-http_realip_module shell > make && make install升级新版本,需要把软件的安装路径,指定到旧版本上。
以上操作完成之后,会把原来的旧版本备份为nginx.old
② 新旧版本同时运行
shell shell > kill -USR2 主进程号③ 停止掉旧进程
查看旧的主进程号,并使用kill -WINCH 优雅的关闭的子进程,再关闭旧的主进程:
shell shell > kill -WINCH 旧的主进程号 shell > kill -QUIT 旧的主进程号在nginx中,默认提供了平滑升级的操作,只需要执行以下命令:
```shell注意先configure 在nginx源码包执行:
shell > make install && make upgrade ```4. 配置文件介绍
查看nignx目录下的配置文件:
/usr/local/nginx/nginx.conf
```nginx
nginx子进程启动用户:
user nobody;子进程数量 一般调整为cpu核数或者倍数:
worker_processes 1;错误日志定义:
error_log logs/error.log;
error_log logs/error.log notice;
error_log logs/error.log info;
进程pid 存储文件:
pid logs/nginx.pid;事件:
events { #每个子进程的连接数 nginx当前并发量 workerprocesses * workerconnections worker_connections 1024; }http协议段:
http { #引入 文件扩展名和与文件类型映射表 include mime.types; #默认文件类型
defaulttype application/octet-stream; #访问日志access.log的格式 #logformat main '$remoteaddr - $remoteuser [$timelocal] "$request" ' # '$status $bodybytessent "$httpreferer" ' # '"$http_useragent" "$httpxforwardedfor"'; #访问日志存储路径 #accesslog logs/access.log main; #linux内核 提供文件读写的机制 sendfile on; #tcpnopush on;
#keepalive_timeout 0;
#长连接超时时间 单位为s
keepalive_timeout 65;
#gzip压缩
#gzip on;
#server虚拟主机的配置
server {
#监听端口
listen 80;
#域名 可以有多个 用空格分隔
server_name localhost;
#默认编码
#charset koi8-r;
#access_log logs/host.access.log main;
#location 用来匹配url
location / {
#默认访问的网站路径
root html;
#默认访问页面 从前往后的顺序查找
index index.html index.htm;
}
#error_page 404 /404.html;
# redirect server error pages to the static page /50x.html
#
error_page 500 502 503 504 /50x.html;
location = /50x.html {
root html;
}
# proxy the PHP scripts to Apache listening on 127.0.0.1:80
#
#location ~ \.php$ {
# proxy_pass http://127.0.0.1;
#}
# pass the PHP scripts to FastCGI server listening on 127.0.0.1:9000
#
#location ~ \.php$ {
# root html;
# fastcgi_pass 127.0.0.1:9000;
# fastcgi_index index.php;
# fastcgi_param SCRIPT_FILENAME /scripts$fastcgi_script_name;
# include fastcgi_params;
#}
# deny access to .htaccess files, if Apache's document root
# concurs with nginx's one
#
#location ~ /\.ht {
# deny all;
#}
}
# another virtual host using mix of IP-, name-, and port-based configuration
#
#server {
# listen 8000;
# listen somename:8080;
# server_name somename alias another.alias;
# location / {
# root html;
# index index.html index.htm;
# }
#}
# HTTPS server
#
#server {
# listen 443 ssl;
# server_name localhost;
# ssl_certificate cert.pem;
# ssl_certificate_key cert.key;
# ssl_session_cache shared:SSL:1m;
# ssl_session_timeout 5m;
# ssl_ciphers HIGH:!aNULL:!MD5;
# ssl_prefer_server_ciphers on;
# location / {
# root html;
# index index.html index.htm;
# }
#}
} ```主要注意:
http=>==server===>location 递进关系2、企业中常见使用方式
1. server配置
1.1、server虚拟主机配置
在实际生产业务环境中,一台web服务器,需要使用多个网站部署。搭建vhost虚拟机主机实现不同域名,解析绑定到不同的目录。
核心语法:
```nginx基于http的web服务:
server{ #监听端口 listen 80 #配置虚拟机 servername shop.lnmp.com root html/tp5shop; location / { index index.php index.html index.htm } location ~ .php$ { fastcgipass 127.0.0.1:9000; fastcgiindex index.php; fastcgiparam SCRIPTFILENAME $documentroot$fastcgiscriptname; include fastcgi_params; } } ```一般server虚拟主机配置有三类:
① 基于域名,将域名配置到server_name上
② 基于IP,将IP配置到server_name上
③ 基于端口,将端口配置到listen
==案例一:基于域名的虚拟机配置==
① 建立网站访问目录
```shell shell > cd /usr/local/nginx/html shell > mkdir tp5shop shell > cd tp5shop创建测试文件:
shell > echo "shop.lnmp.com" >> index.html shell > echo "shop site by php" >> index.php ```② 解析域名并绑定
当前客户端是通过windows的浏览器,需要在win下的hosts文件(C:\Windows\System32\drivers\etc\hosts)进行解析域名。
nginx配置文件绑定域名:
nginx server { #监听端口 listen 80; #绑定域名 server_name shop.lnmp.com; #网站目录 root html/tp5shop; #默认访问页面 index index.html; #这段一定不要忘了配置,需要解析php使用到 location ~ \.php$ { fastcgi_pass 127.0.0.1:9000; fastcgi_index index.php; fastcgi_param SCRIPT_FILENAME $document_root$fastcgi_script_name; include fastcgi_params; } }③ 浏览器访问查看效果
==案例二:配置基于端口的虚拟主机==
还是使用上面创建好的tp5shop目录
修改listen配置进行测试
==案例三:配置基于IP的虚拟主机==
① 添加IP
```shell临时绑定IP:
shell > ifconfig eth0:1 192.168.17.220查看IP是否绑定成功:
shell > ip a ```② nginx配置文件添加
nginx server { listen 80; server_name 192.168.17.220; root html/ip; }③ 建立一个IP测试目录
shell shell > cd /usr/local/nginx/html shell > mkdir ip shell > echo "ip site" >> index.html2. 案例:上线商城项目
①上传项目文件到服务器
```shell shell > cd /usr/local/nginx/html把项目压缩包解压:
shell > unzip tp5shop.zip ```② 配置server虚拟机,客户端配置host解析
```shell编辑配置文件:
shell > vim /usr/local/nginx/conf/nginx.conf nginx在配置文件中配置server虚拟主机段:
server { listen 80; servername shop.lnmp.com; #tp5shop商城项目基于thinkphp5框架开发,需要绑定默认网站目录为public root html/tp5shop/public; index index.php index.html; location ~ .php$ { # root html; fastcgipass 127.0.0.1:9000; fastcgiindex index.php; fastcgiparam SCRIPTFILENAME $documentroot$fastcgiscriptname; include fastcgi_params; } } ```解析域名进行访问,如果是在windows下,就在c:\Windows\System32\drivers\etc\hosts解析
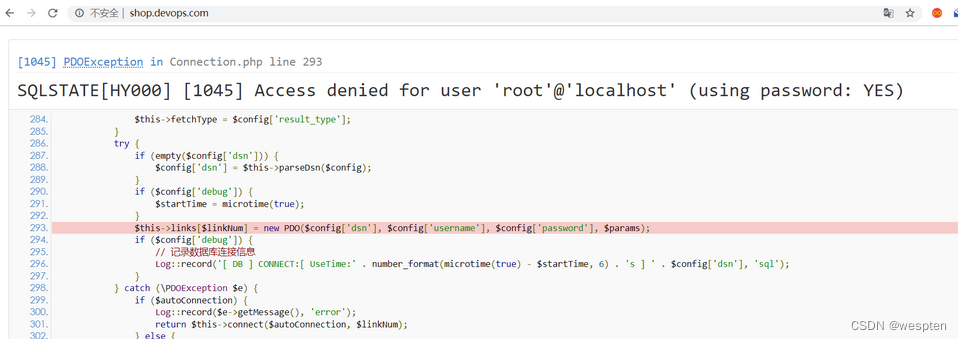
③ 创建数据库,导入数据迁移文件
遇到问题:数据没有导入,没有配置项目连接数据库。
```shell
创建数据库:
mysql > create database tp5shop;使用数据库:
mysql > use tp5shop;通过sql文件导入恢复数据:
mysql > source /usr/local/nginx/html/tpshop.sql ```④ 配置项目连接数据库
修改项目的连接数据库配置文件:
shell shell > vim /usr/local/nginx/html/tp5shop/application/database.php需要修改的内容说明:
php //注意主要连接地址、数据库名称、用户名称、用户密码、连接端口号等参数 //hostname,database,username,password,hostport等参数,根据实际请求修改即可

php return [ // 数据库类型 'type' => 'mysql', // 服务器地址 'hostname' => '127.0.0.1', // 数据库名 'database' => 'tp5shop', // 用户名 'username' => 'root', // 密码 'password' => '123456', // 端口 'hostport' => '3306',
⑤ 测试访问
遇到问题:项目需要在runtime文件夹中写入缓存信息(需要写权限)

分析:
① nginx 读取静态文件 用户www;
② php-fpm 读取、写入、解析php文件 用户www;
应该把runtime目录的所属关系赋予www:
shell shell > cd /usr/local/nginx/html/tp5shop shell > chown -R www:www ./runtime3. 默认官方模块
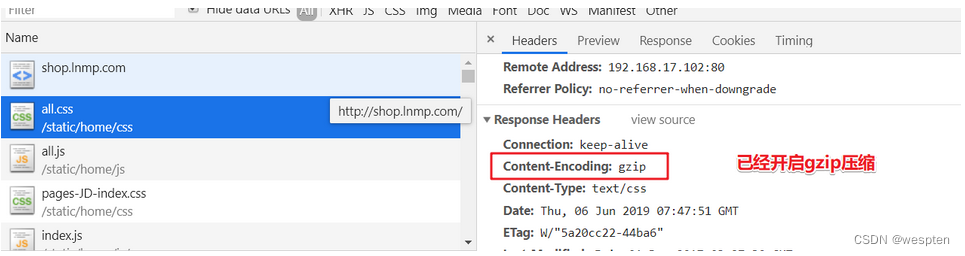
3.1、Gzip压缩
压缩文件,使文件变小,传输更快了。目前市场上大部分浏览器是支持GZIP的。IE6以下支持不好,会出现乱码情况。
官方文档:http://nginx.org/en/docs/http/ngxhttpgzip_module.html
示例语法:
```nginx配置到http段里,使整个http服务都启用gzip压缩。
开启gzip压缩:
gzip on;http协议版本:
gziphttpversion 1.0;IE浏览器不开启gzip IE6以下会乱码:
gzip_disable 'MSIE [1-6].';开启gzip 文件的格式:
gzip_types image/jpeg image/jpg image/png text/plain text/css; ```验证文件是否开启gzip:
3.2、客户端缓存
B/S架构里 browser浏览器 就是客户端。
告知浏览器获取的信息是在某个区间时间段是有效的。
官方文档:http://nginx.org/en/docs/http/ngxhttpheaders_module.html#expires
示例语法:
```nginx location ~ .(js|css)$ { #单位参数 d day 天|H hour 小时 M 分 expires 1h; }在整个http中生效 配置到http段里:
expires 1h ```3.3、基于IP的访问控制
基于ngxhttpaccess_module模块,默认可使用
官方文档:http://nginx.org/en/docs/http/ngxhttpaccess_module.html
语法:
==deny ip== 禁止ip访问
allow ip 允许访问
3.4、基于用户的访问控制
基于ngxhttpauthbasicmodule模块,默认可用。
官方文档:http://nginx.org/en/docs/http/ngxhttpauthbasicmodule.html
语法:
auth_basic "提示信息"
authbasicuser_file /etc/nginx/htpasswd;
配置实现:
① 创建用户名和密码存储文件
```shell shell > cd /usr/local/nginx/confhtpasswd 如果不存在就通过 yum -y install httpd-tools安装。
生成用户名称和密码:
shell > htpasswd -c ./passwd.db lnmp输入密码并再次确认密码。
查看passwd.db文件是否创建成功。
```
② 在配置文件中进行配置
shell shell > vim /usr/local/nginx/conf/nginx.conf配置文件内容:
```nginx根据业务需求,配置到server段里。
登录框显示的标题提示:
auth_basic "test login"加载用户名称和密码校验文件:
authbasicuser_file /usr/local/nginx/conf/passwd.db; ```③ 测试查看
3.5、目录列表显示
显示文件列表,或者需要做一个下载列表。
官方文档:http://nginx.org/en/docs/http/ngxhttpautoindex_module.html#autoindex
示例语法:
```nginx开启目录列表显示:
autoindex on;index 当index默认找不到时,才会使用目录列表:
index index; ```注意:如果目录中没有配置的默认index访问项,而autoindex又没有开启,不能够查看访问目录列表,就会报出403错误。
3.6、反向代理
正向代理:

特点:知道自己使用了代理,需要填写代理服务器的IP等相关连接信息。
==常见于代理客户端上网等操作。==
反向代理:

特点:用户是无感知的,不知道使用了代理服务器。反向代理服务器是和真实访问的服务器是在一起的,有关联的。
作用:可以根据实际业务需求,分发代理页面到不同的解释器。
可以隐藏真实服务器的路径。
==常见于代理后端服务器==
官方文档:http://nginx.org/en/docs/http/ngxhttpproxy_module.html
① 配置反向代理
LNMPA:

==验证例子:==
① 安装httpd 需改端口8080
```shell安装apache:
shell > yum install -y httpd配置apache的配置文件:
shell > vim /etc/httpd/conf/httpd.conf ```修改配置项:
apache listen 8080② 配置nginx的server并进行转发
nginx location / { proxy_pass http://127.0.0.1:8080; }3、日志管理
日志类型:
① access.log 访问日志 查看统计用户的访问信息 流量
② error.log 错误日志 错误信息 重写信息
1. 访问日志
官方文档:nginx documentation
① 查看access.log
shell shell > cd /usr/local/nginx/logs shell > cat access.logaccess.log日志文件内容示例:
nginx 127.0.0.1 - - [06/Oct/2017:11:46:16 +0800] "GET /phpinfo.php HTTP/1.1" 200 25206 "-" "Mozilla/5.0 (Windows NT 10.0; Win64; x64) AppleWebKit/537.36 (KHTML, like Gecko) Chrome/62.0.3202.9 Safari/537.36"② 查看配置解析参数说明
shell shell > vim nginx.conf查看访问日志相关参数
```nginx定义日志格式 格式命名 详细格式参数:
logformat main '$remoteaddr - $remoteuser [$timelocal] "$request" '
#                  '$status $body_bytes_sent "$http_referer" '
#                  '"$http_user_agent" "$http_x_forwarded_for"';
访问日志的存储路径配置 调用的日志格式:
#access_log logs/access.log main;```
| 参数 | 意义 | | --------------------- | ---------------------------------------------------- | | $remote_addr | 客户端的ip地址(代理服务器,显示代理服务ip) | | $remoteuser | 用于记录远程客户端的用户名称(一般为“-”) | | $timelocal | 用于记录访问时间和时区 | | $request | 用于记录请求的url以及请求方法 | | $status | 响应状态码,例如:200成功、404页面找不到等。 | | $bodybytessent | 给客户端发送的文件主体内容字节数 | | $httpuseragent | 用户所使用的代理(一般为浏览器) | | $httpxforwardedfor | 可以记录客户端IP,通过代理服务器来记录客户端的ip地址 | | $httpreferer | 可以记录用户是从哪个链接访问过来的 |访问日志,可以统计分析用户的流量的相关情况。
2. 错误日志
记录一些启动和运行过程中的错误信息:
```nginx定义开启错误日志 日志位置 日志级别:
error_log logs/error.log;
error_log logs/error.log notice;
error_log logs/error.log info;
```官方文档:http://nginx.org/en/docs/ngxcoremodule.html#error_log
shell shell > cat /usr/local/nginx/logs/error.log格式示例:
nginx 2019/06/06 11:42:43 [error] 25356#0: *38 open() "/usr/local/nginx/html/favicon.ico" failed (2: No such file or directory), client: 192.168.17.1, server: localhost, request: "GET /favicon.ico HTTP/1.1", host: "192.168.17.220", referrer: "http://192.168.17.220/index.php"3. 基于域名日志分割
① 开启日志的定义规则
```nginx定义日志格式 定义http里:
logformat mylogs '$remoteaddr - $remoteuser [$timelocal] "$request" ' '$status $bodybytessent "$httpreferer" ' '"$httpuseragent" "$httpxforwardedfor"'; ```② 重启nginx测试查看
```nginx访问日志的存储路径配置 调用的日志格式
在server段里面配置 也就是在当前server里的访问日志,会被写入定义的这里:
accesslog logs/shop.lnmp.comaccess.log mylogs; ```日志切割的方式有很多种:
① 基于域名分开存储
② 日志轮转 时间段
③ 自定义脚本 定时检测大小 根据文件大小进行切割
补充:
nginx详细配置案例:
#user  mysql;
worker_processes  4;

#error_log  logs/error.log;
#error_log  logs/error.log  notice;
#error_log  logs/error.log  info;

#pid        logs/nginx.pid;


events {
    worker_connections  1024;
}


http {
    include       mime.types;
    default_type  application/octet-stream;

    #log_format  main  '$remote_addr - $remote_user [$time_local] "$request" '
    #                  '$status $body_bytes_sent "$http_referer" '
    #                  '"$http_user_agent" "$http_x_forwarded_for"';

    #access_log  logs/access.log  main;

    sendfile        on;
    tcp_nopush     on;

    #keepalive_timeout  0;
    keepalive_timeout  65;

    #gzip  on;
    server {
      listen 80;
      server_name shop.devops.com;
      root html/tp5shop/public;
      #gzip压缩
      gzip on;
      gzip_http_version 1.0;
      gzip_disable 'MSIE [1-6]';
      gzip_types image/jpeg application/javascript text/css;
      location / {
         #配置客户端缓存
         expires 1h;
         index index.js index.php index.html;
      }

        location ~ \.php$ {
        #    root           html;
            fastcgi_pass   127.0.0.1:9000;
            fastcgi_index  index.php;
            fastcgi_param  SCRIPT_FILENAME  $document_root$fastcgi_script_name;
            include        fastcgi_params;
        }
    }
    server {
       listen 80;
       server_name 192.168.17.101;
       root html;
       location / {
           proxy_pass http://127.0.0.1:8080;
       }
    }
    server {
      listen 80;
      server_name web1.devops.com web1.linux.com;
      root html/web1;
      location / {
         index index.js index.php index.html;
      }

        location ~ \.php$ {
        #    root           html;
            fastcgi_pass   127.0.0.1:9000;
            fastcgi_index  index.php;
            fastcgi_param  SCRIPT_FILENAME  $document_root$fastcgi_script_name;
            include        fastcgi_params;
        }
    }
    server{
        listen 3000;
        server_name 192.168.17.241;
        root html/ip;
    }
    server {
        listen       80;
        server_name  localhost;

        #charset koi8-r;

        #access_log  logs/host.access.log  main;
        root   html;
        location / {
            index  index1.html index.htm;
        }

        #error_page  404              /404.html;

        # redirect server error pages to the static page /50x.html
        #
        error_page   500 502 503 504  /50x.html;
        location = /50x.html {
            root   html;
        }

        # proxy the PHP scripts to Apache listening on 127.0.0.1:80
        #
        #location ~ \.php$ {
        #    proxy_pass   http://127.0.0.1;
        #}

        # pass the PHP scripts to FastCGI server listening on 127.0.0.1:9000
        #
        location ~ \.php$ {
        #    root           html;
            fastcgi_pass   127.0.0.1:9000;
            fastcgi_index  index.php;
            fastcgi_param  SCRIPT_FILENAME  $document_root$fastcgi_script_name;
            include        fastcgi_params;
        }

        # deny access to .htaccess files, if Apache's document root
        # concurs with nginx's one
        #
        #location ~ /\.ht {
        #    deny  all;
        #}
    }


    # another virtual host using mix of IP-, name-, and port-based configuration
    #
    #server {
    #    listen       8000;
    #    listen       somename:8080;
    #    server_name  somename  alias  another.alias;

    #    location / {
    #        root   html;
    #        index  index.html index.htm;
    #    }
    #}


    # HTTPS server
    #
    #server {
    #    listen       443 ssl;
    #    server_name  localhost;

    #    ssl_certificate      cert.pem;
    #    ssl_certificate_key  cert.key;

    #    ssl_session_cache    shared:SSL:1m;
    #    ssl_session_timeout  5m;

    #    ssl_ciphers  HIGH:!aNULL:!MD5;
    #    ssl_prefer_server_ciphers  on;

    #    location / {
    #        root   html;
    #        index  index.html index.htm;
    #    }
    #}

}
4、第三方模块使用
Nginx官方没有的功能,开源开发者定制开发一些功能,把代码公布出来,可以通过编译加载第三方模块的方式,使用新的功能。
第三方模块网址:NGINX 3rd Party Modules | NGINX
1. 编译安装第三方模块
① 上传第三方模块压缩包
上传==ngx-fancyindex-v0.4.3.tar.gz==和==tar xvf echo-nginx-module-0.61.tar.gz==,到/root/soft下。
编译安装以上两个Nginx的第三方模块。
② 编译升级安装,并升级
shell shell > tar xvf ngx-fancyindex-v0.4.3.tar.gz shell > tar xvf echo-nginx-module-0.61.tar.gz shell > cd /root/soft/nginx-1.16.0 shell > ./configure --prefix=/usr/local/nginx --user=www --group=www --with-http_ssl_module --with-http_stub_status_module --with-http_realip_module --add-module=/root/soft/ngx-fancyindex-0.4.3/ --add-module=/root/soft/echo-nginx-module-0.61 shell > make && make install && make upgrade2. fancy-index
文档介绍:Fancy Index | NGINX
GitHub - aperezdc/ngx-fancyindex: Fancy indexes module for the Nginx web server
fancy-index模块美化列表效果:

实现操作步骤:
① 查看确认编译模块参数
```shell查看版本号及其编译参数:
shell > /usr/local/nginx/sbin/nginx -V ```确认是否包含ngx-fancyindex模块。
② 配置实现
```nginx可以配置到http、server、location等下。推荐配置到server下。
开启fancy indexes 列表显示功能:
fancyindex on;显示更为可读的文件大小:
fancyindexexactsize off; ```3. echo
echo模块常用来进行调试用,比如输出打印Nginx默认系统变量。
示例语法:
nginx location / { #输出为文本类型 default_type text/plain; #default_type text/html; #打印输出查看变量信息 echo $document_root; }验证是否一下$document_root是否和root设定的值一致。
5、发行版本
1. Nginx社区免费版
2. NGINX+商业版
Advanced Load Balancer, Web Server, & Reverse Proxy - NGINX
3、淘宝的tengine
tengine是alibaba公司,在Nginx的基础上,开发定制,更加服务自己业务的服务器软件。后来进行了开源。
```shell解压编译安装:
shell > tar xvf tengine-2.3.0.tar.gz shell > cd tengine-2.3.0tengine从2.3.0版本之后,tengine的模块被分离到modules,需要自己手动编译安装:
shell > ./configure --prefix=/usr/local/tengine --add-module=/root/soft/tengine-2.3.0/modules/ngxhttpfooterfiltermodule shell > make && make install查看默认加载的模块和参数信息:
shell > /usr/local/tengine/sbin/nginx -Vtengine 默认提供-m参数 查看已经编译加载的模块:
```案例:通过tengine内置模块 自动添加页脚信息 标识服务器信息
使用ngxhttpfooterfiltermodule包含的语法 注意确认是否已经加载此模块。
① 修改配置文件并重载服务
shell > vim /usr/local/tengine/conf/nginx.conf语法规则:
```nginx可定义在http、server、location中,建议在server中。
定义需要插入footer的响应类型(Response Content-Type)。
footer_types "text/plain" "text/css" "application/x-javascript";在上面定义的HTTP响应的正文结尾插入指定的format内容。如果format中含有变量,会被替换为变量当前的值。
footer "$host_comment"; ```示例配置:
nginx server { listen 80; server_name localhost; root html; #开启加载注释页脚信息 footer_types "text/plain" "text/css" "application/x-javascript"; footer "$host_comment"; }② 访问页面查看

4. OpenResty
openresty 在Nginx的基础上,结合lua脚本实现高并发的web平台。作者章亦春
WAF nginx+lua+redis 实现应用型防火墙 动态把IP加入黑名单
官方网址:OpenResty® - 中文官方站
编译安装步骤:
```shell解压编译并安装:
shell > tar xvf openresty-1.15.8.1.tar.gz shell > cd openresty-1.15.8.1 shell > ./configure --prefix=/usr/local/openresty shell > make && make install查看默认编译参数及其模块:
shell > /usr/local/openresty/sbin/openresty -V ```案例:使用lua模块语法
① 修改配置文件
shell shell > vim /usr/local/openresty/nginx/conf/nginx.conf示例配置:
nginx location / { root html; index index.html index.htm; #默认返回类型 default_type text/html; #调用lua模块的语法 content_by_lua 'ngx.say("hello openresty")'; }② 访问页面查看
6、URL匹配之location
Location 配置语法
http://nginx.org/en/docs/http/ngxhttpcore_module.html#location
1. location匹配规则
① = 精确匹配
nginx location = / { #规则 }则匹配到 http://www.example.com/ 这种请求
② ~ 大小写敏感 区分大小写
nginx location ~ /Example/ { #规则 }请求示例 http://www.example.com/Example/ [成功] http://www.example.com/example/ [失败]
③ ~ 大小写忽略*
nginx location ~* /Example/ { #规则 }请求示例 http://www.example.com/Example/ [成功] http://www.example.com/example/ [成功]
④ ^~ 只匹配以 uri 开头
nginx location ^~ /img/ { #规则 }请求实例 以 /img/ 开头的请求,都会匹配上 http://www.example.com/img/a.jpg [成功] http://www.example.com/img/b.mp4 [成功] http://www.example.com/bimg/b.mp4 [失败] http://www.example.com/Img/b.mp4 [失败]
⑤ / 其他匹配都不成功 就匹配此项
nginx location / { #规则 }如果路径是资源文件是存在的,会优先获取资源文件
location匹配优先级
(location =) > (location 完整路径) > (location ^~ 路径) > (location ~,~* 正则顺序) > (location 部分起始路径) > (/)
2. location匹配跳转
@+name @,nginx内部跳转
```nginx location /img/ { #如果状态码是404 就指定404的页面为什么 errorpage 404 = @imgerr; }
location @img_err {
# 规则 return 503; } ```
以 /img/ 开头的请求,如果链接的状态为 404。则会匹配到 @img_err 这条规则上
7、URL重写
==ngx_httprewritemodule==模块用于使用PCRE正则表达式更改请求URI,返回重定向,以及有条件地选择配置
官方文档地址:http://nginx.org/en/docs/http/ngx_httprewritemodule.html
1. return
该指令用于结束规则的执行并返回状态码给客户端。
403 Forbidden.服务器已经理解请求,但是拒绝执行它
404 Not Found.请求失败,请求所希望得到的资源未在服务器上发现.404这个状态码被⼴泛应⽤于当服务器不想揭示为何请求被拒绝,或者没有其他适合的响应可⽤的情况下.
500 Internal Server Error.服务器遇到⼀个未曾预料的状况,导致它无法完成对请求的处理.⼀般来说,这个问题都会在服务器的程序码出错时出现.
502 Bad Gateway.作为网关或代理工作的服务器尝试执行请求时,从上游服务器接收到无效的响应.
503 Service Unavailable.由于临时的服务器维护或过载,服务器当前无法处理请求.这个状况是临时的,并且将在一段时间以后恢复.503状态码的存在并不意味着服务器在过载的时候必须使⽤它.某些服务器只不过是希望拒绝客户端的连接.
504 Gateway Timeout作为网关或代理工作的服务器尝试执行请求时,未能及时从上游服务器(URI标识出的服务器,例如HTTP,FTP,LDAP)或辅助服务器(例如DNS)收到响应。
请求状态码:
示例语法:
```nginx可以匹配到server location if中,推荐配置到location中:
return 403; ```2. rewrite
rewrite 匹配到请求URI,重写到新的URI
rewrite语法 匹配到,替换为其他内容
语法 rewrite 匹配内容 替代内容 标记
官方文档地址:http://nginx.org/en/docs/http/ngxhttprewrite_module.html#rewrite
flag标记说明:
last #本条规则匹配完成后,继续向下匹配新的location URI规则,客户端URL地址不会发生跳转
break #本条规则匹配完成即终止,不再匹配后面的任何规则,客户端URL地址不会发生跳转
redirect #返回302临时重定向,浏览器地址会显示跳转后的URL地址
permanent #返回301永久重定向,浏览器地址栏会显示跳转后的URL地址
匹配顺序:多条rewrite,从上到下匹配,匹配到之后就不在匹配其他rewrite规则。
8、URL相关案例实现
1. 案例:资源重定向实现
业务需求描述:
实际业务不存在index.html,需要重写访问index.php
URL为index.html,而实际访问的是index.php,对外被认为是html静态页面
以上方案就是==seo优化伪静态==的使用,把真实的后端的页面,伪装为静态html页面。
① 修改配置
shell shell > vim /usr/local/nginx/conf/nginx.conf添加配置:
nginx rewrite /index.html /index.php last;② 重载配置测试访问
2. 案例:域名重定向实现
网站的域名升级了,需要启用新的域名使用。
但是用户却不知道,还可能使用旧的域名访问网站。
需要把通过旧域名访问的来源,重定向到新的域名。
把shop.lnmp.com的请求全部重定向到新域名www.shop.com
nginx rewrite / http://www.shop.com permanent;示例配置:
```nginxshop.lnmp.com的请求全部重定向到www.shop.com中:
server { listen 80; servername shop.lnmp.com; rewrite / http://www.shop.com permanent; } server { listen 80; #绑定新域名即可 servername www.shop.com; root html/tp5shop/public; index index.php index.html; #deny 192.168.17.1; #authbasic "shop login"; #authbasicuserfile /usr/local/nginx/conf/passwd.db; accesslog logs/shop.lnmp.comaccess.log mylogs; location / { rewrite /index.html /index.php last; } location ~ .php$ { fastcgipass 127.0.0.1:9000; fastcgiindex index.php; fastcgiparam SCRIPTFILENAME $documentroot$fastcgiscriptname; include fastcgiparams; } #location ~ .(js|css) { # expires 2h; #} }

```
注意新域名www.shop.com 记得在客户端的hosts文件中解析。
3. 案例:防盗链原理和实现

业务需求描述:
域名A的资源文件,经常被域名B直接调用访问。
而用户经常访问域名B,看到的资源(图片等)以为是域名B的,实际则是域名A的。
但是域名A没有从中获得任何收益,缺要给域名B来源的访问耗费服务器资源和带宽。
所以,禁止域名B直接访问和调用域名A的资源的方式,就被称为"防止盗链"。
语法:
定义允许访问的域名来源
valid_referers none blocked servername
none blocked 没有referer的情况,直接访问资源的情况
if ($invalid_referer) {}
1、在ip的虚拟主机,静态文件调用图片。
2、shop的虚拟主机,禁止ip的虚拟主机调用图片。
① ip虚拟主机目录建立静态文件访问shop虚拟主机的图片资源
shell shell > cd /usr/local/nginx/html shell > echo '<img src="http://www.shop.com/static/home/img/2.jpg" />' >> img.html② 在shop虚拟主机配置中,防止其他虚拟机主机盗链
```nginx定义在server里 shop的server。
图片请求防盗链:
location ~* .(jpg|png|jpeg|gif|bmp) { validreferers www.shop.com; if ($invalidreferer) { return 404; } } ```9、安全
1. 反向代理
实现隐藏真实服务的操作,起到一定安全作用。
2. 隐藏版本号
Nginx对外提供服务,为了避免被针对某个版本的漏洞进行攻击。经常做法是隐藏掉软件的版本信息。提供一定的安全性。
```nginx将以下配置加入到http段配置中:
server_tokens off ```3. Https和CA
```nginx server { listen 443 ssl; #绑定好域名 servername web1.heimadevops.top; #指定证书相关位置 sslcertificate /usr/local/nginx/conf/1web1.heimadevops.topbundle.crt; sslcertificatekey /usr/local/nginx/conf/2_web1.heimadevops.top.key; ssl_session_cache shared:SSL:1m;
ssl_session_timeout 5m;
ssl_ciphers HIGH:!aNULL:!MD5;
ssl_prefer_server_ciphers on;
location / {
root html;
index index.html index.htm;
}
}
http跳转到https:
server { listen 80; server_name web1.heimadevops.top; rewrite / https://web1.heimadevops.top permanent; } ```客户端注意解析域名。
Tip:Nginx支持pathinfo路径 重写方式
需求:
php http://www.shop.com/home/goods/index/cate_id/187.html 默认不支持访问 重写成为 http://www.shop.com/index.php?s=home/goods/index/cate_id/187.html语法规则示例:
nginx location / { rewrite /index.html /index.php last; #判断请求的路径 不存在 if (!-e $request_filename) { # 捕获到所有路径信息 重写为index.php的s参数 last需要匹配之后的location规则 rewrite ^(.*)$ /index.php?s=$1 last; } }nginx详细配置案例:
#
worker_processes 2;
events {
worker_connections 1024;
}
http {
log_format mylogs '$remote_addr - [$time_local] "$request" '
'$status' "$http_user_agent";
include mime.types;
default_type application/octet-stream;
sendfile on;
#tcp_nopush on;
#keepalive_timeout 0;
server_tokens off;
keepalive_timeout 65;
gzip on;
gzip_http_version 1.0;
gzip_disable 'MSIE [1-6].';
gzip_types image/jpeg image/jpg image/png text/plain text/css text/javascript application/javascript;
expires 1h;
server {
listen 80;
server_name shop.lnmp.com;
rewrite / http://www.shop.com permanent;
}
server {
listen 80;
server_name www.shop.com;
root html/tp5shop/public;
index index.php index.html;
#deny 192.168.17.1;
#auth_basic "shop login";
#auth_basic_user_file /usr/local/nginx/conf/passwd.db;
access_log logs/shop.lnmp.com_access.log mylogs;
location ~* \.(jpg|png|jpeg|gif|bmp) {
valid_referers www.shop.com;
if ($invalid_referer) {
return 404;
}
}
location / {
rewrite /index.html /index.php last;
}
location ~ \.php$ {
fastcgi_pass 127.0.0.1:9000;
fastcgi_index index.php;
fastcgi_param SCRIPT_FILENAME $document_root$fastcgi_script_name;
include fastcgi_params;
}
#location ~ \.(js|css) {
# expires 2h;
#}
}
server {
listen 80;
server_name web1.heimadevops.top;
rewrite / https://web1.heimadevops.top permanent;
}
server {
listen 80;
server_name 192.168.17.102;
root html;
# location =
#location =/ {
# default_type text/plain;
# echo '= test';
#}
# location ~
#location ~ \.html$ {
# echo '~ .html';
#}
# location ~*
#location ~* \.html$ {
# echo '~ .html';
#}
# location ^~
#location ^~ /abc {
# default_type text/plain;
# echo '^ abc';
#}
# location @
#location /img/ {
# error_page 404 = @error_img;
#}
#location @error_img {
# default_type text/plain;
#echo "img error 404";
# return 502;
#}
}
server {
listen 80;
server_name 192.168.17.220;
#autoindex on;
#fancyindex on;
#fancyindex_exact_size off;
charset utf8;
#index kkk;
root html/ip;
location / {
#proxy_pass http://127.0.0.1:8080;
# proxy_pass https://www.baidu.com;
default_type text/html;
#default_type image/png;
echo "<h1>";
echo $document_root;
echo "</h1>";
echo $date_local;
echo $host;
echo $hostname;
}
}
server {
listen 80;
server_name localhost;
root html;
index index.php index.html index.htm;
location ~ \.php$ {
fastcgi_pass 127.0.0.1:9000;
fastcgi_index index.php;
fastcgi_param SCRIPT_FILENAME $document_root$fastcgi_script_name;
include fastcgi_params;
}
}
server {
listen 443 ssl;
#绑定好域名
server_name web1.heimadevops.top;
#指定证书相关位置
ssl_certificate /usr/local/nginx/conf/1_web1.heimadevops.top_bundle.crt;
ssl_certificate_key /usr/local/nginx/conf/2_web1.heimadevops.top.key;
    ssl_session_cache    shared:SSL:1m;
    ssl_session_timeout  5m;

    ssl_ciphers  HIGH:!aNULL:!MD5;
    ssl_prefer_server_ciphers  on;

    location / {
        root   html;
        index  index.html index.htm;
    }
}
}
三、企业级Tomcat架构
思维导图:

1、Tomcat 简介与工作原理
1. Tomcat介绍
Tomcat是Apache 软件基金会(Apache Software Foundation)的Jakarta 项目中的一个核心项目,由Apache、Sun 和其他一些公司及个人共同开发而成。由于有了Sun 的参与和支持,最新的Servlet 和JSP 规范总是能在Tomcat 中得到体现,Tomcat支持最新的Servlet和JSP规范。因为Tomcat 技术先进、性能稳定,而且免费,因而深受Java 爱好者的喜爱并得到了部分软件开发商的认可,成为目前比较流行的Web 应用服务器。
同类软件:
jboss jetty
weblogic ORACLE 商业用付费 EJB企业支持 重载配置。
websphere IBM 商业授权。
Resin是CAUCHO公司的产品,是一个非常流行的application server,对servlet和JSP提供了良好的支持,性能也比较优良,resin自身采用JAVA语言开发。
2. 工作原理图示

coyote是tomcat的Connector框架的名字,简单说就是coyote来处理底层的socket,并将http请求、响应等字节流层面的东西,包装成Request和Response两个类(这两个类是tomcat定义的,而非servlet中的ServletRequest和ServletResponse),供容器使用。
1、用户点击网页内容,请求被发送到本机端口8080,被在那里监听的Coyote HTTP/1.1 Connector获得。
2、Connector把该请求交给它所在的Service的Engine来处理,并等待Engine的回应。
3、Engine获得请求localhost/test/index.jsp,匹配所有的虚拟主机Host。
4、Engine匹配到名为localhost的Host(即使匹配不到也把请求交给该Host处理,因为该Host被定义为该Engine的默认主机),名为localhost的Host获得请求/test/index.jsp,匹配它所拥有的所有的Context。Host匹配到路径为/test的Context(如果匹配不到就把该请求交给路径名为“ ”的Context去处理)。
5、path=“/test”的Context获得请求/index.jsp,在它的mapping table中寻找出对应的Servlet。Context匹配到URL PATTERN为*.jsp的Servlet,对应于JspServlet类。
6、构造HttpServletRequest对象和HttpServletResponse对象,作为参数调用JspServlet的doGet()或doPost().执行业务逻辑、数据存储等程序。
7、Context把执行完之后的HttpServletResponse对象返回给Host。
8、Host把HttpServletResponse对象返回给Engine。
9、Engine把HttpServletResponse对象返回Connector。
10、Connector把HttpServletResponse对象返回给客户Browser。
2、Tomcat 安装和配置
1. 安装方式介绍
① yum方式安装 加载epel源,版本目前为tomcat7.0;
② 二进制方式安装 直接下载,部署好java环境,即可运行(推荐);
③ 源码方式安装 需要下载Apache Ant进行编译安装;
2. 安装方式介绍
① 上传获取软件
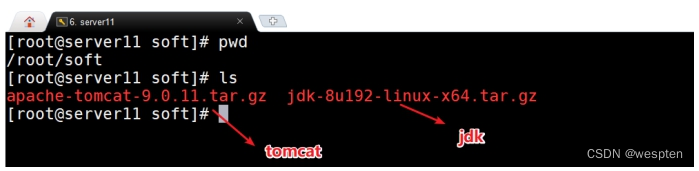
② 部署java环境
```shell shell > tar zxvf jdk-8u192-linux-x64.tar.gz shell > mkdir /usr/local/java shell > mv jdk1.8.0_192 /usr/local/javatomcat配置环境变量的两种方式 三种使用其中一种即可。
第一种tomat依赖JAVA_HOME环境变量:
shell > echo "export JAVA_HOME=/usr/local/java/" >> /etc/profile第二种tomcat依赖java环境变量:
shell > echo "PATH=/usr/local/java/bin:$PATH" >> /etc/profile第三中tomcat依赖JRE_HOME变量:
shell > echo "export JRE_HOME=/usr/local/java/jre" >> /etc/profile shell > . /etc/profile ```如果配置JAVA_HOME路径配置到jdk下就可以,不需要配置到bin下。
如果配置java的环境环境变量PATH,就指定到bin下。
如果启动tomcat,遇到如下问题:
① 没有安装jre jdk
② 环境变量没有配置
③ 启动的软件找不到需要的java相关软件

③ 部署tomcat
shell shell > tar xvf apache-tomcat-9.0.11.tar.gz shelll > mv apache-tomcat-9.0.11 /usr/local/tomcat软件部署之后的目录结构:

3. 目录介绍

bin:存放启动和关闭Tomcat的脚本文件
conf:存放Tomcat服务器的各种全局配置⽂文件,其中最重要的是server.xml和web.xml
lib:存放Tomcat服务器所需的各种JAR文件
logs:存放Tomcat执行时的日志文件
temp:此目录是tomcat存放的临时文件
webapps:tomcat默认存放应用程序的目录,好比apache的默认网页存放路径是/var/www/html一样
work:用于存放JSP应用程序在部署时编译后产生的class文件
项目代码目录:
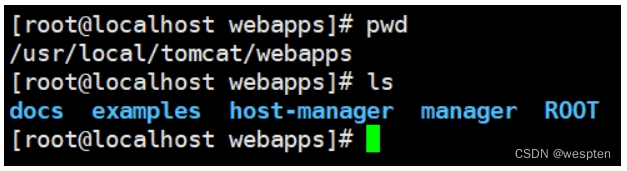
docs tomcat文档
examples tomcat自带的一个独立的web应用程序例子
host-manager tomcat的主机管理应用程序
manager tomcat的管理应用程序
ROOT 指tomcat的应用程序的根,如果应用程序部署在ROOT中,则
可直接通过http://ip:port 访问到
配置文件目录:
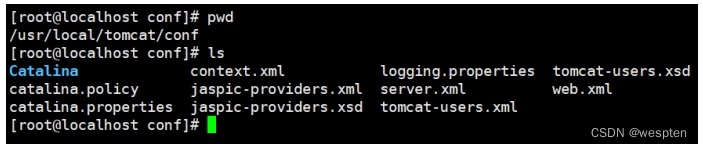
catalina.policy:配置tomcat对文件系统中目录或文件的读、写执行等权限,及对一些内存,session等的管理权限
catalina.properties:配置tomcat的classpath等
context.xml:tomcat的默认context容器
logging.properties:配置tomcat的日志输出方式
server.xml:tomcat的主配置文件 host配置
tomcat-users.xml:tomcat的角色(授权用户)配置文件
web.xml:tomcat的应用程序的部署描述符文件
4. 启动相关说明
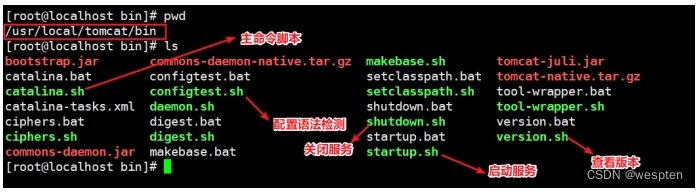
tomcat的相关管理命令在$prefix/bin目录下
经常使用的命令:
catalina.sh 主命令脚本
configtest.sh 检测配置文件
shutdown.sh 关闭
startup.sh 启动
version.sh 查看版本
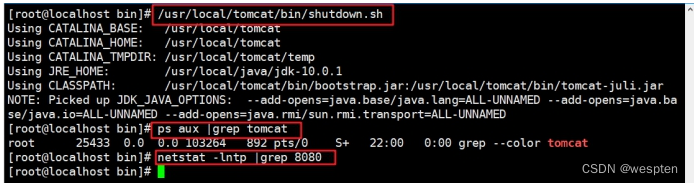
① 测试启动tomcat
shell shell > /usr/local/tomcat/bin/startup.sh shell > ps aux |grep tomcat shell > netstat -lntp |grep 8080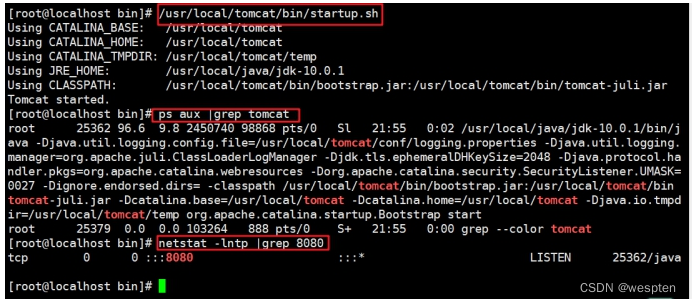
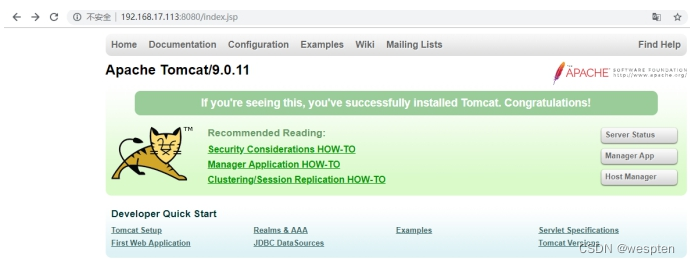
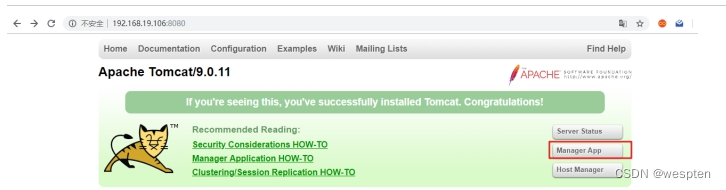
② 查看页面效果
③ 测试关闭tomcat

5. 配置服务
tomcat提供了方便的启动命令脚本,但是却没有提供服务器中经常管理使用的service脚本。可以自行编写服务管理脚本。
① 编辑启动脚本,生成tomcat.pid
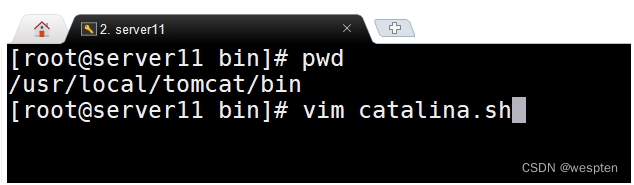


② 脚本实现


配置详情:
#!/bin/bash
#chkconfig: 35 86 89
TOMCATBIN=/usr/local/tomcat/bin/catalina.sh
export JAVA_HOME=/usr/local/java
start(){
  $TOMCATBIN start
}

stop(){
  $TOMCATBIN stop
}

restart(){
 stop
 start
}

status(){
  if [ -f '/var/run/tomcat.pid' ];then
     echo 'tomcat is running'
  else
     echo 'tomcat is not run'
  fi
}

configtest(){
  $TOMCATBIN configtest
}

case "$1" in
   start)
      start;;
   stop)
      stop;;
   restart)
      restart;;
   status)
      status;;
   configtest)
      configtest;;
   *)
      echo '{start|stop|restart|configtest|status}'
esac
补充:
memcached服务文件:
#!bin/bash
. /etc/init.d/functions
case "$1" in
   start)
      /usr/local/memcached/bin/memcached -uroot -d
      ;;
   stop)
      killproc memcached
      ;;
   restart)
      killproc memcached
      /usr/local/memcached/bin/memcached -uroot -d
      ;;
   status)
     status memcached
     ;;
   *)
     echo '不要输入垃圾参数'
esac
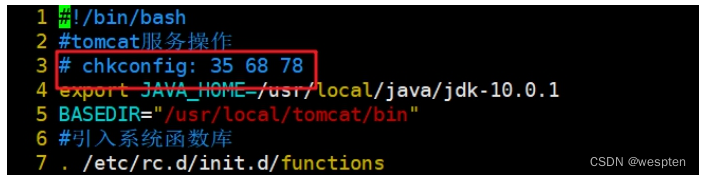
6. 配置开机自启动服务
根据编写的service脚本,通过chkconfig管理即可。

自行编写的service脚本,使用chkconfig管理启动,需要加入chkconfig参数:
3、企业中常见使用方式
1. 简单代码测试
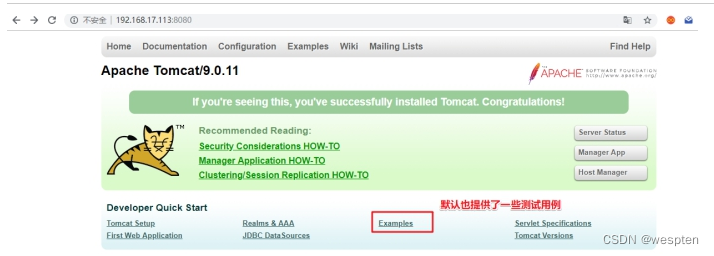
① 默认访问目录

② 编写测试文件

③ 查看测试效果

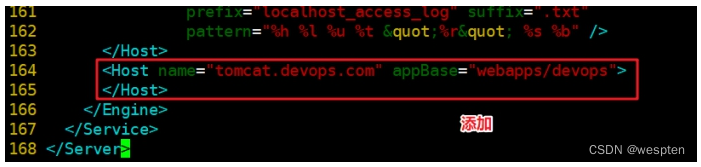
2. 基于域名访问的Host配置
tomcat单实例运行多个tomcat应用的案列
① 建立项目目录并写入测试文件


② 编辑配置文件
shell shell > /usr/local/tomcat/conf/server.xml
name可以填写域名:
③ 检测配置并重启
shell shell > service tomcat configtest shell > service tomcat restart④ 访问主机解析域名

⑤ 测试访问

Tip:
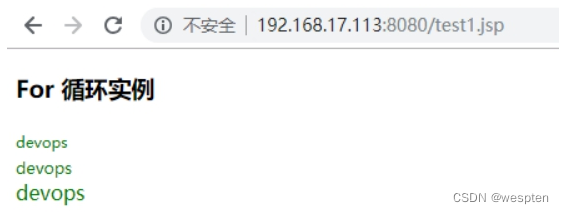
tomcat支持serverlet和jsp规范。
项目源码:
① jsp jsp=>java代码=>class字节码=>加载jvm运行=>解析字符串=>container容器=>connector连接=>浏览器
② java代码
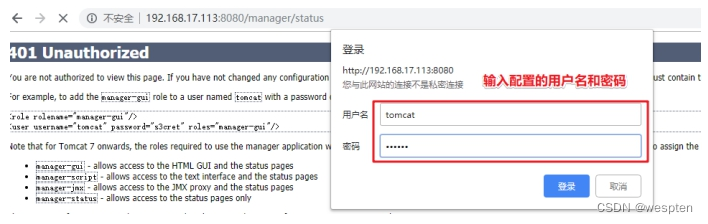
3. 服务器状态查看
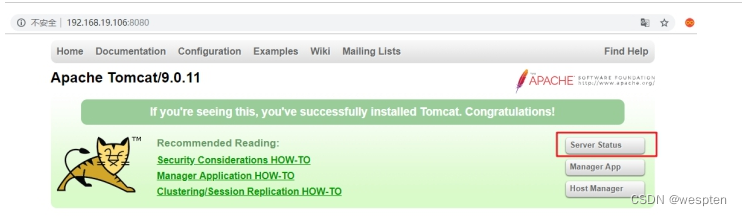
默认访问报错:

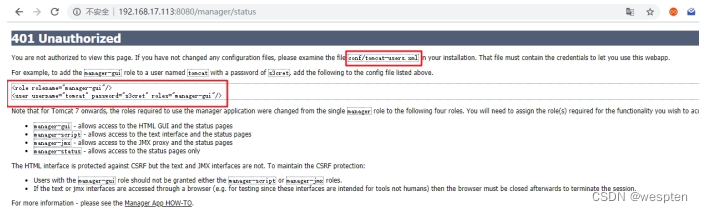
① 去掉访问IP限制


② 创建用户和密码开启访问权限

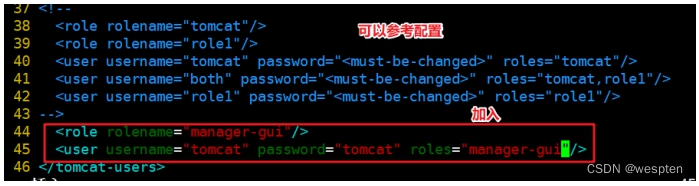
③ 查看页面

4. 应用管理查看

① 测试关闭

② 访问测试
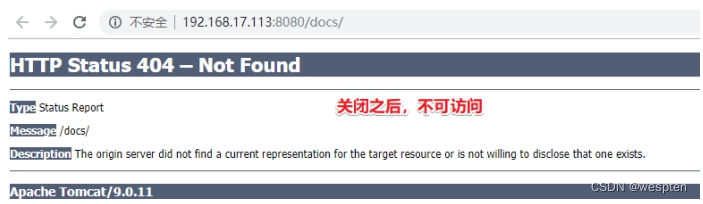
start之后即可重新访问正常显示。
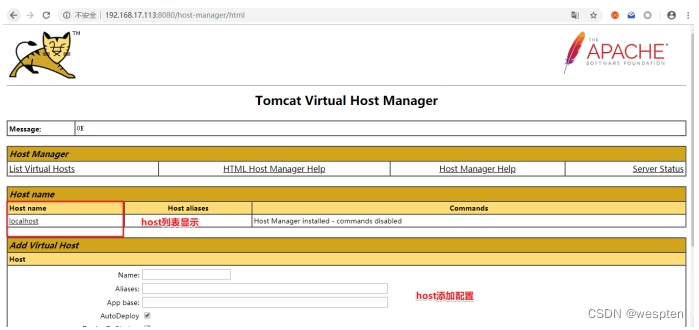
5. 虚拟机Host管理查看

遇到上面类似的错误:

修改host-manager目录下的context.xml:


根据以上配置解决即可:

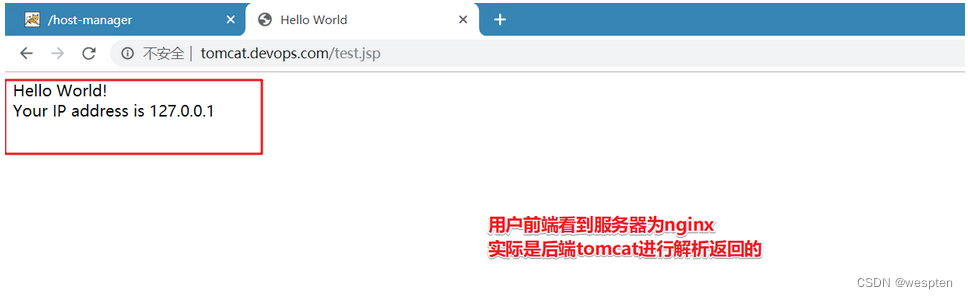
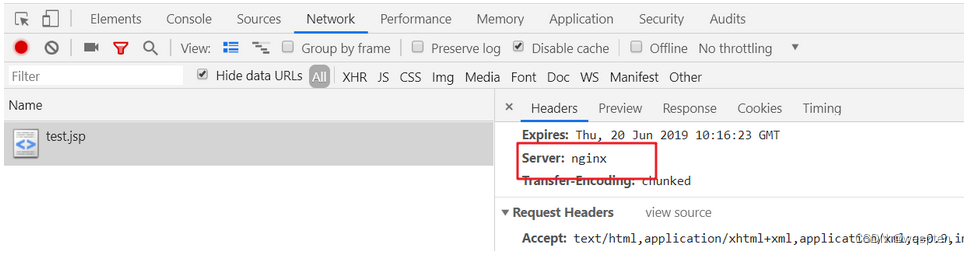
6. Nginx前端反向代理
实际业务环境中,用户是直接通过域名访问。基于协议一般是http、https等。默认tomcat运行在8080端口。一般会通过前端服务器反向代理到后端tomcat的方式,来实现用户可以直接通过域名访问到tomcat的webapp。
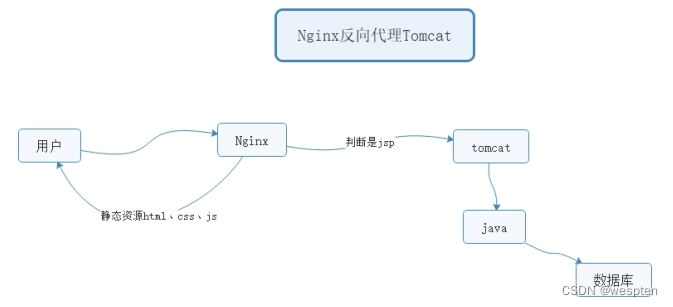
动静分离:动态页面的请求交由后端处理(tomcat+java),静态资源直接返回。
实现配置
配置文件参考:
nginx server{ listen 80; server_name tomcat.devops.com; #和tomcat的host配置一致 root /usr/local/tomcat/webapps/devops/ROOT; #静态不需要进行转发 location ~ \.(html|css|js|png|jpg|jpeg)$ { #default_type text/plain; #echo 'html'; #alias /; #root /usr/local/tomcat/webapps/devops/ROOT; } #其他识别不是静态资源的,统统发送到后端tomcat location / { proxy_pass http://127.0.0.1:8080; proxy_set_header Host $host; proxy_set_header X-Real-IP $remote_addr; #default_type text/plain; #echo $host; #echo $remote_addr; #echo $proxy_add_x_forwarded_for; } }nginx单独访问静态页面,出现403的问题:
分析:没有读权限。

解决方案:
当nginx和tomcat网站根目录一致的情况,注意nginx是否有权限读到tomcat网站目录的权限。
一般性解决方案网站目录文件夹,赋予一个公共用户www
shell shell > cd /usr/local/tomcat shell > chown -R www:www webapps访问查看:
7. Nginx负载均衡
随着业务的发展,单实例服务已经不能够满足业务使用需要。
pv 页面访问数量
qps 每秒查询次数 并发量
DAU 每日活跃用户数
单实例无法满足,扩容为多实例
常见的业务运行方式:
单实例单应用 一个tomcat一个webapps
单实例多应用 一个tomcat多个webapps host
多实例单应用 多个tomcat同一个webapps
多实例实现方式:
① 多台服务器一个运行一个实例(性能好);
② 单台服务器运行多个实例(监听不同的端口,性价比高)伪集群;
多实例多应用。
业务流程图示:

server04 nginx负载均衡
server01 tomcat1
server03 tomcat2
实施步骤:
① 复制虚拟机,多实例
两台tomcat里项目里的内容要一致
在server03上配置和server01一样的实现:
1>建立项目文件夹目录,绑定host主机域名
2>nginx做反向代理
② 配置nginx负载均衡
在server04上进行配置:
nginx upstream tomcat { #ip_hash; server 192.168.17.102:80; server 192.168.17.101:80; } server { listen 80; server_name tomcat.devops.com; location / { proxy_pass http://tomcat; proxy_set_header Host $host; proxy_set_header X-Real-IP $remote_addr; } }4、项目部署
1. 项目介绍
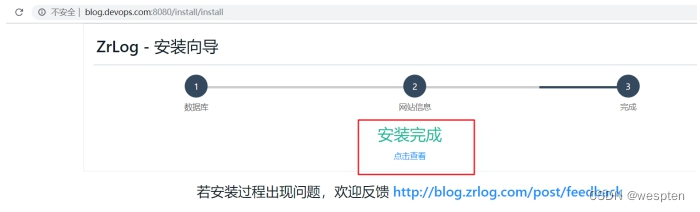
ZrLog是使用 Java 开发的博客/CMS程序,具有简约,易用,组件化,内存占用低等特点。自带 Markdown 编辑器,让更多的精力放在写作上。
2. 项目部署
① 解析域名
![]()

注意域名解析需要先解析到单例服务器,不要给负载均衡。
② 建立项目目录,上传项目程序

③ 绑定域名


④ 开源项目的初始化过程

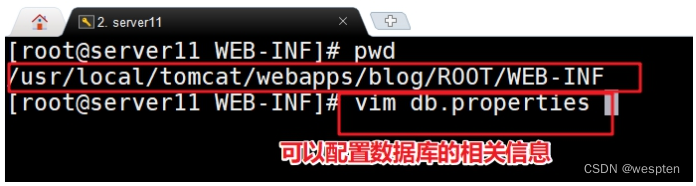
需要建立一个数据库:


此项目的数据库密码配置文件:

脚本检测主从:
slave.sh:
#!/bin/bash
#slaveinfo=$(/usr/local/mysql/bin/mysql -uroot -p123456 -e "show slave status \G")
#echo $slaveinfo
#echo $slaveinfo | grep Slave_IO_Running |awk {'print $2'}
#if [ `mysql -uroot -p123456 -e "show slave status\G" |grep 'Slave_IO_Running' |awk '{sub(/^[ \t]*/,"");print $1}'` && `mysql -uroot -p123456 -e "show slave status\G" |grep 'Slave_SQL_Running' |awk '{sub(/^[ \t]*/,"");print $1}'`  ];then
 #  echo 'ok';
#fi
IO=`mysql -uroot -p123456 -e "show slave status \G" |grep 'Slave_IO_Running' |awk '{sub(/^[ \t]*/,"");print $2}'`
SQL=`mysql -uroot -p123456 -e "show slave status \G" |grep 'Slave_SQL_Running' |awk '{sub(/^[ \t]*/,"");print $2}'`
if [[$IO == 'Yes']] && [[$SQL == 'Yes']];then
   echo 'slave is ok';
fi
slave1.sh:
#!/bin/bash
#与数据库进行交互的到信息
mysql=usr/local/mysql/bin/mysql
Y=Yes
io_sql=`mysql -uroot -p -e 'show slave status \G;' | head -13 | tail -2|awk -F':' '{print $2}'`
#io_sql=`mysql -uroot -p -e 'show slave status \G;' | head -13 | tail -2`
#echo $io_sql
io=`echo $io_sql | awk -F ' '  '{print $1}'`
sql=`echo $io_sql | awk -F ' '  '{print $2}'`
if [ $io = $Y ];then
        if [ "$sql" = "$Y" ];then
        echo '主从复制slave端服务正常'
        else
        echo '主从复制slave端出现异常请检查'
        fi
fi
slave2.sh:
#!/bin/bash
read -p "输入用户名:" name
s=`mysql -u"$name" -p -e "show slave status\G;"`
a=`echo -e "$s"|sed -n 's/^\(.*\)Slave_IO_Running: \(.\{3\}\)/\2/p'`
b=`echo -e "$s"|sed -n 's/^\(.*\)Slave_SQL_Running: \(.\{3\}\)/\2/p'`
if [ $a == 'Yes' ]&&[ $b == 'Yes' ];then
        echo "Mysql Slave is OK"
else
        echo "Mysql Slave is Not OK"
fi
slave.php:
<?php
$mysqli = new mysqli('127.0.0.1','root','123456');
$sql = "show slave status";
$rs = $mysqli->query($sql);
#var_dump($rs);
$data = $rs->fetch_assoc();
#var_dump($data);
if ($data['Slave_IO_Running']=='Yes' && $data['Slave_SQL_Running'] == 'Yes'){
  echo 'slave is ok'."\n";
}else{
  echo 'Last_IO_Error:'.$data['Last_IO_Error']."\n";
}
slave.py:
#!/bin/python
import MySQLdb
db = MySQLdb.connect(host='127.0.0.1',user='root',passwd='123456')
cur = db.cursor()
cur.execute('show slave status')
#print(cur)
for row in cur.fetchall():
 #print(row)
 #print(row[10])
 #print(row[11])
 if row[10]=='Yes' and row[11]=='Yes':
    print('slave is ok')
db.close
#dir(pymysql)
四、企业级HA
思维导图:

1、背景描述及其方案设计
1. 业务背景描述
时间:2009.6-2010.9
发布产品类型:互联网动态站点 商城
⽤户数量: 2000-4000(⽤户量猛增 翻了4倍)
PV : 8000-50000(24⼩时访问次数总和)
QPS: 50-100*(每秒访问次数)
DAU: 200-400(每⽇活跃⽤户数)
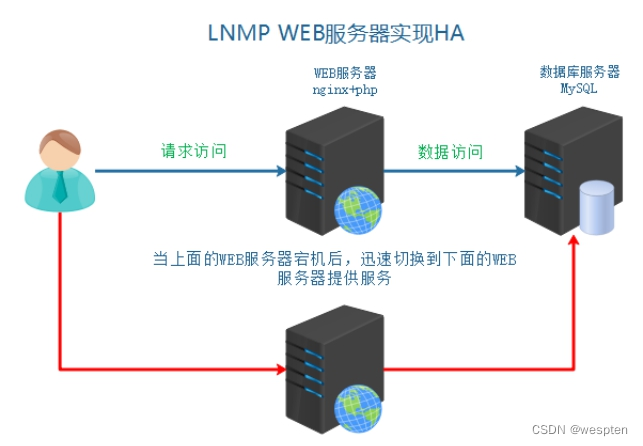
随着用户量增多,单台WEB服务器,压力越来越大。虽然单台WEB服务器,目前可以完成工作任务。但是如果一旦宕机,用户就完全失去服务了,用户体验特别不好。需要备用一台服务器进行使用,主服务器宕机之后,快速切换为备用服务器
2. 模拟运维设计方案
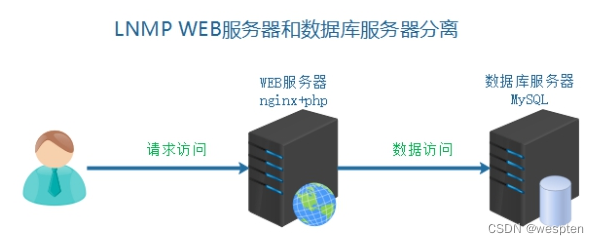
在之前架构中,先将数据库服务器单独迁移:
针对web服务器单点故障,升级为主备服务器架构:

2、数据库服务器迁移
1. 克隆复制虚拟机
server01 WEB服务器 master 192.168.17.102
server02 数据库服务器 192.168.17.100
server03 WEB服务器 backup 192.168.17.101
2. 服务器基本配置
根据之前的服务器基本环境的要求进行配置
因为是克隆获取虚拟机,所以只需要进行IP和MAC地址的修改即可。
```shell
① 删除原有网卡mac地址记录信息
shell > cd /etc/udev/rules.d shell > rm -rf 70-persistent-net.rules② 删除eth0里的mac地址项 HWADDR参数
③ 修改主机名称
shell > sed -i "s/server01/server02/" /etc/sysconfig/network;④ 启动之后,把hosts文件对应也做解析
```
3. 数据备份和迁移
① 源数据库服务器导出数据
```shell
源数据库是server01 在server01上操作:
shell > mysqldump -uroot -p --database tp5shop > /root/tp5shop.sql ```② 导入数据到新数据库服务器
```mysql因为数据库服务器克隆来的,所有本身具有数据 可以删除了库,模拟新机器,重新导入:
mysql > drop database tp5shop;创建数据库并导入数据:
mysql > create database tp5shop; mysql > use tp5shop; mysql > source /root/tp5shop.sql; ```③ 在server02 MySQL服务器中建立远程连接用户并授予权限
mysql mysql > grant all on tp5shop.* to 'tp5shop'@'192.168.17.%' identified by '$Abc3721';④ 修改项目数据库配置文件
shell shell > vim /usr/local/nginx/html/tp5shop/application/database.php修改参考示例:
php return [ // 数据库类型 'type' => 'mysql', // 服务器地址 'hostname' => '192.168.17.100', // 数据库名 'database' => 'tp5shop', // 用户名 'username' => 'tp5shop', // 密码 'password' => '$Abc3721', // 端口 'hostport' => '3306',⑤ 访问页面,查看业务使用情况
3、高可用服务搭建
1. HA高可用
高可用HA(High Availability)是分布式系统架构设计中必须考虑的因素之一,它通常是指通过设计,减少系统服务不可用的时间。假设系统一直能够提供服务,我们说系统的可用性是100%。如果系统每运行100个时间单位,会有1个时间单位无法提供服务,我们说系统的可用性是99%。==很多公司的高可用目标是4个9,也就是99.99%,这就意味着,系统的年停机时间为0.876个小时==。
| 描述 | 通俗叫法 | 可用性级别 | 年度停机时间 | | -------------------------------- | ------------ | -------------- | ---------------- | | 基本可用性 | 2个9 | 99% | 87.6小时 | | 较高可用性 | 3个9 | 99.9% | 8.8小时 | | 具有故障自动恢复能力的可用性 | 4个9 | 99.99% | 53分钟 | | 极高可用性 | 5个9 | 99.999% | 5分钟 |
实现高可用的核心点:
①冗余(多台服务器)
②自动切换
备份服务器:
冷备 服务器不启用(域名不解析),使用的时候再开启,需要手动切换
热备 服务器在等待状态(监控主服务器状态),一旦主宕机,备就接管,自动切换
实现热备,引入VIP的切换:

通过VIP的方式,切换主备服务器:
①默认VIP绑定在主服务器(master)
②master不可用,就切换VIP到备份服务器(backup)
③用户可以使用到连续性更好的服务,通过VIP访问服务器
常用来单独实现高可用的软件:
==①keepalived==
②heartbeat 较早 属于redhat HA工程的一部分
2. keepalived介绍
Keepalived软件起初是专为LVS负载均衡软件设计的,用来管理并监控LVS集群系统中各个服务节点的状态,后来又加入了可以实现高可用的VRRP功能。因此,Keepalived除了能够管理LVS软件外,还可以作为其他服务(例如:Nginx、Haproxy、MySQL等)的高可用解决方案软件
3. keepalived组成和原理
Keepalived软件主要是通过VRRP协议实现高可用功能的。
VRRP是Virtual Router RedundancyProtocol(虚拟路由器冗余协议)的缩写,VRRP出现的目的就是为了解决静态路由单点故障问题的,它能够保证当个别节点宕机时,整个网络可以不间断地运行。
虚拟路由冗余协议,可以认为是实现路由器高可用的协议,即将N台提供相同功能的路由器组成一个路由器组,这个组里面有一个master和多个backup,master上面有一个对外提供服务的vip(该路由器所在局域网内其他机器的默认路由为该vip),master会发组播,当backup收不到vrrp包时就认为master宕掉了,这时就需要根据VRRP的优先级来选举一个backup当master。这样的话就可以保证路由器的高可用了。

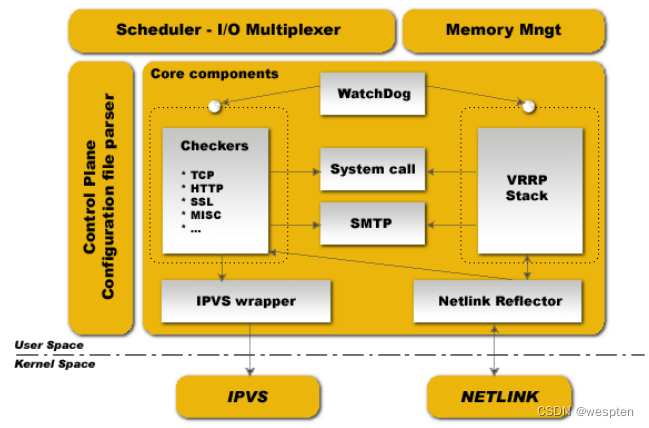
Keepalived的功能体系结构,大致分两层:用户空间(user space)和内核空间(kernel space)。
内核空间:
主要包括IPVS(IP虚拟服务器,用于实现网络服务的负载均衡)和NETLINK(提供高级路由及其他相关的网络功能)两个部份。
用户空间:
WatchDog:负载监控checkers和VRRP进程的状况
VRRP Stack:负载均衡器之间的失败切换FailOver,如果只用一个负载均衡器,则VRRP不是必须的。
Checkers:负责真实服务器的健康检查healthchecking,是keepalived最主要的功能。换言之,可以没有VRRP Stack,但健康检查healthchecking是一定要有的。
IPVS wrapper:用户发送设定的规则到内核ipvs代码
Netlink Reflector:用来设定vrrp的vip地址等。
keepalived主要使用三个模块,分别是core、check和vrrp。
core模块为keepalived的核心,负责主进程的启动、维护以及全局配置文件的加载和解析。
check负责健康检查,包括常见的各种检查方式。
vrrp模块是来实现VRRP协议的。
4. 安装配置启动keepalived
master和backup都需要进行安装,也就是server01和server03机器
```shell
安装keepalived:
shell > yum -y install keepalived ```| 主机名称 | 服务器IP | | | -------- | -------------- | ------ | | server01 | 192.168.17.102 | master | | server03 | 192.168.17.101 | backup |
keepalived需要使用的目录和文件:
| 文件或者目录 | 作用 | | ------------------------------- | -------------- | | /etc/keepalived/keepalived.conf | 生效的配置文件 | | /etc/init.d/keepalived | 服务器管理脚本 | | /var/log/messages | 日志信息 |
配置keepalived:
① 备份主备服务器的配置文件
shell shell > cd /etc/keepalived shell > cp keepalived.conf keepalived.conf_bak② 分别修改主备服务器配置文件
shell > vim keepalived.conf示例配置文件说明:
```shell ! Configuration File for keepalived发送邮件的配置:
globaldefs { notificationemail { [email protected] [email protected] [email protected] } notificationemailfrom [email protected] smtpserver 192.168.200.1 smtpconnecttimeout 30 routerid LVS_DEVEL }vrrp协议的配置:
vrrpinstance VI1 { #工作模式 state MASTER #监听的网卡 interface eth0 #虚拟路由id 需要和备服务器一致 virtualrouterid 51 #权重 优先级 priority 100 #vrrp包的发送周期 1s advertint 1 #权限验证 authentication { authtype PASS authpass 1111 } #需要绑定切换的VIP virtualipaddress { 192.168.200.16 192.168.200.17 192.168.200.18 } } ```主服务器:
shell ! Configuration File for keepalived global_defs { notification_email { [email protected] [email protected] [email protected] } notification_email_from [email protected] smtp_server 192.168.200.1 smtp_connect_timeout 30 router_id LVS_DEVEL } vrrp_instance VI_1 { state MASTER interface eth0 virtual_router_id 51 priority 100 advert_int 1 authentication { auth_type PASS auth_pass 1111 } #master默认只需要修改使用VIP即可 virtual_ipaddress { 192.168.17.200 } }备服务器:
shell ! Configuration File for keepalived global_defs { notification_email { [email protected] [email protected] [email protected] } notification_email_from [email protected] smtp_server 192.168.200.1 smtp_connect_timeout 30 router_id LVS_DEVEL } vrrp_instance VI_1 { #修改工作模式为备 state BACKUP interface eth0 virtual_router_id 51 priority 100 advert_int 1 authentication { auth_type PASS auth_pass 1111 } #注意修改VIP virtual_ipaddress { 192.168.17.200 } }③ 分别按照顺序启动主服务器和备服务器的keepalived
shell shell > service keepalived start④ 查看主备服务器的网卡信息
```shell需要通过ip a命令查看 分别在server01和server03查看:
shell > ip a ```5. 模拟服务器不可用VIP切换
服务器整机不可用,常见于服务器断网,或者断电关机等。
方法一:模拟主服务器断电关闭
```shell关闭主服务器 VIP所在服务器:
shell > poweroff ```方法二:模拟主服务器断网
```shell关闭VIP所在服务器的网卡 使其不能够联网:
shell > service network stop ```通过以上实验检测,发现当主服务器整机不可用时,VIP会切换到备用服务器。
4、实现服务HA
通过keepalived可以直接实现主服务器整机不可用,实现VIP的切换。保证用户可以通过VIP进行访问服务。
但是实际情况下,往往并不是服务器整机不可用,只是对应的服务或者软件不可用。
比如说:nginx提供的web服务,nginx进程关闭
就需要检测当nginx不可用时,就切换VIP
实现过程分析:
VIP实际是由keepalived进行绑定的,所以当nginx服务不可用时,就关闭当前机器的keepalived即可,释放VIP。进而绑定到其他备用服务器。
① 编写服务检测脚本,实现检测nginx是否可用,不可用则关闭当前所在主机的keepalived
② 在keepalived配置中调用检测服务脚本
1. Nginx服务可用检测脚本
主备服务器都要实现此脚本。
① 编写测试脚本 赋予执行权限
shell > cd /etc/keepalived shell > vim check_nginx.sh脚本内容:
```shell

!/bin/bash
nginxstatus=ps -C nginx --no-header | wc -l if [ $nginxstatus -eq 0 ];then service keepalived stop fi ```
赋予脚本执行权限 方便之后其他软件调用执行:
shell shell > chmod +x check_nginx.sh详细脚本:
check_nginx.sh:
#!/bin/bash
#检测服务是否启动,通过进程的方式
nginx_status=`ps -C nginx --no-header | wc -l`
#根据进程返回数,判断nginx是否宕机
#如果返回行数等于0,证明nginx宕机
if [ $nginx_status -eq 0 ];then
   service keepalived stop
fi
② 测试脚本可用性
启动nginx和keepalived。
关闭nginx 执行脚本 查看keepalived是否也关闭。
2. 模拟宕机实现服务切换
在多台服务器中配置keepalived定时触发检测nginx的脚本模块
```shell在vrrp_instance外上面定义:
vrrpscript checknginx { #调用脚本地址 script /etc/keepalived/check_nginx.sh #检测间隔时间 interval 3 }在vrrp_instance里调用:
trackscript { #上线定义的名称 checknginx } ```keepalived.conf:
! Configuration File for keepalived

global_defs {
   notification_email {
     [email protected]
     [email protected]
     [email protected]
   }
   notification_email_from [email protected]
   smtp_server 192.168.200.1
   smtp_connect_timeout 30
   router_id LVS_DEVEL
}

vrrp_script check_nginx {
   script /etc/keepalived/check_nginx.sh
   interval 3
}

vrrp_instance VI_1 {
    state BACKUP
    interface eth0
    virtual_router_id 51
    priority 100
    advert_int 1
    authentication {
        auth_type PASS
        auth_pass 1111
    }
    virtual_ipaddress {
        192.168.19.200
    }
    track_script {
        check_nginx
    }
}
3. 实现web服务器高可用
以上案例已经实现了,服务不可用VIP切换到可用服务器。
现在需求用户的服务是连续不间断的,故用户需要通过VIP进行访问。
① 解析域名到VIP
② 模拟用户访问
5、keepalived的配置补充
脑裂(裂脑):vip出现在了多台机器上。网络不通畅,禁用了数据包,主备服务器没法通讯,造成备服务器认为主服务器不可用,绑定VIP,主服务器VIP不会释放。
解决方案:
①双备或者多备模式 BACKUP 通过priority权重来区分谁的优先级更高
②单播(定向广播)的方式 (一些特定环境禁用了组播方式)
③时间不同步 服务器时间校时
1. 非抢占模式
① nopreempt
在主备服务器的配置文件,vrrp_instance段中
② 设置state工作模式为BACKUP
两个keepalived节点都启动后,默认都是BACKUP状态,双方在发送组播信息后,会根据优先级来选举一个MASTER出来。由于两者都配置了nopreempt,所以MASTER从故障中恢复后,不会抢占vip。这样会避免VIP切换可能造成的服务延迟。
2. 单播模式
一些特定环境下不允许发送组播,造成备服务器无法收到vrrp包,可能会造成脑裂现象。可以通过单播的方式解决。
单播示例配置:注意此语法在keepalived1.2.11版本以上支持
unicastsrcip 192.168.1.21##(本地IP地址)
unicast_peer {
192.168.1.22##(对端IP地址)此地址一定不能忘记
}
主服务器server01配置:
```shell在vrrp_instace段中加入:
本地IP:
unicastsrcip 192.168.17.102 unicast_peer { #对象IP 发送vrrp包给备服务器 192.168.17.101 } ```备服务器server03配置:
```shell在vrrp_instace段中加入。
本地IP:
unicastsrcip 192.168.17.101 unicast_peer { #对象IP 发送vrrp包给备服务器 192.168.17.102 } ```tcpdump抓vrrp包的方式:
shell shell > tcpdump vrrp -n五、企业级LB
思维导图:


1、背景描述及其方案设计
1. 业务背景描述
时间:2011.6.-2013.9
发布产品类型:互联网动态站点 商城
⽤户数量: 4000-8000(用户量猛增)
PV : 16000-100000(24⼩时访问次数总和)
QPS: 50-100*(每秒访问次数)
DAU: 400-800(每日活跃用户数)
随着业务量骤增,之前单点服务器,已经不能够满足业务使用需要。如果主服务器宕机,备服务器提供服务,因为流量太大,备也宕机。需要多台服务器,同时提供服务。
2. 模拟运维设计方案
以上架构服务器,已经不能够满足以上提到的业务需求,架构发生如下变化。

2、服务器基本环境部署
1. 克隆复制虚拟机
server01 web1 192.168.17.102
server02 mysql 192.168.17.100
server03 web2 192.168.17.101
server04 lb load balance 192.168.17.103
2. 基础环境配置
网卡IP、主机名称、hosts解析。
3、负载均衡服务器搭建
1. 引入负载均衡技术
负载均衡技术 (load blance) 是一种概念 把资源的使用进行平均分配。
负载均衡:分发流量、请求到不同的服务器。使流量平均分配(理想的状态的)
作用:
服务器容灾 流量分发
主要作用:
① 流量分发 请求平均 降低单例压力
其他作用:
②安全 隐藏后端真实服务
③屏蔽非法请求(七层负载均衡)
2. 负载均衡分类

1)二层负载均衡(mac)
根据OSI模型分的二层进行负载,一般是用虚拟mac地址方式,外部对虚拟MAC地址请求,负载均衡接收后,再分配后端实际的MAC地址响应。
**2)三层负载均衡(ip) **
一般采用虚拟IP地址方式,外部对虚拟的ip地址请求,负载均衡接收后,再分配后端实际的IP地址响应。
3)四层负载均衡(tcp) 网络运输层面的负载均衡
在三层负载均衡的基础上,用ip+port接收请求,再转发到对应的机器。
4)七层负载均衡(http) 智能型负载均衡
根据虚拟的url或IP,主机接收请求,再转向(反向代理)相应的处理服务器。
3. 常见实现方式
实现方式分类:
① 软件级别 性价比高 可控性强
② 硬件级别 性能好 价格高 几万到几十万不等
硬件是实现方式:
F5 BIG-IP 四层和七层
软件实现方式:
| OSI分层 | 实现方式 | | ------- | -------------------------------- | | 七层 | Nginx、HAProxy | | 四层 | LVS、HAProxy、Nginx(1.9版本后) |
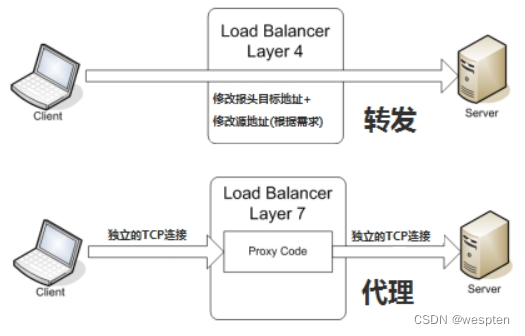
四层和七层对比:

4. Nginx负载均衡配置
官方文档:http://nginx.org/en/docs/http/ngxhttpupstream_module.html
架构分析:
①用户访问请求Nginx负载均衡服务器
②Nginx负载均衡服务器再分发请求到web服务器
实际配置负载均衡,只需修改作为负载均衡服务器的Nginx即可。当前架构中的server04
① 在客户端解析域名到负载均衡服务器
② 在负载均衡的Nginx配置
```shell
注意本次架构中 server04的Nginx服务器是负载均衡服务器:
shell > cd /usr/local/nginx/conf/nginx.conf ```配置文件示例:
```nginx在http段进行配置。
分发请求到后端服务器:
upstream shop { #web1 server01 server 192.168.17.102; #web2 server02 server 192.168.17.101; }修改之前的shop的server段配置:
server { listen 80; servername www.shop.com; location / { #代理转发到shop段 匹配到上面的upstream proxypass http://shop; #以下两条配置,实质是设置了传输的header头信息
#传输域名给后端服务器 进行识别 方便匹配对应server虚拟主机 proxysetheader Host $host; #发送客户端IP 给后端服务器 用来方便后端服务器识别用户真实IP proxysetheader X-Real-IP $remote_addr; } } ```
③ 重载负载均衡服务器Nginx配置测试查看效果
可以停掉其中一台web服务器进行测试。
5. 查看确认负载均衡
如何确认服务器是否实现了负载均衡?
①在不同的web服务器同路由访问的文件中,写入不同的信息,以示区别。
②通过查看后端web服务器的访问日志进行确定
==方法一:在不同服务器写入不同信息==
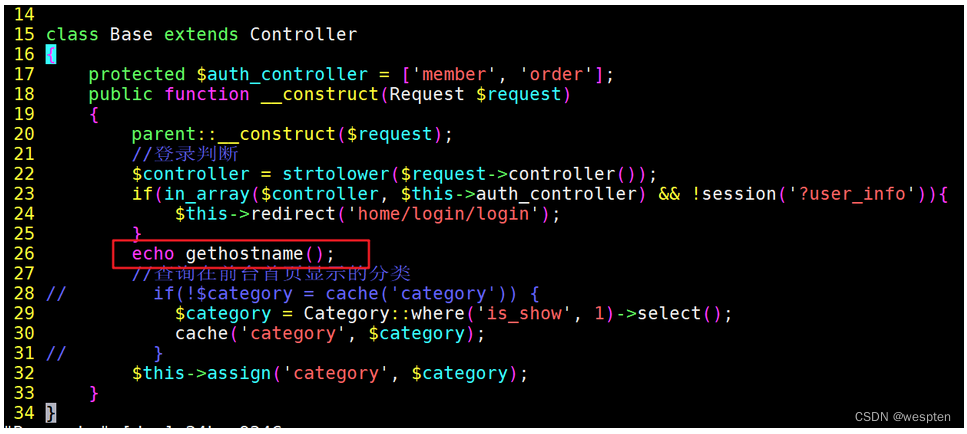
① 分别修改web服务器的信息
shell shell > vim /usr/local/nginx/html/tp5shop/application/home/controller/Base.php写入一个动态参数,根据php语法自动调用当前主机名称。
Base(server01 web1).php:
<?php
/**
 * Created by PhpStorm.
 * User: asus
 * Date: 2018/4/3
 * Time: 21:10
 */

namespace app\home\controller;

use think\Request;
use think\Controller;
use app\home\model\Category;

class Base extends Controller
{
    protected $auth_controller = ['member', 'order'];
    public function __construct(Request $request)
    {
        parent::__construct($request);
        //登录判断
        $controller = strtolower($request->controller());
        if(in_array($controller, $this->auth_controller) && !session('?user_info')){
            $this->redirect('home/login/login');
        }
        //查询在前台首页显示的分类
//        if(!$category = cache('category')) {
            $category = Category::where('is_show', 1)->select();
            cache('category', $category);
//        }
        echo '这是server01服务器  web1服务器提供的服务';
        $this->assign('category', $category);
    }
}
Base (server01 web2).php:
<?php
/**
 * Created by PhpStorm.
 * User: asus
 * Date: 2018/4/3
 * Time: 21:10
 */

namespace app\home\controller;

use think\Request;
use think\Controller;
use app\home\model\Category;

class Base extends Controller
{
    protected $auth_controller = ['member', 'order'];
    public function __construct(Request $request)
    {
        parent::__construct($request);
        //登录判断
        $controller = strtolower($request->controller());
        if(in_array($controller, $this->auth_controller) && !session('?user_info')){
            $this->redirect('home/login/login');
        }
        //查询在前台首页显示的分类
//        if(!$category = cache('category')) {
            $category = Category::where('is_show', 1)->select();
            cache('category', $category);
//        }
        echo '这是由server03服务器 web2服务器  提供的服务';
        $this->assign('category', $category);
    }
}
② 访问查看负载均衡效果

方法二:查看后端web服务器的访问日志
shell shell > cat /usr/local/nginx/logs/access.log6. 负载均衡后获取客户端IP
负载均衡之后,在后端的web服务器获取到的是负载均衡服务器的IP,而不能够获取到客户端的真实IP。
需要进行以下特殊配置:
①首先在负载均衡服务器中配置,转发客户端IP给后端web服务器
②后端web服务器需要配置,识别从负载均衡服务器传输过来的客户端真实IP
官方网址:http://nginx.org/en/docs/http/ngxhttprealip_module.html
使用ngxhttprealipmodule模块提供的setrealipfrom语法,默认此模块没有安装,需要编译时添加编译参数。
web服务器上配置setrealip_from 代表从哪儿来源的IP,需要识别真实客户端IP
示例配置:
```nginx此配置在web服务器上的nginx。
可配置到http、server、location中,推荐配置到server中。
配置需要识别的IP来源 负载均衡的IP:
setrealip_from 192.168.17.103 ```7. upstream中server的关键字
upstream中的分发之后的几个关键字:
backup 备 其他的没有backup标识的都无响应,才分发到backup
down 此条配置,不会被分发到
nginx upstream shop { server 192.168.17.102 down; server 192.168.17.101 backup; }8. session一致性问题
访问管理后端页面,登录发现验证码不通过。

分析原因:
① 比如分发到web1服务器,生成验证码,存储到session中,默认在服务器本地
② 再次校验的时候,请求分发到web2服务器了,所有验证码一直校验不通过
解决方案思路:
① 生成和验证session都请求同一台服务器
② 共享session nfs mysql ==内存缓存软件(memcached、redis)==
9. Nginx的负载均衡算法
Nginx 官方默认3种负载均衡的算法
① ==Round-Robin RR轮询(默认)== 一次一个的来(理论上的,实际实验可能会有间隔)
② ==weight 权重== 权重高多分发一些 服务器硬件更好的设置权重更高一些
③ ==ip_hash== 同一个IP,所有的访问都分发到同一个web服务器
Tip:
第三方模块实现的调度算法 需要编译安装第三方模块
④ fair 根据后端服务器的繁忙程度 将请求发到非繁忙的后端服务器
⑤ url_hash 如果客户端访问的url是同一个,将转发到同一台后端服务器
验证一:验证加权轮询算法
示例配置:
nginx upstream shop { #web1 server01 server 192.168.17.102 weight=5; #web2 server02 server 192.168.17.101 weight=3; }
server01 web 1 1 1 1 1 1
server03 web 2 1 1 1
8次中,server01分发5次,server03分发3次。
验证二:ip一致性算法
示例配置:
nginx upstream shop { #ip hash 一致性算法配置 设置此项 weight就失效了 ip_hash; #web1 server01 server 192.168.17.102 weight=5; #web2 server02 server 192.168.17.101 weight=3; }nginx(server01 web).conf:
#user  nobody;
worker_processes  1;

#error_log  logs/error.log;
#error_log  logs/error.log  notice;
#error_log  logs/error.log  info;

#pid        logs/nginx.pid;


events {
    use epoll;
    worker_connections  1024;
}


http {
    include       mime.types;
    default_type  application/octet-stream;

    #log_format  main  '$remote_addr - $remote_user [$time_local] "$request" '
    #                  '$status $body_bytes_sent "$http_referer" '
    #                  '"$http_user_agent" "$http_x_forwarded_for"';

    #access_log  logs/access.log  main;

    sendfile        on;
    #tcp_nopush     on;

    #keepalive_timeout  0;
    keepalive_timeout  65;

    #gzip  on;
    #upstream backend_php {
    #    server unix:/tmp/php-cgi.sock;
    #    server unix:/tmp/php-cgi-9001.sock;
    #    server unix:/tmp/php-cgi-9002.sock;
    #}
    server {
        listen       80;
        server_name  shop.devops.com;

        #charset koi8-r;

        #access_log  logs/host.access.log  main;
        root html/tp5shop/public;
        location / {
            #root   html;
            index  index.php index.html index.htm;
            if (!-e $request_filename) {
               rewrite ^(.*)$ /index.php?s=/$1 last
;
            }
        }
        #设定查看Nginx状态的地址
        location /NginxStatus {
            stub_status;
        }
        #error_page  404              /404.html;

        # redirect server error pages to the static page /50x.html
        #
        error_page   500 502 503 504  /50x.html;
        location = /50x.html {
            root   html;
        }

        # proxy the PHP scripts to Apache listening on 127.0.0.1:80
        #
        #location ~ \.php$ {
        #    proxy_pass   http://127.0.0.1;
        #}

        # pass the PHP scripts to FastCGI server listening on 127.0.0.1:9000
        #
        location ~ \.php$ {
        #    root           html;
            #fastcgi_pass   127.0.0.1:9000;
            fastcgi_pass   unix:/tmp/php-cgi.sock;
            #fastcgi_pass   backend_php;
            fastcgi_index  index.php;
            fastcgi_param  SCRIPT_FILENAME  $document_root$fastcgi_script_name;
            include        fastcgi_params;
        }

        # deny access to .htaccess files, if Apache's document root
        # concurs with nginx's one
        #
        #location ~ /\.ht {
        #    deny  all;
        #}
    }


    # another virtual host using mix of IP-, name-, and port-based configuration
    #
    #server {
    #    listen       8000;
    #    listen       somename:8080;
    #    server_name  somename  alias  another.alias;

    #    location / {
    #        root   html;
    #        index  index.html index.htm;
    #    }
    #}


    # HTTPS server
    #
    #server {
    #    listen       443 ssl;
    #    server_name  localhost;

    #    ssl_certificate      cert.pem;
    #    ssl_certificate_key  cert.key;

    #    ssl_session_cache    shared:SSL:1m;
    #    ssl_session_timeout  5m;

    #    ssl_ciphers  HIGH:!aNULL:!MD5;
    #    ssl_prefer_server_ciphers  on;

    #    location / {
    #        root   html;
    #        index  index.html index.htm;
    #    }
    #}

}
nginx(server04 LB).conf:
#user  nobody;
worker_processes  1;

#error_log  logs/error.log;
#error_log  logs/error.log  notice;
#error_log  logs/error.log  info;

#pid        logs/nginx.pid;


events {
    use epoll;
    worker_connections  1024;
}


http {
    include       mime.types;
    default_type  application/octet-stream;

    #log_format  main  '$remote_addr - $remote_user [$time_local] "$request" '
    #                  '$status $body_bytes_sent "$http_referer" '
    #                  '"$http_user_agent" "$http_x_forwarded_for"';

    #access_log  logs/access.log  main;

    sendfile        on;
    #tcp_nopush     on;

    #keepalive_timeout  0;
    keepalive_timeout  65;

    #gzip  on;
    #负载均衡配置
    upstream shop {
    #分发请求到的服务器
      #ip_hash;
      #server server01.devops.com weight=1;
      #server server03.devops.com weight=1;
      server 192.168.19.200 weight=1;
      server 192.168.19.201 weight=1;
    }
    #接收用户请求
    server {
       server_name  shop.devops.com;
       location / {
          #代理转发  反向代理配置
          proxy_pass http://shop;
       }
    }
}
10. 实现负载均衡高可用
所有的请求流量,都要经过负载均衡服务器,负载均衡服务器压力很大,防止它宕机,导致后端服务所有都不可用,需要对负载均衡服务器,做高可用。
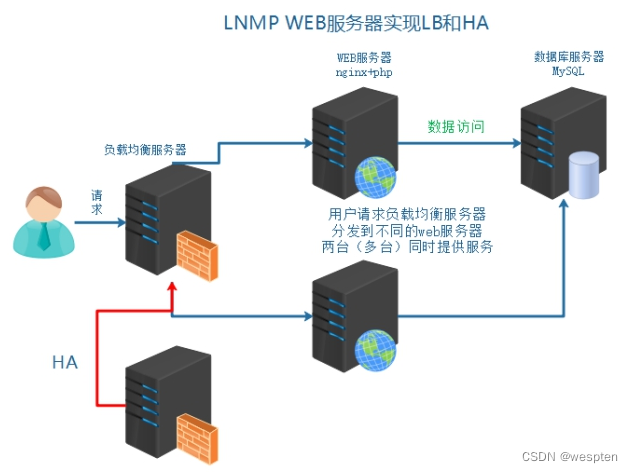
给负载均衡服务器server04做一台备用服务器server05,通过keepalived实现高可用。
通过keepalived实现VIP在负载均衡服务器组的切换。
server04 master LB 192.168.17.103
server05 backup LB 192.168.17.50
主负载均衡的keepalived配置:
shell vrrp_instance VI_1 { state BACKUP interface eth0 #虚拟路由ID 新ID 不要之前的冲突 virtual_router_id 52 priority 100 nopreempt advert_int 1 authentication { auth_type PASS auth_pass 1111 } virtual_ipaddress { #添加新VIP 192.168.17.201 } track_script { check_nginx } }备负载均衡的keepalived配置:
```shell vrrpinstance VI1 { state BACKUP interface eth0 #修改routeid virtualrouterid 52 priority 99 nopreempt advertint 1 authentication { authtype PASS authpass 1111 } #unicastsrcip 192.168.17.101 #unicastpeer { # 192.168.17.102 #} virtualipaddress { #新VIP 192.168.17.201 } trackscript { checknginx } }
```
keepalived(server01).conf:
! Configuration File for keepalived

global_defs {
   notification_email {
     [email protected]
     [email protected]
     [email protected]
   }
   notification_email_from [email protected]
   smtp_server 192.168.200.1
   smtp_connect_timeout 30
   router_id LVS_DEVEL
}

vrrp_script check_nginx {
   script /etc/keepalived/check_nginx.sh
   interval 3
}

vrrp_instance VI_1 {
    state MASTER
    interface eth0
    virtual_router_id 51
    nopreempt
    priority 100
    advert_int 1
    authentication {
        auth_type PASS
        auth_pass 1111
    }
    virtual_ipaddress {
        192.168.19.200
    }
    track_script {
        check_nginx
    }
}
vrrp_instance VI_2 {
    state backup
    interface eth0
    virtual_router_id 52
    nopreempt
    priority 100
    advert_int 1
    authentication {
        auth_type PASS
        auth_pass 1111
    }
    virtual_ipaddress {
        192.168.19.201
    }
    track_script {
        check_nginx
    }
}
keepalived(server03).conf:
! Configuration File for keepalived

global_defs {
   notification_email {
     [email protected]
     [email protected]
     [email protected]
   }
   notification_email_from [email protected]
   smtp_server 192.168.200.1
   smtp_connect_timeout 30
   router_id LVS_DEVEL
}

vrrp_script check_nginx {
   script /etc/keepalived/check_nginx.sh
   interval 3
}

vrrp_instance VI_1 {
    state BACKUP
    interface eth0
    virtual_router_id 51
    nopreempt
    priority 100
    advert_int 1
    authentication {
        auth_type PASS
        auth_pass 1111
    }
    virtual_ipaddress {
        192.168.19.200
    }
    track_script {
        check_nginx
    }
}
vrrp_instance VI_2 {
    state MASTER
    interface eth0
    virtual_router_id 52
    nopreempt
    priority 100
    advert_int 1
    authentication {
        auth_type PASS
        auth_pass 1111
    }
    virtual_ipaddress {
        192.168.19.201
    }
    track_script {
        check_nginx
    }
}
keepalived(server04).conf:
! Configuration File for keepalived

global_defs {
   notification_email {
     [email protected]
     [email protected]
     [email protected]
   }
   notification_email_from [email protected]
   smtp_server 192.168.200.1
   smtp_connect_timeout 30
   router_id LVS_DEVEL
}

vrrp_script check_nginx {
   script /etc/keepalived/check_nginx.sh
   interval 3
}

vrrp_instance VI_1 {
    state MASTER
    interface eth0
    virtual_router_id 53
    nopreempt
    priority 100
    advert_int 1
    authentication {
        auth_type PASS
        auth_pass 1111
    }
    virtual_ipaddress {
        192.168.19.202
    }
    track_script {
        check_nginx
    }
}
vrrp_instance VI_2 {
    state backup
    interface eth0
    virtual_router_id 52
    nopreempt
    priority 100
    advert_int 1
    authentication {
        auth_type PASS
        auth_pass 1111
    }
    virtual_ipaddress {
        192.168.19.201
    }
    track_script {
        check_nginx
    }
}
keepalived (server05).conf:
! Configuration File for keepalived

global_defs {
   notification_email {
     [email protected]
     [email protected]
     [email protected]
   }
   notification_email_from [email protected]
   smtp_server 192.168.200.1
   smtp_connect_timeout 30
   router_id LVS_DEVEL
}

vrrp_script check_nginx {
   script /etc/keepalived/check_nginx.sh
   interval 3
}

vrrp_instance VI_1 {
    state MASTER
    interface eth0
    virtual_router_id 53
    nopreempt
    priority 100
    advert_int 1
    authentication {
        auth_type PASS
        auth_pass 1111
    }
    virtual_ipaddress {
        192.168.19.202
    }
    track_script {
        check_nginx
    }
}
vrrp_instance VI_2 {
    state backup
    interface eth0
    virtual_router_id 52
    nopreempt
    priority 100
    advert_int 1
    authentication {
        auth_type PASS
        auth_pass 1111
    }
    virtual_ipaddress {
        192.168.19.201
    }
    track_script {
        check_nginx
    }
}
4、LVS介绍和安装
==LVS==(Linux Virtual Server)即Linux虚拟服务器,是由章文嵩博士主导的开源负载均衡项目,目前LVS已经被集成到Linux内核模块中。该项目==在Linux内核中实现了基于IP的数据请求负载均衡调度方案==。
LVS的IPVS模块在Linux内核2.4之后以上都被默认支持了,只需要安装ipvsadm管理配置软件即可。
作用和优势:
①工作在网络层,可以实现高性能,高可用的服务器集群技术。 ②廉价,可把许多低性能的服务器组合在一起形成一个超级服务器。 ③易用,配置非常简单,且有多种负载均衡的方法。 ④稳定可靠,即使在集群的服务器中某台服务器无法正常工作,也不影响整体效果。 ⑤可扩展性非常好。
安装ipvsadm 只在负载均衡调度服务器上安装即可
shell shell > yum -y install ipvsadm
LVS的常见工作方式:
①NAT(地址转换) ②DR(直接路由)
LVS调度算法:
1. Fixed Scheduling Method 静态调度方法
① RR 轮询 调度器通过"轮叫"调度算法将外部请求按顺序轮流分配到集群中的真实服务器上,它均等地对待每一台服务器,而不管服务器上实际的连接数和系统负载。
② WRR 加权轮询 调度器通过"加权轮叫"调度算法根据真实服务器的不同处理能力来调度访问请求。 这样可以保证处理能力强的服务器处理更多的访问流量。调度器 可以自动问询真实服务器的负载情况,并动态地调整其权值。
③ DH 目标地址hash 算法也是针对目标IP地址的负载均衡,但它是一种静态映射算法,通过一个散列(Hash)函数将一个目标IP地址映射到一台服务器。 目标地址散列调度算法先根据请求的目标IP地址,作为散列键(Hash Key)从静态分配的散列表找出对应的服务器,若该服务器是可用的且未超载,将请求发送到该服务器,否则返回空。
④ SH 源地址hash 算法正好与目标地址散列调度算法相反,它根据请求的源IP地址,作为散列键(Hash Key)从静态分配的散列表找出对应的服务器,若该服务器是 可用的且未超载,将请求发送到该服务器,否则返回空。 它采用的散列函数与目标地址散列调度算法的相同。除了将请求的目标IP地址换成请求的源IP地址外,它的算法流程与目标地址散列调度算法的基本相似。在实际应用中,源地址散列调度和目标地址散列调度可以结合使用在防火墙集群中,它们可以保证整个系统的唯一出入口。
2. Dynamic Scheduling Method 动态调度方法
① LC 最少连接 调度器通过"最少连接"调度算法动态地将网络请求调度到已建立的链接数最少的服务器上。 如果集群系统的真实服务器具有相近的系统性能,采用"最小连接"调度算法可以较好地均衡负载。
② WLC 加权最少连接 在集群系统中的服务器性能差异较大的情况下,调度器采用"加权最少链接"调度算法优化负载均衡性能,具有较高权值的服务器将承受较大比例的活动连接负载。调度器可以自动问询真实服务器的负载情况,并动态地调整其权值。
③ SED 最少期望延迟 基于wlc算法,举例说明:ABC三台机器分别权重123,连接数也分别是123,name如果使用WLC算法的话一个新请求 进入时他可能会分给ABC中任意一个,使用SED算法后会进行这样一个运算 A:(1+1)/2
B:(1+2)/2
C:(1+3)/3 根据运算结果,把连接交给C
④ NQ 从不排队调度方法 无需列队,如果有台realserver的连接数=0 就直接分配过去,不需要进行sed运算.
⑤ LBLC 基于本地的最少连接 "基于局部性的最少链接" 调度算法是针对目标IP地址的负载均衡,目前主要用于Cache集群系统。 该算法根据请求的目标IP地址找出该 目标IP地址最近使用的服务器,若该服务器 是可用的且没有超载,将请求发送到该服务器; 若服务器不存在,或者该服务器超载且有服务器处于一半的工作负载,则用"最少链接"的原则选出一个可用的服务器,将请求发送到该服务器。
⑥ LBLCR 带复制的基于本地的最少连接 "带复制的基于局部性最少链接"调度算法也是针对目标IP地址的负载均衡,目前主要用于Cache集群系统。 它与LBLC算法的不同 之处是它要维护从一个 目标IP地址到一组服务器的映射,而LBLC算法维护从一个目标IP地址到一台服务器的映射。 该算法根据请求的目标IP地址找出该目标IP地址对应的服务器组,按"最小连接"原则从服务器组中选出一台服务器, 若服务器没有超载,将请求发送到该服务器;若服务器超载,则按"最小连接"原则从这个集群中选出一 台服务器 ,将该服务器加入到服务器组中,将请求发送到该服务器。同时,当该服务器组有一段时间没有被修改, 将最忙的服务器从服务器组中删除,以降低复制的程度。
5、LVS实现负载均衡
1. LVS-NAT实现
需要知道的几个名词概念:
服务类型 所充当的角色
DS 负载均衡调度服务器
RS 真实服务器
IP的类型和作用
CIP 客户端IP
DIP 负载均衡调度服务器IP
VIP 负载均衡调度服务器的虚拟IP 对外提供服务的IP 用户访问的IP
RIP 真实服务器IP
不管采用什么网络工作方式
用户访问的服务器IP永远是通过VIP,域名必须绑定解析到VIP上
1.1、模式介绍

1、用户请求VIP(也可以说是CIP请求VIP)
2、Director Server 收到用户的请求后,发现源地址为CIP请求的目标地址为VIP,那么Director Server会认为用户请求的是一个集群服务,那么Director Server 会根据此前设定好的调度算法将用户请求负载给某台Real Server。 假如说此时Director Server 根据调度的结果会将请求分摊到RealServer1上去,那么Director Server 会将用户的请求报文中的目标地址,从原来的VIP改为RealServer1的IP,然后再转发给RealServer1
3、此时RealServer1收到一个源地址为CIP目标地址为自己的请求,那么RealServer1处理好请求后会将一个源地址为自己目标地址为CIP的数据包通过Director Server 发出去,
4、当Driector Server收到一个源地址为RealServer1 的IP 目标地址为CIP的数据包,此时Driector Server 会将源地址修改为VIP,然后再将数据包发送给用户
1.2、案例实现
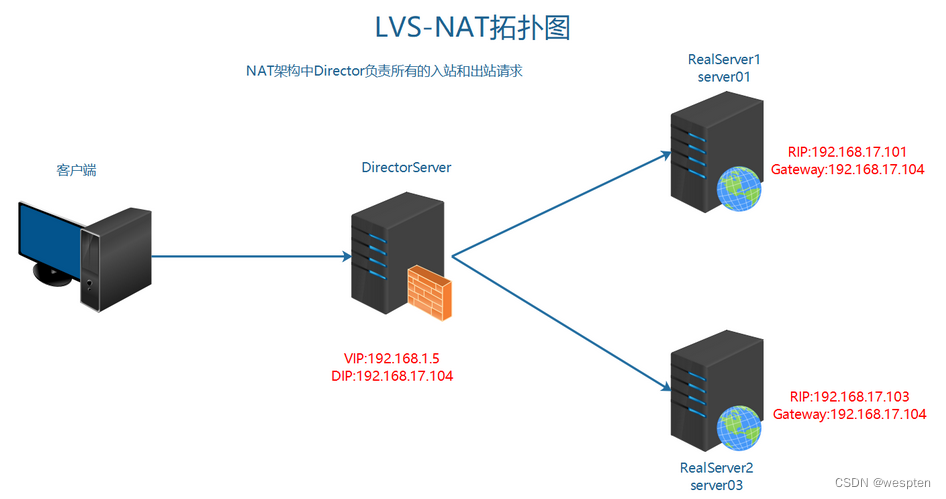
| server | type | IP | | -------- | -------------------------------- | ---------------------------------------------------- | | 客户端 | | | | server04 | 负载均衡调度服务器 DS | 192.168.24.52(对外访问的VIP) 192.168.17.103(DIP) | | server01 | 真实服务器 web服务器 RS | 192.168.17.102(RIP) | | server03 | 真实服务器 web服务器 RS | 192.168.17.101(RIP) |
给server04增加一块网卡,命名为eth1 桥接模式,自动获取IP即可,例子中IP获取为192.168.1.5
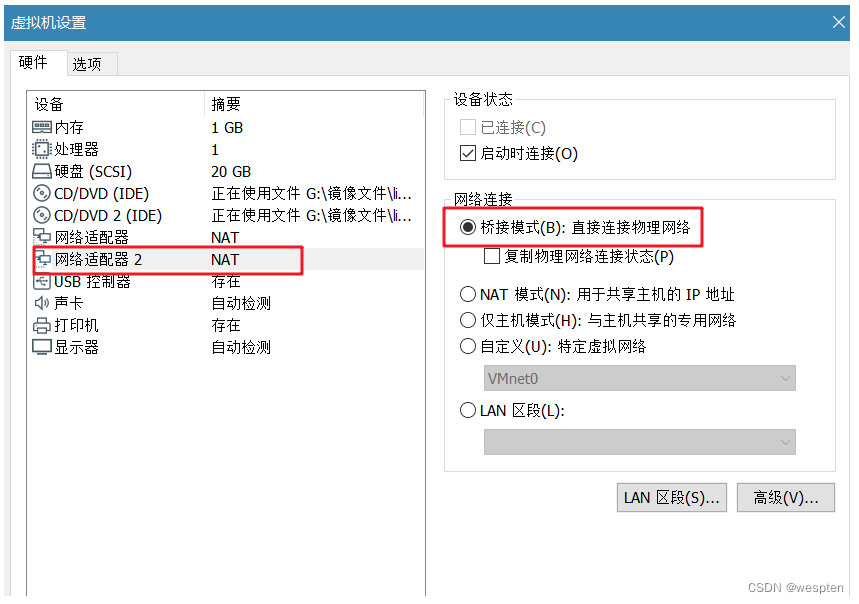
在centos系统中建立网卡配置文件:
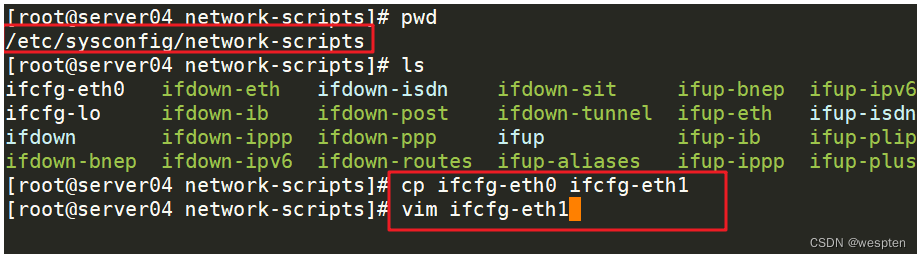
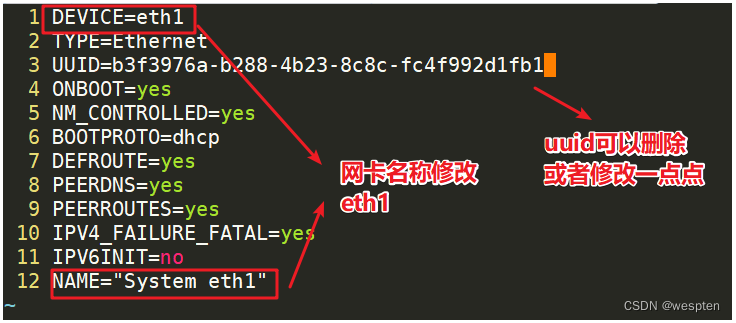
启动网卡:

注意如果获取不到IP信息,查看桥接模式的对应网卡,是否选择正确:

① RS上web服务正常运行,这个之前案例已经实现,可以沿用
```shell启动web服务,能够正常访问。
添加默认路由网关。
如果有默认路由网关删除掉即可:
shell > route del default shell > route add default gw 192.168.17.103 ```② 在DS上通过ipvsadm配置调度规则
```shell定义一个集群服务。
定义IP为VIP:
shell > ipvsadm -A -t 192.168.24.52:80 -s rr添加RealServer并指定工作模式为NAT:
shell > ipvsadm -a -t 192.168.24.52:80 -r 192.168.17.102 -m shell > ipvsadm -a -t 192.168.24.52:80 -r 192.168.17.101 -m查看ipvs定义的规则列表:
shell > ipvsadm -L -n启动Linux的路由转发功能:
shell > echo 1 > /proc/sys/net/ipv4/ip_forward ```常用参数说明
-A 增加一个虚拟服务
-t 配置虚拟机服务的地址
-s 负载均衡调度算法
-a 增加一个真实服务器
-r 真实服务器的地址
-m NAT工作模式
-C 清楚所有规则
-g DR工作模式
-w 权重
③ 访问查看效果
④ 修改测试调度算法
通过-s重新指定负载均衡调度算法:
shell shell > ipvsadm -E -t 192.168.24.52:80 -s dh解决session生成和验证一致性问题。
扩展:使用shell脚本编写lvs启动工具
lvsnatds.sh 调度服务器使用脚本 注意修改对应的VIP和RIP
lvsnatrs.sh 真实服务器使用脚本 注意修改对应的网关到RS服务器的RIP
分别上到各服务器,进行执行即可。
详细脚本案例:
lvs_nat_ds.sh:
#!/bin/bash
#
# chkconfig: - 88 12
# description: LVS script for VS/NAT
VIP=192.168.24.52
RIP1=192.168.17.102
RIP2=172.168.17.101
# 配置服务
case "$1" in
start)
  #配置网卡转发
  echo 1 > /proc/sys/net/ipv4/ip_forward
  #判断安装ipvsadm
  rpm -qa|grep ipvsadm >> /dev/null
  if [ $? -ne 0 ];then
      yum -y install ipvsadm
  fi
  #清空lvs规则
  ipvsadm -C
  #添加一个转发服务
  ipvsadm -A -t $VIP:80 -s rr
  #添加分发节点
  ipvsadm -a -t $VIP:80 -r $RIP1 -m
  ipvsadm -a -t $VIP:80 -r $RIP2 -m
;;

stop)
  #关闭网卡转发
  echo 0 > /proc/sys/net/ipv4/ip_forward
  #清空lvs规则
  ipvsadm -C
;;
status)
  #查看当前规则
  ipvsadm -Ln
;;
*)
  echo "Usage: $0 {start|stop|status}"
;; esac
lvs_nat_rs.sh:
#!/bin/bash
#添加路由默认网关到DIP
DIP=192.168.17.103
#删除默认
route del default
#添加网关
route add default gw $DIP
2. LVS-DR实现
2.1、模式介绍

1、首先用户用CIP请求VIP。
2、根据上图可以看到,不管是Director Server还是Real Server上都需要配置VIP,那么当用户请求到达我们的集群网络的前端路由器的时候,请求数据包的源地址为CIP目标地址为VIP,此时路由器会发广播问谁是VIP,那么我们集群中所有的节点都配置有VIP,此时谁先响应路由器那么路由器就会将用户请求发给谁,这样一来我们的集群系统是不是没有意义了,那我们可以在网关路由器上配置静态路由指定VIP就是Director Server,或者使用一种机制不让Real Server 接收来自网络中的ARP地址解析请求,这样一来用户的请求数据包都会经过Director Servrer。
3、当Director Server收到用户的请求后根据此前设定好的调度算法结果来确定将请求负载到某台Real Server上去,假如说此时根据调度算法的结果,会将请求负载到RealServer 1上面去,此时Director Server 会将数据帧中的目标MAC地址修改为Real Server1的MAC地址,然后再将数据帧发送出去。
4、当Real Server1 收到一个源地址为CIP目标地址为VIP的数据包时,Real Server1发现目标地址为VIP,而VIP是自己,于是接受数据包并给予处理,当Real Server1处理完请求后,会将一个源地址为VIP目标地址给CIP的数据包发出去,此时的响应请求就不会再经过Director Server了,而是直接响应给用户。
2.2、案例实现
| server | type | IP | | -------- | -------------------------- | ---------------------------------------------- | | 客户端 | | | | server04 | 负载均衡调度服务器 DS | 192.168.17.103(DIP) 192.168.17.205(VIP) | | server01 | 真实服务器 web服务器 RS | 192.168.17.102(RIP) 192.168.17.205(VIP) | | server03 | 真实服务器 web服务器 RS | 192.168.17.101(RIP) 192.168.17.205(VIP) |① 在RS上配置
```shell设置arp的通告模式 通过VIP请求到DS服务器:
shell > echo 1 > /proc/sys/net/ipv4/conf/lo/arpignore shell > echo 2 > /proc/sys/net/ipv4/conf/lo/arpannounce shell > echo 1 > /proc/sys/net/ipv4/conf/all/arpignore shell > echo 2 > /proc/sys/net/ipv4/conf/all/arpannounce绑定VIP到网卡:
shell > ifconfig lo:0 192.168.17.205 broadcast 192.168.17.205 netmask 255.255.255.255 up添加主机路由:
shell > route add -host 192.168.17.205 dev lo:0 ```② 在DS上配置
```shell配置DS上的VIP:
shell > ifconfig eth0:0 192.168.17.205 broadcast 192.168.17.205 netmask 255.255.255.255 up添加主机路由:
shell > route add -host 192.168.17.205 dev eth0:0配置转发规则:
shell > ipvsadm -C shell > ipvsadm -A -t 192.168.17.205:80 -s rr shell > ipvsadm -a -t 192.168.17.205:80 -r 192.168.17.102 -g shell > ipvsadm -a -t 192.168.17.205:80 -r 192.168.17.101 -g ```详细脚本案例:
lvs_dr_ds.sh:
#!/bin/bash
## chkconfig: - 88 12
# description: LVS script for VS/DR
VIP=192.168.17.205
RIP1=192.168.17.102
RIP2=192.168.17.101
GW=192.168.17.2
# 配置服务
case "$1" in
start)
  #DR配置绑定VIP
  ifconfig eth0:0 $VIP broadcast $VIP netmask 255.255.255.255 up
  #添加主机路由
  route add -host $VIP dev eth0:0
  #配置网卡转发
  # echo 1 > /proc/sys/net/ipv4/ip_forward
  #配置网关
  route del default
  route add default gw $GW
  #判断安装ipvsadm
  rpm -qa|grep ipvsadm >> /dev/null
  if [ $? -ne 0 ];then
      yum -y install ipvsadm
  fi
  #清空lvs规则
  ipvsadm -C
  #添加一个转发服务
  ipvsadm -A -t $VIP:80 -s rr
  #添加分发节点
  ipvsadm -a -t $VIP:80 -r $RIP1 -g
  ipvsadm -a -t $VIP:80 -r $RIP2 -g
;;

stop)
  #关闭网卡转发
  echo 0 > /proc/sys/net/ipv4/ip_forward
  #清空lvs规则
  ipvsadm -C
;;
status)
  #查看当前规则
  ipvsadm -Ln
;;
*)
  echo "Usage: $0 {start|stop}"
;; esac
lvs_dr_rs.sh:
#!/bin/bash
VIP=192.168.17.205
#配置VIP只有DS响应
echo 1 > /proc/sys/net/ipv4/conf/lo/arp_ignore
echo 2 > /proc/sys/net/ipv4/conf/lo/arp_announce
echo 1 > /proc/sys/net/ipv4/conf/all/arp_ignore
echo 2 > /proc/sys/net/ipv4/conf/all/arp_announce
#绑定VIP到网卡
ifconfig lo:0 $VIP  broadcast $VIP netmask 255.255.255.255 up
#添加主机路由
route add -host $VIP dev lo:0
6、企业架构LB-服务器的负载均衡之HAProxy实现
1. 安装
yum方式安装:
shell shell > yum install haproxy源码编译方式安装。
2. 配置
源配置文件说明:
# cd /etc/haproxy/
# cp haproxy.cfg haproxy.cfg.bak
# vim haproxy.cfg
**********************************************************************
#---------------------------------------------------------------------
# Example configuration for a possible web application. See the
# full configuration options online.
#
# http://haproxy.1wt.eu/download/1.4/doc/configuration.txt
#
#---------------------------------------------------------------------
#---------------------------------------------------------------------
# Global settings
#---------------------------------------------------------------------
global #全局配置文件
# to have these messages end up in /var/log/haproxy.log you will
# need to: #配置日志
#
# 1) configure syslog to accept network log events. This is done
# by adding the '-r' option to the SYSLOGD_OPTIONS in
# /etc/sysconfig/syslog #修改syslog配置文件
#
# 2) configure local2 events to go to the /var/log/haproxy.log
# file. A line like the following can be added to
# /etc/sysconfig/syslog #定义日志设备
#
# local2.* /var/log/haproxy.log
#
log 127.0.0.1 local2 #日志配置,所有的日志都记录本地,通过local2输出
chroot /var/lib/haproxy #改变haproxy的工作目录
pidfile /var/run/haproxy.pid #指定pid文件的路径
maxconn 4000 #最大连接数的设定
user haproxy #指定运行服务的用户
group haproxy #指定运行服务的用户组
daemon
# turn on stats unix socket
stats socket /var/lib/haproxy/stats
#---------------------------------------------------------------------
# common defaults that all the 'listen' and 'backend' sections will
# use if not designated in their block
#---------------------------------------------------------------------
defaults
mode http #默认使用协议,可以为{http|tcp|health} http:是
七层协议 tcp:是四层 health:只返回OK
log global #全局日志记录
option httplog #详细记录http日志
option dontlognull #不记录空日志
option http-server-close #启用http-server-close
option forwardfor except 127.0.0.0/8 #来自这些信息的都不forwardfor
option redispatch #重新分发,ServerID对应的服务器宕机后,强制定向到
其他运行正常的服务器
retries 3 #3次连接失败则认为服务不可用
timeout http-request 10s #默认http请求超时时间
timeout queue 1m #默认队列超时时间
timeout connect 10s #默认连接超时时间
timeout client 1m #默认客户端超时时间
timeout server 1m #默认服务器超时时间
timeout http-keep-alive 10s #默认持久连接超时时间
timeout check 10s #默认检查时间间隔
maxconn 3000 #最大连接数
#---------------------------------------------------------------------
# main frontend which proxys to the backends
#---------------------------------------------------------------------
frontend main *:5000
#定义ACL规则以如".html"结尾的文件;-i:忽略大小写
acl url_static path_beg -i /static /images /javascript /stylesheets
acl url_static path_end -i .jpg .gif .png .css .js
use_backend static if url_static #调用后端服务器并检查ACL规则是否被匹配
default_backend app #客户端访问时默认调用后端服务器地址池
#---------------------------------------------------------------------
# static backend for serving up images, stylesheets and such
#---------------------------------------------------------------------
backend static #定义后端服务器
balance roundrobin #定义算法;基于权重进行轮询
server static 127.0.0.1:4331 check check:启动对后端server的健康状态检测
#---------------------------------------------------------------------
# round robin balancing between the various backends
#---------------------------------------------------------------------
backend app
balance roundrobin
server app1 127.0.0.1:5001 check
server app2 127.0.0.1:5002 check
server app3 127.0.0.1:5003 check
server app4 127.0.0.1:5004 check
实际配置文件使用:
#---------------------------------------------------------------------
# Example configuration for a possible web application. See the
# full configuration options online.
#
# http://haproxy.1wt.eu/download/1.4/doc/configuration.txt
#
#---------------------------------------------------------------------
#---------------------------------------------------------------------
# Global settings
#---------------------------------------------------------------------

global
# to have these messages end up in /var/log/haproxy.log you will
# need to:
#
# 1) configure syslog to accept network log events. This is done
# by adding the '-r' option to the SYSLOGD_OPTIONS in
# /etc/sysconfig/syslog
#
# 2) configure local2 events to go to the /var/log/haproxy.log
# file. A line like the following can be added to
# /etc/sysconfig/syslog
#
# local2.* /var/log/haproxy.log
#
log 127.0.0.1 local2
chroot /var/lib/haproxy
pidfile /var/run/haproxy.pid
maxconn 4000
user haproxy
group haproxy
daemon
# turn on stats unix socket
stats socket /var/lib/haproxy/stats
#---------------------------------------------------------------------
# common defaults that all the 'listen' and 'backend' sections will
# use if not designated in their block
#---------------------------------------------------------------------
defaults
mode http
log global
option httplog
option dontlognull
option http-server-close
option forwardfor except 127.0.0.0/8
option redispatch
retries 3
timeout http-request 10s
timeout queue 1m
timeout connect 10s
timeout client 1m
timeout server 1m
timeout http-keep-alive 10s
timeout check 10s
maxconn 3000
listen stats
mode http
bind *:1090
stats enable
stats hide-version
stats uri /hadmin?stats

stats realm Haproxy\ Statistics
stats auth admin:admin
stats admin if TRUE
#---------------------------------------------------------------------
# main frontend which proxys to the backends
#---------------------------------------------------------------------
frontend main *:80
#stats uri /status
#acl url_static path_beg -i /static /images /javascript /stylesheets
#acl url_static path_end -i .jpg .gif .png .css .js
#use_backend static if url_static
default_backend app
#---------------------------------------------------------------------
# static backend for serving up images, stylesheets and such
#---------------------------------------------------------------------
#backend static
# balance roundrobin
# server static 127.0.0.1:4331 check
#---------------------------------------------------------------------
# round robin balancing between the various backends
#---------------------------------------------------------------------
backend app
balance roundrobin
server app1 192.168.17.100:80 check
server app2 192.168.17.104:80 check
#server app1 192.168.17.100:80 weight 1
#server app2 192.168.17.104:80 weight 1
#server app3 127.0.0.1:5003 check
#server app4 127.0.0.1:5004 check
详细配置:
haproxy.cfg:
#---------------------------------------------------------------------
# Example configuration for a possible web application.  See the
# full configuration options online.
#
#   http://haproxy.1wt.eu/download/1.4/doc/configuration.txt
#
#---------------------------------------------------------------------

#---------------------------------------------------------------------
# Global settings
#---------------------------------------------------------------------
global
    # to have these messages end up in /var/log/haproxy.log you will
    # need to:
    #
    # 1) configure syslog to accept network log events.  This is done
    #    by adding the '-r' option to the SYSLOGD_OPTIONS in
    #    /etc/sysconfig/syslog
    #
    # 2) configure local2 events to go to the /var/log/haproxy.log
    #   file. A line like the following can be added to
    #   /etc/sysconfig/syslog
    #
    #    local2.*                       /var/log/haproxy.log
    #
    log         127.0.0.1 local2

    chroot      /var/lib/haproxy
    pidfile     /var/run/haproxy.pid
    maxconn     4000
    user        haproxy
    group       haproxy
    daemon

    # turn on stats unix socket
    stats socket /var/lib/haproxy/stats

#---------------------------------------------------------------------
# common defaults that all the 'listen' and 'backend' sections will
# use if not designated in their block
#---------------------------------------------------------------------
defaults
    mode                    http
    log                     global
    option                  httplog
    option                  dontlognull
    option http-server-close
    option forwardfor       except 127.0.0.0/8
    option                  redispatch
    retries                 3
    timeout http-request    10s
    timeout queue           1m
    timeout connect         10s
    timeout client          1m
    timeout server          1m
    timeout http-keep-alive 10s
    timeout check           10s
    maxconn                 3000
listen stats
    mode http
    bind *:1090
    stats enable
    stats hide-version
    stats uri    /hadmin?stats
    stats realm  Haproxy\ Statistics
    stats auth    admin:admin
    stats admin if TRUE
#---------------------------------------------------------------------
# main frontend which proxys to the backends
#---------------------------------------------------------------------
frontend  main *:80
    #acl url_static       path_beg       -i /static /images /javascript /stylesheets
    #acl url_static       path_end       -i .jpg .gif .png .css .js

    #use_backend static          if url_static
    default_backend             app

#---------------------------------------------------------------------
# static backend for serving up images, stylesheets and such
#---------------------------------------------------------------------
#backend static
#  balance     roundrobin
#    server      static 127.0.0.1:4331 check

#---------------------------------------------------------------------
# round robin balancing between the various backends
#---------------------------------------------------------------------
backend app
    balance     roundrobin
    server  web01 192.168.19.100:80 check weight 1
    server  web02 192.168.19.102:80 check weight 1
    #server  app3 127.0.0.1:5003 check
    #server  app4 127.0.0.1:5004 check
7、通过Heartbeat实现负载均衡服务器的高可用
环境准备:
server04 LB 192.168.17.103
server05 backup LB 192.168.17.104
VIP:192.168.17.202
1. 安装
shell安装wget:
shell > yum install -y wget配置epel源:
shell > wget -O /etc/yum.repos.d/epel.repo http://mirrors.aliyun.com/repo/epel-6.repo安装heartbeat:
shell > yum install -y heartbeat ```2. 配置
① 两台服务器都需要操作
复制初始化配置文件:
shell shell > cd /usr/share/doc/heartbeat-3.0.4/ shell > cp authkeys ha.cf haresources /etc/ha.d/ shell > cd /etc/ha.d在两台服务器的/etc/hosts文件解析:
192.168.17.103 server04 192.168.17.104 server05/etc/ha.d/authkeys文件去掉对应注释:
```shell到文件中,去掉以下几行的注释:
auth 1 1 crc 2 sha1 HI! 3 md5 Hello! ```==记得授权authkeys权限600==
② 主服务器配置
/etc/haresources文件:
```shell

node-name resource1 resource2 ... resourceN
添加本主机名称 VIP 启动的服务名称。
添加的服务器名称 需要在/etc/init.d里有server管理服务的脚本:
server04 192.168.17.202 nginx ```/etc/ha.cf文件:
```shell找到ucast项 去掉注释并修改。
给备服务器发送的地址 这里写备服务器的IP:
ucast eth0 192.168.17.104找到node项,并去掉注释添加:
node server04 node server05 ```③ 备服务器配置
/etc/haresources文件:
```shell

node-name resource1 resource2 ... resourceN
添加本主机名称 VIP 启动的服务名称:
server05 192.168.17.202 nginx ```/etc/ha.cf文件:
```shell找到ucast项 去掉注释并修改。
给备服务器发送的地址 这里写备服务器的IP:
ucast eth0 192.168.17.103找到node项,并去掉注释添加:
node server04 node server05 ```六、企业级MySQL架构
思维导图:

1、企业架构MySQL读写分离
业务背景描述:
发布产品类型:互联网动态站点 商城
用户数量: 10000-12000(用户量猛增)
PV : 100000-500000(24小时访问次数总和)
QPS: 50-100*(每秒访问次数)
DAU: 2000(每日活跃⽤户数)
之前业务中是单台MySQL提供服务,使用多台MySQL数据库服务器,降低单台压力,实现集群架构的稳定性和高可用性、数据的一致性、完整性、replication。
通过业务比对和分析发现,随着用户活跃增多,读取数据的请求变多,故着重解决读取数据的压力。
2、模拟运维设计方案
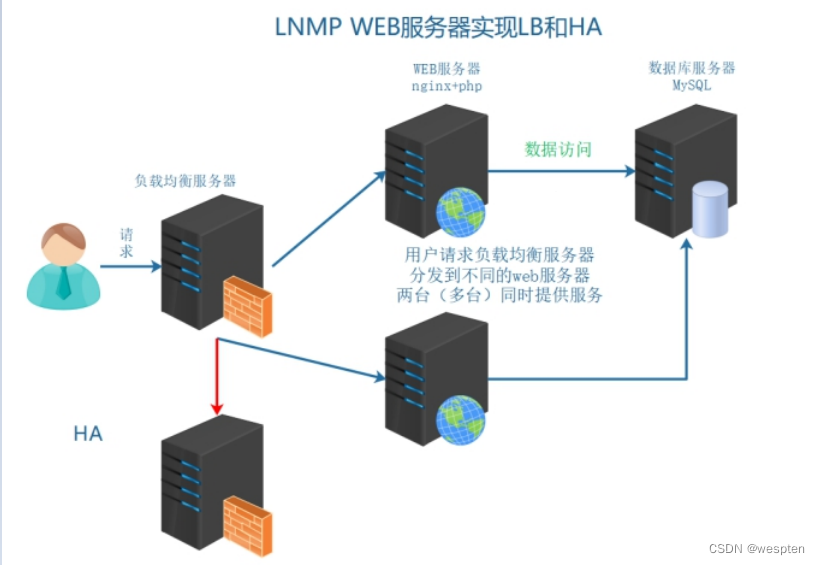
根据以上业务需求,在之前业务架构的基础上实现数据的读写分离:
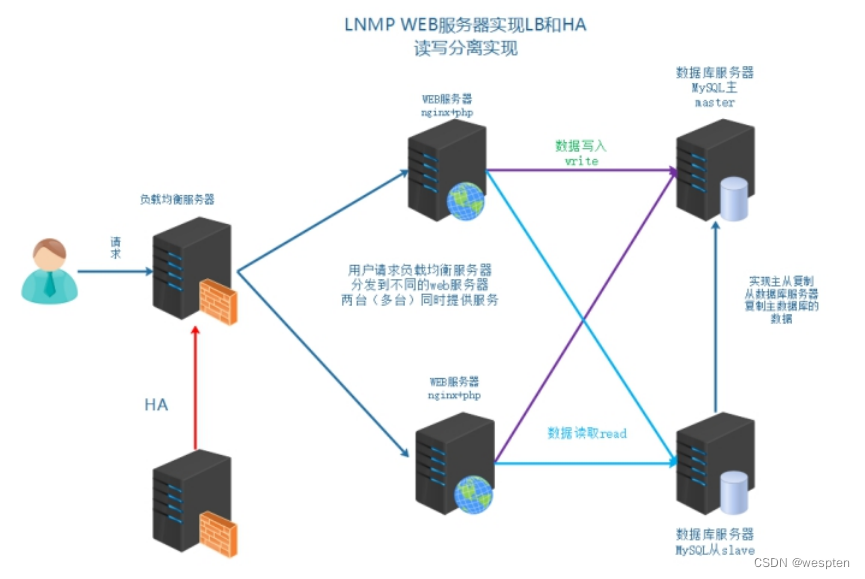
3、读写分离的目的
数据库负载均衡:
当数据库请求增多时,单例数据库不能够满足业务需求。需要进行数据库实例的扩容,多台数据库同时相应请求,也就是说需要对数据库的请求,进行负载均衡。
但是由于数据库服务特殊原因,数据库扩容基本要求为: 数据的一致性和完整性 。所以要保证多台数据库实例的数据一致性和完整性 ,以MySQL为例来说,官方提供了主从复制机制 。
读写分离:
数据库的负载均衡不同于其他服务的负载均衡,数据要求一致性。 基于主从复制的基础上,常见的数据库负载均衡使用的是读写分离方式。写入主数据库,读取到从数据库 。可以认为数据库读写分离,是一种特殊的负载均衡实现。
4、读写分离常见的实现方式
① 业务代码的读写分离
需要在业务代码中,判断数据操作是读还是写,读连接从数据服务器操作,写连接主数据库服务器操作以当前LNMP为例,需要通过PHP代码实现读写分离。
② 中间件代理方式的读写分离
在业务代码中,数据库的操作,不直接连接数据库,而是先请求到中间件服务器(代理)。
由代理服务器,判断是读操作去从数据服务器,写操作去主数据服务器。
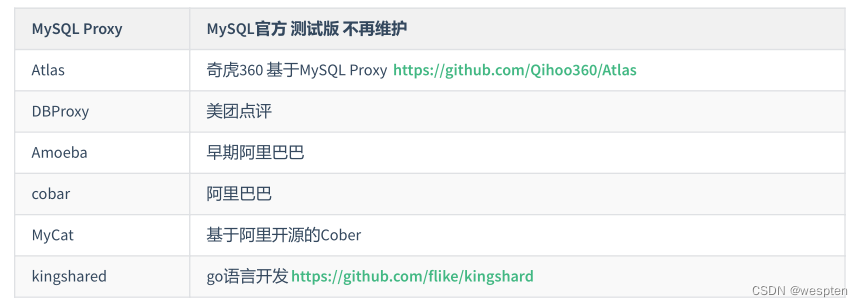
也就是如下图示架构:

问:如何选择?
① 业务实现读写分离,操作方便,成本低,当前的开发框架基本支持读写分离
② 中间件代理服务器,除了能够实现读写分离,还可以作为数据库集群的管理平台
5、MySQL读写分离案列实现
0)搭建M-S复制
主从复制的原理 :主服务器开启bin-log(记录了写操作) 从服务器获取到主服务器的bin-log 记录到relay-log中。从服务器在通过异步的线程方式,对于relay-log进行重放操作。
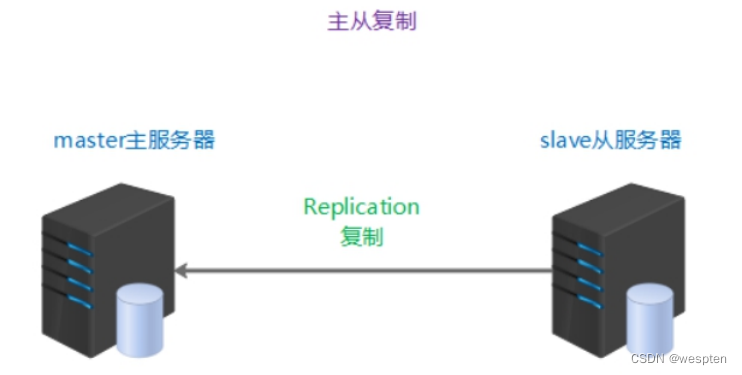
server02 mysql master 192.168.17.100
server06 mysql slave 192.168.17.105
1)master配置
① 在master服务器授权,slave服务器replication slave权限
slave是通过MySQL连接登录到master上来读取二进制日志的,因此需要在master上给slave配置权限:
mysql > grant replication slave on *.* to 'slave'@'192.168.17.105'identified by '123456';② master服务器打开bin-log日志,并标识server-id
shell > vim /etc/my.cnf配置文件内容:
[mysqld]
log-bin = mysql-index
server-id = 1
注意重启mysql使配置生效。
③ 制作一个完整的备份
如果确认主从的数据库,默认开始数据是一致的,可以不做备份:
shell > mysqldump -uroot -p'123456' --all-databases > /root/mysql.sql④ 查看master上的bin-log及其position位置
mysql > show master status;查看并记录File的值,Position的值。之后需要在从服务器上,指向这些信息。

2)slave配置
① 恢复备份文件
如果slave和master的数据本身就是相同的,可以不选择备份和导入。
② 配置server-id,标识服务器
shell > vim /etc/my.cnf配置文件内容:
[mysqld]
server-id=2
由于是克隆获取的MySQL实例,所以auto.conf里记录的UUID一样,需要删除/usr/local/mysql/data/auto.conf文件 ,否则主从无法识别互相身份,重启自动生成新的即可。
③ 配置slave replication
mysql > stop slave;
mysql> change master to master_host='192.168.17.101',master_user='slave1',master_password='123456',master_log_file='mysql-bin.000002',master_log_pos=333;
mysql > start slave;
参数说明:
master_host :主master的IP
master_user:主master允许登录,拥有replication slave权限
master_password:用户的密码
需要通过mysql > show master status; 在master执行
master_log_file:主master记录的bin-log日志文件名称
master_log_pos:主master记录的bin-log日志文件对应的位置
④ 启动replication,并检查结果
mysql > show slave status\G;查看到两个yes,主从复制成功。否则,查看显示最下面信息,通过error信息进行排查问题。
6、架配置实现读写分离
① 通过查看thinkphp5手册找到处理方案
② 修改项目配置文件
一定要先去确定主从数据库的数据一致(tp5shop),用户名称和密码可以进行登录使用:
shell > vim /usr/local/nginx/html/tp5shop/application/database.php配置文件示例:
return [
// 数据库类型
'type' => 'mysql',
// 服务器地址
// 1、主从数据库的连接地址 主在前 从在后
'hostname' => '192.168.17.100,192.168.17.105',
// 2、主从数据库的名称、用户、密码一样的话,只配置一份即可。如果不一样,按照先后顺序,逗号分隔
// 数据库名
'database' => 'tp5shop',
// 用户名
'username' => 'tp5shop',
// 密码
'password' => '$Abc3721',
// 端口
'hostport' => '3306',
// 连接dsn
'dsn' => '',
// 数据库连接参数
'params' => [],
// 数据库编码默认采用utf8
'charset' => 'utf8',
// 数据库表前缀
'prefix' => 'tpshop_',
// 数据库调试模式
'debug' => true,
// 3、项目框架的业务代码实现读写分离,使用的是分布式(主从服务器) 配置为1
// 数据库部署方式:0 集中式(单一服务器),1 分布式(主从服务器)
'deploy' => 1,
// 4、数据库读写分离是业务代码实现的,配置为true
// 数据库读写是否分离 主从式有效
'rw_separate' => true,
// 读写分离后 主服务器数量
'master_num' => 1,
// 指定从服务器序号
'slave_no' => '',
// 是否严格检查字段是否存在
测试可以down主库,看从库是否可以访问。thinkphp5中,如果slave宕机,master提供读服务。
7、MyCAT实现读写分离
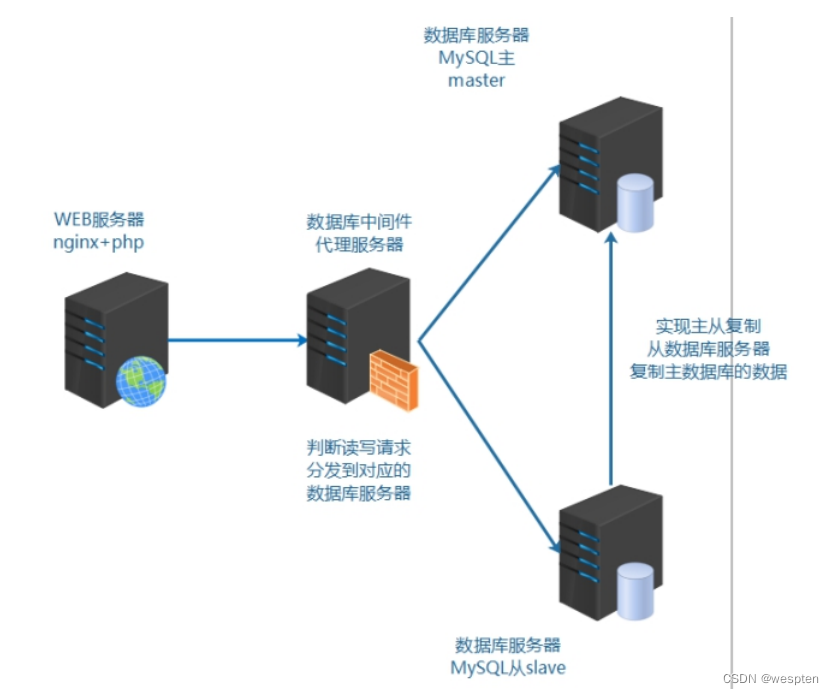
准备一台服务器,作为数据库的中间件服务器,配置基本环境,网卡、FQDN:
server01 web1 192.168.17.101
server02 master 192.168.17.102
server06 slave 192.168.17.106
server07 mycat 192.168.17.107
Mycat 数据库中间件
国内最活跃的、性能最好的开源数据库中间件!
官方网址:
GitHub - MyCATApache/Mycat-Server
因为mycat是由java语言开发,必须使用java的允许环境进行启动和操作。
7.1、jdk安装
java 静态编译的编程语言 代码编译成机器码 执行机器码输出结果。
编译jdk javac 编译java代码,运行 jre 编译好的机器码(可以执行文件) java。
问:公司服务器部署的java环境是jdk还是jre?
答:jre java解析运行环境 一般情况编译过的可执行的java程序 ,jre就够用了。
jdk javac 编译的环境 如果服务器上传是源代码文件 就可以编译,之后再执行。
实际业务环境中,如果存在需要编译的情况,就选择jdk。
①下载安装jdk
选择下载x64架构.tar.gz包
上传mycat和jdk到soft目录下:
shell > tar xvf jdk-8u192-linux-x64.tar.gz
shell > mv jdk1.8.0_192 /usr/local/java
② 配置环境变量
#追加环境变量
shell > echo "PATH=/usr/local/java/bin:$PATH" >> /etc/profile
shell > source /etc/profile
#检测java环境变量 如果看到版本信息即为成功
shell > java --version
7.2、mycat安装和测试启动
① 解压安装MyCAT
shell > tar xvf Mycat-server-1.6.5-release-20180122220033-linux.tar.gz -C /usr/local实际解压到目录即可,无需安装。
② 软件目录介绍

③ 启动mycat
默认情况下启动mycat是可以启动的:
#通过控制台 进行前端启动 可以看到执行过程
shell > /usr/local/mycat/bin/mycat console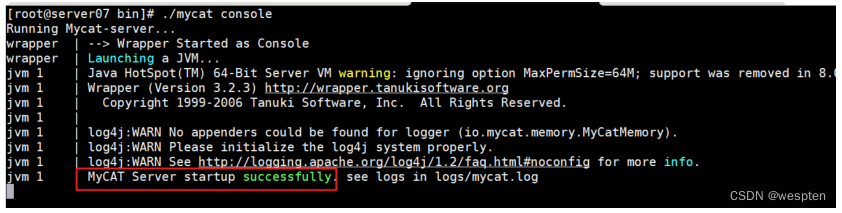
注意如果启动不成功,可能是由于没有解析 主机名称 。 需要在hosts文件中进行解析 。
7.3、配置读写分离
读写分离的配置文件:

Mycat是由java开发,java开发的软件大部分配置文件是xml格式。注意它的基本格式。
xml格式注意点:
1、xml声明信息
2、具有一个根标签
3、双标签和单标签格式
4、注意闭合标签
5、注释格式为
① 查看server.xml
默认server.xml可以不用修改:
shell > /usr/local/mycat/conf
shell > vim server.xml
修改server.xml:
配置mycat对外的使用用户信息:
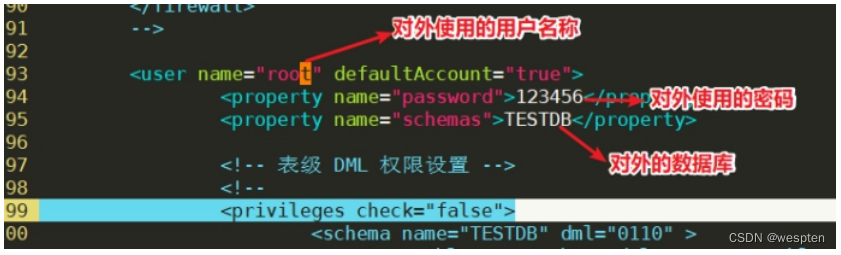
server.xml详细配置:
<?xml version="1.0" encoding="UTF-8"?>
<!-- - - Licensed under the Apache License, Version 2.0 (the "License");
	- you may not use this file except in compliance with the License. - You
	may obtain a copy of the License at - - http://www.apache.org/licenses/LICENSE-2.0
	- - Unless required by applicable law or agreed to in writing, software -
	distributed under the License is distributed on an "AS IS" BASIS, - WITHOUT
	WARRANTIES OR CONDITIONS OF ANY KIND, either express or implied. - See the
	License for the specific language governing permissions and - limitations
	under the License. -->
<!DOCTYPE mycat:server SYSTEM "server.dtd">
<mycat:server xmlns:mycat="http://io.mycat/">
	<system>
	<property name="nonePasswordLogin">0</property> <!-- 0为需要密码登陆、1为不需要密码登陆 ,默认为0,设置为1则需要指定默认账户-->
	<property name="useHandshakeV10">1</property>
	<property name="useSqlStat">0</property>  <!-- 1为开启实时统计、0为关闭 -->
	<property name="useGlobleTableCheck">0</property>  <!-- 1为开启全加班一致性检测、0为关闭 -->

		<property name="sequnceHandlerType">2</property>
	<property name="subqueryRelationshipCheck">false</property> <!-- 子查询中存在关联查询的情况下,检查关联字段中是否有分片字段 .默认 false -->
      <!--  <property name="useCompression">1</property>--> <!--1为开启mysql压缩协议-->
        <!--  <property name="fakeMySQLVersion">5.6.20</property>--> <!--设置模拟的MySQL版本号-->
	<!-- <property name="processorBufferChunk">40960</property> -->
	<!--
	<property name="processors">1</property>
	<property name="processorExecutor">32</property>
	 -->
        <!--默认为type 0: DirectByteBufferPool | type 1 ByteBufferArena | type 2 NettyBufferPool -->
		<property name="processorBufferPoolType">0</property>
		<!--默认是65535 64K 用于sql解析时最大文本长度 -->
		<!--<property name="maxStringLiteralLength">65535</property>-->
		<!--<property name="sequnceHandlerType">0</property>-->
		<!--<property name="backSocketNoDelay">1</property>-->
		<!--<property name="frontSocketNoDelay">1</property>-->
		<!--<property name="processorExecutor">16</property>-->
		<!--
			<property name="serverPort">8066</property> <property name="managerPort">9066</property>
			<property name="idleTimeout">300000</property> <property name="bindIp">0.0.0.0</property>
			<property name="frontWriteQueueSize">4096</property> <property name="processors">32</property> -->
		<!--分布式事务开关,0为不过滤分布式事务,1为过滤分布式事务(如果分布式事务内只涉及全局表,则不过滤),2为不过滤分布式事务,但是记录分布式事务日志-->
		<property name="handleDistributedTransactions">0</property>

			<!--
			off heap for merge/order/group/limit      1开启   0关闭
		-->
		<property name="useOffHeapForMerge">1</property>

		<!--
			单位为m
		-->
        <property name="memoryPageSize">64k</property>

		<!--
			单位为k
		-->
		<property name="spillsFileBufferSize">1k</property>

		<property name="useStreamOutput">0</property>

		<!--
			单位为m
		-->
		<property name="systemReserveMemorySize">384m</property>


		<!--是否采用zookeeper协调切换  -->
		<property name="useZKSwitch">false</property>

		<!-- XA Recovery Log日志路径 -->
		<!--<property name="XARecoveryLogBaseDir">./</property>-->

		<!-- XA Recovery Log日志名称 -->
		<!--<property name="XARecoveryLogBaseName">tmlog</property>-->

	</system>

	<!-- 全局SQL防火墙设置 -->
	<!--白名单可以使用通配符%或着*-->
	<!--例如<host host="127.0.0.*" user="root"/>-->
	<!--例如<host host="127.0.*" user="root"/>-->
	<!--例如<host host="127.*" user="root"/>-->
	<!--例如<host host="1*7.*" user="root"/>-->
	<!--这些配置情况下对于127.0.0.1都能以root账户登录-->
	<!--
	<firewall>
	   <whitehost>
	      <host host="1*7.0.0.*" user="root"/>
	   </whitehost>
       <blacklist check="false">
       </blacklist>
	</firewall>
	-->

	<user name="devops" defaultAccount="true">
		<property name="password">123</property>
		<property name="schemas">TESTDB</property>

		<!-- 表级 DML 权限设置 -->
		<!--
		<privileges check="false">
			<schema name="TESTDB" dml="0110" >
				<table name="tb01" dml="0000"></table>
				<table name="tb02" dml="1111"></table>
			</schema>
		</privileges>
		 -->
	</user>

	<!--<user name="user">
		<property name="password">user</property>
		<property name="schemas">TESTDB</property>
		<property name="readOnly">true</property>
	</user>-->

</mycat:server>
② 修改schema.xml
schema标签里配置name的server.xml里的虚拟数据库名称,dataNode 填写后面使用的dataNode名称。
dataNode标签和dataHost指定配置使用。
dataHost标签里配置writeHost和readHost(密码,地址,用户名称)。
schema=>dataNode=>dataHost=>writeHost=>readHost可以使用给大家精简过的配置文件:
<?xml version="1.0"?>
<!DOCTYPE mycat:schema SYSTEM "schema.dtd">
<mycat:schema xmlns:mycat="http://io.mycat/">
<!-- 1、TESTDB和server.xml配置文件中的映射的数据库名称要一致 dataNone填写下面的dataNode名称 -->
<schema name="TESTDB" checkSQLschema="false" sqlMaxLimit="100" dataNode="dn3"></schema>
<!-- 2、dataNode name和上面的一致 dataHost填写下面的dataHost的name名称 database填写后端真实数
据库名称-->
<dataNode name="dn3" dataHost="localhost1" database="tp5shop" />
<!-- 3、可以配置负载均衡、读写分离算法 暂时可以不用动-->
<dataHost name="localhost1" maxCon="1000" minCon="10" balance="0" writeType="0"
dbType="mysql" dbDriver="native" switchType="1" slaveThreshold="100">
<!-- 对后端数据库服务器 发送的心跳检测 -->
<heartbeat>select user()</heartbeat>
<!-- can have multi write hosts -->
<!-- 4、配置后端真实数据库的相关登录信息 -->
<writeHost host="hostM1" url="192.168.17.100:3306" user="tp5shop"
password="$Abc3721">
<!-- can have multi read hosts -->
<readHost host="hostS2" url="192.168.17.105:3306" user="tp5shop"
password="$Abc3721" />
</writeHost>
<!-- <writeHost host="hostS1" url="localhost:3316" user="root" password="123456" />-
->
<!-- <writeHost host="hostM2" url="localhost:3316" user="root" password="123456"/> -
->
</dataHost>
</mycat:schema>
注意修改第7行,真实数据库的名称。
schema.xml详细配置:
<?xml version="1.0"?>
<!DOCTYPE mycat:schema SYSTEM "schema.dtd">
<mycat:schema xmlns:mycat="http://io.mycat/">
	<schema name="TESTDB" checkSQLschema="false" sqlMaxLimit="100" dataNode="dn3"></schema>
	<dataNode name="dn3" dataHost="localhost1" database="tp5shop" />
	<dataHost name="localhost1" maxCon="1000" minCon="10" balance="0" writeType="0" dbType="mysql" dbDriver="native" switchType="1"  slaveThreshold="100">
		<heartbeat>select user()</heartbeat>
		<!-- can have multi write hosts -->
		<writeHost host="hostM1" url="192.168.17.101:3306" user="tp5shop" password="ZTQ2YjZkMTJiMmRi">
			<!-- can have multi read hosts -->
			<readHost host="hostS2" url="192.168.17.105:3306" user="tp5shop" password="ZTQ2YjZkMTJiMmRi" />
		</writeHost>
		<!-- <writeHost host="hostS1" url="localhost:3316" user="root" password="123456" />-->
		<!-- <writeHost host="hostM2" url="localhost:3316" user="root" password="123456"/> -->
	</dataHost>
</mycat:schema>
③ 启动mycat服务
shell > /usr/local/mycat/bin/mycat start
#确认mycat是否真的启动,查看它的端口 9066 8066
shell > netstat -lntp|grep 8066
Tip:如果配置之后,启动mycat,不能够启动。
通过查看/usr/local/mycat/logs/wrapper.log。
7.4、mycat客户端
连接mycat客户端:
shell > mysql -h127.0.0.1 -uroot -p123456 -P8066执行查询命令测试结果:
mysql > show databases;
mysql > use TESTDB;
mysql > show tables;
7.5、mycat管理端
连接mycat管理端:
shell > mysql -h127.0.0.1 -uroot -p123456 -P9066执行管理命令查看:
mysql > show @@help; //查看管理监控端的所有帮助命令
mysql > show @@heartbeat; //查看服务器状态
7.6、业务代码配置
使用数据库中间件服务器实现读写分离和后端真实数据库的管理。 对于前端业务来说 ,数据操作需要连接的是数据库中间件服务器。 操作连接的是数据库中间件服务器,而不直接连接多实例的真实服务器了 。
① 修改项目数据库配置文件
shell > vim /usr/local/nginx/html/tp5shop/application/database.php配置文件示例:
return [
// 数据库类型
'type' => 'mysql',
// 服务器地址
// 1、连接mycat数据库中间件服务器
'hostname' => '192.168.17.106',
// 2、mycat对外映射的数据库名称
// 数据库名
'database' => 'TESTDB',
// 3、mycat对外映射的用户
// 用户名
'username' => 'root',
// 4、mycat对外映射的密码
// 密码
'password' => '123456',
// 端口
'hostport' => '3306',
// 连接dsn
'dsn' => '',
// 数据库连接参数
'params' => [],
// 数据库编码默认采用utf8
'charset' => 'utf8',
// 数据库表前缀
'prefix' => 'tpshop_',
// 数据库调试模式
'debug' => true,
// 5、使用数据库中间件,对于前端业务服务器来说,属于使用集中式单一服务器 配置为0
// 数据库部署方式:0 集中式(单一服务器),1 分布式(主从服务器)
'deploy' => 0,
// 6、集中式单一服务器 不在业务代码进行读写分离,交由数据库中间件去做 配置为false
// 数据库读写是否分离 主从式有效
'rw_separate' => false,
// 读写分离后 主服务器数量
'master_num' => 1,
// 指定从服务器序号
'slave_no' => '',
// 是否严格检查字段是否存在
② 测试访问
7.7、balance属性和writeType属性
balance 属性
负载均衡类型,目前的取值有 3 种:
1、balance="0", 不开启读写分离机制,所有读操作都发送到当前可用的 writeHost 上。
2、balance="1", 全部的readHost 与 stand by writeHost 参与 select 语句的负载均衡,简单的说,当双主双从模式(M1->S1,M2->S2,并且 M1与 M2 互为主备),正常情况下,M2,S1,S2 都参与 select 语句的负载均衡。
3、balance="2", 所有读操作都随机的在writeHost、readhost 上分发。 4、balance="3", 所有读请求随机的分发到 writerHost 对应的 readhost 执行,writerHost 不负担读压力,注意 balance=3 只在 1.4 及其以后版本有,1.3 没有。
writeType 属性
负载均衡类型,目前的取值有 3 种:
1、writeType="0", 所有写操作发送到配置的第一个 writeHost,第一个挂了切到还生存的第二个writeHost,重新启动后已切换后的为准。
2、writeType="1",所有写操作都随机的发送到配置的 writeHost,1.5 以后废弃不推荐。
switchType 属性
-1 表示不自动切换
1 默认值,自动切换
2 基于 MySQL 主从同步的状态决定是否切换
补充:
参考的配置文件:
keepalived.conf:
! Configuration File for keepalived

global_defs {
   notification_email {
     [email protected]
     [email protected]
     [email protected]
   }
   notification_email_from [email protected]
   smtp_server 192.168.200.1
   smtp_connect_timeout 30
   router_id LVS_DEVEL
}

vrrp_instance VI_1 {
    state MASTER
    interface eth0
    virtual_router_id 51
    priority 100
    advert_int 1
    authentication {
        auth_type PASS
        auth_pass 1111
    }
    virtual_ipaddress {
        192.168.17.205
    }
}

virtual_server 192.168.17.205 80 {
    delay_loop 6
    lb_algo wrr
    lb_kind DR
    #persistence_timeout 50
    protocol TCP

    real_server 192.168.17.101 80 {
        weight 1
        TCP_CHECK {
            connect_timeout 3
            nb_get_retry 3
            delay_before_retry 3
            connect_port 80
        }
    }

    real_server 192.168.17.103 80 {
        weight 1
        TCP_CHECK {
            connect_timeout 3
            nb_get_retry 3
            delay_before_retry 3
            connect_port 80
        }
    }
}
lvs_dr_ds_mysql.sh:
#!/bin/bash
## chkconfig: - 88 12
# description: LVS script for VS/DR
VIP=192.168.17.205
RIP1=192.168.17.101
RIP2=192.168.17.103
#GW=192.168.17.2
# 配置服务
case "$1" in
start)
  #DR配置绑定VIP
  ifconfig eth1:0 $VIP broadcast $VIP netmask 255.255.255.255 up
  #添加主机路由
  route add -host $VIP dev eth1:0
  #配置网卡转发
  echo 1 > /proc/sys/net/ipv4/ip_forward
  #配置网关
 # route del default
 # route add default gw $GW
  #判断安装ipvsadm
  rpm -qa|grep ipvsadm >> /dev/null
  if [ $? -ne 0 ];then
      yum -y install ipvsadm
  fi
  #清空lvs规则
  ipvsadm -C
  #添加一个转发服务
  ipvsadm -A -t $VIP:3306 -s rr
  #添加分发节点
  ipvsadm -a -t $VIP:3306 -r $RIP1 -g
  ipvsadm -a -t $VIP:3306 -r $RIP2 -g
;;

stop)
  #关闭网卡转发
  echo 0 > /proc/sys/net/ipv4/ip_forward
  #清空lvs规则
  ipvsadm -C
;;
status)
  #查看当前规则
  ipvsadm -Ln
;;
*)
  echo "Usage: $0 {start|stop}"
;; esac
haproxy.cfg:
#---------------------------------------------------------------------
# Example configuration for a possible web application.  See the
# full configuration options online.
#
#   http://haproxy.1wt.eu/download/1.4/doc/configuration.txt
#
#---------------------------------------------------------------------

#---------------------------------------------------------------------
# Global settings
#---------------------------------------------------------------------
global
    # to have these messages end up in /var/log/haproxy.log you will
    # need to:
    #
    # 1) configure syslog to accept network log events.  This is done
    #    by adding the '-r' option to the SYSLOGD_OPTIONS in
    #    /etc/sysconfig/syslog
    #
    # 2) configure local2 events to go to the /var/log/haproxy.log
    #   file. A line like the following can be added to
    #   /etc/sysconfig/syslog
    #
    #    local2.*                       /var/log/haproxy.log
    #
    log         127.0.0.1 local2

    chroot      /var/lib/haproxy
    pidfile     /var/run/haproxy.pid
    maxconn     4000
    user        haproxy
    group       haproxy
    daemon

    # turn on stats unix socket
    stats socket /var/lib/haproxy/stats

#---------------------------------------------------------------------
# common defaults that all the 'listen' and 'backend' sections will
# use if not designated in their block
#---------------------------------------------------------------------
defaults
    mode                    tcp
    log                     global
    option                  httplog
    option                  dontlognull
    option http-server-close
    option forwardfor       except 127.0.0.0/8
    option                  redispatch
    retries                 3
    timeout http-request    10s
    timeout queue           1m
    timeout connect         10s
    timeout client          1m
    timeout server          1m
    timeout http-keep-alive 10s
    timeout check           10s
    maxconn                 3000
listen stats
    mode http
    bind *:1090
    stats enable
    stats hide-version
    stats uri    /hadmin?stats
    stats realm  Haproxy\ Statistics
    stats auth    admin:admin
    stats admin if TRUE
#---------------------------------------------------------------------
# main frontend which proxys to the backends
#---------------------------------------------------------------------
frontend  main *:3306
    #acl url_static       path_beg       -i /static /images /javascript /stylesheets
    #acl url_static       path_end       -i .jpg .gif .png .css .js

    #use_backend static          if url_static
    default_backend             app

#---------------------------------------------------------------------
# static backend for serving up images, stylesheets and such
#---------------------------------------------------------------------
backend static
    balance     roundrobin
    server      static 127.0.0.1:4331 check

#---------------------------------------------------------------------
# round robin balancing between the various backends
#---------------------------------------------------------------------
backend app
    balance     roundrobin
    server  mysql1 192.168.17.101:3306 check
    server  mysql2 192.168.17.103:3306 check
    #server  app3 127.0.0.1:5003 check
    #server  app4 127.0.0.1:5004 check
8、企业架构MySQL复制技术
1. 业务背景
pv 总访问次数;
qps 每秒并发数;
DAU 每日活跃用户数;
之前web服务器已经进行过升级,nginx解析静态文件和php解析动态文件,压力比较小了。但是当连接数据库查询数据时,MySQL服务器出现了宕机情况,服务不可用情况,数据查询返回速度很慢,连接数很多,开启最大连接数和连接超时时间也没有很好的效果。
2. 模拟架构实现
根据以上的业务背景需求,提供如下解决方案。
之前是单台MySQL提供服务,使用多台MySQL数据库服务器,降低单台压力,实现集群架构的稳定性和高可用性。
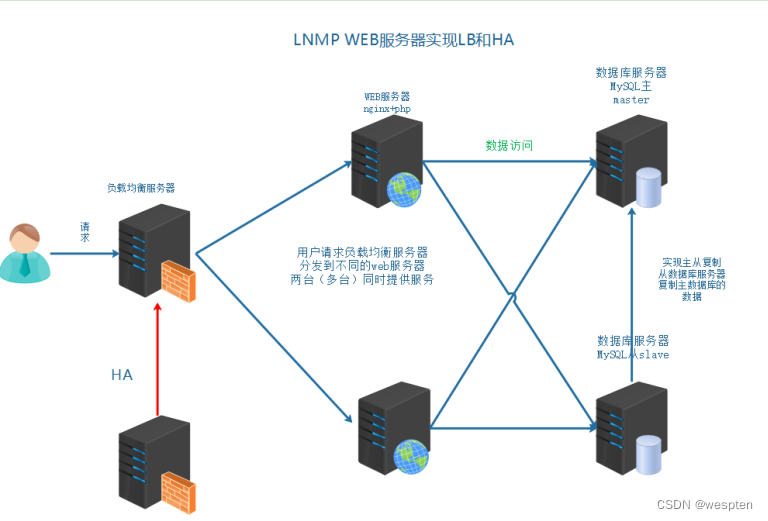
以上架构的问题:
使用多台数据库服务器,必须保证数据信息的一致性。
Replication是一项用途广泛的MySQL技术
什么是MySQL Replication?
Replication可以实现将数据从⼀台数据库服务器(master)复制一台到多台数据。
库服务器(slave)
默认情况下,属于异步复制。因此无需维持长连接。
主从复制 主服务器提供权限和数据,让从服务器进行同步和复制。
客观上,是存在数据延迟的 。
3. 复制的使用范围
Replication的用途:
① Fail Over 故障切换
② Backup Server 备用服务器
③ High Performance 高性能
④ 机械故障 远程灾备
4. 复制原理
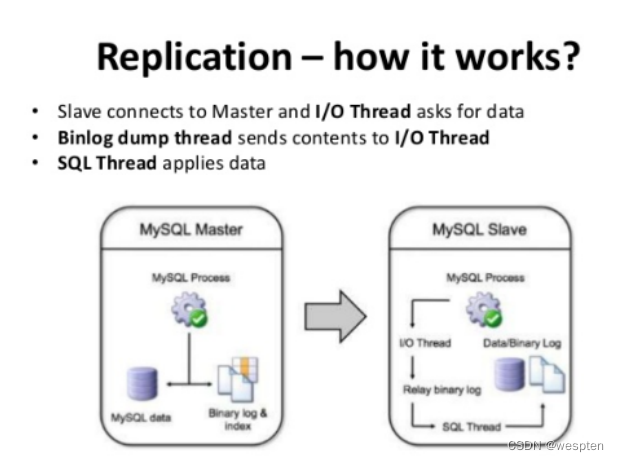
简单的说,就是master将数据库的改变写入bin-log二进制日志,slave同步这些二进制
日志,并根据这些二进制日志进行数据操作。

1. 在主库上把数据更改(DDL DML DCL)记录到二进制日志(Binary Log)中;
2. 备库I/O线程将主库上的日志复制到自己的中继日志(Relay Log)中;
3. 备库SQL线程读取中继日志中的事件,将其重放到备库数据库之上;
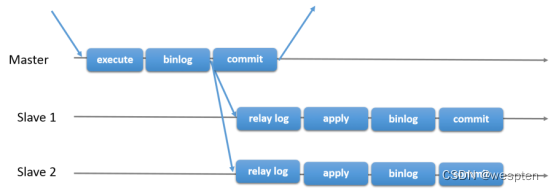
5. 复制类型
①主从复制 M-S
一台master 写bin-log;
一台slave 读master的bin-log 写relay-log 重放relay-log 执行SQL;
② 主主复制 M-M
master和slave互为主从:
mater1(salve2);
mater1(salve2) 作为 master2(slave1)的主服务器;
两对主从 互为主从:
master1->slave1 是主从;
slave2->master2 是主从;
③ M-S-S
slave1同步master slave2同步slave2;
为了降低master的压力;

6. 案列实现
需要两台数据库服务器,先进行克隆和基础环境的配置(FQDN network)。
在主从复制中,在mysql5.0以上版本支持的 。最好主从服务器版本一致,起码大版本一致。
mysql5.5.33、mysql5.5.40:
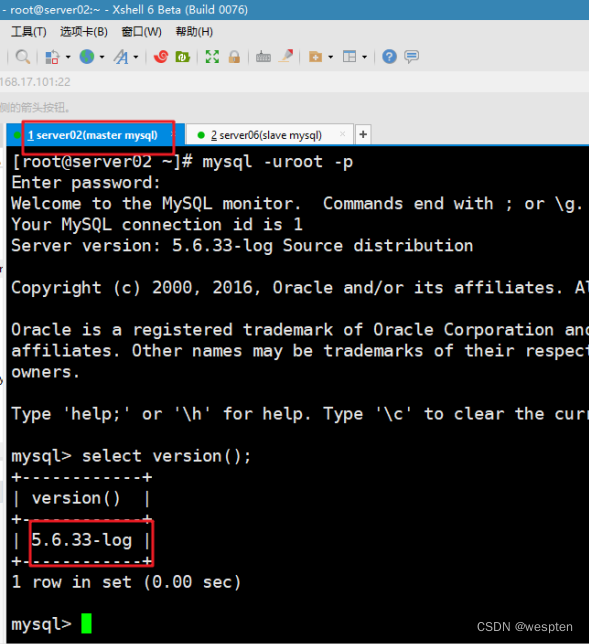

6.1、传统主从
slave同步master服务器:
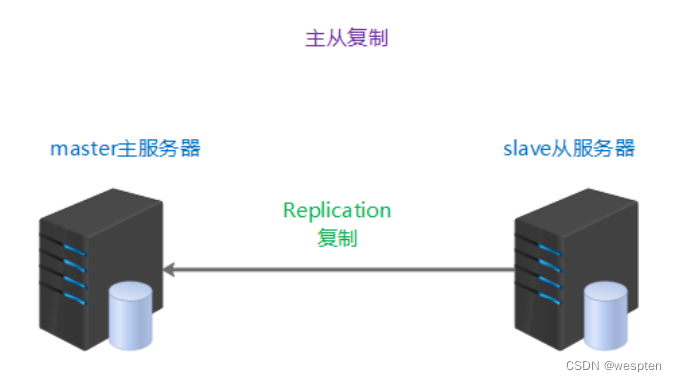
master  server02 192.168.17.101
slave   server06  192.168.17.108
1)master配置:
① 在master服务器授权,slave服务器replication slave权限
slave是通过MySQL连接登录到master上来读取二进制日志的,因此需要在master上给slave配置权限:
mysql > grant replication slave on *.* to 'slave1'@'192.168.17.108'identified by '123456';② master服务器打开bin-log日志,并标识server-id
shell > vim /etc/my.cnf
[mysqld]
log-bin = mysql-index
server-id = 1
重启mysql。
③ 制作一个完整的备份
shell > mysqldump -uroot -p'123456' --all-databases > /root/mysql.sql④ 查看master上的bin-log及其position位置
mysql > show master status;
2)slave配置
① 恢复备份文件
如果slave和master的数据本身就是相同的,可以不选择备份和导入:
shell > mysql -uroot -p'123456' < /tmp/mysql.sql② 配置server-id,标识服务器
shell > vim /etc/my.cnf
[mysqld]
server-id=2
重启mysql服务。
在slave服务器上配置slave服务器,通过启动slave服务,让从服务器到主服务器读取日志。
③配置slave replication
mysql > stop slave;(如果之前已经配置过)
mysql> change master to master_host='192.168.17.101',master_user='slave1',master_password='123456',master_log_file='mysql-bin.000002',master_log_pos=333;
参数说明:
master_host:主master的IP
master_user:主master允许登录,拥有replication slave权限
master_password:用户的密码
需要通过mysql > show master status; 在master执行
master_log_file:主master记录的bin-log日志文件名称
master_log_pos:主master记录的bin-log日志文件对应的位置
④ 启动replication,并检查结果
mysql > start slave;
mysql > show slave status\G;
出现问题:
mysql5.6以上加入了server-UUID的区分服务器唯一性:
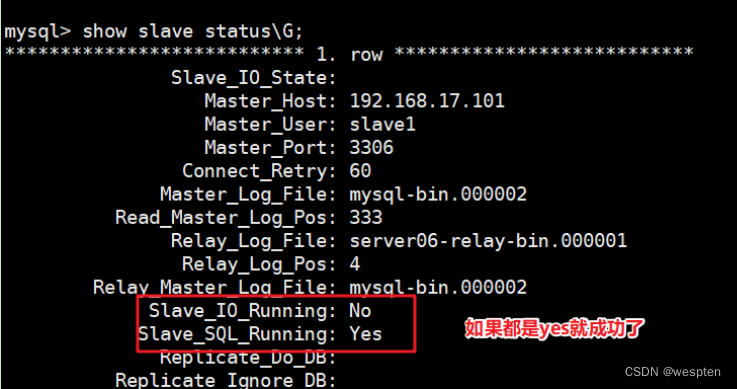
这里可以看到错误的信息,如果看不懂,就通过搜索引擎查询:

解决方法:
把slave的/usr/local/mysql/data/auto.cnf 删除,重启mysqld即可。

可以删除或者简单修改就可以。
/usr/local/mysql/data/auto.cnf:
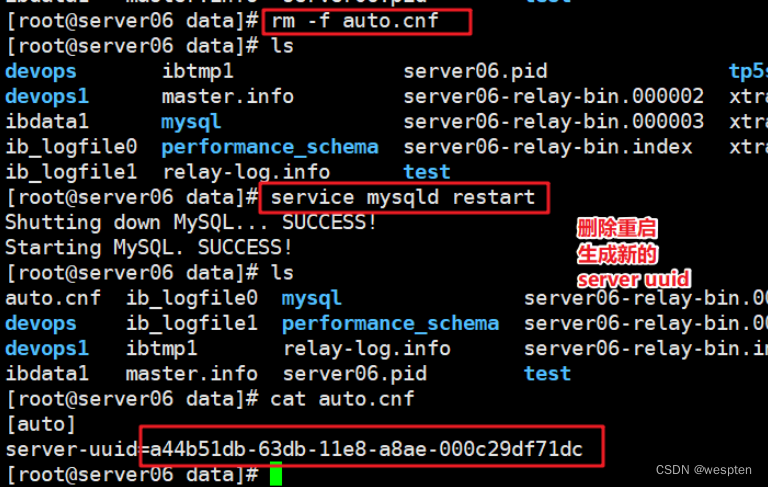
正常搭建成功的master=>slave的状态:
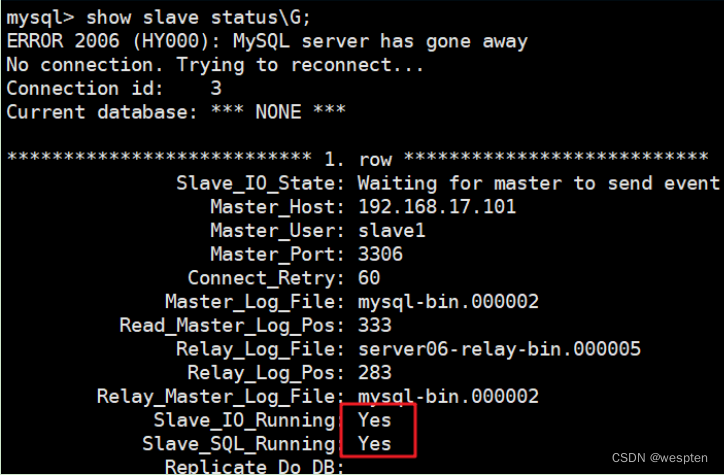
测试主从效果:

Tip:如果主从复制不成功。
试从以下几个方面分析问题,解决问题之后再从配置从服务器第③步进行操作,恢复主从。
① 主服务器server-id 1,开启bin-log,建立一个replication slave权限的用户

②主服务器防火墙远程3306端口开启,从服务器需要连接同步
③从服务器指向主服务器的参数信息是否正确 change语法的相关指向信息

6.2、延时复制

应用场景 :
①误删除恢复 主误删除了 因为从延迟执行语句,数据还是之前的状态
②延迟测试
③历史查询
slave服务器配置:
mysql > stop slave;
mysql > change master to master_delay = 60;
测试延时复制。
在master直接执行操作,查看slave服务器的slave状态:
mysql > show slave status\G;
6.3、半同步复制
默认主从复制是异步的,master执行之后,slave可能没有执行完。
半同步:等待同步时间,如果超过这个时间,就恢复使用异步复制。
为了保证数据的一致性 :

① 检测MySQL插件是否支持动态载入
mysql> show global variables like 'have_dynamic_loading';在master和slave都需要查看一下:
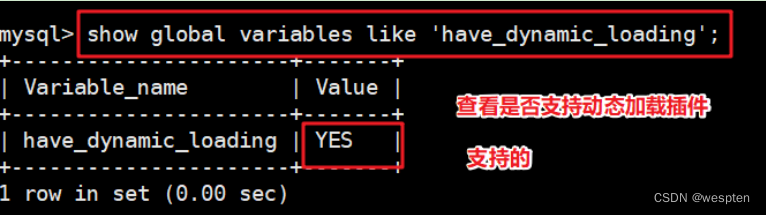
② 查看插件所在目录
mysql> show global variables like 'plugin_dir';

③ 在master上执行安装同步插件
mysql> install plugin rpl_semi_sync_master soname 'semisync_master.so';
mysql> set global rpl_semi_sync_master_enabled = 1;
mysql> set global rpl_semi_sync_master_timeout = 3000;   //同步超时时间毫秒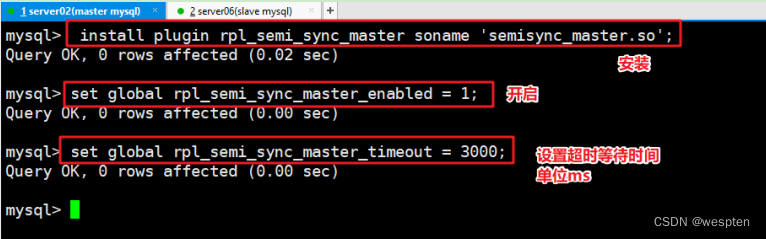
④ 在slave上执行安装同步插件
mysql> install plugin rpl_semi_sync_slave soname 'semisync_slave.so';
mysql> set global rpl_semi_sync_slave_enabled = 1;
mysql> stop slave io_thread;
mysql> start slave io_thread;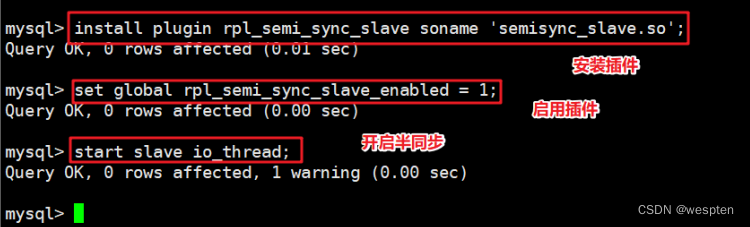
验证半同步的存在。
⑤ 测试停止slave stop
slave执行:
mysql > stop slave;在slave执行stop slave之后,在master进行测试,会看到超时等待了3000ms,又走了异步复制。
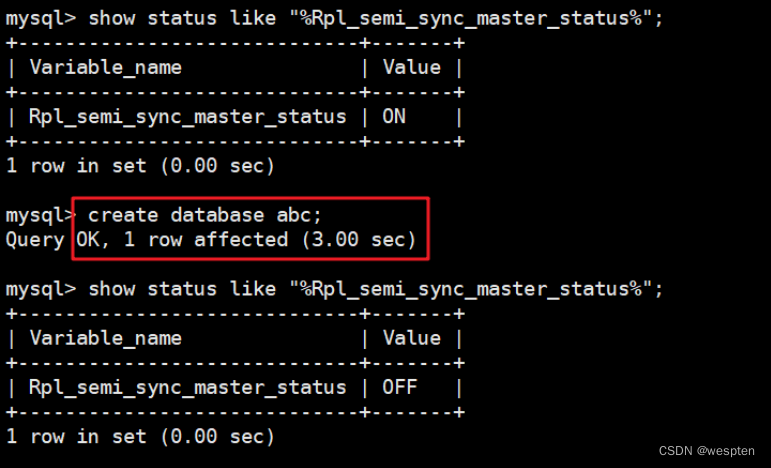
查看半同步服务状态。
master查看:
mysql > show status like "%Rpl_semi_sync_master_status%";
slave查看:
mysql > show status like "%Rpl_semi_sync_slave_status%";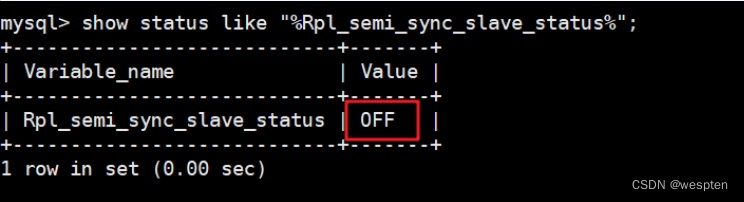
注:
rpl_semi_sync_master_enabled:控制Master是否开启半同步,开启或不开启,将其设置为ON或OFF(1 or 0)
rpl_semi_sync_master_timeout:控制Master等待多长时间被告知Slave已收到,也就是所谓的超时时间,单位是毫秒
rpl_semi_sync_slave_enabled:控制Slave是否开启半同步,开启或不开启,将其设置为ON或OFF(1 or 0)
也可以将配置写入到/etc/my.cnf的配置文件中,mysql启动会自动加载:
Master服务器设置
[mysqld]
rpl_semi_sync_master_enabled = 1
rpl_semi_sync_master_timeout = 1000  # 1s
Slave服务器设置
[mysqld]
rpl_semi_sync_slave_enabled = 1
6.4、互为主从

在主从的基础上 slave业务上不允许写,可以随意操作两台服务器,都可以读都可以写
master(slave2) master2(slave1)
以下是在server06之前的slave服务器进行操作现在的master2。
① master2(slave) server06开启复制用户


② 开启bin-log
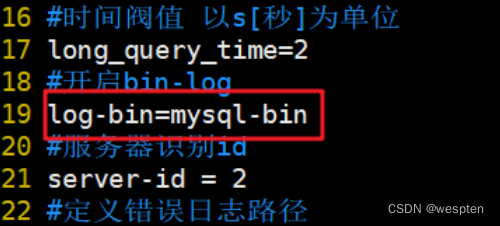
重启mysqld服务。
③ 查看master status

这里是用来配置日志文件和日志记录到的位置,以下是在server02之前的master上配置,现在的slave2。
① 配置slave服务
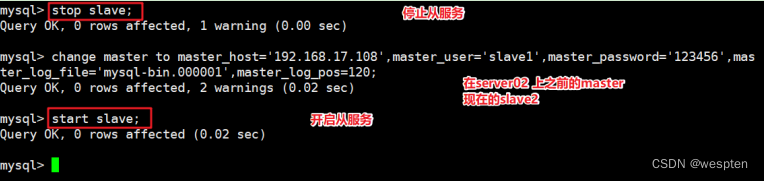
②查看slave状态并测试
在server02执行:
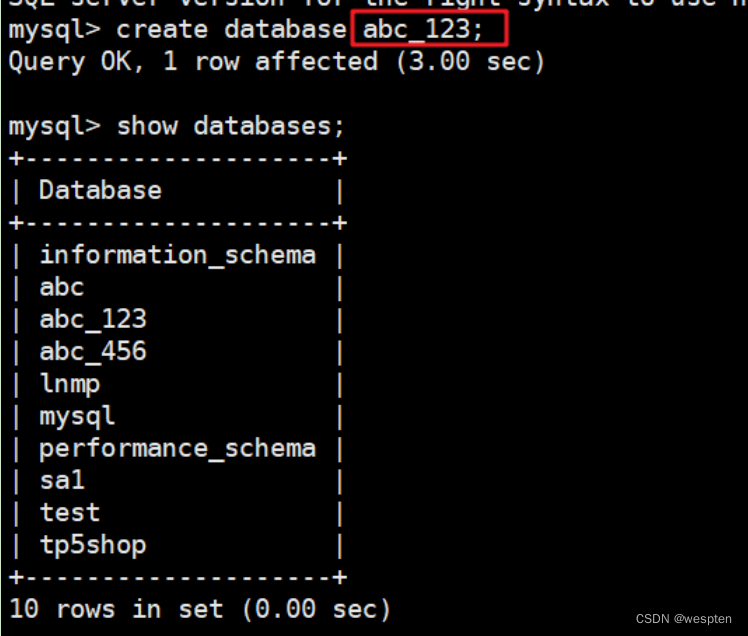
server06同步:

在server06执行:

server02同步:
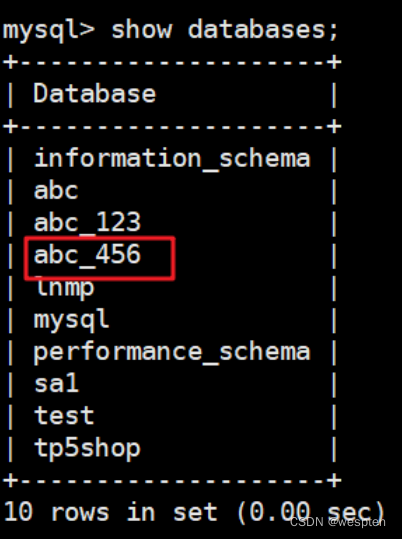
总结:
主从复制:主服务器提供二进制日志文件,从服务器读取bin-log 写入relay-log 重放SQL,实现数据的复制功能
延时复制:从延迟时间复制主服务器的bin-log 主误操作,不会及时影响到从服务器,从服务器可以作为恢复依据
半同步复制:正常主从复制 是异步的,可能会出现造成主从数据不一致,可以通过半同步的方式,保证从的relay-log写入了,才回复给主,主完成整个操作。保证了主和从的数据是一直一致的。如果slave挂了,一直没有回复主,主超过等待时间,会使用异步复制
互为主从:在主从的基础上,实现双台服务器,都可以进行读写操作
两对主从,互为主从 双主结构 M-M。