kubernetes 部署工具:sealos
tags: 部署

文章目录
1. 简介
sealos 是以 kubernetes 为内核的云操作系统发行版
早期单机操作系统也是分层架构,后来才演变成 linux windows 这种内核架构,云操作系统从容器诞生之日起分层架构被击穿,未来也会朝着高内聚的"云内核"架构迁移
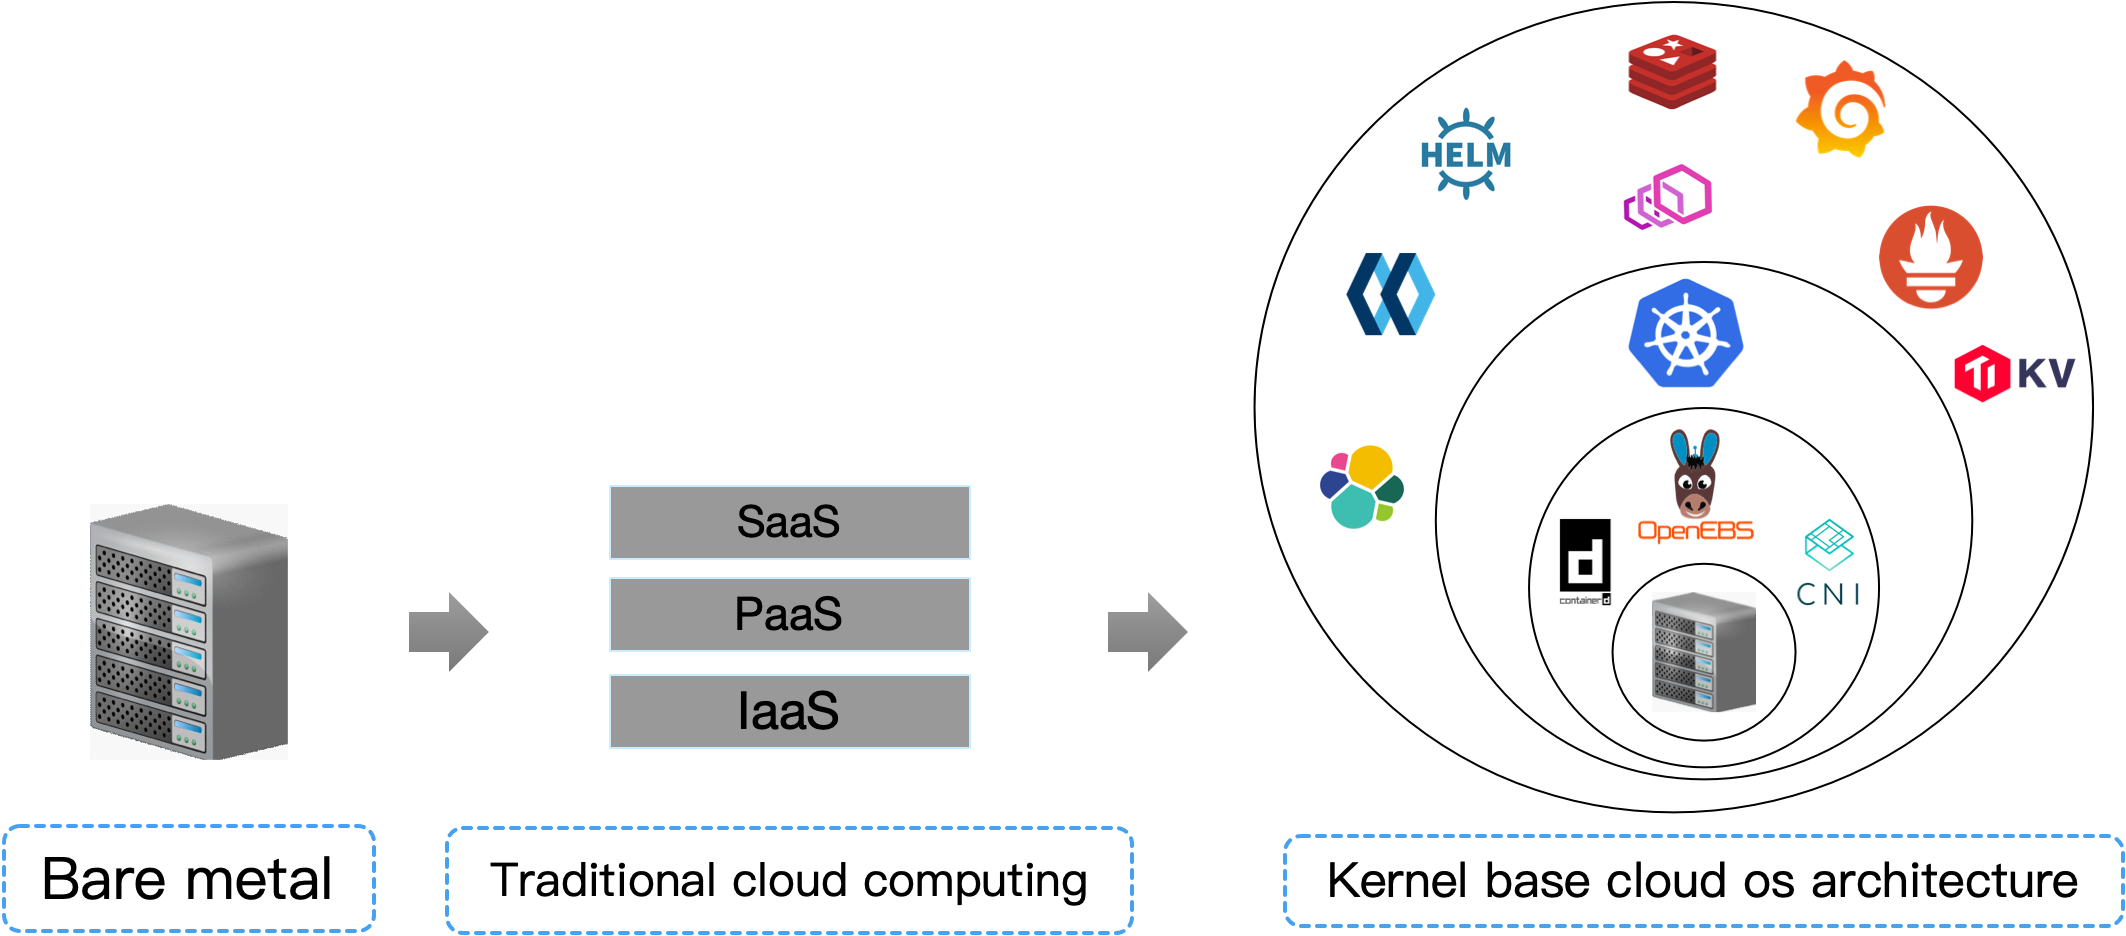
-
从现在开始,把你数据中心所有机器想象成一台"抽象"的超级计算机,sealos 就是用来管理这台超级计算机的操作系统,kubernetes 就是这个操作系统的内核!
-
云计算从此刻起再无 IaaS PaaS SaaS 之分,只有云操作系统驱动(CSI CNI CRI 实现) 云操作系统内核(kubernetes) 和 分布式应用组成。
2. 特性
-
管理集群生命周期
- 快速安装高可用 Kubernetes 集群
- 添加/删除节点
- 清理集群、备份与自动恢复等
-
下载和使用完全兼容 OCI 标准的分布式应用
- OpenEBS, MinIO, Ingress, PostgreSQL, MySQL, Redis 等
-
定制化分布式应用
- 用 Dockerfile 构建分布式应用镜像,保存所有的依赖
- 发布分布式应用镜像到 Docker Hub
- 融合多个应用构建专属的云平台
-
sealos desktop
- 像使用 win11 一样使用云 (2022.9 惊艳上线)
3. 安装 sealos
3.1 先决条件
sealos 是一个简单的 go 二进制文件,可以安装在大多数 Linux 操作系统中。
以下是一些基本的安装要求:
- 每个集群节点应该有不同的主机名。 主机名不要带下划线。
- 所有节点的时间同步。
- 在kubernetes集群的第一个节点上运行
sealos run命令,目前集群外的节点不支持集群安装。 - 建议使用干净的操作系统来创建集群。不要自己装 Docker
- 支持大多数 Linux 发行版,例如:
UbuntuCentOSRocky linux。 - 在
dockerhub 支持 kubernetes 版本。 - 支持容器运行时是
containerd。发布的 CPU 架构架构是amd64和arm64。
3.2 二进制安装
3.2.1 amd64
$ wget https://github.com/labring/sealos/releases/download/v4.0.0/sealos_4.0.0_linux_amd64.tar.gz \
   && tar zxvf sealos_4.0.0_linux_amd64.tar.gz sealos && chmod +x sealos && mv sealos /usr/bin
3.2.2 arm64
$ wget https://github.com/labring/sealos/releases/download/v4.0.0/sealos_4.0.0_linux_arm64.tar.gz \
   && tar zxvf sealos_4.0.0_linux_arm64.tar.gz sealos && chmod +x sealos && mv sealos /usr/bin
3.3 apt 安装
echo "deb [trusted=yes] https://apt.fury.io/labring/ /" | sudo tee /etc/apt/sources.list.d/labring.list
sudo apt update
sudo apt install sealos
3.4 yum 安装
sudo cat > /etc/yum.repos.d/labring.repo << EOF
[fury]
name=labring Yum Repo
baseurl=https://yum.fury.io/labring/
enabled=1
gpgcheck=0
EOF
sudo yum update
sudo yum install sealos
3.5 源码安装
源码安装
前置依赖
- git
- golang 1.19+
- libgpgme-dev libbtrfs-dev libdevmapper-dev
如果在 arm64 环境下需要添加 :arm64 后缀
打包
# git clone the repo
git clone https://github.com/labring/sealos.git
# just make it
make build
4. sealo 命令
4.1 参数
sealos  -h
simplest way install kubernetes tools.

Usage:
  sealos [command]

Available Commands:
  add         add some nodes
  apply       apply a kubernetes cluster
  build       build an cloud image from a Kubefile
  completion  Generate the autocompletion script for the specified shell
  create      create a cluster without running the CMD
  delete      delete some node
  docs        generate API reference
  exec        exec a shell command or script on all node.
  gen         generate a Clusterfile
  help        Help about any command
  images      list cloud image
  inspect     inspect the configuration of a application or image
  load        load cloud image
  login       login image repository
  logout      logout image repository
  prune       prune image
  pull        pull cloud image
  push        push cloud image
  reset       simplest way to reset your cluster
  rmi         remove one or more cloud images
  run         simplest way to run your kubernetes HA cluster
  save        save cloud image to a tar file
  scp         copy local file to remote on all node.
  tag         tag a image as a new one
  version     version

Flags:
      --cluster-root string   cluster root directory (default "/var/lib/sealos")
      --debug                 enable debug logger
  -h, --help                  help for sealos

Use "sealos [command] --help" for more information about a command.
5. sealos 安装 kubernetes 集群
5.1 单机在线安装
$ sealos run labring/kubernetes:v1.25.0 labring/calico:v3.24.1 --masters 192.168.10.61 -p redhat
输出:
2022-10-14T15:58:43 info Start to create a new cluster: master [192.168.10.61], worker []
2022-10-14T15:58:43 info Executing pipeline Check in CreateProcessor.
2022-10-14T15:58:43 info checker:hostname [192.168.10.61:22]
2022-10-14T15:58:43 info checker:timeSync [192.168.10.61:22]
2022-10-14T15:58:43 info Executing pipeline PreProcess in CreateProcessor.
c66205961bc8f650543cee92361987ce5e1ad77de4c85fc39e2b609734c6f3e8
e2122fc58fd32f1c93ac75da5c473aed746f1ad9b31a73d1f81a0579b96e775b
default-8ehumfes
default-ya7t5b2p
2022-10-14T15:58:43 info Executing pipeline RunConfig in CreateProcessor.
2022-10-14T15:58:43 info Executing pipeline MountRootfs in CreateProcessor.
which: no docker in (/usr/local/sbin:/usr/local/bin:/usr/sbin:/usr/bin:/usr/local/go/bin:/root/go/bin:/root/bin)
 INFO [2022-10-14 15:58:47] >> check root,port,cri success
Created symlink from /etc/systemd/system/multi-user.target.wants/containerd.service to /etc/systemd/system/containerd.service.
 INFO [2022-10-14 15:58:52] >> Health check containerd!
 INFO [2022-10-14 15:58:52] >> containerd is running
 INFO [2022-10-14 15:58:52] >> init containerd success
Created symlink from /etc/systemd/system/multi-user.target.wants/image-cri-shim.service to /etc/systemd/system/image-cri-shim.service.
 INFO [2022-10-14 15:58:52] >> Health check image-cri-shim!
 INFO [2022-10-14 15:58:52] >> image-cri-shim is running
 INFO [2022-10-14 15:58:52] >> init shim success
* Applying /usr/lib/sysctl.d/00-system.conf ...
net.bridge.bridge-nf-call-ip6tables = 0
net.bridge.bridge-nf-call-iptables = 0
net.bridge.bridge-nf-call-arptables = 0
* Applying /usr/lib/sysctl.d/10-default-yama-scope.conf ...
* Applying /usr/lib/sysctl.d/50-default.conf ...
kernel.sysrq = 16
kernel.core_uses_pid = 1
kernel.kptr_restrict = 1
net.ipv4.conf.default.rp_filter = 1
net.ipv4.conf.all.rp_filter = 1
net.ipv4.conf.default.accept_source_route = 0
net.ipv4.conf.all.accept_source_route = 0
net.ipv4.conf.default.promote_secondaries = 1
net.ipv4.conf.all.promote_secondaries = 1
fs.protected_hardlinks = 1
fs.protected_symlinks = 1
* Applying /etc/sysctl.d/99-sysctl.conf ...
* Applying /etc/sysctl.d/ipv6.conf ...
net.ipv6.conf.all.disable_ipv6 = 1
* Applying /etc/sysctl.d/k8s.conf ...
net.bridge.bridge-nf-call-ip6tables = 1
net.bridge.bridge-nf-call-iptables = 1
net.ipv4.conf.all.rp_filter = 0
* Applying /etc/sysctl.conf ...
net.ipv4.ip_forward = 1
 INFO [2022-10-14 15:58:53] >> init kube success
 INFO [2022-10-14 15:58:53] >> init containerd rootfs success
2022-10-14T15:58:54 info Executing pipeline Init in CreateProcessor.
2022-10-14T15:58:54 info start to copy kubeadm config to master0
2022-10-14T15:58:55 info start to generate cert and kubeConfig...
2022-10-14T15:58:55 info start to generator cert and copy to masters...
2022-10-14T15:58:55 info apiserver altNames : {

    map[apiserver.cluster.local:apiserver.cluster.local kubernetes:kubernetes kubernetes.default:kubernetes.default kubernetes.default.svc:kubernetes.default.svc kubernetes.default.svc.cluster.local:kubernetes.default.svc.cluster.local localhost:localhost master1:master1] map[10.103.97.2:10.103.97.2 10.96.0.1:10.96.0.1 127.0.0.1:127.0.0.1 192.168.10.61:192.168.10.61]}
2022-10-14T15:58:55 info Etcd altnames : {

    map[localhost:localhost master1:master1] map[127.0.0.1:127.0.0.1 192.168.10.61:192.168.10.61 ::1:::1]}, commonName : master1
2022-10-14T15:59:04 info start to copy etc pki files to masters
2022-10-14T15:59:04 info start to create kubeconfig...
2022-10-14T15:59:07 info start to copy kubeconfig files to masters
2022-10-14T15:59:07 info start to copy static files to masters
2022-10-14T15:59:07 info start to apply registry
Created symlink from /etc/systemd/system/multi-user.target.wants/registry.service to /etc/systemd/system/registry.service.
 INFO [2022-10-14 15:59:07] >> Health check registry!
 INFO [2022-10-14 15:59:07] >> registry is running
 INFO [2022-10-14 15:59:07] >> init registry success
2022-10-14T15:59:07 info start to init master0...
2022-10-14T15:59:07 info registry auth in node 192.168.10.61:22
2022-10-14T15:59:08 info domain sealos.hub:192.168.10.61 append success
2022-10-14T15:59:08 info domain apiserver.cluster.local:192.168.10.61 append success
W1014 15:59:08.761092   19002 initconfiguration.go:119] Usage of CRI endpoints without URL scheme is deprecated and can cause kubelet errors in the future. Automatically prepending scheme "unix" to the "criSocket" with value "/run/containerd/containerd.sock". Please update your configuration!
[init] Using Kubernetes version: v1.25.0
[preflight] Running pre-flight checks
	[WARNING FileExisting-socat]: socat not found in system path
[preflight] Pulling images required for setting up a Kubernetes cluster
[preflight] This might take a minute or two, depending on the speed of your internet connection
[preflight] You can also perform this action in beforehand using 'kubeadm config images pull'
[certs] Using certificateDir folder "/etc/kubernetes/pki"
[certs] Using existing ca certificate authority
[certs] Using existing apiserver certificate and key on disk
[certs] Using existing apiserver-kubelet-client certificate and key on disk
[certs] Using existing front-proxy-ca certificate authority
[certs] Using existing front-proxy-client certificate and key on disk
[certs] Using existing etcd/ca certificate authority
[certs] Using existing etcd/server certificate and key on disk
[certs] Using existing etcd/peer certificate and key on disk
[certs] Using existing etcd/healthcheck-client certificate and key on disk
[certs] Using existing apiserver-etcd-client certificate and key on disk
[certs] Using the existing "sa" key
[kubeconfig] Using kubeconfig folder "/etc/kubernetes"
[kubeconfig] Using existing kubeconfig file: "/etc/kubernetes/admin.conf"
[kubeconfig] Using existing kubeconfig file: "/etc/kubernetes/kubelet.conf"
W1014 15:59:53.929922   19002 kubeconfig.go:249] a kubeconfig file "/etc/kubernetes/controller-manager.conf" exists already but has an unexpected API Server URL: expected: https://192.168.10.61:6443, got: https://apiserver.cluster.local:6443
[kubeconfig] Using existing kubeconfig file: "/etc/kubernetes/controller-manager.conf"
W1014 15:59:54.931774   19002 kubeconfig.go:249] a kubeconfig file "/etc/kubernetes/scheduler.conf" exists already but has an unexpected API Server URL: expected: https://192.168.10.61:6443, got: https://apiserver.cluster.local:6443
[kubeconfig] Using existing kubeconfig file: "/etc/kubernetes/scheduler.conf"
[kubelet-start] Writing kubelet environment file with flags to file "/var/lib/kubelet/kubeadm-flags.env"
[kubelet-start] Writing kubelet configuration to file "/var/lib/kubelet/config.yaml"
[kubelet-start] Starting the kubelet
[control-plane] Using manifest folder "/etc/kubernetes/manifests"
[control-plane] Creating static Pod manifest for "kube-apiserver"
[control-plane] Creating static Pod manifest for "kube-controller-manager"
[control-plane] Creating static Pod manifest for "kube-scheduler"
[etcd] Creating static Pod manifest for local etcd in "/etc/kubernetes/manifests"
[wait-control-plane] Waiting for the kubelet to boot up the control plane as static Pods from directory "/etc/kubernetes/manifests". This can take up to 4m0s
[apiclient] All control plane components are healthy after 13.505355 seconds
[upload-config] Storing the configuration used in ConfigMap "kubeadm-config" in the "kube-system" Namespace
[kubelet] Creating a ConfigMap "kubelet-config" in namespace kube-system with the configuration for the kubelets in the cluster
[upload-certs] Skipping phase. Please see --upload-certs
[mark-control-plane] Marking the node master1 as control-plane by adding the labels: [node-role.kubernetes.io/control-plane node.kubernetes.io/exclude-from-external-load-balancers]
[mark-control-plane] Marking the node master1 as control-plane by adding the taints [node-role.kubernetes.io/control-plane:NoSchedule]
[bootstrap-token] Configuring bootstrap tokens, cluster-info ConfigMap, RBAC Roles
[bootstrap-token] Configured RBAC rules to allow Node Bootstrap tokens to get nodes
[bootstrap-token] Configured RBAC rules to allow Node Bootstrap tokens to post CSRs in order for nodes to get long term certificate credentials
[bootstrap-token] Configured RBAC rules to allow the csrapprover controller automatically approve CSRs from a Node Bootstrap Token
[bootstrap-token] Configured RBAC rules to allow certificate rotation for all node client certificates in the cluster
[bootstrap-token] Creating the "cluster-info" ConfigMap in the "kube-public" namespace
[kubelet-finalize] Updating "/etc/kubernetes/kubelet.conf" to point to a rotatable kubelet client certificate and key
[addons] Applied essential addon: CoreDNS
[addons] Applied essential addon: kube-proxy

Your Kubernetes control-plane has initialized successfully!

To start using your cluster, you need to run the following as a regular user:

  mkdir -p $HOME/.kube
  sudo cp -i /etc/kubernetes/admin.conf $HOME/.kube/config
  sudo chown $(id -u):$(id -g) $HOME/.kube/config

Alternatively, if you are the root user, you can run:

  export KUBECONFIG=/etc/kubernetes/admin.conf

You should now deploy a pod network to the cluster.
Run "kubectl apply -f [podnetwork].yaml" with one of the options listed at:
  https://kubernetes.io/docs/concepts/cluster-administration/addons/

You can now join any number of control-plane nodes by copying certificate authorities
and service account keys on each node and then running the following as root:

  kubeadm join apiserver.cluster.local:6443 --token <value withheld> \
	--discovery-token-ca-cert-hash sha256:31904857384ceab70b28116385948f8d3381bf0de4c2951136cfbed1978e0bee \
	--control-plane --certificate-key <value withheld>

Then you can join any number of worker nodes by running the following on each as root:

kubeadm join apiserver.cluster.local:6443 --token <value withheld> \
	--discovery-token-ca-cert-hash sha256:31904857384ceab70b28116385948f8d3381bf0de4c2951136cfbed1978e0bee
2022-10-14T16:00:10 info Executing pipeline Join in CreateProcessor.
2022-10-14T16:00:10 info start to get kubernetes token...
2022-10-14T16:00:12 info Executing pipeline RunGuest in CreateProcessor.
2022-10-14T16:00:12 info guest cmd is kubectl create namespace tigera-operator
namespace/tigera-operator created
2022-10-14T16:00:12 info guest cmd is helm install calico charts/calico --namespace tigera-operator
NAME: calico
LAST DEPLOYED: Fri Oct 14 16:00:16 2022
NAMESPACE: tigera-operator
STATUS: deployed
REVISION: 1
TEST SUITE: None
2022-10-14T16:00:20 info succeeded in creating a new cluster, enjoy it!
2022-10-14T16:00:20 info
      ___           ___           ___           ___       ___           ___
     /\  \         /\  \         /\  \         /\__\     /\  \         /\  \
    /::\  \       /::\  \       /::\  \       /:/  /    /::\  \       /::\  \
   /:/\ \  \     /:/\:\  \     /:/\:\  \     /:/  /    /:/\:\  \     /:/\ \  \
  _\:\~\ \  \   /::\~\:\  \   /::\~\:\  \   /:/  /    /:/  \:\  \   _\:\~\ \  \
 /\ \:\ \ \__\ /:/\:\ \:\__\ /:/\:\ \:\__\ /:/__/    /:/__/ \:\__\ /\ \:\ \ \__\
 \:\ \:\ \/__/ \:\~\:\ \/__/ \/__\:\/:/  / \:\  \    \:\  \ /:/  / \:\ \:\ \/__/
  \:\ \:\__\    \:\ \:\__\        \::/  /   \:\  \    \:\  /:/  /   \:\ \:\__\
   \:\/:/  /     \:\ \/__/        /:/  /     \:\  \    \:\/:/  /     \:\/:/  /
    \::/  /       \:\__\         /:/  /       \:\__\    \::/  /       \::/  /
     \/__/         \/__/         \/__/         \/__/     \/__/         \/__/

                  Website :https://www.sealos.io/
                  Address :github.com/labring/sealos
如果安装失败,类似以下情况:
2022-10-14T15:18:06 info sync new version copy pki config: /var/lib/sealos/data/default/pki /root/.sealos/default/pki
2022-10-14T15:18:06 info sync new version copy etc config: /var/lib/sealos/data/default/etc /root/.sealos/default/etc
2022-10-14T15:18:06 info start to install app in this cluster
2022-10-14T15:18:06 info succeeded install app in this cluster: no change apps
2022-10-14T15:18:06 info start to scale this cluster
2022-10-14T15:18:06 info succeeded in scaling this cluster: no change nodes
2022-10-14T15:18:06 info
      ___           ___           ___           ___       ___           ___
     /\  \         /\  \         /\  \         /\__\     /\  \         /\  \
    /::\  \       /::\  \       /::\  \       /:/  /    /::\  \       /::\  \
   /:/\ \  \     /:/\:\  \     /:/\:\  \     /:/  /    /:/\:\  \     /:/\ \  \
  _\:\~\ \  \   /::\~\:\  \   /::\~\:\  \   /:/  /    /:/  \:\  \   _\:\~\ \  \
 /\ \:\ \ \__\ /:/\:\ \:\__\ /:/\:\ \:\__\ /:/__/    /:/__/ \:\__\ /\ \:\ \ \__\
 \:\ \:\ \/__/ \:\~\:\ \/__/ \/__\:\/:/  / \:\  \    \:\  \ /:/  / \:\ \:\ \/__/
  \:\ \:\__\    \:\ \:\__\        \::/  /   \:\  \    \:\  /:/  /   \:\ \:\__\
   \:\/:/  /     \:\ \/__/        /:/  /     \:\  \    \:\/:/  /     \:\/:/  /
    \::/  /       \:\__\         /:/  /       \:\__\    \::/  /       \::/  /
     \/__/         \/__/         \/__/         \/__/     \/__/         \/__/

                  Website :https://www.sealos.io/
                  Address :github.com/labring/sealos
执行:sealos reset 重置清理失败的介质, 再根据具体报错纠正,尝试重新执行安装命令:
sealos run labring/kubernetes:v1.25.0 labring/helm:v3.8.2 labring/calico:v3.24.1 --masters 192.168.10.61 -p redhat
也可以创建集群的同时部署其他工具应用,例如:labring/helm:v3.8.2
sealos run labring/kubernetes:v1.25.0 labring/helm:v3.8.2 labring/calico:v3.24.1 --masters 192.168.10.61 -p redhat
查看集群状态
$ kubectl  get pods -A -w #等待pod全部启动正常

$ kubectl  get pods -A
NAMESPACE          NAME                                       READY   STATUS    RESTARTS   AGE
calico-apiserver   calico-apiserver-8d6558cbd-qf2sk           1/1     Running   0          2m54s
calico-apiserver   calico-apiserver-8d6558cbd-x6n8g           1/1     Running   0          2m54s
calico-system      calico-kube-controllers-85666c5b94-hbqcl   1/1     Running   0          3m47s
calico-system      calico-node-p4cq2                          1/1     Running   0          3m47s
calico-system      calico-typha-5c9dd767c7-ww7fb              1/1     Running   0          3m47s
calico-system      csi-node-driver-tlcr4                      2/2     Running   0          3m18s
kube-system        coredns-565d847f94-89v7j                   1/1     Running   0          3m57s
kube-system        coredns-565d847f94-gmn9v                   1/1     Running   0          3m57s
kube-system        etcd-master1                               1/1     Running   1          4m9s
kube-system        kube-apiserver-master1                     1/1     Running   1          4m9s
kube-system        kube-controller-manager-master1            1/1     Running   1          4m9s
kube-system        kube-proxy-jzjk4                           1/1     Running   0          3m57s
kube-system        kube-scheduler-master1                     1/1     Running   1          4m9s
tigera-operator    tigera-operator-6675dc47f4-9nw5f           1/1     Running   0          3m57s

$ kubectl get no
NAME      STATUS   ROLES           AGE   VERSION
master1   Ready    control-plane   97s   v1.25.0
5.2 多机在线安装
安装一个高可用的 kubernetes 集群,并用 calico 作为网络插件
这里的 kubernetes:v1.25.0 和 calico:v3.24.1 就是存在 registry 里的集群镜像,完全兼容 OCI 标准
sealos run labring/kubernetes:v1.25.0 labring/helm:v3.8.2 labring/calico:v3.24.1 --masters 192.168.10.61 --nodes 192.168.10.62,192.168.10.63 -p redhat
5.3 多机离线安装
5.3.1 新版本离线安装
首先在有网络的环境中 save 安装包:
$ sealos pull labring/kubernetes:v1.25.0
$ labring/helm:v3.8.2
$ labring/calico:v3.24.1
$ sealos save -o kubernetes.tar labring/kubernetes:v1.25.0 labring/helm:v3.8.2 labring/calico:v3.24.1
拷贝 kubernetes.tar 到离线环境, 使用 load 命令导入镜像即可:
$ sealos load -i kubernetes.tar
剩下的安装方式与在线安装一致。
$ sealos images # 查看集群镜像是否导入成功
$ sealos run labring/kubernetes:v1.25.0 labring/helm:v3.8.2 labring/calico:v3.24.1 --masters 192.168.10.61 --nodes 192.168.10.62,192.168.211.63 -p redhat
5.3.2 旧版本离线安装
下载离线安装包:https://github.com/sealstore/cloud-kernel/releases/
该离线安装包更新截止2019年5月08日,版本已经较为老旧,建议采用在线安装。
下载sealos旧版本命令:
wget -c https://github.com/fanux/sealos/releases/download/v3.3.8/sealos && chmod +x sealos && mv sealos /usr/bin/
最新版本(4.1.3)sealos与旧版本参数已经有了很多的区别。
多 master HA 只需执行以下命令:
$ sealos init --master 192.168.10.61 \
  --master 192.168.10.62 \
  --master 192.168.10.63 \
  --node 192.168.10.64 \
  --user root \
  --passwd your-server-password \
  --version v1.14.1 \
  --pkg-url /root/kube1.14.1.tar.gz
单 master 多 node:
$ sealos init --master 192.168.0.2 \
  --node 192.168.0.5 \
  --user root \
  --passwd your-server-password \
  --version v1.14.1 \
  --pkg-url /root/kube1.14.1.tar.gz
使用免密钥或者密钥对:
$ sealos init --master 172.16.198.83 \
  --node 172.16.198.84 \
  --pkg-url https://sealyun.oss-cn-beijing.aliyuncs.com/free/kube1.15.0.tar.gz \
  --pk /root/kubernetes.pem # this is your ssh private key file \
  --version v1.15.0
查看集群状态
$ kubectl get node
NAME                      STATUS   ROLES    AGE     VERSION
izj6cdqfqw4o4o9tc0q44rz   Ready    master   2m25s   v1.14.1
izj6cdqfqw4o4o9tc0q44sz   Ready    master   119s    v1.14.1
izj6cdqfqw4o4o9tc0q44tz   Ready    master   63s     v1.14.1
izj6cdqfqw4o4o9tc0q44uz   Ready    <none>   38s     v1.14.1

$ kubectl get pod --all-namespaces
NAMESPACE     NAME                                              READY   STATUS    RESTARTS   AGE
kube-system   calico-kube-controllers-5cbcccc885-9n2p8          1/1     Running   0          3m1s
kube-system   calico-node-656zn                                 1/1     Running   0          93s
kube-system   calico-node-bv5hn                                 1/1     Running   0          2m54s
kube-system   calico-node-f2vmd                                 1/1     Running   0          3m1s
kube-system   calico-node-tbd5l                                 1/1     Running   0          118s
kube-system   coredns-fb8b8dccf-8bnkv                           1/1     Running   0          3m1s
kube-system   coredns-fb8b8dccf-spq7r                           1/1     Running   0          3m1s
kube-system   etcd-izj6cdqfqw4o4o9tc0q44rz                      1/1     Running   0          2m25s
kube-system   etcd-izj6cdqfqw4o4o9tc0q44sz                      1/1     Running   0          2m53s
kube-system   etcd-izj6cdqfqw4o4o9tc0q44tz                      1/1     Running   0          118s
kube-system   kube-apiserver-izj6cdqfqw4o4o9tc0q44rz            1/1     Running   0          2m15s
kube-system   kube-apiserver-izj6cdqfqw4o4o9tc0q44sz            1/1     Running   0          2m54s
kube-system   kube-apiserver-izj6cdqfqw4o4o9tc0q44tz            1/1     Running   1          47s
kube-system   kube-controller-manager-izj6cdqfqw4o4o9tc0q44rz   1/1     Running   1          2m43s
kube-system   kube-controller-manager-izj6cdqfqw4o4o9tc0q44sz   1/1     Running   0          2m54s
kube-system   kube-controller-manager-izj6cdqfqw4o4o9tc0q44tz   1/1     Running   0          63s
kube-system   kube-proxy-b9b9z                                  1/1     Running   0          2m54s
kube-system   kube-proxy-nf66n                                  1/1     Running   0          3m1s
kube-system   kube-proxy-q2bqp                                  1/1     Running   0          118s
kube-system   kube-proxy-s5g2k                                  1/1     Running   0          93s
kube-system   kube-scheduler-izj6cdqfqw4o4o9tc0q44rz            1/1     Running   1          2m43s
kube-system   kube-scheduler-izj6cdqfqw4o4o9tc0q44sz            1/1     Running   0          2m54s
kube-system   kube-scheduler-izj6cdqfqw4o4o9tc0q44tz            1/1     Running   0          61s
kube-system   kube-sealyun-lvscare-izj6cdqfqw4o4o9tc0q44uz      1/1     Running   0          86s
5.4 自定义安装
运行 sealos gen 生成一个 Clusterfile。 例如:
$ sealos gen labring/kubernetes:v1.25.0 labring/helm:v3.8.2 labring/calico:v3.24.1 \
   --masters 192.168.10.61,192.168.10.62,192.16.10.63 \
   --nodes 192.168.10.64,192.168.10.65,192.168.10.66 --passwd xxx > Clusterfile
将 calico Clusterfile 追加到生成的 Clusterfile 后,然后更新集群配置。例如,要修改 pods 的 CIDR 范围,就可以修改 networking.podSubnet 和 spec.data.spec.calicoNetwork.ipPools.cidr 字段。 最终的 Clusterfile 会像是这样:
apiVersion: apps.sealos.io/v1beta1
kind: Cluster
metadata:
  creationTimestamp: null
  name: default
spec:
  hosts:
    - ips:
        - 192.168.0.2:22
        - 192.168.0.3:22
        - 192.168.0.4:22
      roles:
        - master
        - amd64
    - ips:
        - 192.168.0.5:22
        - 192.168.0.6:22
        - 192.168.0.7:22
      roles:
        - node
        - amd64
  image:
    - labring/kubernetes:v1.25.0
    - labring/helm:v3.8.2
    - labring/calico:v3.24.1
  ssh:
    passwd: xxx
    pk: /root/.ssh/id_rsa
    port: 22
    user: root
status: {

    }
---
apiVersion: kubeadm.k8s.io/v1beta2
kind: ClusterConfiguration
networking:
  podSubnet: 10.160.0.0/12
---
apiVersion: apps.sealos.io/v1beta1
kind: Config
metadata:
  name: calico
spec:
  path: manifests/calico.yaml
  data: |
    apiVersion: operator.tigera.io/v1
    kind: Installation
    metadata:
      name: default
    spec:
      # Configures Calico networking.
      calicoNetwork:
        # Note: The ipPools section cannot be modified post-install.
        ipPools:
        - blockSize: 26
          # Note: Must be the same as podCIDR
          cidr: 10.160.0.0/12
          encapsulation: IPIP
          natOutgoing: Enabled
          nodeSelector: all()
        nodeAddressAutodetectionV4:
          interface: "eth.*|en.*"
6. sealos 管理
6.1 部署应用
安装各种分布式应用
sealos run labring/helm:v3.8.2 # install helm
sealos run labring/openebs:v1.9.0 # install openebs
sealos run labring/minio-operator:v4.4.16 labring/ingress-nginx:4.1.0 \
   labring/mysql-operator:8.0.23-14.1 labring/redis-operator:3.1.4 # oneliner
6.2 构建镜像
这里展示了如何用 helm 构建一个 nginx-ingress 集群镜像。
6.2.1 下载 helm chart
$ mkdir ingress-nginx && cd ingress-nginx
$ helm repo add ingress-nginx https://kubernetes.github.io/ingress-nginx
$ helm pull ingress-nginx/ingress-nginx
随后就能找到下载的 chart:
$ ls
ingress-nginx-4.3.0.tgz
6.2.2 添加镜像列表
sealos 会下载镜像列表中的镜像并缓存到 registry 目录。
目录必须形如 images/shim/[your image list filename]:
$ ls /var/lib/sealos/data/default/rootfs/images/shim/
calicoImages      DefaultImageList  LvscareImageList

$ cat /var/lib/sealos/data/default/rootfs/images/shim/DefaultImageList
registry.k8s.io/kube-apiserver:v1.25.0
registry.k8s.io/kube-controller-manager:v1.25.0
registry.k8s.io/kube-scheduler:v1.25.0
registry.k8s.io/kube-proxy:v1.25.0
registry.k8s.io/pause:3.8
registry.k8s.io/etcd:3.5.4-0
registry.k8s.io/coredns/coredns:v1.9.3

$ cat /var/lib/sealos/data/default/rootfs/images/shim/calicoImages
docker.io/calico/apiserver:v3.24.1
docker.io/calico/cni:v3.24.1
docker.io/calico/csi:v3.24.1
docker.io/calico/ctl:v3.24.1
docker.io/calico/dikastes:v3.24.1
docker.io/calico/kube-controllers:v3.24.1
docker.io/calico/node-driver-registrar:v3.24.1
docker.io/calico/node:v3.24.1
docker.io/calico/pod2daemon-flexvol:v3.24.1
docker.io/calico/typha:v3.24.1

$ vim /var/lib/sealos/data/default/rootfs/images/shim/nginxImages
k8s.gcr.io/ingress-nginx/controller:v1.2.0
k8s.gcr.io/ingress-nginx/kube-webhook-certgen:v1.1.1
6.2.3 编写 Dockerfile
FROM scratch
COPY ingress-nginx-4.3.0.tgz .
CMD ["helm install ingress-nginx ingress-nginx-4.3.0.tgz --namespace ingress-nginx --create-namespace"]
6.2.4 定制应用镜像
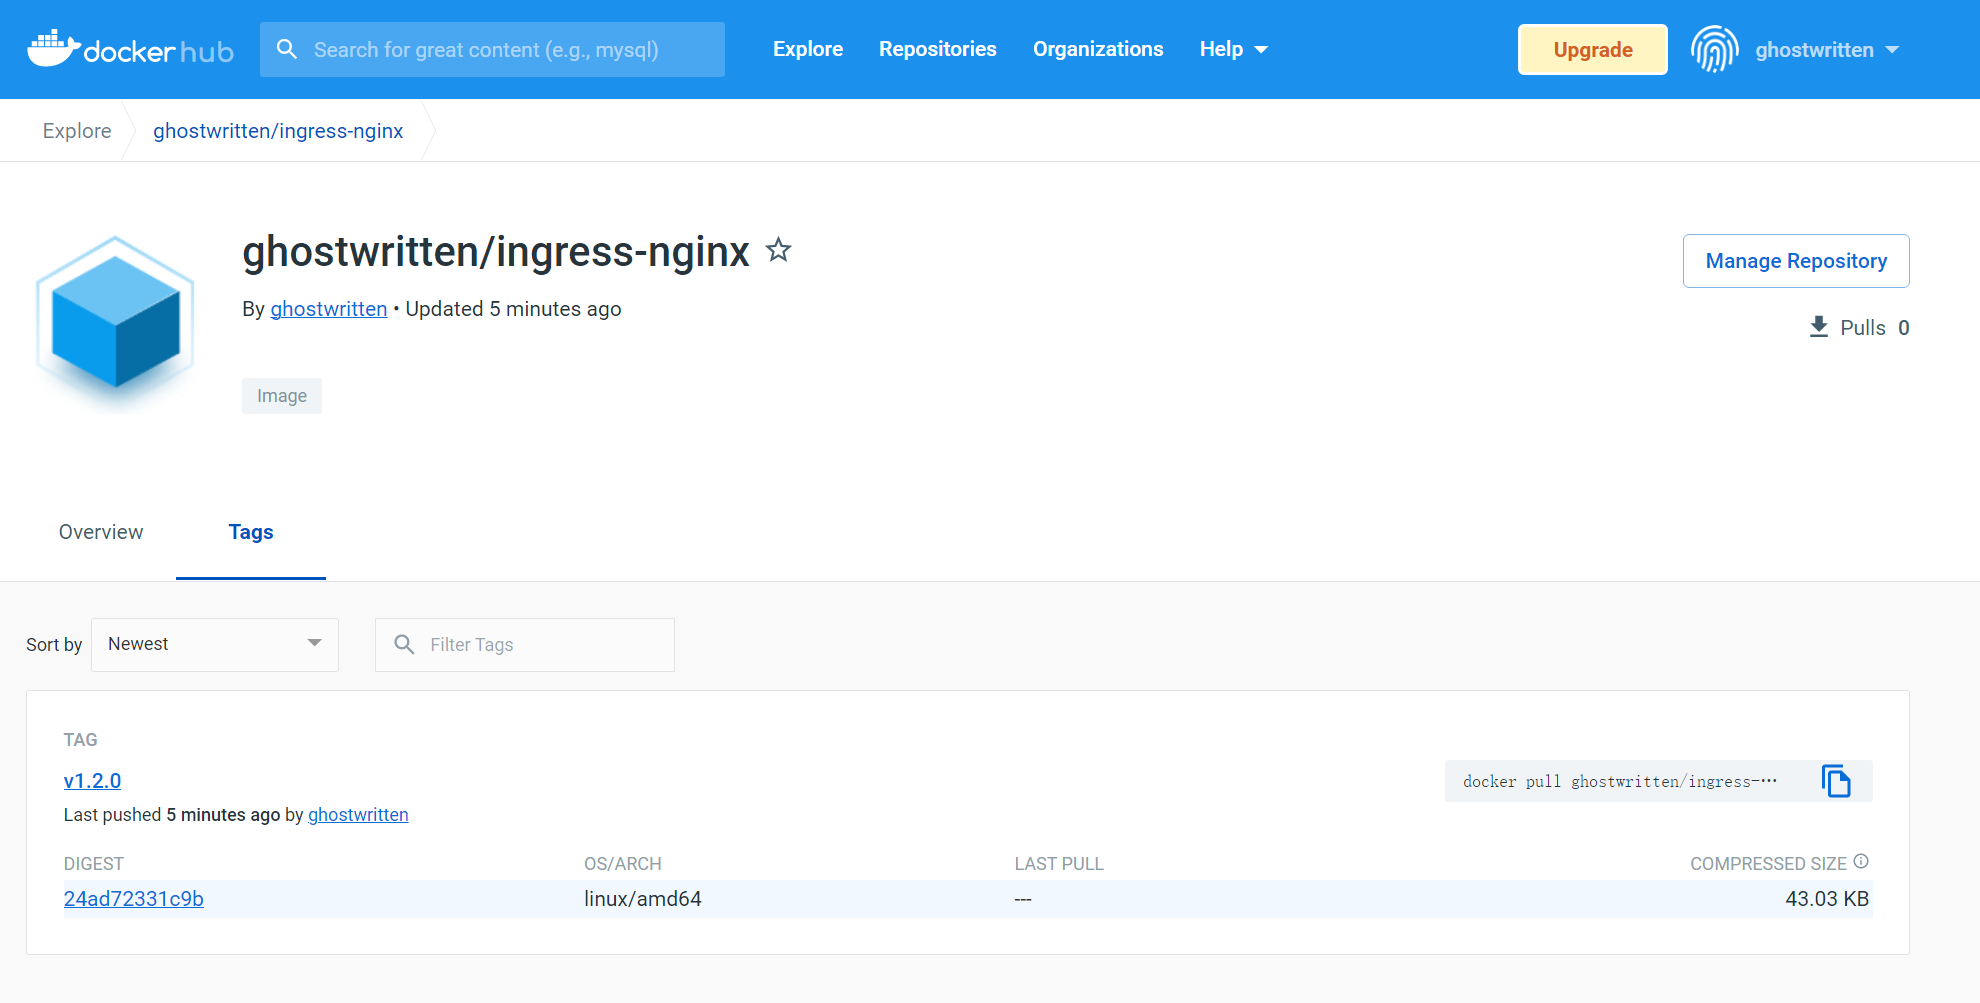
镜像名格式:docker.io/<dockerhub_name>/<image_name>:<version>
$ sealos build -f Dockerfile -t docker.io/ghostwritten/ingress-nginx:v1.2.0 .
output:
2022-10-14T16:30:08 info lookup in path charts
2022-10-14T16:30:08 info path charts is not exists, skip
2022-10-14T16:30:08 warn if you access private registry,you must be 'sealos login' or 'buildah login'
2022-10-14T16:30:08 info pull images [] for platform is linux/amd64
2022-10-14T16:30:08 info output images [] for platform is linux/amd64
STEP 1/3: FROM scratch
STEP 2/3: COPY ingress-nginx-4.3.0.tgz  .
STEP 3/3: CMD ["helm install ingress-nginx ingress-nginx-4.3.0.tgz --namespace ingress-nginx --create-namespace"]
COMMIT docker.io/ghostwritten/ingress-nginx:v1.2.0
Getting image source signatures
Copying blob ccfa5df3b9eb done
Copying config 76dea8608c done
Writing manifest to image destination
Storing signatures
--> 76dea8608c7
[Warning] one or more build args were not consumed: [TARGETARCH TARGETOS TARGETPLATFORM]
Successfully tagged docker.io/ghostwritten/ingress-nginx:v1.2.0
76dea8608c7a9edf375c293b4d5edb0f3e516f0c74016ee0dd0f3ffa5c179a02
2022-10-14T16:30:13 info
      ___           ___           ___           ___       ___           ___
     /\  \         /\  \         /\  \         /\__\     /\  \         /\  \
    /::\  \       /::\  \       /::\  \       /:/  /    /::\  \       /::\  \
   /:/\ \  \     /:/\:\  \     /:/\:\  \     /:/  /    /:/\:\  \     /:/\ \  \
  _\:\~\ \  \   /::\~\:\  \   /::\~\:\  \   /:/  /    /:/  \:\  \   _\:\~\ \  \
 /\ \:\ \ \__\ /:/\:\ \:\__\ /:/\:\ \:\__\ /:/__/    /:/__/ \:\__\ /\ \:\ \ \__\
 \:\ \:\ \/__/ \:\~\:\ \/__/ \/__\:\/:/  / \:\  \    \:\  \ /:/  / \:\ \:\ \/__/
  \:\ \:\__\    \:\ \:\__\        \::/  /   \:\  \    \:\  /:/  /   \:\ \:\__\
   \:\/:/  /     \:\ \/__/        /:/  /     \:\  \    \:\/:/  /     \:\/:/  /
    \::/  /       \:\__\         /:/  /       \:\__\    \::/  /       \::/  /
     \/__/         \/__/         \/__/         \/__/     \/__/         \/__/

                  Website :https://www.sealos.io/
                  Address :github.com/labring/sealos
sealos 在构建的时候会自动添加镜像列表中的镜像依赖到集群镜像中,通过神奇的方式保存了里面依赖的 Docker 镜像。 并且在到别的环境中运行的时候更神奇的自动检测集群中想是否的 Docker 镜像,有的话自动下载,没有的话才会去 k8s.gcr.io 下载。 用户无需修改 helm chart 中的 docker 镜像地址,这里用到了镜像缓存代理的黑科技。
6.2.5 推送到镜像至 registry
$ sealos login docker.io -u ghostwritten  -p <xxxx>
Login Succeeded!

$ sealos push docker.io/ghostwritten/ingress-nginx:v1.2.0
output:
Getting image source signatures
Copying blob 5890fd8f0df3 done
Copying config 76dea8608c done
Writing manifest to image destination
Storing signatures
6.2.6 运行集群镜像
$ sealos run docker.io/ghostwritten/ingress-nginx:v1.2.0
6.3 增加节点
6.3.1 增加 node 节点
$ sealos add --nodes 192.168.64.21,192.168.64.19
6.3.2 增加 master 节点
$ sealos add --masters 192.168.64.21,192.168.64.19
6.4 删除节点
6.4.1 删除 node 节点
$ sealos delete --nodes 192.168.64.21,192.168.64.19
6.4.2 删除 master 节点
$ sealos delete --masters 192.168.64.21,192.168.64.19
6.5 清理集群
$ sealos reset
参考: