文章目录
1.MyBatis
MyBatis基本上取消了所有的JDBC硬编码,对于单独使用这样的ORM框架,只需要:
1.导入maven坐标
<dependency>
  <groupId>junit</groupId>
  <artifactId>junit</artifactId>
  <version>4.11</version>
  <scope>test</scope>
</dependency>
<dependency>
  <groupId>mysql</groupId>
  <artifactId>mysql-connector-java</artifactId>
  <version>8.0.30</version>
</dependency>
<dependency>
  <groupId>org.mybatis</groupId>
  <artifactId>mybatis</artifactId>
  <version>3.5.10</version>
</dependency>
2.编写配置文件mybatis-config.xml
<?xml version="1.0" encoding="UTF-8" ?>
<!DOCTYPE configuration
PUBLIC "-//mybatis.org//DTD Config 3.0//EN"
"https://mybatis.org/dtd/mybatis-3-config.dtd">
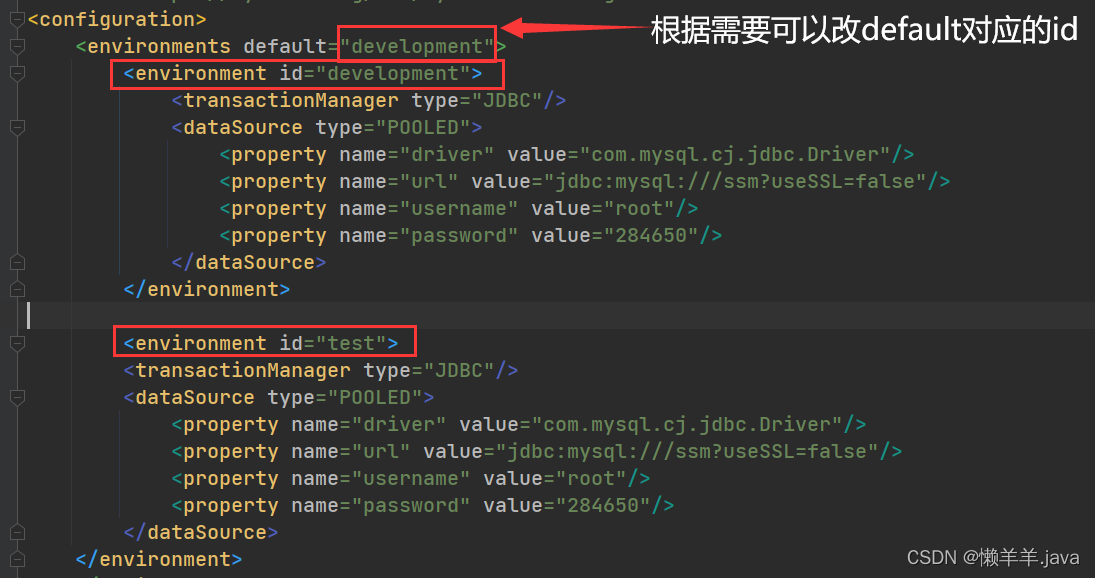
<configuration>
<environments default="development">
<environment id="development">
<transactionManager type="JDBC"/>
<dataSource type="POOLED">
<property name="driver" value="com.mysql.cj.jdbc.Driver"/>
<property name="url" value="jdbc:mysql:///ssm?useSSL=false"/>
<property name="username" value="root"/>
<property name="password" value="284650"/>
</dataSource>
</environment>
</environments>
<mappers>
<mapper resource="BookMapper.xml"/>
</mappers>
</configuration>
3.编写对应的Mapper映射文件,SQL都写在了配置文件里,每一句SQL都有所属的命名空间、id、resultType这都是在代码中准确定位并执行的保障
<?xml version="1.0" encoding="UTF-8" ?>
<!DOCTYPE mapper
        PUBLIC "-//mybatis.org//DTD Mapper 3.0//EN"
        "https://mybatis.org/dtd/mybatis-3-mapper.dtd">
<mapper namespace="BookTest">
    <select id="selectAllBook" resultType="com.yu7.Pojo.Book">
        select * from ssm_db
    </select>
</mapper>
4.写Java代码执行sql
//加载myBatis核心配置文件,获取SqlSessionFactory
String resource = "mybatis-config.xml";
InputStream resourceAsStream = Resources.getResourceAsStream(resource);
SqlSessionFactory sqlSessionFactory = new SqlSessionFactoryBuilder().build(resourceAsStream);
//获取SqlSession对象,用来执行sql
SqlSession sqlSession = sqlSessionFactory.openSession();
//执行sql
List<Book> bookList = sqlSession.selectList("BookTest.selectAllBook");
System.out.println(bookList);
sqlSession.close();
2.Mapper代理
上述的快速入门其实还是存在一定的硬编码,我们可以通过Mapper代理的方式进一步简化,官网里是这样说的:
如何实现Mapper代理?
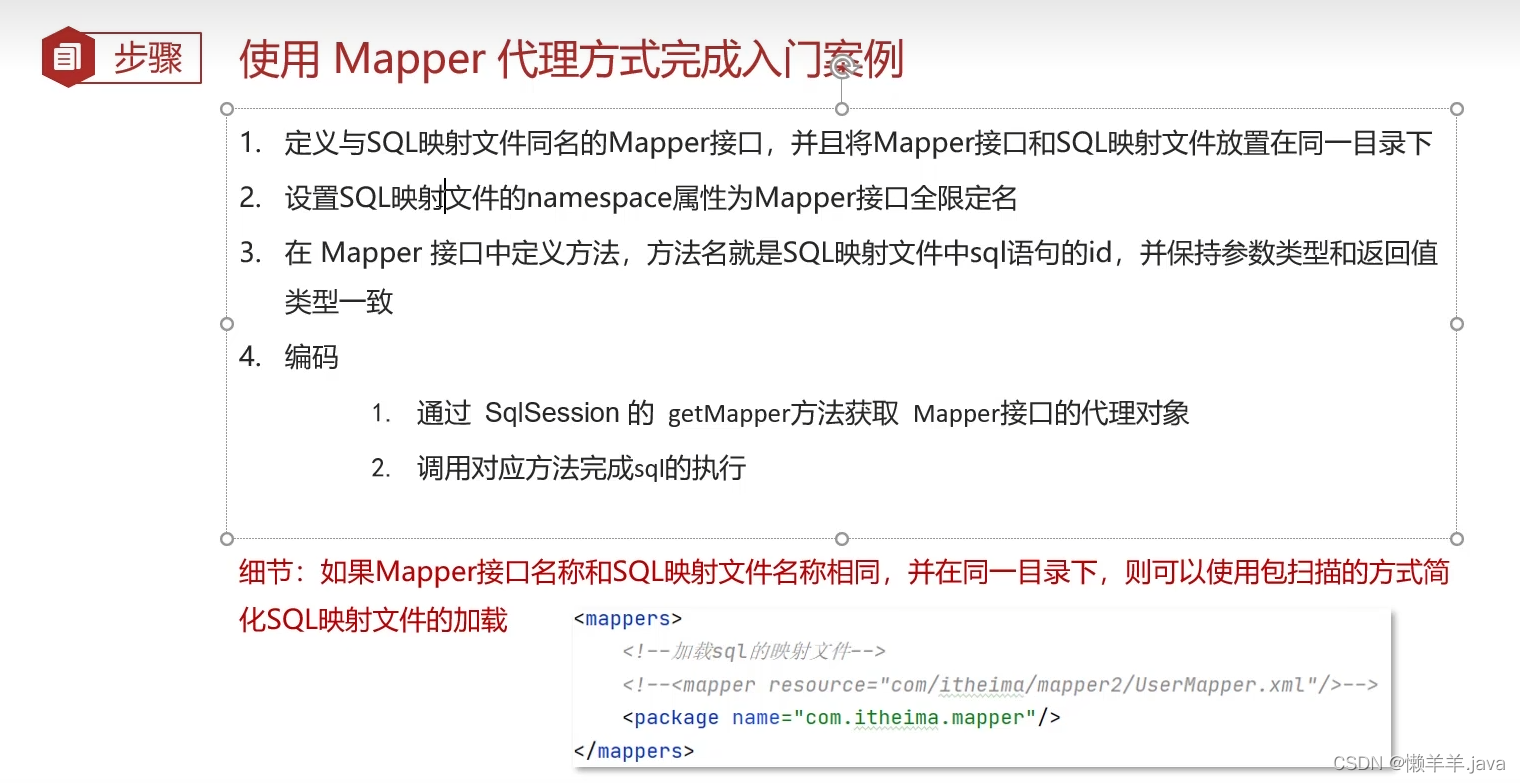
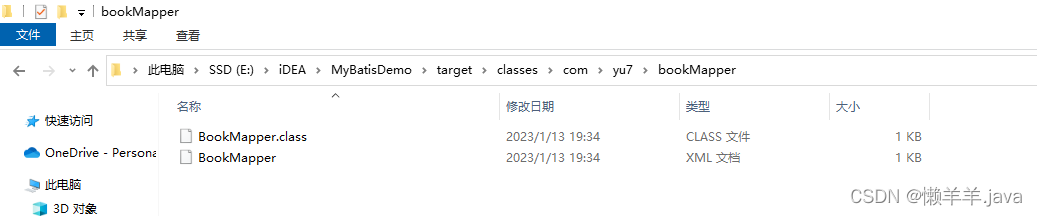
1.定义一个Mapper接口,并将接口和SQL映射文件放在同一目录下,可以把配置文件放在Java代码中但不推荐,也可以在配置文件Resource里创建相同的目录结构,要注意目录层次要用"/",而不能用”.“,才能保证mapper文件和.class文件在同一目录下,要不然目录结构不匹配会导致Mapper代理不成功

正确的方式编译过后这两个文件才会在一个目录下
2.mapper文件的命名空间为接口的全限名
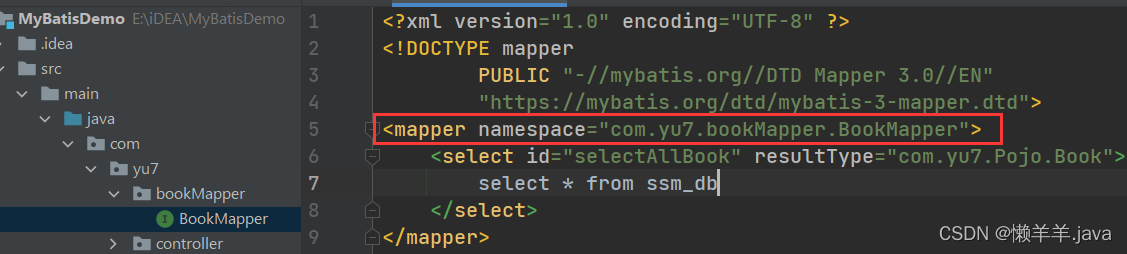
并修改原先mybatis-config.xml里的sql映射文件路径
其实,当你的mapper接口都按照规范写在一块儿,就不用针对不同的mapper来写不同的SQL映射,直接可以这样写:

3.在mapper接口里写方法(在配置文件里已经定义)
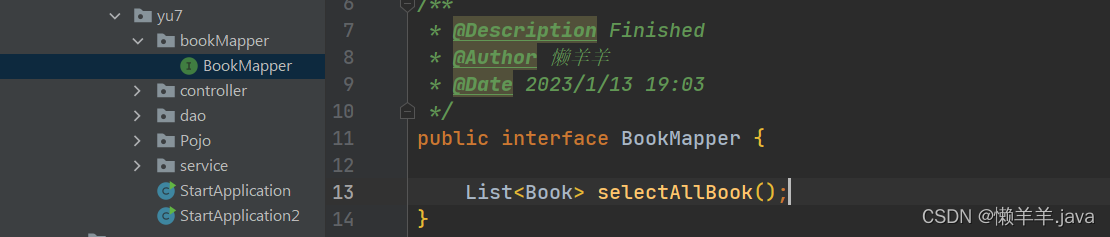
4.通过Mapper代理的方式执行SQL
//加载myBatis核心配置文件,获取SqlSessionFactory
String resource = "mybatis-config.xml";
InputStream resourceAsStream = Resources.getResourceAsStream(resource);
SqlSessionFactory sqlSessionFactory = new SqlSessionFactoryBuilder().build(resourceAsStream);

//获取SqlSession对象,用来执行sql
SqlSession sqlSession = sqlSessionFactory.openSession();

//通过Mapper代理来执行SQL
BookMapper bookMapper = sqlSession.getMapper(BookMapper.class);
List<Book> bookList = bookMapper.selectAllBook();

System.out.println(bookList);
sqlSession.close();
总结起来,就是MyBatis-config.xml里配置的连接信息被加载,加载完之后加载mapper标签中的sql映射文件(xxxMapper.xml),在那里面有不同的命名空间并且其中都有着各种各样标注着id、resultType的sql片段。当这些东西被加载完以后,我就可以在接口里定义和sql映射文件中id一致的方法来完成对数据库的操作。
3.MyBatis配置升级
!!!配置要讲究顺序!!!
1.多数据源配置
2.类型别名
为了让我们书写更方便,基本类型会自动配置,自定义的类型可以自己一个一个的配 也可以使用包扫描的方式
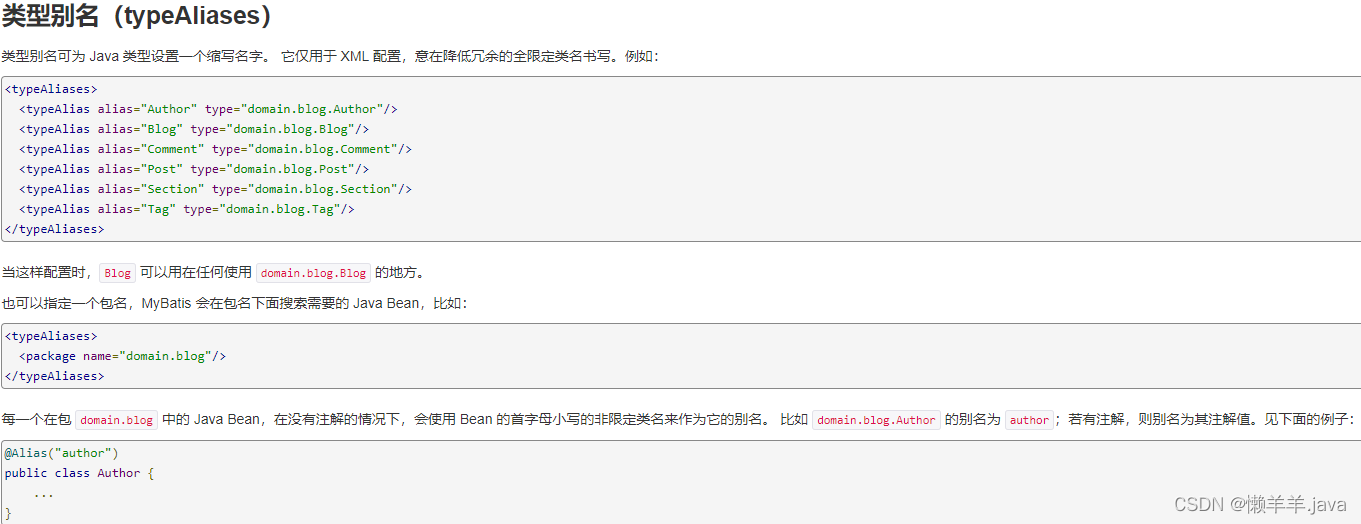
在mybatis-config配置文件中,我们可以通过typeAliases标签来给映射类型取别名(包扫描)
<typeAliases>
    <package name="com.yu7.Pojo"/>
</typeAliases>
这样SQL映射文件里的resultType属性就可以直接用别名了(不区分大小写),而不需要像以前那样用包路径名(com.yu7.Pojo.Book)

4.配置文件CRUD
要想写好CRUD必须要弄清楚三件事1.SQL咋写2.完成业务要不要参数3.结果参数怎么处理
sql片段
解决数据库表字段与实体不对应,提升开发效率
<sql id="brand_column">
     id, brand_name as brandName, company_name as companyName, ordered, description, status
 </sql>
 <select id="selectAll" resultType="brand">
     select
         <include refid="brand_column" />
     from tb_brand;
 </select>
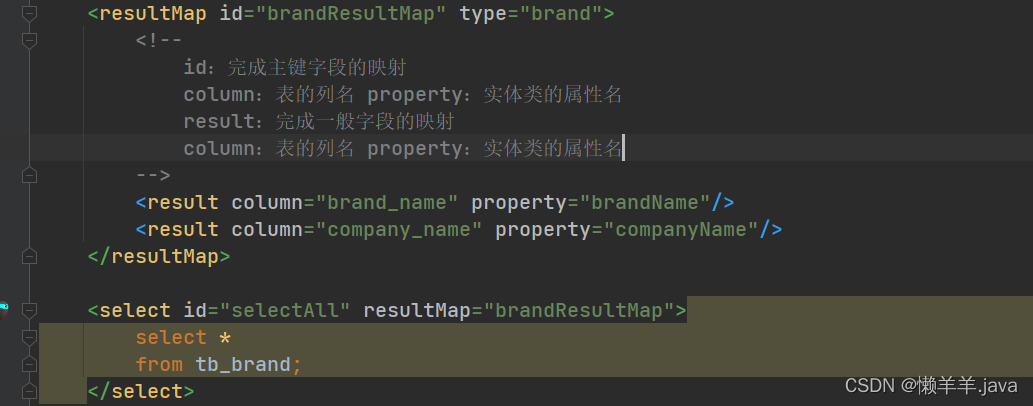
ResultMap
其实前面的在SQL映射文件里写resultType不好,可以在Mapper.xml配置文件中使用resultMap,并且可以在标签里给表中的字段起别名来解决表与实体不匹配的问题,就像这样:
一些特殊情况
参数占位符:
    1. #{}:执行SQL时会将#{}替换为 ?,可以防止SQL注入
    2. ${}:拼sql。会存在SQL注入问题
    3. 使用时机:
        * 参数传递的时候:#{}
        * 表名或者列名不固定的情况下:${} 会存在SQL注入问题

 * 参数类型:parameterType:可以省略
 * 特殊字符处理: 比如在SQL里就不能写 < 所以使用转义字符或者CDATA区来解决
    1. 转义字符:
    2. CDATA区:
5.多条件查询
多条件模糊查询场景
<select id="selectByCondition" resultMap="brandResultMap">
     select *
     from tb_brand
     where status = #{status}
       and company_name like #{companyName}
       and brand_name like #{brandName}
 </select>
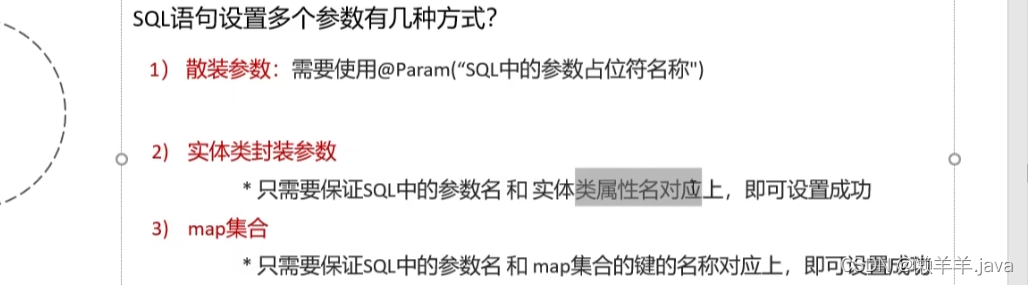
1.对接收参数的处理
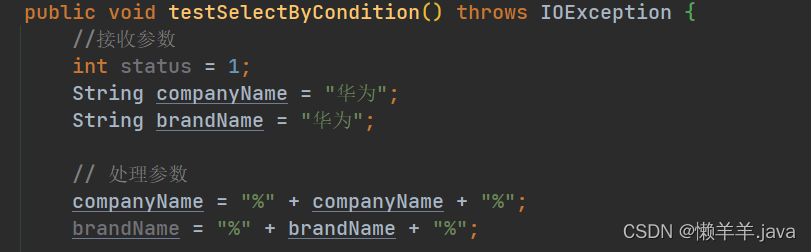 2.散装参数:如果方法中有多个参数,需要使用@Param(“SQL参数占位符名称”) 用它将形参列表里的参数与mapper文件里sql中的占位符参数映射一致
List<Brand> selectByCondition
    (
    @Param("status") int status,
    @Param("companyName") String companyName,
    @Param("brandName") String brandName
    );
3.对象参数:对象的属性名称要和参数占位符名称一致
将参数封装成一个对象,方法通过接收对象来进行查询
 //封装对象
 Brand brand = new Brand();
 brand.setStatus(status);
 brand.setCompanyName(companyName);
 brand.setBrandName(brandName);
4.map集合参数
Map map = new HashMap();
map.put("status" , status);
map.put("companyName", companyName);
map.put("brandName" , brandName);
6.多条件动态查询
用户输入的值不一样,对应的SQL不一样
上述的查询存在弊端,当用户查询的值和方法接收的参数不匹配或者接收的空值就会导致执行的SQL过不了语法,因此需要对接收的参数做检验来动态地查询
<select id="selectByCondition" resultMap="brandResultMap">
    select *
    from tb_brand
    /* where 1 = 1*/
    <where>
        <if test="status != null">
            and status = #{

    status}
        </if>
        <if test="companyName != null and companyName != '' ">
            and company_name like #{

    companyName}
        </if>
        <if test="brandName != null and brandName != '' ">
            and brand_name like #{

    brandName}
        </if>
    </where>
</select>
如果第一个if不生效,那么SQL语法就错误了,为了解决这一问题,可以使用恒等式或者,当第一个if不生效,它会自动帮你去掉and并且会自动生成where关键字
7.单条件动态条件查询
用户选择一个类型来进行单条件查询,当用户一个条件都不选,标签会自动识别并去掉where关键字
<select id="selectByConditionSingle" resultMap="brandResultMap">
    select *
    from tb_brand
    <where>
        <choose><!--相当于switch-->
            <when test="status != null"><!--相当于case-->
                status = #{status}
            </when>
            <when test="companyName != null and companyName != '' "><!--相当于case-->
                company_name like #{companyName}
            </when>
            <when test="brandName != null and brandName != ''"><!--相当于case-->
                brand_name like #{brandName}
            </when>
        </choose>
    </where>
</select>
8.添加数据并主键返回
使用useGeneratedKeys=“true” keyProperty=“id”
void add(Brand brand);
<insert id="add" useGeneratedKeys="true" keyProperty="id">
    insert into tb_brand (brand_name, company_name, ordered, description, status)
    values (#{

    brandName}, #{

    companyName}, #{

    ordered}, #{

    description}, #{

    status});
</insert>
sqlSession.commit();
记得提交事务
9.更新数据
更新全部字段,动态更新字段,使用动态SQL通用性强。使用固定字段,如果有些字段没有更新可能会被改成Null所以不推荐
<update id="update">
    update tb_brand
    <set>
        <if test="brandName != null and brandName != ''">
            brand_name = #{

    brandName},
        </if>
        <if test="companyName != null and companyName != ''">
            company_name = #{

    companyName},
        </if>
        <if test="ordered != null">
            ordered = #{

    ordered},
        </if>
        <if test="description != null and description != ''">
            description = #{

    description},
        </if>
        <if test="status != null">
            status = #{

    status}
        </if>
    </set>
    where id = #{

    id};
</update>
10.删除数据
删除一条数据
<delete id="deleteById">
    delete from tb_brand where id = #{

    id};
</delete>
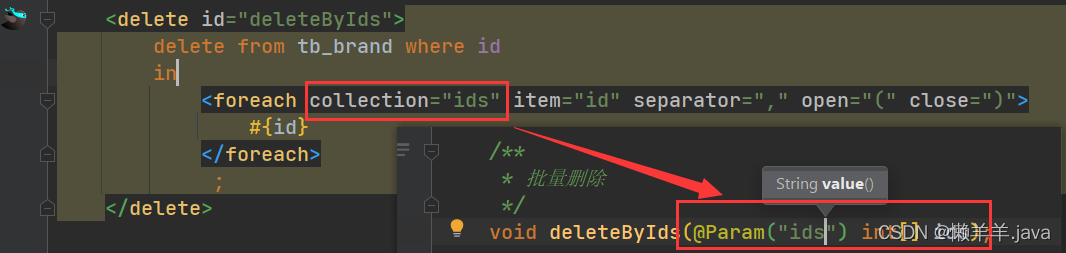
删除多条数据:把接收到的参数封装成一个数组,遍历数组一个一个删除
void deleteByIds(int[] ids);
<!--
    mybatis会将数组参数,封装为一个Map集合。
        * 默认:array = 数组 键是array 值是数组
        * 使用@Param注解改变map集合的默认key的名称
	    * collection="array"表示遍历键为array的值,也就是数组
-->
<delete id="deleteByIds">
    delete from tb_brand where id
    in
        <foreach collection="array" item="id" separator="," open="(" close=")">
            #{id}
        </foreach>
         ;
</delete>
open="(" close=")"可以自动拼括号
不过还有一种写法:
11.参数传递
当我们在mapper接口的方法里接收多个参数时,需要使用@Param注解来将接收的参数和mapper文件里的占位符中参数保持一致,这是因为myBatis底层会对接收到的多个参数进行封装,并且封装成map,其中k为arg0,param1,param2…,很显然如果你不写注解,底层就会默认帮你封装,这就会导致与mapper文件里占位符中的参数不一致,从而导致占位符中的值都为null !
针对不同类型都有不同的封装策略,要根据实际情况来看是否需要写注解
MyBatis 参数封装:
  * 单个参数:
      1. POJO类型:直接使用,属性名 和 参数占位符名称 一致
      2. Map集合:直接使用,键名 和 参数占位符名称 一致
      3. Collection:封装为Map集合,可以使用@Param注解,替换Map集合中默认的arg键名
          map.put("arg0",collection集合);
          map.put("collection",collection集合);
      4. List:封装为Map集合,可以使用@Param注解,替换Map集合中默认的arg键名
          map.put("arg0",list集合);
          map.put("collection",list集合);
          map.put("list",list集合);
      5. Array:封装为Map集合,可以使用@Param注解,替换Map集合中默认的arg键名
          map.put("arg0",数组);
          map.put("array",数组);
      6. 其他类型:直接使用
  * 多个参数:封装为Map集合,可以使用@Param注解,替换Map集合中默认的arg键名
      map.put("arg0",参数值1)
      map.put("param1",参数值1)
      map.put("param2",参数值2)
      map.put("agr1",参数值2)
      ---------------@Param("username")
      map.put("username",参数值1)
      map.put("param1",参数值1)
      map.put("param2",参数值2)
      map.put("agr1",参数值2)
12.注解开发
看博主懒羊羊.java以前写的MyBatis博客
切记,注解开发只适用于一些简单的功能,复杂的功能还是用配置文件吧