“ 种一棵树最好的时间是十年前,其次就是现在!”
目录
上一篇文章我们介绍了Mybatis的一些入门操作,包括配置文件的细节、CRUD操作,动态Sql以及基于Mapperd代理方式开发等内容,这篇文章开始着手MyBtis的缓存机制以及逆向工程的开发。
1、引入log4j日志框架
在项目中加入log4j的配置文件,用于打印日志信息,便于开发调试
在src/main/resources目录下创建log4j.properties文件,配置信息如下:
# Global logging configurationlog4j.rootLogger=DEBUG, stdout# Console output...log4j.appender.stdout=org.apache.log4j.ConsoleAppenderlog4j.appender.stdout.layout=org.apache.log4j.PatternLayoutlog4j.appender.stdout.layout.ConversionPattern=%5p [%t] - %m%n
只要将该文件放在指定的位置,log4j工具会自动到指定位置加载上述文件,读取文件中的配置信息并使用!
2、MyBatis缓存机制
2.1 缓存的意义
将用户经常查询的数据放在缓存(内存)中,这样用户去查询数据就不用频繁的从系型数据库进行查询,这样避免了频繁的与数据库进行交互,尤其在查询越多,缓存命中率越高的情况下,使用缓存对性能的提高更明显
MyBatis框架提供了对缓存的支持,分为一级缓存和二级缓存,默认情况下开启的是一级缓存(同一个SqlSession级别)
2.2 一级缓存
同一个SqlSession对象,在参数和Sql语句完全一样的情况下,只执行一次Sql语句进行查询(如果缓存没有过期)
修改
上一篇文章我们进行了代码优化,封装了一个MyBatisUtil工具类,引入ThreadLocal,现在方便我们测试,需要将ThreadLocal变量暂时屏蔽掉,这样保证每次创建的SqlSession都是不相同的。
/*** 获取SqlSession对象* @return*/public static SqlSession getSqlSession(){// SqlSession sqlSession = threadLocal.get();// if (sqlSession == null){// sqlSession = sqlSessionFactory.openSession(true);// threadLocal.set(sqlSession);// }SqlSession sqlSession = sqlSessionFactory.openSession(true);return sqlSession;}
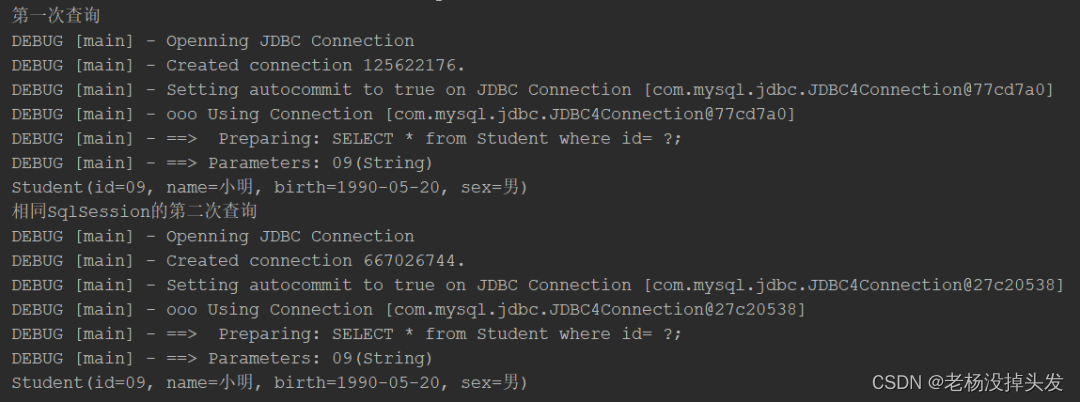
相同SqlSession
public static void main(String[] args) throws IOException {System.out.println("第一次查询");SqlSession sqlSession = MybatisUtil.getSqlSession();StudentMapper mapper = sqlSession.getMapper(StudentMapper.class);System.out.println(mapper.getStudentById("09"));System.out.println("相同SqlSession的第二次查询");StudentMapper mapper2 = sqlSession.getMapper(StudentMapper.class);System.out.println(mapper2.getStudentById("09"));}
输出结果如下:

第一次查询发送了Sql语句后返回了结果
第二次查询没有发送Sql语句直接返回了结果,说明是从一级缓存中直接获取的
不同SqlSession
public static void main(String[] args) throws IOException {System.out.println("第一次查询");SqlSession sqlSession = MybatisUtil.getSqlSession();StudentMapper mapper = sqlSession.getMapper(StudentMapper.class);System.out.println(mapper.getStudentById("09"));System.out.println("不同SqlSession的第二次查询");SqlSession sqlSession2 = MybatisUtil.getSqlSession();StudentMapper mapper2 = sqlSession2.getMapper(StudentMapper.class);System.out.println(mapper2.getStudentById("09"));}
输出结果如下:
第一次查询发送了Sql语句后返回了结果
第二次查询也同样发送了Sql语句后返回了结果,没有从缓存中获取
2.3 刷新缓存
刷新缓存是清空这个SqlSession的所有缓存,并不只是某一个
在xml文件中添加flushCache="true
<!--根据id查找学生信息-->
<select id="getStudentById" flushCache="true" parameterType="string" resultType="com.cn.pojo.Student" >
SELECT * from Student where id= #{id};
</select>相同SqlSession的情况下输出结果如下:

因为加入了刷新缓存,所有前后两次查询都发送了Sql语句
总结:
-
相同的SqlSession,MyBatis框架会把查询的结果写入SqlSession的一级缓存中,缓存使用的数据结构是Map,其中的key就是把执行的方法和参数通过算法生成缓存的key,如果后面查询的键值一样,就直接从map中获取。
-
相同的SqlSession,在查询前可以通过配置flushCache="true清空缓存
-
不同的SqlSession之间缓存是隔离的
-
任何UPDATE,INSERT,DELETE的提交事务的语句都会清空缓存,为的就是避免读取的时候有脏数据
2.4 二级缓存
二级缓存是用来解决一级缓存不能跨会话共享的问题,范围是mapper级别,可以被多个SqlSession共享(只要是同一个接口里的相同方法都可以共享),
查询顺序:二级缓存 —> 一级缓存 —> 数据库
配置二级缓存
在mybatis-config.xml文件中配置全局开关
<!-- 全局开关配置参数 --><settings><!-- 开启二级缓存 --><setting name="cacheEnabled" value="true"/></settings>
在对应的映射文件mapper.xml中配置分开关
<!--二级缓存分开关配置--><cache></cache>
映射pojo的序列化
@Datapublic class Student implements Serializable {//代码省略}
测试代码
 public static void main(String[] args) throws IOException {
        System.out.println("第一次查询");
        SqlSession sqlSession = MyBatisUtils.getSqlSession();
        StudentMapper studentMapper = sqlSession.getMapper(StudentMapper.class);
        System.out.println(studentMapper.getStudentById("08"));
        sqlSession.close();
        System.out.println("第二次查询");
        SqlSession sqlSession2 = MyBatisUtils.getSqlSession();
        StudentMapper mapper2 = sqlSession2.getMapper(StudentMapper.class);
        System.out.println(mapper2.getStudentById("08"));
    }
输出结果如下:

第一次查询发送了Sql语句后返回了结果
第二次查询没有发送Sql语句直接返回了结果,从二级缓存中获取,命中率为0.5
总结:
-
调用sqlSession.close()或者sqlSession.commit()这两个方法后,此时才能将数据序列化并保存到二级缓存中
-
刷新缓存时会清空所有缓存,所以对于变化频率高的Sql要禁用二级缓存
3、MyBatis逆向工程
3.1 什么是逆向工程
之前我们写代码都是自己手动创建实体类、映射文件和Sql语句,MyBatis框架提供逆向工程,可以针对单表自动生成MyBatis执行所需要的的代码(pojo,mapper,mapper.xml 等等),提高开发效率。
3.2 逆向工程开发
pom.xml中配置逆向工程插件
<build>
        <finalName>MyBatis</finalName>
        <plugins>
            <plugin>
                <groupId>org.mybatis.generator</groupId>
                <artifactId>mybatis-generator-maven-plugin</artifactId>
                <version>1.3.2</version>
                <configuration>
                    <verbose>true</verbose>
                    <overwrite>true</overwrite>
                </configuration>
            </plugin>
        </plugins>
</build>创建generatorConfig.xml配置文件(默认放在resources包下)
<?xml version="1.0" encoding="UTF-8"?>
<!DOCTYPE generatorConfiguration
        PUBLIC "-//mybatis.org//DTD MyBatis Generator Configuration 1.0//EN"
        "http://mybatis.org/dtd/mybatis-generator-config_1_0.dtd">

<generatorConfiguration>
    <!--引入配置文件-->
    <properties resource="db.properties"></properties>

    <!--指定特定数据库的jdbc驱动jar包的位置(后期自己更改)-->
    <classPathEntry location="${jdbc.driverLocation}"></classPathEntry>

    <context id="default" targetRuntime="MyBatis3">

        <!-- optional,旨在创建class时,对注释进行控制 -->
        <commentGenerator>
            <!-- 是否取消注释 -->
            <property name="suppressAllComments" value="true" />
            <!-- 是否生成注释代时间戳 -->
            <property name="suppressDate" value="true" />
        </commentGenerator>

        <!-- 连接数据库配置信息 -->
        <jdbcConnection driverClass="${database.driver}"
                        connectionURL="${database.url}"
                        userId="${database.username}"
                        password="${database.password}">
        </jdbcConnection>

        <!-- javaModelGenerator是模型的生成信息,这里将指定这些Java model类的生成路径 -->
        <javaModelGenerator targetPackage="com.cn.pojo"
                            targetProject="src/main/java">
            <!-- 是否对类CHAR类型的列的数据进行trim操作 -->
            <property name="trimStrings" value="true" />
        </javaModelGenerator>

        <!-- 配置SQL映射文件生成信息 -->
        <sqlMapGenerator targetPackage="mapper"
                         targetProject="src/main/resources">
        </sqlMapGenerator>

        <!-- 配置dao接口生成信息 -->
        <javaClientGenerator type="XMLMAPPER"
                             targetPackage="com.cn.mapper"
                             targetProject="src/main/java">
            <property name="enableSubPackages" value="true" />
        </javaClientGenerator>

        <table tableName="teacher" domainObjectName="Teacher"/>
    </context>
</generatorConfiguration>引入的db.properties配置信息如下:
database.driver=com.mysql.jdbc.Driver
database.url=jdbc:mysql://localhost:3306/db20?characterEncoding=utf-8
database.username=root
database.password=root

jdbc.driverLocation=C:\\Users\\Administrator\\maven\\repository\\mysql\\mysql-connector-java\\5.1.47\\mysql-connector-java-5.1.47.jar
在IDEA添加一个"Run 运行选项",使用maven运行mybatis-generator-maven-plugin插件
点击 菜单run中Edit Configurations,会出现

点击 + 号,选择maven

在name和Commond line如上图所示分别填写,后apply和ok
最后点击generator,生成model,mapper,dao
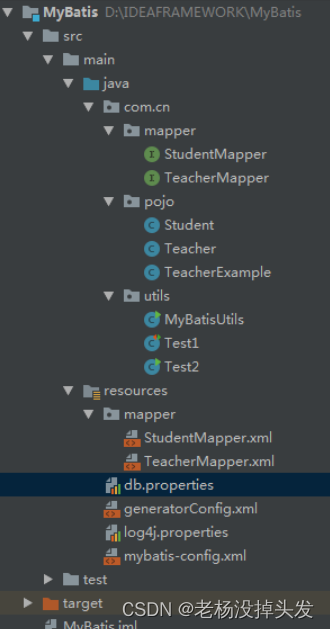
逆向工程生成如下图:
注意:Mybatis中逆向工程生成的mapper所进行的操作都是单表的
到目前为止MyBatis框架入门第二篇就已经讲解完毕,下一篇文章我们开始学习Spring框架的快速入门。