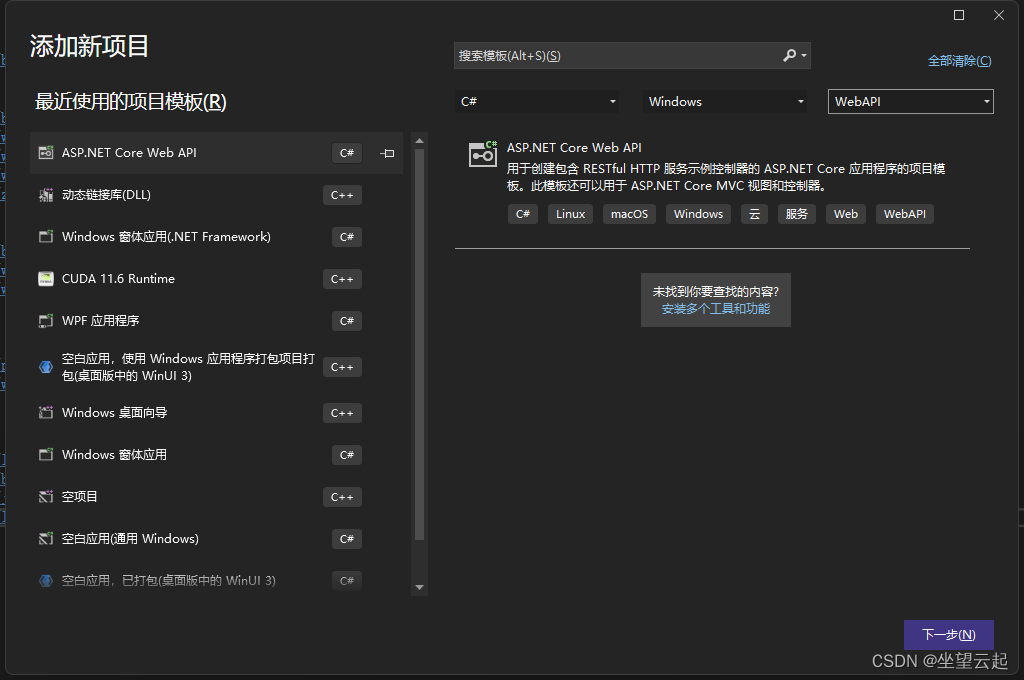
1、创建ASP.NET Core Web API项目
创建好之后,IDE会自动为我们创建一个Controller,然后会自动引入Swagger。
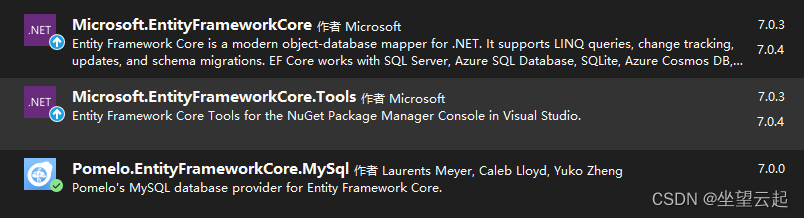
2、配置ef框架
我们这里是使用mysql数据库。
(1)在上面我们创建项目之后,这里进行ef框架的配置。安装以下包。
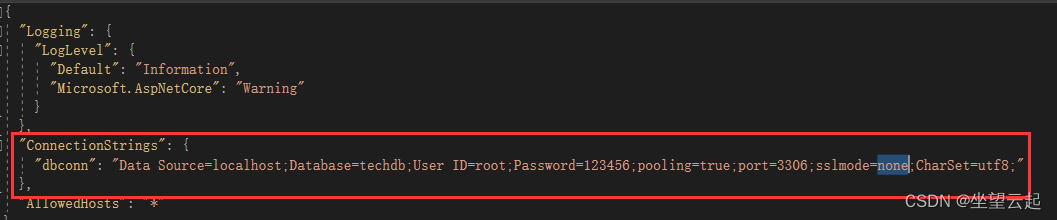
(2)打开appsettings.json,然后添加数据库连接字符串。
(3)创建DbContext
public class MyContext : DbContext
{
    protected readonly IConfiguration Configuration;

    public DBEntities(DbContextOptions<DBEntities> options) : base(options)
    {

    }

    public DbSet<tc_user> tc_user_market { get; set; }
}
(4)注入DbContext
在Program.cs文件内添加代码。
builder.Services.AddDbContext<DBEntities>(options =>
  options.UseMySql(builder.Configuration.GetConnectionString("dbconn"), new MySqlServerVersion(new Version())));
(5)创建model、interface、service
model
[Table("tc_user", Schema = "dbo")]
    [Serializable]
    public class tc_user
    {
        public tc_user()
        {

        }
        ///<summary>
        /// 主键ID
        ///</summary>
        [Key]
        public int id { get; set; }

        /// <summary>
        ///
        /// </summary>
        public string username { get; set; }


        public string password { get; set; }


        public long createtime { get; set; }


        public long updatetime { get; set; }


        public byte userflag { get; set; }

    }
接口
public interface Itc_user
    {

        #region 基础接口

        /// <summary>
        /// 添加信息
        /// </summary>
        /// <param name="model">实体</param>
        /// <returns></returns>
        bool Add(tc_user model);

        /// <summary>
        /// 删除信息
        /// </summary>
        /// <param name="id">主键</param>
        /// <returns></returns>
        bool Del(int id);

        /// <summary>
        /// 获得信息
        /// </summary>
        /// <param name="id">主键</param>
        /// <returns></returns>
        tc_user FindDefault(int id);

        /// <summary>
        /// 更新信息
        /// <param name="model">实体</param>
        /// </summary>
        /// <returns></returns>
        bool Update(tc_user model);

        /// <summary>
        /// 获得所有信息
        /// </summary>
        /// <returns></returns>
        List<tc_user> FindAll();

        #endregion 基础接口
    }
service
public class UserService : Itc_user
    {
        private DBEntities _context;

        public UserService(DBEntities context)
        {
            _context = context;
        }

        public bool Add(tc_user model)
        {
            _context.tc_user_market.Add(model);
            int recordsAffected;
            recordsAffected = _context.SaveChanges();
            return recordsAffected > 0;
        }

        public bool Del(int id)
        {
            var info = _context.tc_user_market.SingleOrDefault(m => m.id == id);
            if (info != null)
            {
                _context.tc_user_market.Remove(info);
                _context.SaveChanges();
            }
            else
            {
                return false;
            }
            return true;
        }

        public List<tc_user> FindAll()
        {
            return _context.tc_user_market.OrderByDescending(m => m.id).ToList();
        }

        public tc_user FindDefault(int id)
        {
            return _context.tc_user_market.Where(m => m.id == id).FirstOrDefault();
        }

        public bool Update(tc_user model)
        {
            var info = _context.tc_user_market.SingleOrDefault(m => m.id == model.id);

            info.id = model.id;//主键ID
            info.username = model.username;
            info.password = model.password;
            info.createtime = new DateTimeOffset(DateTime.UtcNow).ToUnixTimeSeconds();
            info.updatetime = new DateTimeOffset(DateTime.UtcNow).ToUnixTimeSeconds();
            info.userflag = 0;

            int recordsAffected;
            recordsAffected = _context.SaveChanges();
            return recordsAffected > 0;
        }
    }
(6)注入Service
在Program.cs文件内添加代码。
//注册service
builder.Services.AddScoped<Itc_user, UserService>();
(7)在Controller内调用
[ApiController]
[Route("[controller]")]
public class UserLoginController : ControllerBase
{
    private Itc_user _userService;

    public UserLoginController(Itc_user userService)
    {
        _userService = userService;
    }

    [HttpGet(Name = "GetUserList")]
    public List<tc_user> GetUserList()
    {
        return _userService.FindAll();
    }
}
3、配置跨域
修改Program.cs文件,主要注意builder.Services.AddCors、app.UseCors等部分
using Microsoft.EntityFrameworkCore;
using TechAccumulat.Helpers;
using TechAccumulat.Interfaces;
using TechAccumulat.Services;

var builder = WebApplication.CreateBuilder(args);

// Add services to the container.

builder.Services.AddControllers();
// Learn more about configuring Swagger/OpenAPI at https://aka.ms/aspnetcore/swashbuckle
builder.Services.AddEndpointsApiExplorer();
builder.Services.AddSwaggerGen();

//配置数据库连接
builder.Services.AddDbContext<DBEntities>(options =>
  options.UseMySql(builder.Configuration.GetConnectionString("dbconn"), new MySqlServerVersion(new Version())));

//注册service
builder.Services.AddScoped<Itc_user, UserService>();

//注册跨域
builder.Services.AddCors(options =>
{
    options.AddPolicy("any", builder =>
    {
        builder.WithOrigins("http://localhost:9527") //允许任何来源的主机访问
        .AllowAnyMethod()
        .AllowAnyHeader()
        .AllowCredentials();
    });
});

var app = builder.Build();

// Configure the HTTP request pipeline.
if (app.Environment.IsDevelopment())
{
    app.UseSwagger();
    app.UseSwaggerUI();
}

app.UseRouting();

//使用
app.UseCors("any");

app.UseEndpoints(x => x.MapControllers());

app.UseHttpsRedirection();

app.UseAuthorization();

app.MapControllers();

app.Run();
然后在Controller,增加[EnableCors("any")]。
4、前后端请求和接收
后端 |
前端 |
FromForm |
application/x-www-form-urlencoded |
FromBody |
application/json |
FromQuery |
url传值 |
5、Vue进行接口调用
vue中使用axios请求post接口,请求会发送两次。服务端设置了可跨域访问都会默认发送两次请求,第一次是预检请求,查询是否支持跨域,第二次才是真正的post提交。
浏览器分为简单请求以及非简单请求。非简单跨域请求都会请求两次。简单请求需要同时满足以下条件。
1. 只能是Get、Head、Post方法
2. 除了浏览器自己在Http头上加的信息(如Connection、User-Agent),开发者只能加这几个:Accept、Accept-Language、Content-Type、。。。。
3. Content-Type只能取这几个值:
application/x-www-form-urlencoded
multipart/form-data
text/plain配置axios
const service = axios.create({
  baseURL: process.env.VUE_APP_BASE_API, // url = base url + request url
  // withCredentials: true,     // send cookies when cross-domain requests
  timeout: 5000, // request timeout
  headers: {
    'Content-Type': 'application/json'
  }
})
创建请求方法
export function login(data) {
  return request({
    url : 'UserLogin/UserSignIn',
    method: 'post',
    data
  })
}
6、配置jwt
vue端,主要是“config.headers['Authorization'] = 'Bearer ' + getToken()“,这里的token就是获取jwt的时候存储起来的,请求其它需要授权的接口的时候带回去。
const service = axios.create({
  baseURL: process.env.VUE_APP_BASE_API, // url = base url + request url

  // withCredentials: true, // send cookies when cross-domain requests
  timeout: 5000, // request timeout
  headers: {
    'Content-Type': 'application/json'
    //'Content-Type': 'application/x-www-form-urlencoded'
  }
})

// request interceptor
service.interceptors.request.use(
  config => {
    // do something before request is sent

    if (store.getters.token) {
      // let each request carry token
      // ['X-Token'] is a custom headers key
      // please modify it according to the actual situation
      config.headers['Authorization'] = 'Bearer ' + getToken()
    }
    return config
  },
  error => {
    // do something with request error
    console.log(error) // for debug
    return Promise.reject(error)
  }
)
服务端
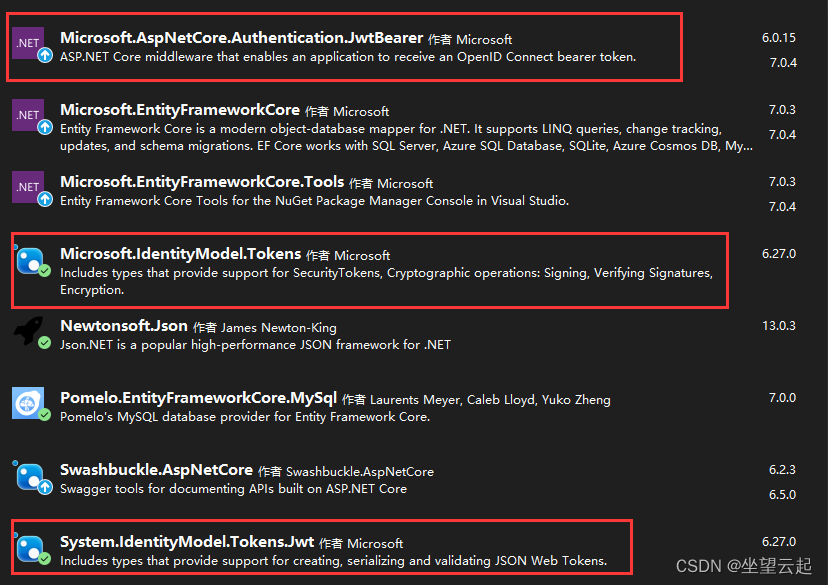
首先安装相应的包,注意与自己的目标框架一致。
Program.cs,注意builder.Services.AddSwaggerGen、#region JWT服务、app.UseAuthentication();、app.UseAuthorization();等需要正确填写,并且注意顺序。
using Microsoft.AspNetCore.Authentication.JwtBearer;
using Microsoft.EntityFrameworkCore;
using Microsoft.Extensions.DependencyInjection;
using Microsoft.Extensions.Options;
using Microsoft.IdentityModel.Tokens;
using Microsoft.OpenApi.Models;
using System.Reflection;
using System.Text;
using TechAccumulat.Helpers;
using TechAccumulat.Interfaces;
using TechAccumulat.Services;

var builder = WebApplication.CreateBuilder(args);

// Add services to the container.

builder.Services.AddControllers();
// Learn more about configuring Swagger/OpenAPI at https://aka.ms/aspnetcore/swashbuckle
builder.Services.AddEndpointsApiExplorer();
builder.Services.AddSwaggerGen();

//配置数据库连接
builder.Services.AddDbContext<DBEntities>(options =>
  options.UseMySql(builder.Configuration.GetConnectionString("dbconn"), new MySqlServerVersion(new Version())));

//注册service
builder.Services.AddScoped<Itc_user, UserService>();

builder.Services.AddCors(options =>
{
    options.AddPolicy("any", builder =>
    {
        builder.WithOrigins("http://localhost:9527") //允许任何来源的主机访问
        .AllowAnyMethod()
        .AllowAnyHeader()
        .AllowCredentials();
        /* builder.AllowAnyOrigin() //允许任何来源的主机访问
         .AllowAnyMethod()
         .AllowAnyHeader()
         .AllowCredentials();//指定处理cookie*/
    });
});


#region sqagger
builder.Services.AddSwaggerGen(config =>
{
    config.CustomSchemaIds(c => c.FullName);
    //在 header中添加token,传递到后台


    config.AddSecurityRequirement(new OpenApiSecurityRequirement
    {
        {
            new OpenApiSecurityScheme
            {
                Reference = new OpenApiReference { Type = ReferenceType.SecurityScheme, Id = "Bearer" }
            },
            new List<string>()
        }
    });

    //使用过滤器单独对某些API接口实施认证,可以自定义https://www.bbsmax.com/A/D8546LxvzE/
    //config.OperationFilter<SwaggerOperationFilter>();
    config.AddSecurityDefinition("Bearer", new OpenApiSecurityScheme
    {
        Description = "JWT授权(数据将在请求头中进行传输) 直接在下框中输入Bearer {token}(注意两者之间是一个空格)\"",
        Name = "Authorization",//jwt默认的参数名称
        In = ParameterLocation.Header,//jwt默认存放Authorization信息的位置(请求头中)
        Type = SecuritySchemeType.ApiKey
    });

    /*var security = new Dictionary<string, IEnumerable<string>> { { "CoreAPI", new string[] { } }, };
    config.AddSecurityRequirement(security);
    c.AddSecurityDefinition("CoreAPI", new ApiKeyScheme
    {
        Description = "JWT授权(数据将在请求头中进行传输) 在下方输入Bearer {token} 即可,注意两者之间有空格",
        Name = "Authorization",//jwt默认的参数名称
        In = "header",//jwt默认存放Authorization信息的位置(请求头中)
        Type = "apiKey"
    });*/

});
#endregion


#region JWT服务
// 注册JWT服务
builder.Services.AddSingleton(new JwtHelper(builder.Configuration));

builder.Services.AddAuthentication("Bearer").AddJwtBearer(o =>
{
    o.TokenValidationParameters = new TokenValidationParameters()
    {
        ValidateIssuer = true, //是否验证Issuer
        ValidIssuer = builder.Configuration["Jwt:Issuer"], //发行人Issuer
        ValidateAudience = true, //是否验证Audience
        ValidAudience = builder.Configuration["Jwt:Audience"], //订阅人Audience
        ValidateIssuerSigningKey = true, //是否验证SecurityKey
        IssuerSigningKey = new SymmetricSecurityKey(Encoding.UTF8.GetBytes(builder.Configuration["Jwt:SecretKey"])), //SecurityKey
        ValidateLifetime = true, //是否验证失效时间
        ClockSkew = TimeSpan.FromSeconds(30), //过期时间容错值,解决服务器端时间不同步问题(秒)
        RequireExpirationTime = true,
    };
    o.Events = new JwtBearerEvents
    {
        OnAuthenticationFailed = context =>
        {
            // 如果过期,则把<是否过期>添加到,返回头信息中
            if (context.Exception.GetType() == typeof(SecurityTokenExpiredException))
            {
                context.Response.Headers.Add("Token-Expired", "true");
            }
            return Task.CompletedTask;
        }
    };
});
#endregion


var app = builder.Build();

// Configure the HTTP request pipeline.
if (app.Environment.IsDevelopment())
{
    app.UseSwagger();
    app.UseSwaggerUI();
}


app.UseRouting();

app.UseCors("any");

//http跳转到https, 开发或不配置域名时就不开启
//app.UseHttpsRedirection();
app.UseAuthentication();

// 启用认证中间件
app.UseAuthorization();

app.UseEndpoints(x => x.MapControllers());

app.MapControllers();

app.Run();
配置appsetting.json,添加相应设置
"Jwt": {
    "SecretKey": "u6u^Bdob@OJ&KF2RcAB%ybsoy&2S7jhP^SW!q!Z^FK7eB7F8CcxIHsIh4Ll3pL^#",
    "Issuer": "WebAppIssuer",
    "Audience": "WebAppAudience"
  },
创建一个JwtHelper.cs
public class JwtHelper
    {
        private readonly IConfiguration _configuration;

        /// <summary>
        /// Token配置
        /// </summary>
        /// <param name="configuration"></param>
        public JwtHelper(IConfiguration configuration)
        {
            _configuration = configuration;
        }

        /// <summary>
        /// 创建Token 这里面可以保存自己想要的信息
        /// </summary>
        /// <param name="username"></param>
        /// <param name="mobile"></param>
        /// <returns></returns>
        public string CreateToken(string username, string mobile)
        {
            // 1. 定义需要使用到的Claims
            var claims = new[]
            {
                new Claim("username", username),
                new Claim("mobile", mobile),
                /* 可以保存自己想要信息,传参进来即可
                new Claim("sex", "sex"),
                new Claim("limit", "limit"),
                new Claim("head_url", "xxxxx")
                */
            };

            // 2. 从 appsettings.json 中读取SecretKey
            var secretKey = new SymmetricSecurityKey(Encoding.UTF8.GetBytes(_configuration["Jwt:SecretKey"]));

            // 3. 选择加密算法
            var algorithm = SecurityAlgorithms.HmacSha256;

            // 4. 生成Credentials
            var signingCredentials = new SigningCredentials(secretKey, algorithm);

            // 5. 根据以上,生成token
            var jwtSecurityToken = new JwtSecurityToken(
                _configuration["Jwt:Issuer"],    //Issuer
                _configuration["Jwt:Audience"],  //Audience
                claims,                          //Claims,
                DateTime.Now,                    //notBefore
                DateTime.Now.AddSeconds(86400),     //expires
                signingCredentials               //Credentials
            );

            // 6. 将token变为string
            var token = new JwtSecurityTokenHandler().WriteToken(jwtSecurityToken);

            return token;
        }
    }
接着在controller的需要验证的方法上添加[Authorize]注解
7、文件上传/带参数
这里使用最基本的el-upload组件。如果需要校验需要传headers参数。
<el-upload
    class="upload-demo"
    name="files"
    headers="header"
    drag
    action="http://localhost:5290/baseApi/File/CreateFile"
    accept=".jpg,.jpeg,.png,.gif,.pdf,.doc,.zip"
    :multiple=true
    :file-list="fileList">
    <i class="el-icon-upload"></i>
    <div class="el-upload__text">将文件拖到此处,或<em>点击上传</em></div>
    <div class="el-upload__tip" slot="tip">只能上传jpg/png/pdf/doc/zip等文件</div>
  </el-upload>
.net core web api后端
[HttpPost]
[Authorize]
public string CreateFile([FromForm] List<IFormFile> files)
{
    if (files != null && files.Count>0)
    {
        foreach (var file in files)
        {
            var fileDir = "files";
            string projectFileName = System.Guid.NewGuid().ToString("N") + '_' + file.FileName;
            string filePath = fileDir + $@"\{projectFileName}";
            using (FileStream fs = System.IO.File.Create(filePath))
            {
                file.CopyTo(fs);
                fs.Flush();
            }
        }

        //还有一些插入数据库的逻辑
    }
}
带参数的情况,后台这样接收
public class RequestFileModel
{
    public List<IFormFile> files { get; set; }

    public int type { get; set; }

    public int fid { get; set; }
}

[HttpPost]
[Authorize]
public string CreateFile([FromForm] RequestFileModel model)
{
    //这里是你的业务逻辑
}
8、tinymce整合
(1)本地化
1、将tinymce整合包下载到public文件夹内,语言文件的js也要下载,我这里用的4.9.3版本。下载地址https://www.tiny.cloud/get-tiny/self-hosted/
2、修改components下面的Tinymce内的index.vue文件,将CDN修改为本地路径
const tinymceCDN = '/tinymce/tinymce.min.js'

# 配置语言路径
language_url:"/tinymce/langs/zh_CN.js",
//language: 'zh_CN',
(2)上传处理
修改components下面的Tinymce内的components下面的EditorImage.vue
修改action,修改为你的路径
action="http://localhost:5290/baseApi/File/CreateFile"修改handleSuccess方法,我这里习惯使用url的方式,实际也可以自行处理使用image base64,不过这样做就等于把图片存到数据库了,不是太好。
handleSuccess(response, file) {
      console.log(response)
      const uid = file.uid
      const objKeyArr = Object.keys(this.listObj)
      for (let i = 0, len = objKeyArr.length; i < len; i++) {
        if (this.listObj[objKeyArr[i]].uid === uid) {
          this.listObj[objKeyArr[i]].url = "http://localhost:8020/" + response.query[0].url
          this.listObj[objKeyArr[i]].hasSuccess = true
          return
        }
      }
    },
(3)赋值绑定
用setContent进行赋值,更加稳定
<tinymce ref="tinymceTxt" v-model="postForm.contactcontent" :value="postForm.contactcontent" :height="300" />

this.$refs.tinymceTxt.setContent(response.query.contactcontent)
9、Vue配置全局变量
定义,个人喜欢再App.vue中直接定义
<template>
  <div id="app">
    <router-view />
  </div>
</template>

<script>
const imgUpload = 'http://localhost:8080/uploadFile'
const imgDomain = 'http://localhost:8081/'

export default {
  imgUpload,
  imgDomain,
  name: 'App'
}
</script>
使用方式
this.GLOBAL.imgUpload98、需要注意的重要问题
1、每个Vue的页面,export default { name : "千万不要用中文" }。
99、遇到的错误
(1)EF Core Error:Unable to cast object of type ‘System.DBNull‘ to type ‘System.String‘
原因1:可能在model里面未恰当使用了[Required]。
原因2:可能在项目的.csproj文件里面Nullable属性启动了,改成disable。
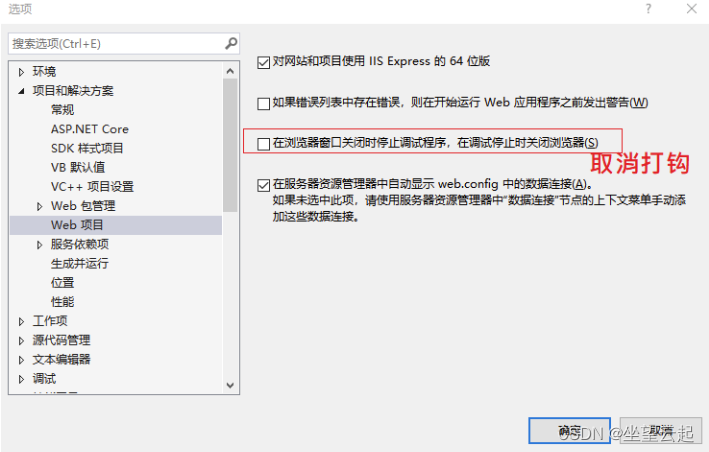
(2)上传文件到服务端程序停止
工具>选项>项目和解决方案>web项目>如图取消打钩,保存退出。重新运行
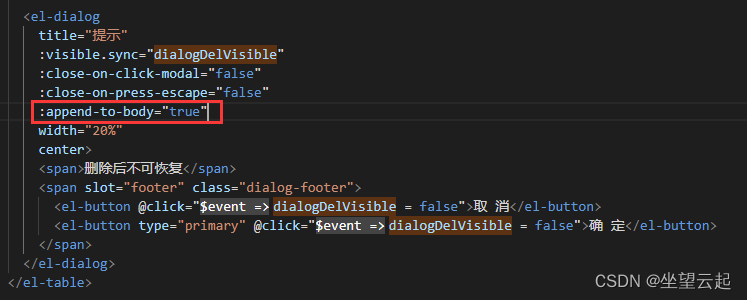
(3)el-dialog不显示的问题
这里是由于一个属性没有设置正确导致的问题。在el-dialog 标签内,添加如图红色矩形框内所示属性。
即可解决问题。
可以直接写 append-to-body
也可以写成 :append-to-body=“true”