前言
2023年第一篇文章,祝大家在新的一年里“卯”足干劲,在技术上 “兔”飞猛进!

上一篇文章 基于PHP和MySQL的新闻发布系统 给大家介绍了制作一个新闻发布系统的主要功能的实现,在文章的末尾还提出了一些需要完善的方面。那么这篇文章就给我们的新闻发布系统增加cookie和session来提高用户的登录体验以及增强登录的安全性。
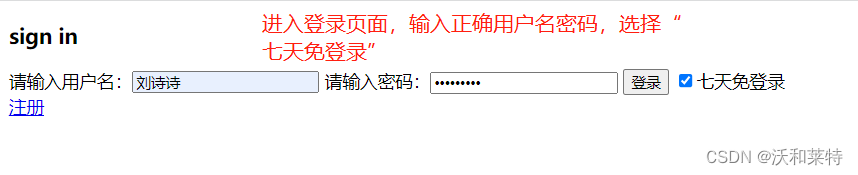
效果展示

这次我们仿照一个学校的官网去做一个新闻发布系统,通过增加cookie来实现一天(或多天)免登录功能;通过添加session来实现非法用户禁止登录的功能。
cookie
当我们在注册登录进入某一网站时,就可以通过cookie实现免登录功能;cookie是网站用户登陆的凭据(浏览器记住密码的功能就是通过与浏览器中保存的cookie进行验证后进行登录的)。
// 设置cookie
setcookie("username","张三");
$user=$_COOKIE['username'];
echo "$user";//输出张三

//设置cookie过期时间
setcookie("username","李四",time()+3600*24);//表示一天后过期
$user=$_COOKIE['username'];
echo "$user";

// 访问时间  访问时间显示格式
setcookie("visitime",date("Y-m-d H:i:s"));
$time=$_COOKIE['visitime'];
echo "$time";//输出当前访问的时间

//记录登录时间
date_default_timezone_set("Asia/Shanghai");
if(!isset($_COOKIE['visitime'])){


    setcookie("visitime",date("Y-m-d  H:i:s"),time()+3600);
    // $time=$_COOKIE['visitime'];
    echo "欢迎您首次访问该网站";
}else{


    echo "您上次访问网站的时间是".$_COOKIE['visitime'];
}

// 删除cookie存储数据
setcookie("visitime","",time()-1);
代码实现功能
(1)登录页面添加 “实现免登录”功能的按钮
<form action="login_do.php" method="post" id="myform">
        请输入用户名:<input type="text" name="username" id="username">
        请输入密码:<input type="password" name="userpwd" id="userpwd">
        <input type="submit" value="登录">
        <span><input type="checkbox" name="free">七天免登录</span>
    </form>
(2)判断用户是否选择免登录功能,并实现免登录功能。
include "./conn.php";
$username=$_POST['username'];
$userpwd=md5($_POST['userpwd']);
$free=$_POST['free'];//post传递复选框选中与否的状态
$sel="select * from admin where username='{

      $username}';";
$rs=$mysqli->query($sel);
$rows=$mysqli->affected_rows;
if($free){


    setcookie("username",$username,time()+7*24*3600);
    setcookie("userpwd",$userpwd,time()+7*24*3600);
}
if($rows>0){


    // 用户名存在  验证用户输入的密码和数据表中存在的用户名对应的密码是否一致
$result=$rs->fetch_assoc();
if($userpwd==$result['userpwd']){


    echo "<script>alert('登录成功');location.href='news_select.php'</script>";
}else{


//密码有误不可登录,清除cookie数据
    setcookie("username","",time()-1);
    setcookie("userpwd","",time()-1);
    echo "<script>alert('密码错误,请重新输入或注册');location.href='login.php'</script>";
}
}else{


    // 用户名不存在   清除cookie数据
    setcookie("username","",time()-1);
    setcookie("userpwd","",time()-1);
    echo "<script>alert('用户名不存在,请重新输入或者先注册');location.href='login.php';</script>" ;
}
session
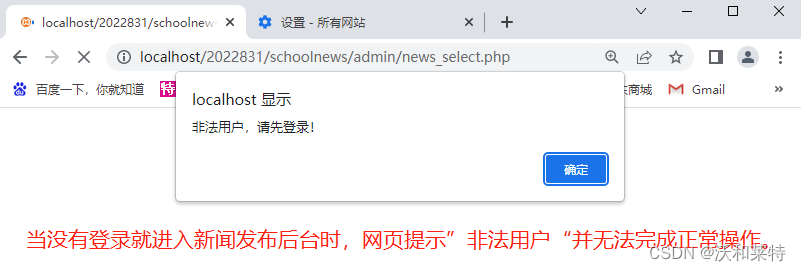
session用于保存登录用户的信息,可以实现禁止非法用户(未登录用户)登录。
// 启动会话
session_start();

// 注册会话
$_SESSION['username']='张三';

//删除会话
unset($_SESSION['username']);
//判断是否为登录用户,如果不是就弹出警告框,阻止非法用户对信息的查看。
//将该代码写在需要进行登录后才能查看的页面中即可。
session_start();
if(!isset($_SESSION['username'])){


    echo "<script>alert('非法用户,请先登录!');location.href='login.php';</script>" ;
    exit;
}
代码实现功能
include "./conn.php";
$username=$_POST['username'];
$userpwd=md5($_POST['userpwd']);
$free=$_POST['free'];//设置cookie时不要忘记接收登录页面传来的$free
$sel="select * from admin where username='{

      $username}';";
$rs=$mysqli->query($sel);
$rows=$mysqli->affected_rows;
if($free){


    setcookie("username",$username,time()+7*24*3600);
    setcookie("userpwd",$userpwd,time()+7*24*3600);
}
if($rows>0){


    // 用户名存在  验证用户输入的密码和数据表中存在的用户名对应的密码是否一致
$result=$rs->fetch_assoc();
if($userpwd==$result['userpwd']){


    echo "<script>alert('登录成功');location.href='news_select.php'</script>";
    //登录成功就开启session,存储成功登录的用户名
    session_start();
    $_SESSION['username']=$username;
}else{


    setcookie("username","",time()-1);
    setcookie("userpwd","",time()-1);
    echo "<script>alert('密码错误,请重新输入或注册');location.href='login.php'</script>";
}
}else{


    // 用户名不存在
    setcookie("username","",time()-1);
    setcookie("userpwd","",time()-1);
    echo "<script>alert('用户名不存在,请重新输入或者先注册');location.href='login.php';</script>" ;
}
两者区别
| cookie | session |
|---|---|
| 存储在本地 | 存储在服务器 |
| 存活时间可设置 | 存活时间较短 |
| 安全性相对较低,但不需要占用服务器的资源 | 安全性相对较高,但会大量占用服务器的资源 |
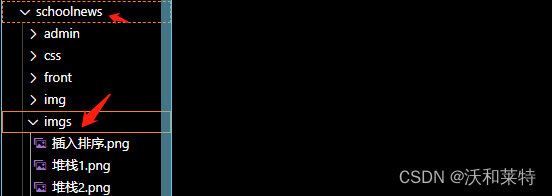
新增功能——图片上传和读取
在这个新闻发布系统中,我们可以通过增加一个图片上传和读取的功能来优化这个系统:实现这个功能的主要思路是:上传图片时将图片的类型以及名称读取并存储到新建的数据表中;显示图片时将所选需要查看的图片的id通过get传递,然后执行SQL语句将图片显示出来。
新建文件夹
首先我们需要创建一个用于存放需要上传的图片的文件夹:
新建数据表
接着创建一个用于存储上传图片的数据表:

代码完善
上传图片:
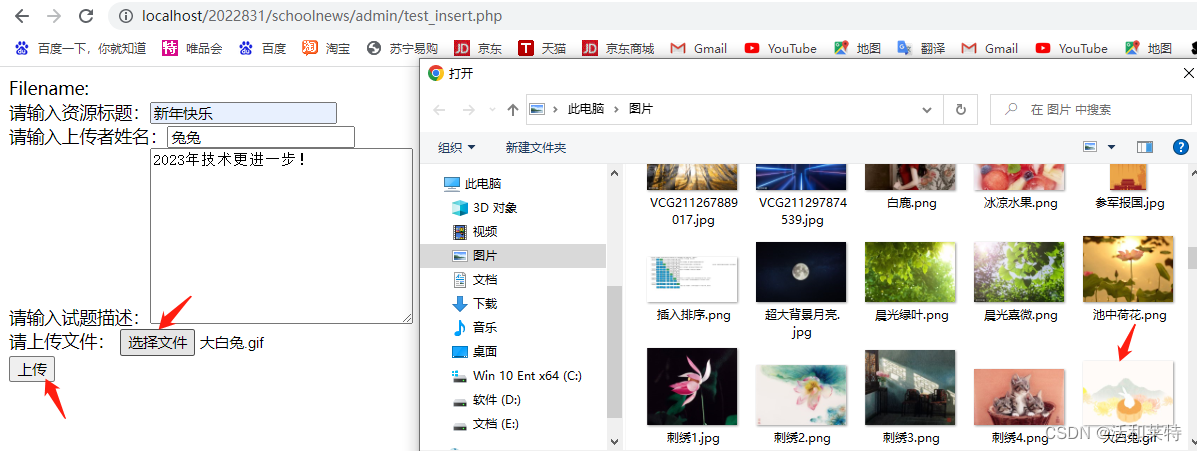
 <!-- test_insert.php -->
    <form action="test_insert_do.php" method="post" enctype="multipart/form-data">
        <label for="file">Filename:</label><br />
        请输入资源标题:<input type="text" name="test"></br>
        请输入上传者姓名:<input type="text" name="author"><br>
        请输入试题描述:<textarea name="content" id="" cols="30" rows="10"></textarea><br>
        请上传文件: <input type="file" name="file" id="file" /> <br />
        <input type="submit" name="submit" value="上传" />

    </form>
//test_insert_do.php
include './conn.php';
$test = $_POST['test'];
$content = $_POST['content'];
$author = $_POST['author'];
$submit = $_POST['submit'];
$ctime = time();
$mtime = time();
// 当点击submit时,存储上传图片的信息
if (isset($_POST['submit'])) {


    if ($_FILES["file"]["error"] > 0) {

     //如果上传出错
        echo "Error: " . $_FILES["file"]["error"] . "<br />";
    } else {


        $image = $_FILES["file"]["name"]; // 存储在服务器的文件的临时副本的名称
        $type = $_FILES["file"]["type"]; //被上传文件的类型

        // 判断在该路径中是否有相同名字和类型的图片
        if (file_exists("../imgs" . $_FILES["file"]["name"])) {


            echo $_FILES["file"]["name"] . " already exists. ";
        } else {


            //不存在的话就将图片另存为自己的路径下
            move_uploaded_file(
                $_FILES["file"]["tmp_name"],
                "../imgs/" . $_FILES["file"]["name"]
            );
        }
    }
}
//将图片存入tests数据表
$in = "insert into tests(test,content,author,ctime,mtime,type,photoname)values
('{

      $test}','{

      $content}','{

      $author}',$ctime,$mtime,'{

      $type}','{

      $image}');";
$st = $mysqli->query($in);

if ($st) {


    echo "<script>alert('发布成功!');location.href='test_select.php';</script>";
} else {


    echo "<script>alert('发布失败!');location.href='test_select.php';</script>";
}
对图片实现查、删、改
查看图片
//test_check.php
include "./conn.php";
include "./session.php";
$id = $_GET['id'];
//找到指定图片——将查找的指定id的图片的信息转化成一维数组,根据图片名+存储路径的方式将其显示出来。
$sqlstr2 = "select * from tests where id={

      $id}";
$word2 = $mysqli->query($sqlstr2);
$thread = $word2->fetch_assoc();
if ($thread) {


    header('content_type:' . $thread['type']);
    echo "<img  src='../imgs/" . $thread['photoname'] . "'/>";
}
其中删除图片和修改图片不再赘述,详细的注释可以参考上一篇文章 基于PHP和MySQL的新闻发布系统 。
删除图片
//test_delete.php
include "./conn.php";
include "./session.php";
$id=$_GET['id'];
$de="delete from tests where id={

      $id};";
$del=$mysqli->query($de);
if($del){


    echo "<script>alert('删除成功!');location.href='./test_select.php';</script>";
}else{


    echo "<script>alert('删除失败!');location.href='./test_select.php';</script>";
}
修改图片
//test_update.php
include "./conn.php";
$id = $_GET['id'];
include "./session.php";
?>
<!DOCTYPE html>
<html lang="en">

<head>
    <meta charset="UTF-8">
    <meta http-equiv="X-UA-Compatible" content="IE=edge">
    <meta name="viewport" content="width=device-width, initial-scale=1.0">
    <title>Document</title>
</head>

<body>
    <form action="test_update_do.php?id=<?= $id ?>" method="post" enctype="multipart/form-data">
        <label for="file">Filename:</label><br />
        请输入资源标题:<input type="text" name="test"></br>
        请输入上传者姓名:<input type="text" name="author"><br>
        请输入试题描述:<textarea name="content" id="" cols="30" rows="10"></textarea><br>
        <!-- 隐藏域获取id -->
        <input type="hidden" name="id" value="<?= $id ?>">
        请上传文件: <input type="file" name="file" id="file" /> <br />
        <input type="submit" name="submit" value="修改" />
    </form>
</body>

</html>
//test_update_do.php
require("./conn.php");
$id=$_POST['id'];
$test=$_POST['test'];
$content=$_POST['content'];
$author=$_POST['author'];
$submit=$_POST['submit'];
$mtime=time();

if (isset($_POST['submit'])) {


    if ($_FILES["file"]["error"] > 0) {

     //如果上传出错
        echo "Error: " . $_FILES["file"]["error"] . "<br />";
    } else {


        $image = $_FILES["file"]["name"]; // 存储在服务器的文件的临时副本的名称
        $type = $_FILES["file"]["type"]; //被上传文件的类型

        // 判断在改路径中是否有相同名字和类型的图片
        if (file_exists("../imgs" . $_FILES["file"]["name"])) {


            echo $_FILES["file"]["name"] . " already exists. ";
        } else {


            //不存在的话就将图片另存为自己的路径下
            move_uploaded_file(
                $_FILES["file"]["tmp_name"],
                "../imgs/" . $_FILES["file"]["name"]
            );
        }
    }
}

$upd="update  tests set test='{

      $test}',content='{

      $content}',author='{

      $author}',mtime=$mtime,type='{

      $type}',photoname='{

      $image}' where id={

      $id};";
$st=$mysqli->query($upd);
if($st){


    echo "<script>alert('修改成功');location.href='test_select.php';</script>";
}else{


    echo "<script>alert('修改失败');location.href='test_select.php';</script>";
}
总结
如果我们需要经常登录一个站点时,可以用cookie来保存信息,这样可以避免每次都需要重新输入用户名和密码进行登录的繁琐;当对于需要安全性高的站点以及更好的控制数据时,我们可以结合两者,使网站按照我们的想法进行运行。

当然在忙碌的学习中,也不要忘记在这美好的时光里多陪伴陪伴家人呀!再次祝大家事事顺心!
如有不足,感谢指正!