此项目直接调用zed相机实现三维测距,无需标定,相关内容如下:
1. yolov5 + 双目测距(标定测距)
2. yolov5直接调用zed相机实现三维测距
3. 具体实现效果已在哔哩哔哩发布,点击此链接跳转
下载链接1:https://download.csdn.net/download/qq_45077760/87647999(点击跳转CSDN)
下载链接2:https://github.com/up-up-up-up/zed-v4(点击跳转github)
相关配置
python==3.7
Windows系统
pycharm平台
zed api(zed api配置步骤)
1.首先加载模型
    config_path = "yolov4-tiny.cfg"
    weight_path = "yolov4-tiny.weights"
    meta_path = "coco.names"
    svo_path = None
    zed_id = 0
    help_str = 'zed_yolo.py -c <config> -w <weight> -m <meta> -s <svo_file> -z <zed_id>'

    try:
        opts, args = getopt.getopt(
            argv, "hc:w:m:s:z:", ["config=", "weight=", "meta=", "svo_file=", "zed_id="])
    except getopt.GetoptError:
        log.exception(help_str)
        sys.exit(2)

    for opt, arg in opts:
        if opt == '-h':
            log.info(help_str)
            sys.exit()
        elif opt in ("-c", "--config"):
            config_path = arg
        elif opt in ("-w", "--weight"):
            weight_path = arg
        elif opt in ("-m", "--meta"):
            meta_path = arg
        elif opt in ("-s", "--svo_file"):
            svo_path = arg
        elif opt in ("-z", "--zed_id"):
            zed_id = int(arg)
    weightsPath_tiny = weight_path
    configPath_tiny = config_path
    net = cv2.dnn.readNet(weightsPath_tiny, configPath_tiny)
    net.setPreferableBackend(cv2.dnn.DNN_BACKEND_CUDA)
    net.setPreferableTarget(cv2.dnn.DNN_TARGET_CUDA_FP16)
    model = cv2.dnn_DetectionModel(net)
2.打开zed相机并配置
zed = sl.Camera()

    # Set configuration parameters
    input_type = sl.InputType()

    init = sl.InitParameters(input_t=input_type)
    init.camera_resolution = sl.RESOLUTION.HD720
    init.depth_mode = sl.DEPTH_MODE.PERFORMANCE
    init.coordinate_units = sl.UNIT.MILLIMETER

    # Open the camera
    err = zed.open(init)
    if err != sl.ERROR_CODE.SUCCESS:
        print(repr(err))
        zed.close()
        exit(1)

    # Set runtime parameters after opening the camera
    runtime = sl.RuntimeParameters()
    runtime.sensing_mode = sl.SENSING_MODE.STANDARD

    # Prepare new image size to retrieve half-resolution images
    image_size = zed.get_camera_information().camera_resolution
    image_size.width = image_size.width
    image_size.height = image_size.height

    # Declare your sl.Mat matrices
    image_zed = sl.Mat(image_size.width, image_size.height, sl.MAT_TYPE.U8_C4)

    disparity = sl.Mat()  # 视差值
    dep = sl.Mat()  # 深度图

    depth_image_zed = sl.Mat(image_size.width, image_size.height, sl.MAT_TYPE.U8_C4)
    point_cloud = sl.Mat()
3.进行图像处理
    def YOLOv4_video(pred_image):
        model.setInputParams(size=(416, 416), scale=1 / 255, swapRB=True)
        image_test = cv2.cvtColor(pred_image, cv2.COLOR_RGBA2RGB)
        image = image_test.copy()
        print('image', image.shape)
        confThreshold = 0.5
        nmsThreshold = 0.4
        classes, confidences, boxes = model.detect(image, confThreshold, nmsThreshold)
        return classes, confidences, boxes

        while (exit_flag == True):
        err = zed.grab(runtime)
        if err == sl.ERROR_CODE.SUCCESS:
            i = 0
            # Retrieve the left image, depth image in the half-resolution
            zed.retrieve_image(image_zed, sl.VIEW.LEFT, sl.MEM.CPU, image_size)
            zed.retrieve_image(depth_image_zed, sl.VIEW.DEPTH, sl.MEM.CPU, image_size)

            # 获取视差值
            zed.retrieve_measure(disparity, sl.MEASURE.DISPARITY, sl.MEM.CPU)
            dis_map = disparity.get_data()
            zed.retrieve_image(dep, sl.VIEW.DEPTH)  # 深度图
            depth_map = depth_image_zed.get_data()
            dep_map = dep.get_data()

            # Retrieve the RGBA point cloud in half resolution
            zed.retrieve_measure(point_cloud, sl.MEASURE.XYZRGBA, sl.MEM.CPU, image_size)
            point_map = point_cloud.get_data()

            # Get and print distance value in mm at the center of the image
            # We measure the distance camera - object using Euclidean distance

            # To recover data from sl.Mat to use it with opencv, use the get_data() method
            # It returns a numpy array that can be used as a matrix with opencv
            image_ocv = image_zed.get_data()
            # depth_image_ocv = depth_image_zed.get_data()
            view = np.concatenate((cv2.resize(image_ocv, (640, 360)), cv2.resize(dep_map, (640, 360))), axis=1)
            cv2.imshow("View", view)
            key = cv2.waitKey(1)
            if key & 0xFF == 27:  # esc退出
                break
            if key & 0xFF == ord('s'):  # 图像保存
                savePath = os.path.join("./images", "V{:0>3d}.png".format(i))  # 注意根目录是否存在"./images"文件夹
                cv2.imwrite(savePath, view)
            i = i + 1
            classes, confidences, boxes = YOLOv4_video(image_ocv)

            for cl, score, (left, top, width, height) in zip(classes, confidences, boxes):
                start_pooint = (int(left), int(top))
                end_point = (int(left + width), int(top + height))

                x = int(left + width / 2)
                y = int(top + height / 2)

                color = COLORS[0]

                img = cv2.rectangle(image_ocv, start_pooint, end_point, color, 3)
                img = cv2.circle(img, (x, y), 5, [0, 0, 255], 5)
                text = f'{

      LABELS[cl]}: {

      score:0.2f}'
                cv2.putText(img, text, (int(left), int(top - 7)), cv2.FONT_ITALIC, 1, COLORS[0], 2)

                x = round(x)
                y = round(y)

                err, point_cloud_value = point_cloud.get_value(x, y)
                distance = math.sqrt(
                    point_cloud_value[0] * point_cloud_value[0] + point_cloud_value[1] * point_cloud_value[1] +
                    point_cloud_value[2] * point_cloud_value[2])

                print("Distance to Camera at (class : {0}, score : {1:0.2f}): distance : {2:0.2f} mm".format(LABELS[cl],
                                                                                                             score,
                                                                                                             distance),
                      end="\r")

                cv2.putText(img, "Distance: " + str(round(distance / 1000, 2)) + 'm',
                            (int(left), int(top + 25)),
                            cv2.FONT_HERSHEY_COMPLEX, 1, COLORS[1], 2)

                cv2.imshow("Image", img)
                key = cv2.waitKey(2)

            frame_count = frame_count + 1

            if key & 0xFF == 27:  # esc退出
                break
            if key & 0xFF == ord('s'):  # 图像保存
                savePath = os.path.join("./images", "V{:0>3d}.png".format(i))  # 注意根目录是否存在"./images"文件夹
                cv2.imwrite(savePath, view)
            i = i + 1

    cv2.destroyAllWindows()
    zed.close()
完整代码
import os
import sys
import numpy as np
import pyzed.sl as sl
import cv2
import math
import logging
import getopt

log = logging.getLogger(__name__)
logging.basicConfig(level=logging.INFO)


def main(argv):
    global img
    config_path = "yolov4-tiny.cfg"
    weight_path = "yolov4-tiny.weights"
    meta_path = "coco.names"
    svo_path = None
    zed_id = 0

    help_str = 'zed_yolo.py -c <config> -w <weight> -m <meta> -s <svo_file> -z <zed_id>'

    try:
        opts, args = getopt.getopt(
            argv, "hc:w:m:s:z:", ["config=", "weight=", "meta=", "svo_file=", "zed_id="])
    except getopt.GetoptError:
        log.exception(help_str)
        sys.exit(2)

    for opt, arg in opts:
        if opt == '-h':
            log.info(help_str)
            sys.exit()
        elif opt in ("-c", "--config"):
            config_path = arg
        elif opt in ("-w", "--weight"):
            weight_path = arg
        elif opt in ("-m", "--meta"):
            meta_path = arg
        elif opt in ("-s", "--svo_file"):
            svo_path = arg
        elif opt in ("-z", "--zed_id"):
            zed_id = int(arg)

    # Set configuration parameters
    input_type = sl.InputType()
    if svo_path is not None:
        log.info("SVO file : " + svo_path)
        input_type.set_from_svo_file(svo_path)
    else:
        # Launch camera by id
        input_type.set_from_camera_id(zed_id)
    # Create a ZED camera object
    zed = sl.Camera()

    # Set configuration parameters
    input_type = sl.InputType()
    init = sl.InitParameters(input_t=input_type)
    init.camera_resolution = sl.RESOLUTION.HD720
    init.depth_mode = sl.DEPTH_MODE.PERFORMANCE
    init.coordinate_units = sl.UNIT.MILLIMETER

    # Open the camera
    err = zed.open(init)
    if err != sl.ERROR_CODE.SUCCESS:
        print(repr(err))
        zed.close()
        exit(1)

    # Set runtime parameters after opening the camera
    runtime = sl.RuntimeParameters()
    runtime.sensing_mode = sl.SENSING_MODE.STANDARD

    # Prepare new image size to retrieve half-resolution images
    image_size = zed.get_camera_information().camera_resolution
    image_size.width = image_size.width
    image_size.height = image_size.height

    # Declare your sl.Mat matrices
    image_zed = sl.Mat(image_size.width, image_size.height, sl.MAT_TYPE.U8_C4)

    disparity = sl.Mat()  # 视差值
    dep = sl.Mat()  # 深度图
    depth_image_zed = sl.Mat(image_size.width, image_size.height, sl.MAT_TYPE.U8_C4)
    point_cloud = sl.Mat()
    # =======================================  yolov4  video test et ============================================

    weightsPath_tiny = weight_path
    configPath_tiny = config_path
    net = cv2.dnn.readNet(weightsPath_tiny, configPath_tiny)
    net.setPreferableBackend(cv2.dnn.DNN_BACKEND_CUDA)
    net.setPreferableTarget(cv2.dnn.DNN_TARGET_CUDA_FP16)
    model = cv2.dnn_DetectionModel(net)

    def YOLOv4_video(pred_image):
        model.setInputParams(size=(416, 416), scale=1 / 255, swapRB=True)
        image_test = cv2.cvtColor(pred_image, cv2.COLOR_RGBA2RGB)
        image = image_test.copy()
        print('image', image.shape)
        confThreshold = 0.5
        nmsThreshold = 0.4
        classes, confidences, boxes = model.detect(image, confThreshold, nmsThreshold)

        return classes, confidences, boxes

    LABELS = []
    with open(meta_path, 'r') as f:
        LABELS = [cname.strip() for cname in f.readlines()]
    COLORS = [[0, 0, 255], [30, 255, 255], [0, 255, 0]]
    frame_count = 0
    exit_flag = True

    while (exit_flag == True):
        err = zed.grab(runtime)
        if err == sl.ERROR_CODE.SUCCESS:
            i = 0
            # Retrieve the left image, depth image in the half-resolution
            zed.retrieve_image(image_zed, sl.VIEW.LEFT, sl.MEM.CPU, image_size)
            zed.retrieve_image(depth_image_zed, sl.VIEW.DEPTH, sl.MEM.CPU, image_size)

            # 获取视差值
            zed.retrieve_measure(disparity, sl.MEASURE.DISPARITY, sl.MEM.CPU)
            dis_map = disparity.get_data()
            zed.retrieve_image(dep, sl.VIEW.DEPTH)  # 深度图
            depth_map = depth_image_zed.get_data()
            dep_map = dep.get_data()

            # Retrieve the RGBA point cloud in half resolution
            zed.retrieve_measure(point_cloud, sl.MEASURE.XYZRGBA, sl.MEM.CPU, image_size)
            point_map = point_cloud.get_data()
            image_ocv = image_zed.get_data()
            # depth_image_ocv = depth_image_zed.get_data()
            view = np.concatenate((cv2.resize(image_ocv, (640, 360)), cv2.resize(dep_map, (640, 360))), axis=1)
            cv2.imshow("View", view)
            key = cv2.waitKey(1)
            if key & 0xFF == 27:  # esc退出
                break
            if key & 0xFF == ord('s'):  # 图像保存
                savePath = os.path.join("./images", "V{:0>3d}.png".format(i))  # 注意根目录是否存在"./images"文件夹
                cv2.imwrite(savePath, view)
            i = i + 1
            classes, confidences, boxes = YOLOv4_video(image_ocv)

            for cl, score, (left, top, width, height) in zip(classes, confidences, boxes):
                start_pooint = (int(left), int(top))
                end_point = (int(left + width), int(top + height))

                x = int(left + width / 2)
                y = int(top + height / 2)

                color = COLORS[0]

                img = cv2.rectangle(image_ocv, start_pooint, end_point, color, 3)
                img = cv2.circle(img, (x, y), 5, [0, 0, 255], 5)
                text = f'{

      LABELS[cl]}: {

      score:0.2f}'
                cv2.putText(img, text, (int(left), int(top - 7)), cv2.FONT_ITALIC, 1, COLORS[0], 2)

                x = round(x)
                y = round(y)

                err, point_cloud_value = point_cloud.get_value(x, y)
                distance = math.sqrt(
                    point_cloud_value[0] * point_cloud_value[0] + point_cloud_value[1] * point_cloud_value[1] +
                    point_cloud_value[2] * point_cloud_value[2])

                print("Distance to Camera at (class : {0}, score : {1:0.2f}): distance : {2:0.2f} mm".format(LABELS[cl],
                                                                                                             score,
                                                                                                             distance),
                      end="\r")

                cv2.putText(img, "Distance: " + str(round(distance / 1000, 2)) + 'm',
                            (int(left), int(top + 25)),
                            cv2.FONT_HERSHEY_COMPLEX, 1, COLORS[1], 2)

                cv2.imshow("Image", img)
                key = cv2.waitKey(2)

            frame_count = frame_count + 1

            if key & 0xFF == 27:  # esc退出
                break
            if key & 0xFF == ord('s'):  # 图像保存
                savePath = os.path.join("./images", "V{:0>3d}.png".format(i))  # 注意根目录是否存在"./images"文件夹
                cv2.imwrite(savePath, view)
            i = i + 1

    cv2.destroyAllWindows()
    zed.close()

    print("\nFINISH")


if __name__ == "__main__":
    main(sys.argv[1:])
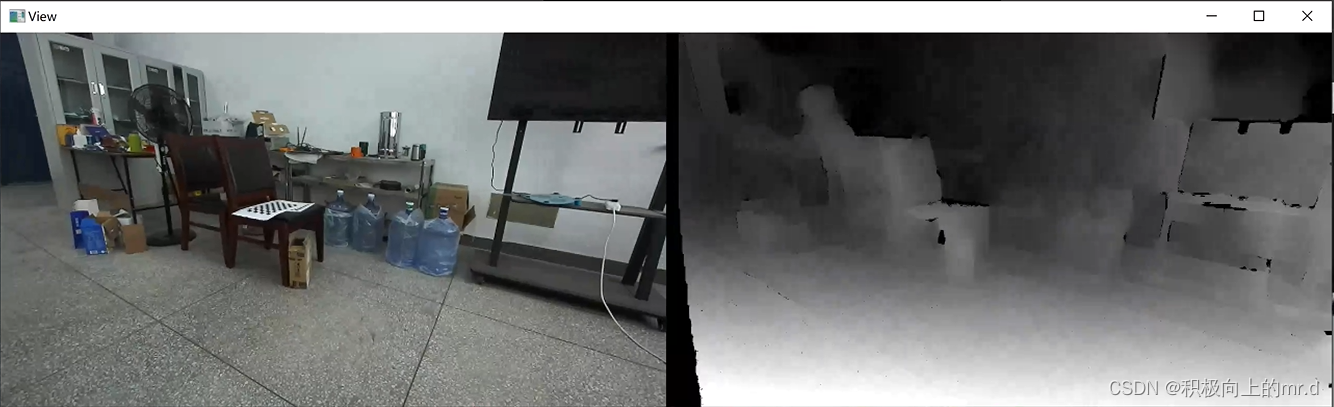
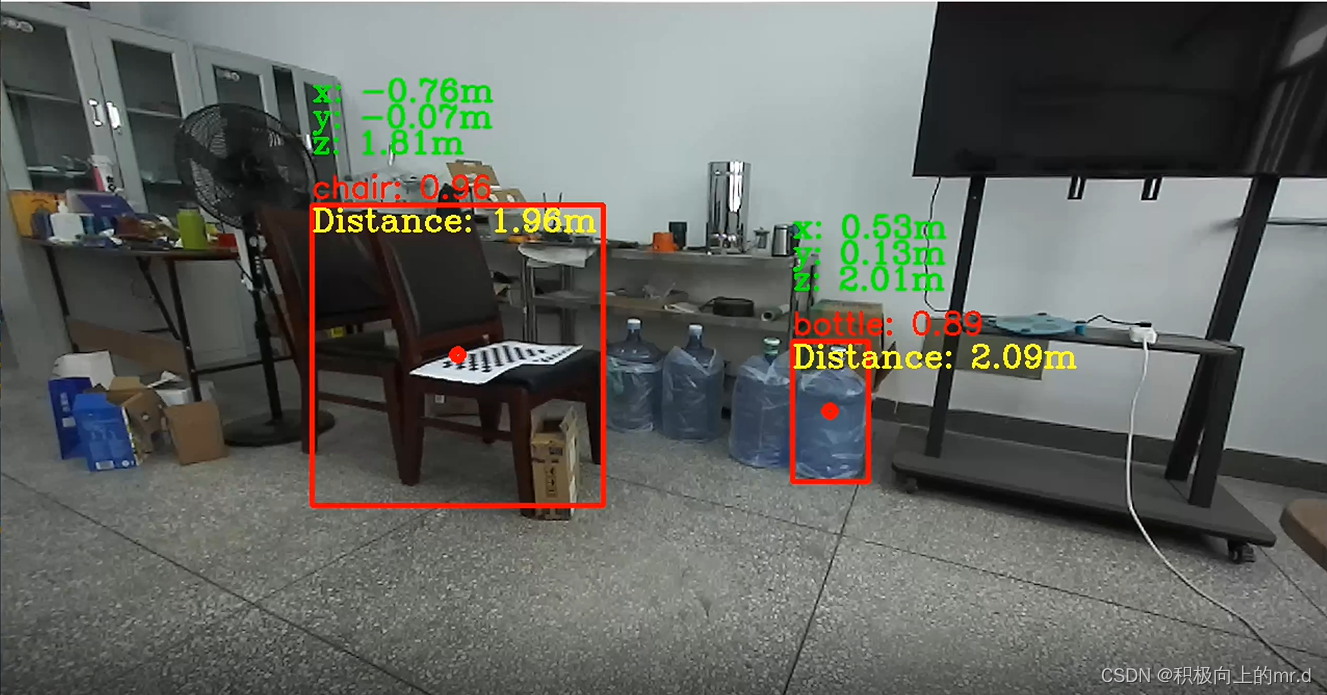
测距图片挺准确的,因为免去了棋盘格标定,直接调用的zed内部参数,具体效果图看深度图可以看出来,可以对比标定和未标定的效果
深度图(将左相机画面和深度图做了拼接)