参考:Animation Blend Profile in Unity
参考:Unreal Engine - How to make a Blend Profile
参考:blend-masks-and-blend-profiles-in-unreal-engine
什么是Blend Profile
Animation Blend Profile is a UE4 animation system feature that enables us to set blend speed of each bone separately.
这个概念是在UE4的动画系统里提出的feature,可以让我们设置每个Bone的blend speed。如果没有这玩意儿,正常动画Blend时,所有的Bone的Blend Speed都是相同的。
这个功能可以有效解决movement动画之间的transition造成的滑步问题,同时保证上半身动画的流畅性。
这种动画的转态,比如Idle和Moving的切换,悬空和落地的切换,都是极度需要Blend Profile功能的,我估计这个原理是让上半身的Blend Speed和下半身的BlendSpeed不同,从而保证上半身动画流畅的同时,解决下半身的滑步问题。
举个细节的例子,从动画A到动画B的Transition Time为0.5s,如果是线性Blend,那么正常Joint X在Blend时的A的权重为1,B的权重为0,那么0.5s后,A的权重会从1线性减少到0,B的权重从0线性增加到1。如果此时我把Joint Y的Blend Speed设置为X的两倍,那么Y会在0.25s内从A动画过渡到B,如下图所示:
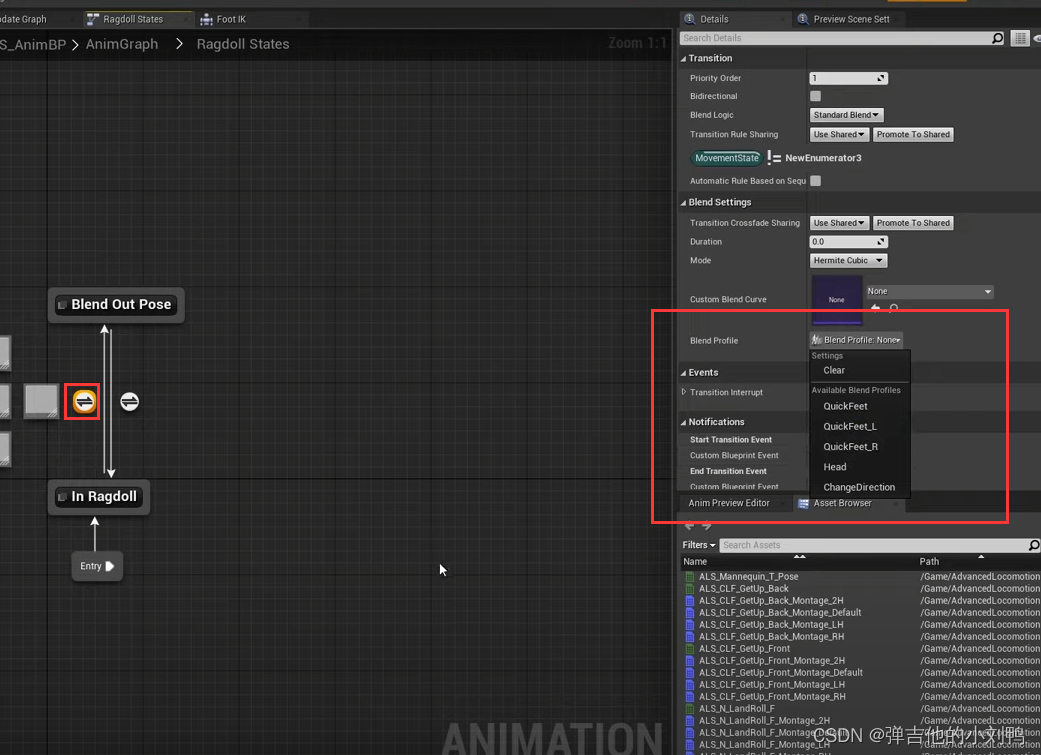
UE的动画过渡里就可以使用Blend Profile,如下图所示:
而且Blend Space里也可以设置Blend Profile,因为Blend Space的本质就是处理动画的Blend,如下图所示是在Blend Space里的设置:

Blend Mask是什么
在UE的源码里,Blend Mask类型为EBlendProfileMode的一种,也就是说UE认为它是一种Blend Profile:
enum class EBlendProfileMode : uint8
{


	// The bone's transition time is a factor based on the transition time.
	// For example 0.5 means it takes half the time of the transition.
	// Values should be between 0 and 1. They will be clamped if they go out of this range.
	// A bone value of 0 means the bone will instantly transition into the target state.
	TimeFactor = 0,// 值必须<=1

	// The bone's transition weight is multiplied by this factor.
	// For example 2.0 means the bone's blend weight is twice as high as the transition's blend weight.
	// Values should typically be equal or greater than 1.0.
	// If you want certain bones to instantly transition into the target state
	// the Time Factor based method might be a better choice.
	WeightFactor,// 值必须>=1

	// Used for blend masks. Per bone alpha
	BlendMask UMETA(Hidden),
};
感觉UE里认为,能够改变joint影响Blend时的joint的权重设置的东西,都属于Blend Profile,所以它才把Blend Mask也归类为Blend Profile的一种。Blend Mask跟其他类型的Blend Profile不同,它并不会加速blend过程中各个joint的权重值的改变,它只能决定各个joint的权重值的改变是否随着MainWeight改变,改变的程度是多少(范围在[0, 1]区间),类似于Unity的AvatarMask
Blend Mask的用法
创建和编辑的操作跟其他类型的Blend Profile是差不多的:
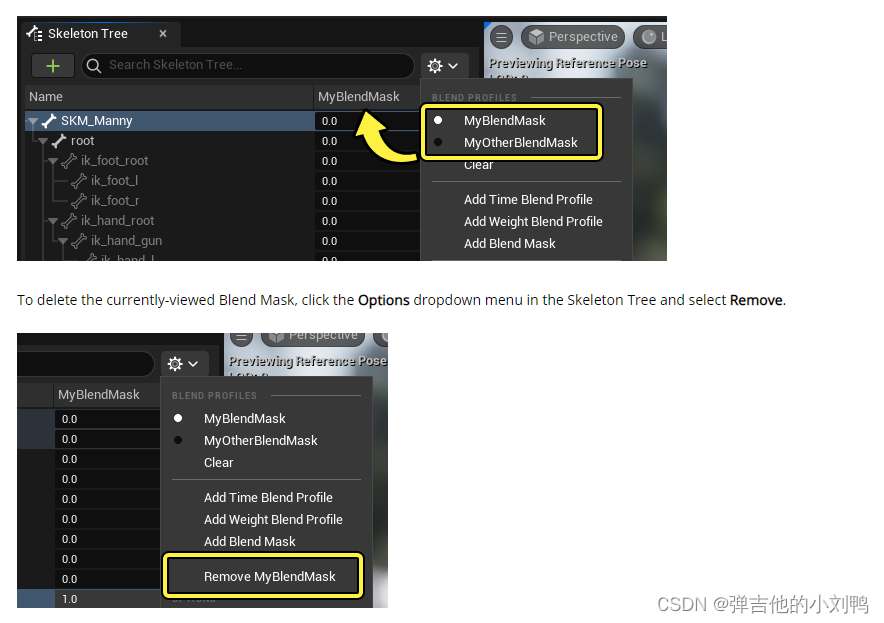
默认Blend Mask的每个Bone的BlendScale值为0,可供选择的范围在[0, 1]区间,0代表此Bone完全不受Blend Profile影响
具体使用时要通过动画蓝图的Layered Blend Per Bone节点实现,如下图所示:
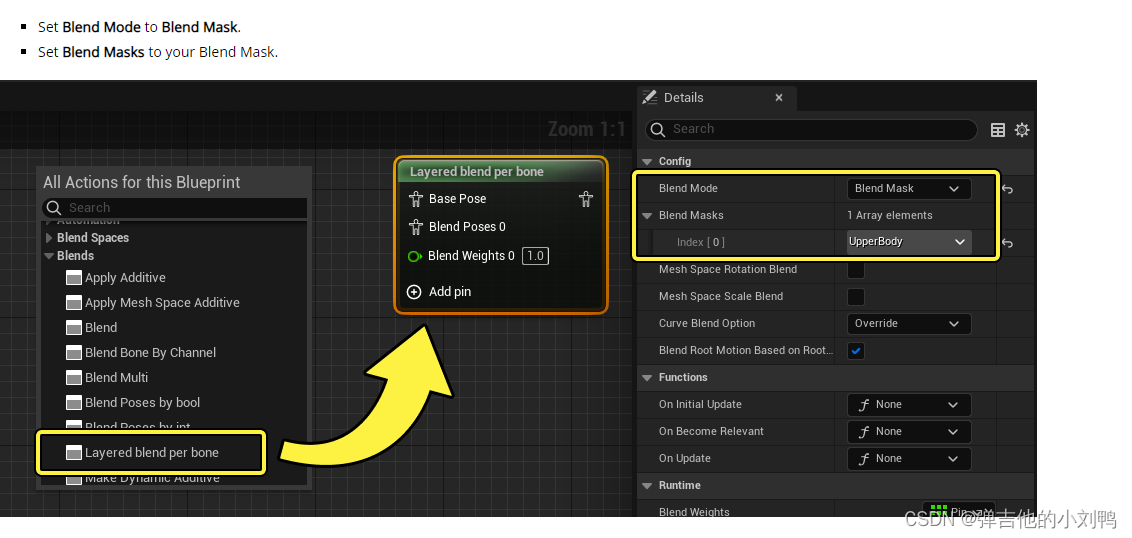
蓝图连接逻辑如下图所示,其实这里的Blend Mask很像Unity里的Avatar Mask
Blend Profile的使用场景
Blend Mask应该是只能用在Layered Blend Per Bone里,而Weight Factor和Time Factor类型的Blend Profile会被用在这五个地方:
- Blend Poses by bool.
- Blend Poses by int.
- Blend Poses by enum.
- State Machine Transitions.
- Animation Montages.
BlendSpace里有类似的设置,不过不是BlendProfile,而是叫Target Weight Interpolation Speed Per Sec。
这里的五种节点都会最终调用UBlendProfile::CalculateBoneWeight函数,计算每个Bone在Blend过程中的权重值,无非调用地点有所区别:
- Blend Poses by bool,Blend Poses by int和Blend Poses by enum都继承于
FAnimNode_BlendListBase类,会在里面的Update_AnyThread函数里被调用 - State Machine Transitions则是在
FAnimationActiveTransitionEntry::Update里被调用 Animation Montages则是通过AnimationSlot,在FAnimInstanceProxy::SlotEvaluatePoseWithBlendProfiles里被调用的,当AnimationSlotNode在其Evaluate函数里发现了处于Blend状态下的Montage,且设置了BlendProfile时,会调用SlotEvaluatePoseWithBlendProfiles函数
UE相关源码记录
这里拿动画状态机里BlendProfile的应用举例,我在动画的转态上加了个Blend Profile,源码里的CallStack顺序如下:
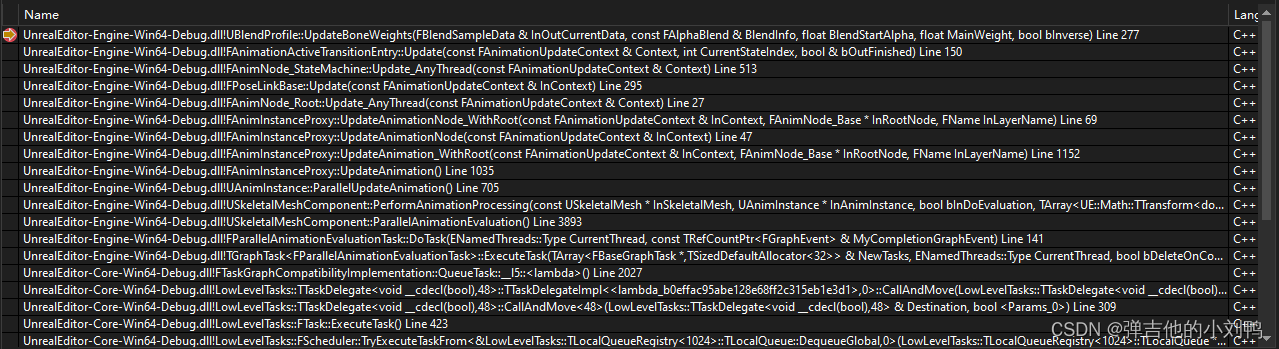
图中的展示顺序表示,最终调用的UBlendProfile::UpdateBoneWeights的caller是statieMachine对应的AnimNode(FAnimNode_StateMachine::Update_AnyThread函数),对应的状态机节点会遍历每个动画Transition的对象,然后根据是否存在BlendProfile改变骨骼权重:
void FAnimationActiveTransitionEntry::Update(const FAnimationUpdateContext& Context, int32 CurrentStateIndex, bool& bOutFinished)
{


	bOutFinished = false;

	// Advance time
	if (bActive)
	{


		ElapsedTime += Context.GetDeltaTime();
		Blend.Update(Context.GetDeltaTime());

		// If non-zero, calculate the query alpha
		float QueryAlpha = 0.0f;
		if (CrossfadeDuration > 0.0f)
		{


			QueryAlpha = ElapsedTime / CrossfadeDuration;
		}

		Alpha = FAlphaBlend::AlphaToBlendOption(QueryAlpha, Blend.GetBlendOption(), Blend.GetCustomCurve());

		if (Blend.IsComplete())
		{


			bActive = false;
			bOutFinished = true;
		}

		// Update state blend data (only when we're using per-bone)
		if (BlendProfile)
		{


			for (int32 Idx = 0 ; Idx < 2 ; ++Idx)
			{


				const bool bForwards = (Idx == 0);
				StateBlendData[Idx].TotalWeight = bForwards ? Alpha : 1.0f - Alpha;
				BlendProfile->UpdateBoneWeights(StateBlendData[Idx], Blend, 0.0f, StateBlendData[Idx].TotalWeight, !bForwards);
			}

			FBlendSampleData::NormalizeDataWeight(StateBlendData);
		}
	}
}
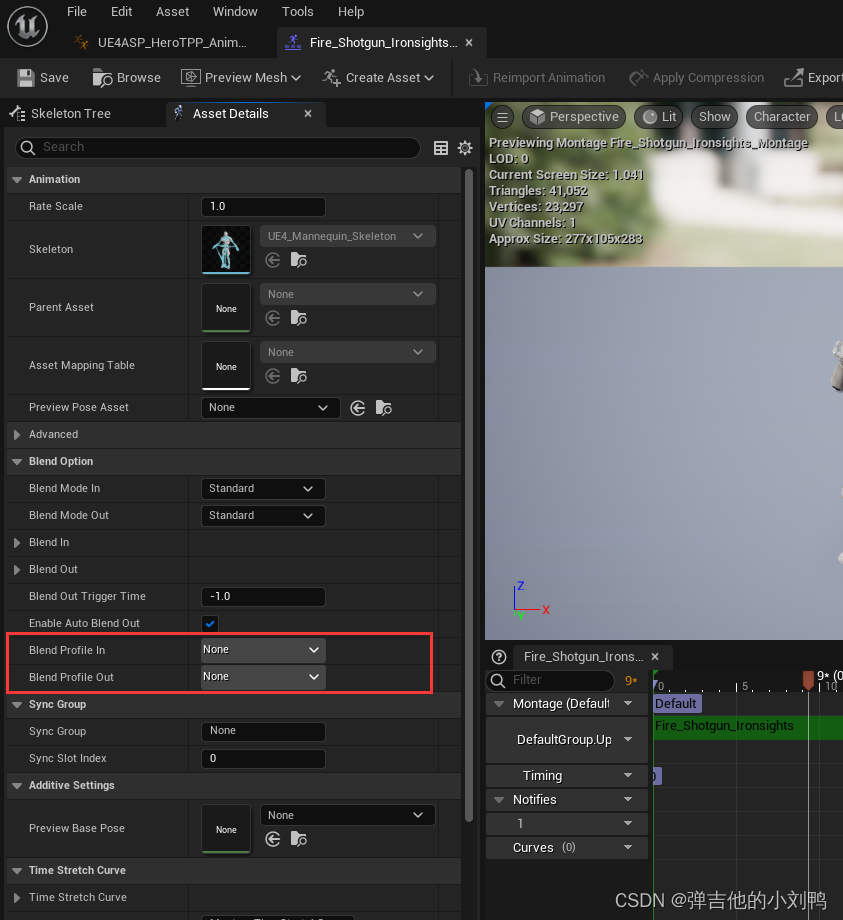
Montage里的Blend Profile
相关设置不在LayeredBlendPerBone或者AnimationSlotNode的蓝图Details面板上,而是在Montage资产里,如下图所示,可以选择在Blend In Montage和Blend Out Montage时使用Blend Profile:
三种模式下的BlendProfile
UE的枚举叫EBlendProfileMode:
/** The mode in which the blend profile should be applied. */
UENUM()
enum class EBlendProfileMode : uint8
{


	// The bone's transition time is a factor based on the transition time.
	// For example 0.5 means it takes half the time of the transition.
	// 注意这里设置0.5并不是0.5秒的意思, 而是指的TransitionTime的一半
	// Values should be between 0 and 1. They will be clamped if they go out of this range.
	// A bone value of 0 means the bone will instantly transition into the target state.
	TimeFactor = 0,

	// The bone's transition weight is multiplied by this factor.
	// For example 2.0 means the bone's blend weight is twice as high as the transition's blend weight.
	// Values should typically be equal or greater than 1.0.
	// If you want certain bones to instantly transition into the target state
	// the Time Factor based method might be a better choice.
	WeightFactor,

	// Used for blend masks. Per bone alpha
	BlendMask UMETA(Hidden),
};
TimeFactor和WeightFactor模式的区别在于权重的计算方法不同,其他基本没任何区别,WeightFactor算法其实很简单,直接根据原本的PoseWeight乘以对应的BlendProfile即可:
float UBlendProfile::CalculateBoneWeight(float BoneFactor, EBlendProfileMode Mode, const FAlphaBlend& BlendInfo, float BlendStartAlpha, float MainWeight, bool bInverse)
{


	switch (Mode)
	{


		// The per bone value is a factor of the transition time, where 0.5 means half the transition time, 0.1 means one tenth of the transition time, etc.
		case EBlendProfileMode::TimeFactor:
		{


			// Most bones will have a bone factor of 1, so let's optimize that case.
			// Basically it means it will just follow the main weight.
			if (BoneFactor >= 1.0f - ZERO_ANIMWEIGHT_THRESH)
			{


				return !bInverse ? MainWeight : 1.0f - MainWeight;
			}

			// Make sure our input values are valid, which is between 0 and 1.
			const float ClampedFactor = FMath::Clamp(BoneFactor, 0.0f, 1.0f);

			// Calculate where blend begin value is for this specific bone. So where did our blend start from?
			// Note that this isn't just the BlendInfo.GetBlendedValue() because it can be different per bone as some bones are further ahead in time.
			// We also need to sample the actual curve for this to get the real value.
			const float BeginValue = (ClampedFactor > ZERO_ANIMWEIGHT_THRESH) ? FMath::Clamp(BlendStartAlpha / ClampedFactor, 0.0f, 1.0f) : 1.0f;
			const float RealBeginValue = FAlphaBlend::AlphaToBlendOption(BeginValue, BlendInfo.GetBlendOption(), BlendInfo.GetCustomCurve());

			// Calculate the current alpha value for the bone.
			// As some bones can blend faster than others, we basically scale the current blend's alpha by the bone's factor.
			// After that we sample the curve to get the real alpha blend value.
			const float LinearAlpha = (ClampedFactor > ZERO_ANIMWEIGHT_THRESH) ? FMath::Clamp(BlendInfo.GetAlpha() / ClampedFactor, 0.0f, 1.0f) : 1.0f;
			const float RealBoneAlpha = FAlphaBlend::AlphaToBlendOption(LinearAlpha, BlendInfo.GetBlendOption(), BlendInfo.GetCustomCurve());

			// Now that we know the alpha for our blend, we can calculate the actual weight value.
			// Also make sure the bone weight is valid. Values can't be zero because this could introduce issues during normalization internally in the pipeline.
			const float BoneWeight = RealBeginValue + RealBoneAlpha * (BlendInfo.GetDesiredValue() - RealBeginValue);
			const float ClampedBoneWeight = FMath::Clamp(BoneWeight, ZERO_ANIMWEIGHT_THRESH, 1.0f);

			// Return our calculated weight, depending whether we'd like to invert it or not.
			return !bInverse ? ClampedBoneWeight : (1.0f - ClampedBoneWeight);
		}

		// The per bone value is a factor of the main blend's weight.
		case EBlendProfileMode::WeightFactor:
		{


			if (!bInverse)
			{


				return FMath::Max(MainWeight * BoneFactor, ZERO_ANIMWEIGHT_THRESH);
			}

			// We're inversing. weight模式下的BoneFactor是>=1的
			const float Weight = (BoneFactor > ZERO_ANIMWEIGHT_THRESH) ? MainWeight / BoneFactor : 1.0f;
			return FMath::Max(Weight, ZERO_ANIMWEIGHT_THRESH);
		}

		// Handle unsupported modes.
		// If you reach this point you have to add another case statement for your newly added blend profile mode.
		default:
		{


			checkf(false, TEXT("The selected Blend Profile Mode is not supported (Mode=%d)"), Mode);
			break;
		}
	}

	return MainWeight;
}
这里面没有对BlendMask这种模式的处理,因为BlendMask是专门用于 Layered Blend Per Bone节点上的,
这里的TimeFactor和WeightFactor的BlendProfile的使用机制是差不多的,但UE的文档告诉我,这里weightFactor模式下的值应该>=1,而TimeFactor下的值应该<=1,如下所示:
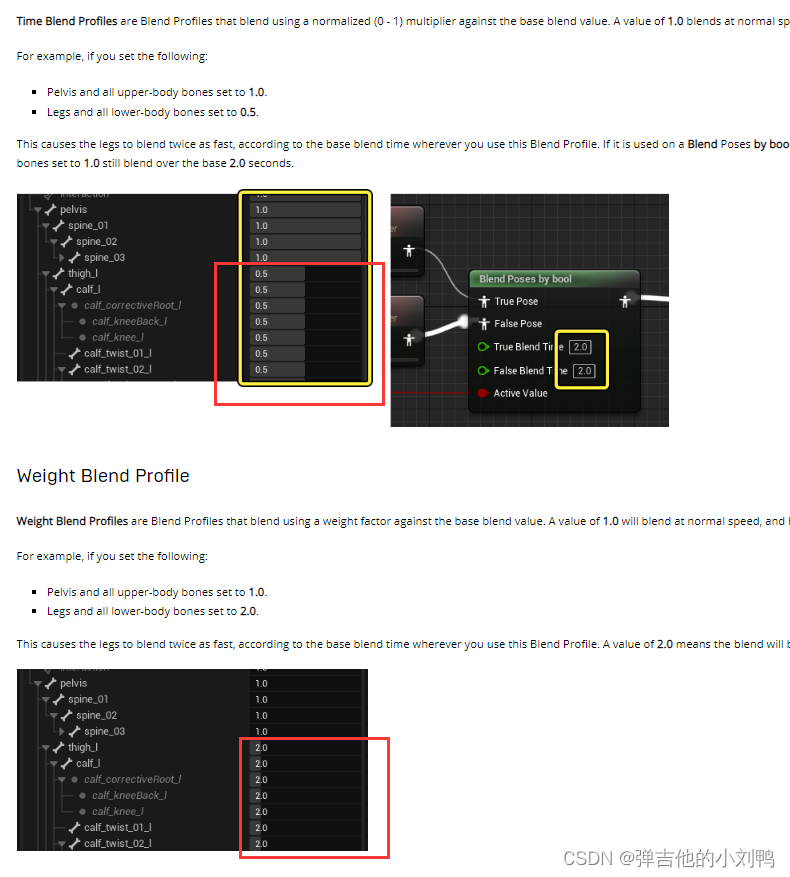
这说明Blend Profile只能加速动画转态里的特定joint的Blend速度,而不能减速,顺便看了下代码里面,也是这么个逻辑。感觉也比较合理,毕竟动画转态时间外部已经给定了,所以只能加速部分joints的转态,而不能减速。
具体权重怎么计算的
拿WeightFactor模式举例,假设A和B俩Pose相Blend,此时它俩权重分别为0.8和0.2,是从Pose A要过渡到B,然后有个特殊Bone的BlendProfile的BlendScale值设为了2.0,那么此时根据UBlendProfile::CalculateBoneWeight函数,俩Pose里该Joint的权重分别为:
Wb = 0.8 * 2 = 1.6;// 为了加速骨骼的Blend,需要让骨骼在Pose B的权重增大
Wa = 0.2 / 2 = 0.1; // 那么骨骼在另一个Pose A的权重必然减少
最后再归一化一下,就是二者各自的权重了
附录
Unity里实现Blend Profile
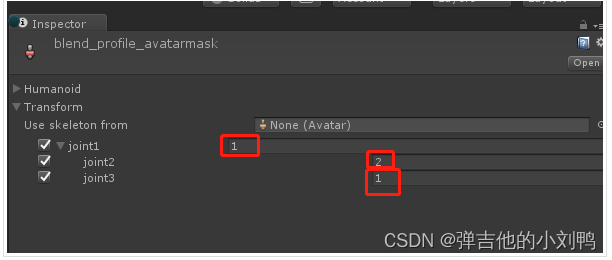
首先,既然是逐Bone Blend,那么需要有个编辑的地方,去设置每个Bone的Blend速度,可以选择在AvatarMask界面里编辑,如下图所示(注意这里的时间至少是1, otherwise there would be some problem with transition time):
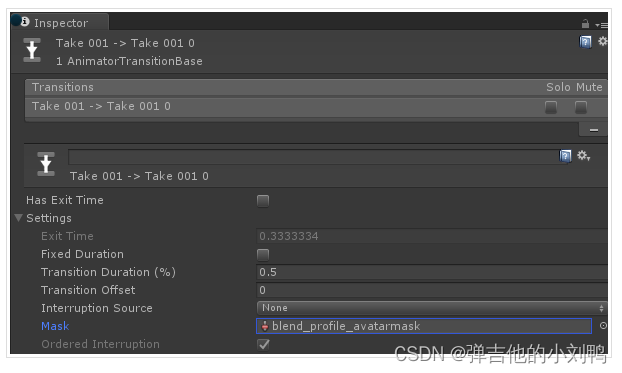
然后在动画状态机的Transition里设置加上对应的Blend Profile借助的Avatar Mask即可:
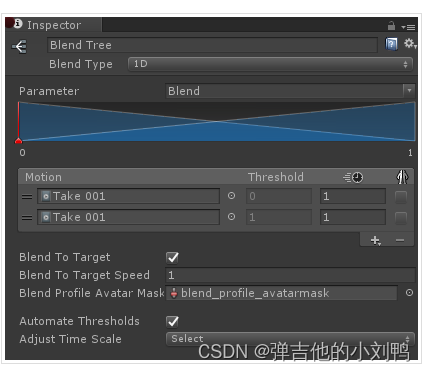
Unity的BlendTree里使用Blend Profile
其实就跟UE的Blend Space里用Blend Profile是一样的,UE里Blend Space有这么个设置:
也是类似的,在Blend Tree的Inspector界面里添加Avatar Mask即可: